Thank you a lot. It's not an easy process, so i think a lot of people wold appreciate some photos.
No problem, thanks for reading!
I'll have instructions for those interested here in this post.
Edit: I just realized I used the word "you/your" a lot when writing this, but I mean that towards anyone attempting the mod. Didn't want to sound too mean!
First off, just note that do this at your own risk. If you've modded before, this is a pretty simple mod and requires no soldering. Just don't accidentally poke the drivers nor pull the internal wiring too much.
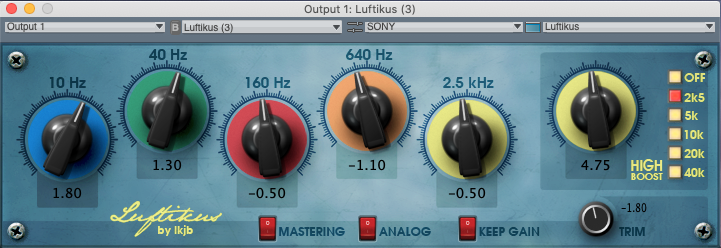
To add on to what I mentioned in my other post above, the mod consists of
a handful (or 0.5 grams) of Twaron angel hair damping material;
2 Koss Porta Pro earpad right up against each driver rear; and
2 Sony urethane rings placed around each driver on the front. The Sony urethane rings are used in Sony's studio monitors (MDR-V6, MDR-7506, etc.). The Twaron angel hair would help control earcup resonance which would show up as a bump at 5 kHz (or at least I think) and dampen the bass some, the Porta Pro earpad also helps dampen the bass and is placed right behind the driver - blocking the sound port and only letting some air through, and lastly the Sony urethane rings help tame the treble.
1. Firstly, remove the earpads. The earpads are attached via clips so they pop right off at the "seam" or crack where the arrow is pointing.


2. You can attach the Sony urethane rings here at this step or near the end of the mod. I would recommend doing it here as it acts as a barrier for the 3 screws you will be pulling out (so that it won't accidentally drop into the diaphragm/driver). The arrow points to the Sony urethane ring. There are little adhesives at the bottom of the rings so they stick right on. You can probably make your own though results may vary. You can buy them from a Sony parts site, but the price is a bit ridiculous (4.80 USD a piece + shipping IIRC). They definitely do help a LOT though.
You can get the urethane rings here. Just type in "7506" under "Model Prefix starts with". The product description will be "RING URETHANE" and the part number is "
211314901". Edit: Actually, if you click on hyperlink in the part number within the quotations, it'll take you straight to the part needed.

3. The screws are under the thin piece of damping material approximately in the circled location. Lift it up a bit and take the screws out. Just standard Phillips screws. Careful not to accidentally drop the screws into the driver.
.JPG")
4. The whole entire front baffle comes right off from the earcup cavity. Carefully lift the front baffle out. Careful not to yank and snap the internal wiring.

5. Place the Koss Porta Pro pad right against the driver -
you can get from Amazon here. I have the little flaps on the pad towards the driver though not sure if it matters. The red arrow indicates the pad. The green arrow indicates the bass port that the edges of the Porta Pro pad will sit right against.

6. Place the Twaron angel hair damping material (the yellow stuff) within the earcup cavity - I'm not sure where my buddy got it from but I think
you can get that here. I just realized now that it's very expensive :O I gotta really thank them now! Be sure to compress the material slightly to allow yourself to put the screws back into the threads - otherwise, it'll be very tough to screw them back up. A buddy of mine sent me these and pre-measured them since the material is supposedly very dependent on its mass - I don't know too much about the material so I'm inclined to believe him. You will need 2 blobs of the material measuring 0.5 grams - if you have a micro scale, that'll work perfectly; if not, I'd just get a handful of 2 blobs of similar looking mass. Oh and also, don't breathe in the fibers.
As for alternatives, I'm not 100% sure what will replicate the same or similar results but I'd try cotton stuffing they use for stuffed animals.

7. Put the front baffle back over the earcup cavity and screw them back up. Make sure there's no fibers from the Twaron angel hair sticking out; not required but it just looks better not seeing any yellow fibers sticking out

Check the top port for any fibers sticking out as well. If there is any sticking out, unscrew the front baffle back off and poke the fibers back in with a toothpick or a thin object.
8. If you're satisfied with the results, just repeat the steps for the other side. The other side is just a bit trickier since there's more internal wiring to deal with. Otherwise, it's the same thing.
I think that's pretty much it!


.png")

.JPG")


.JPG")


