Pioneer SE-A1000 (Sennheiser HD 650 for $45?)
Sep 28, 2013 at 12:51 PM Post #691 of 1,082
IBJAMON & PICHU
 
Sorry for the late reply , wasn't checking this thread till today.
 
If you are referring to this mod in my post..
 
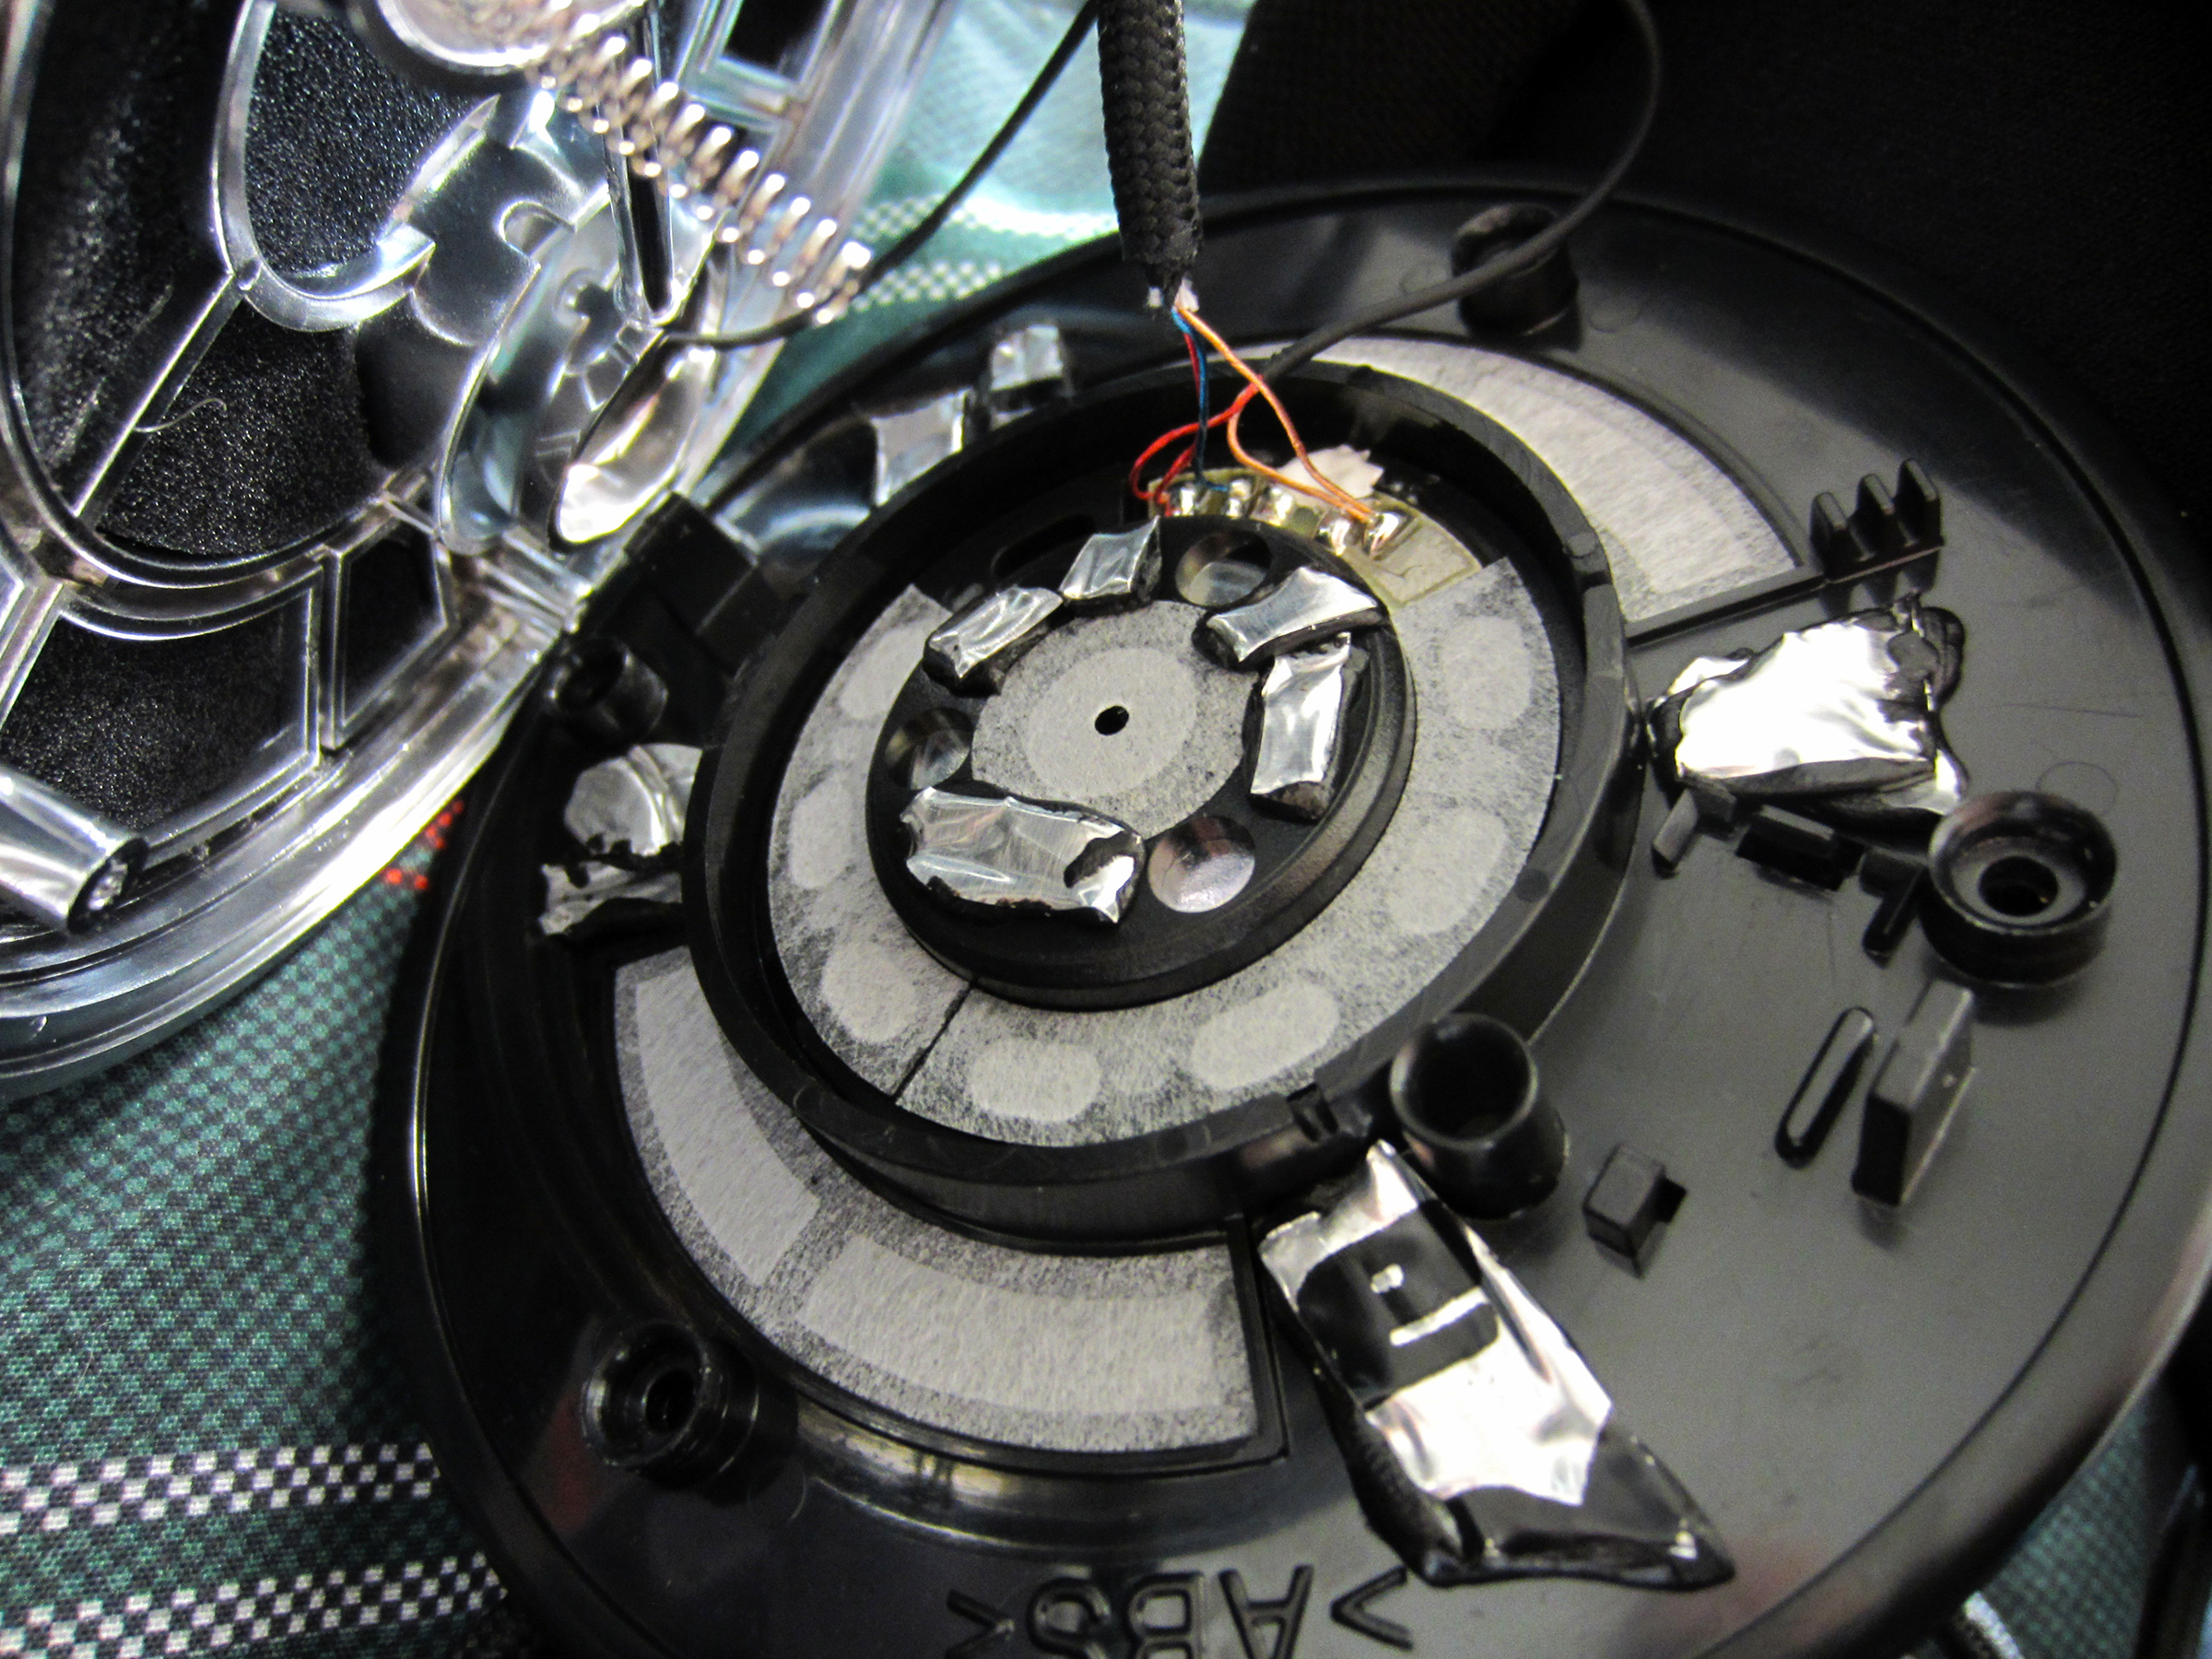
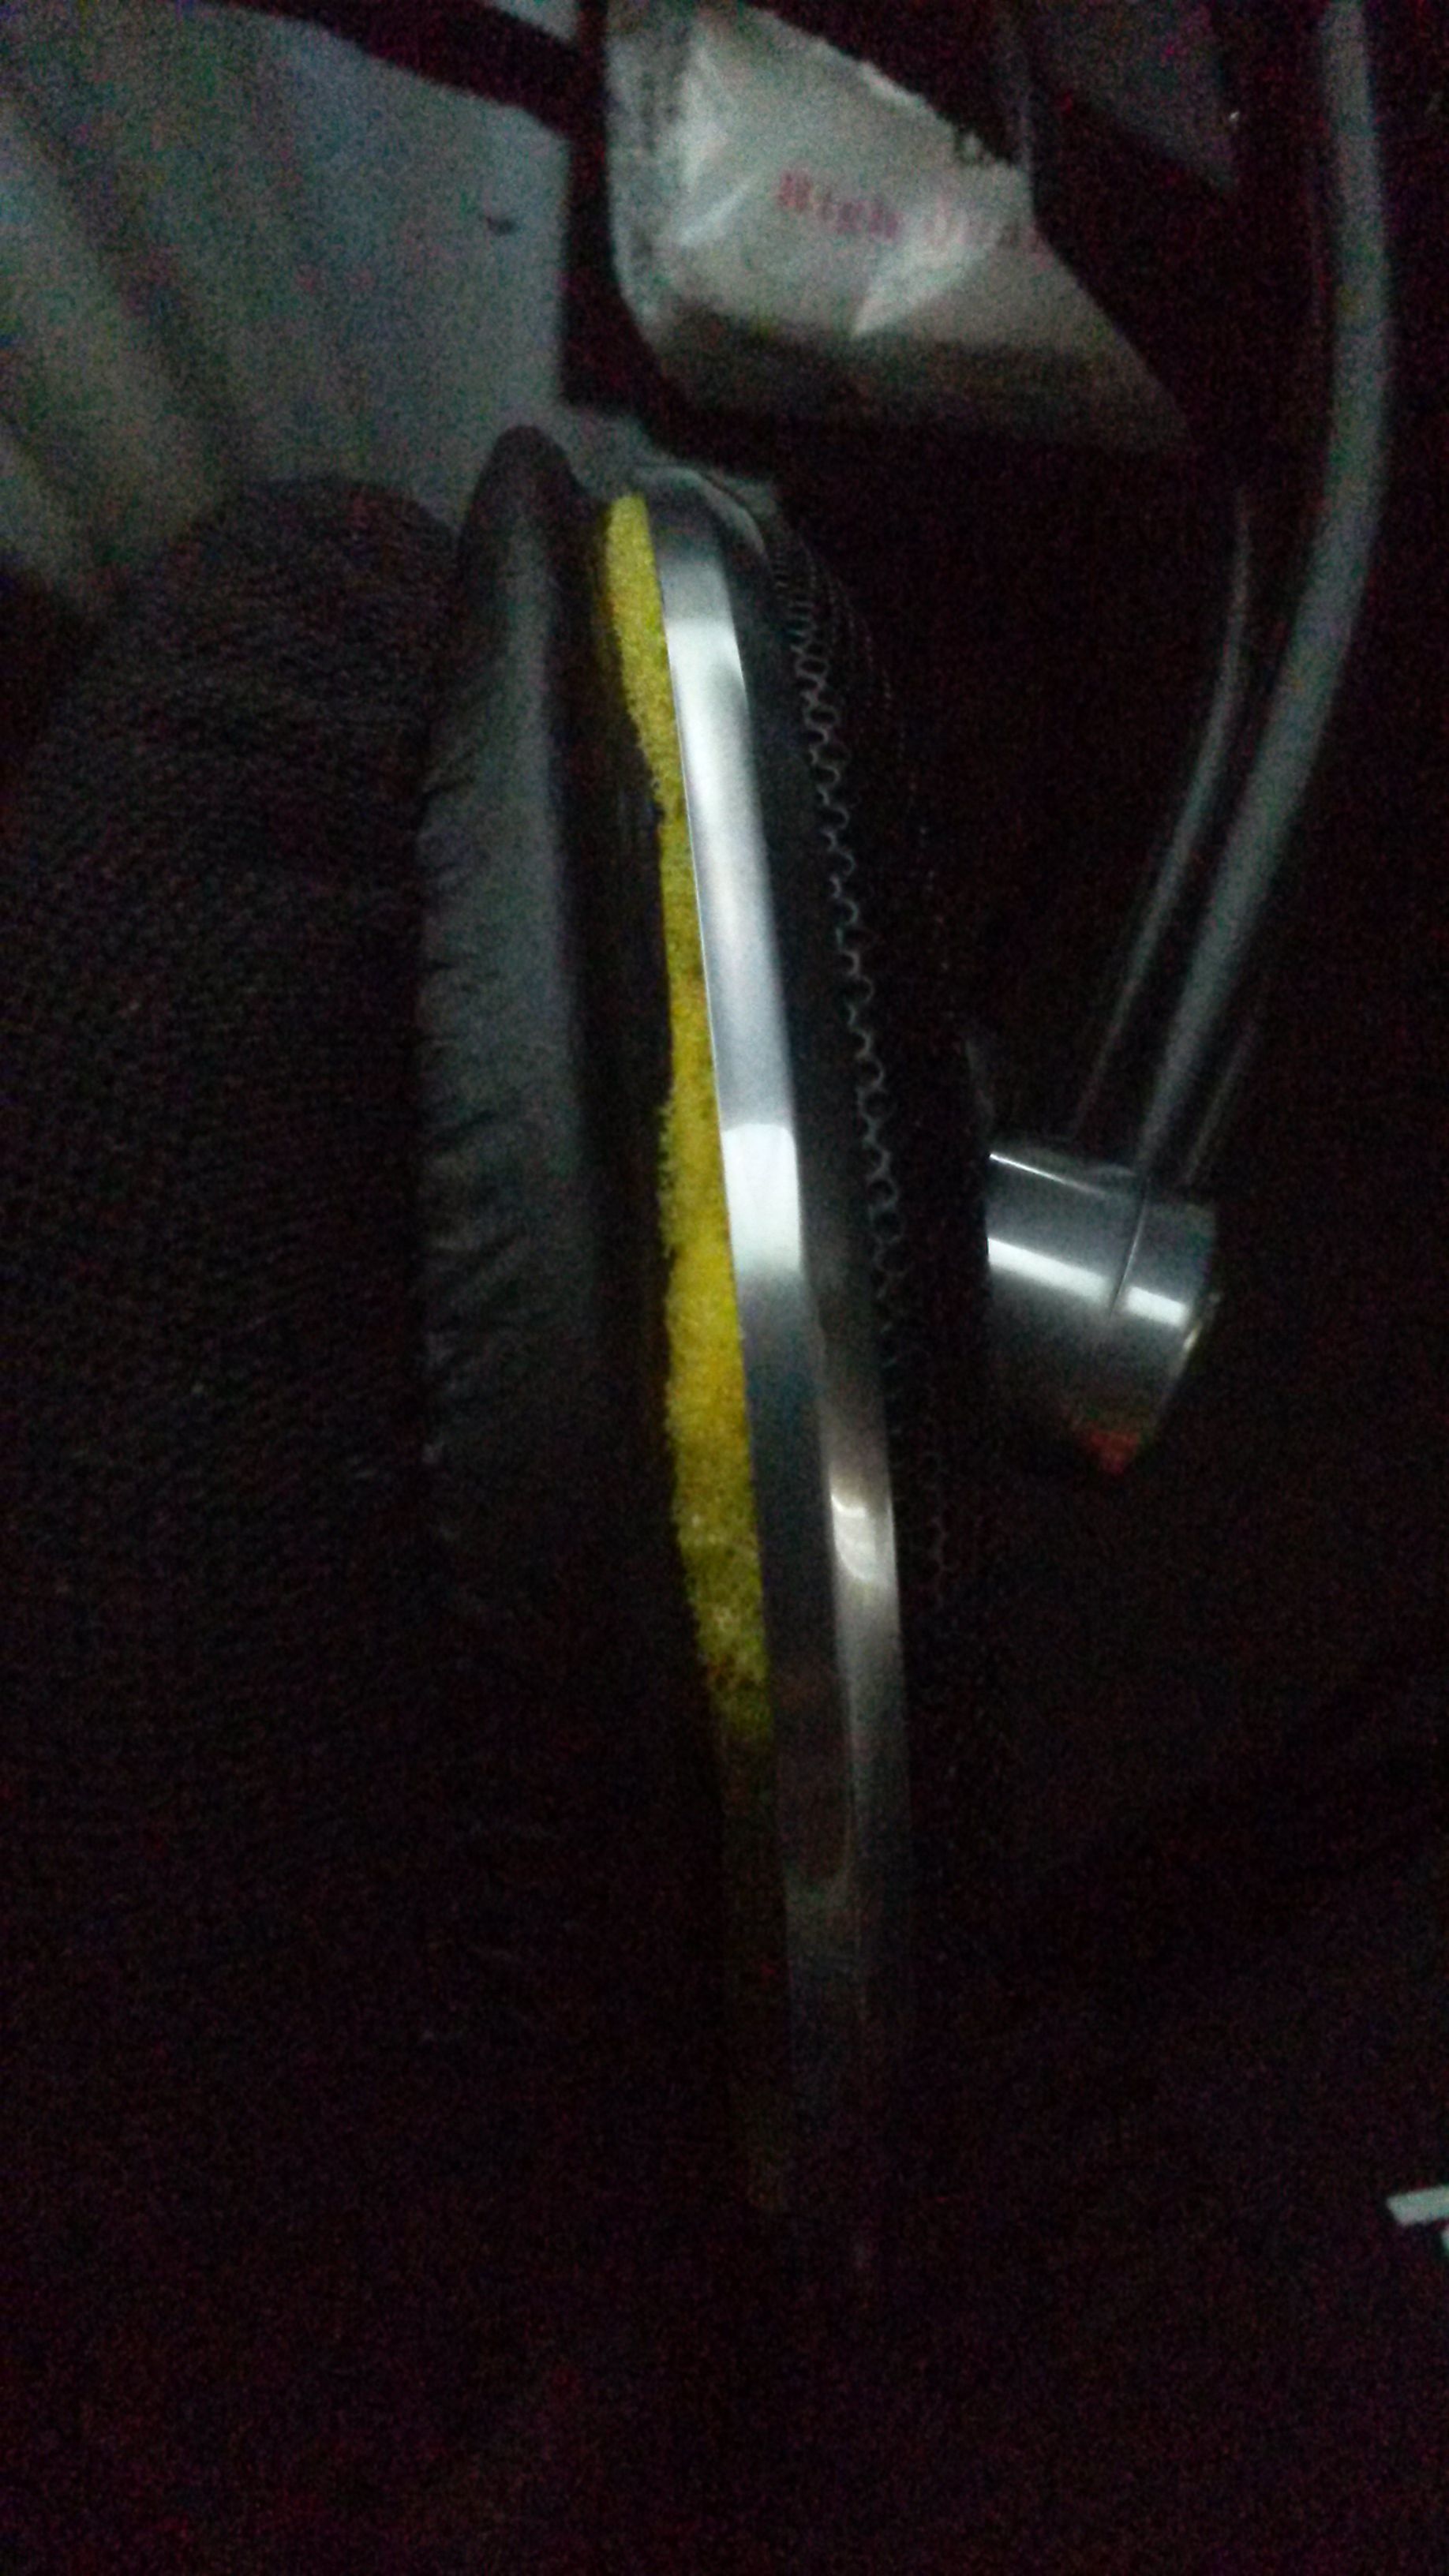
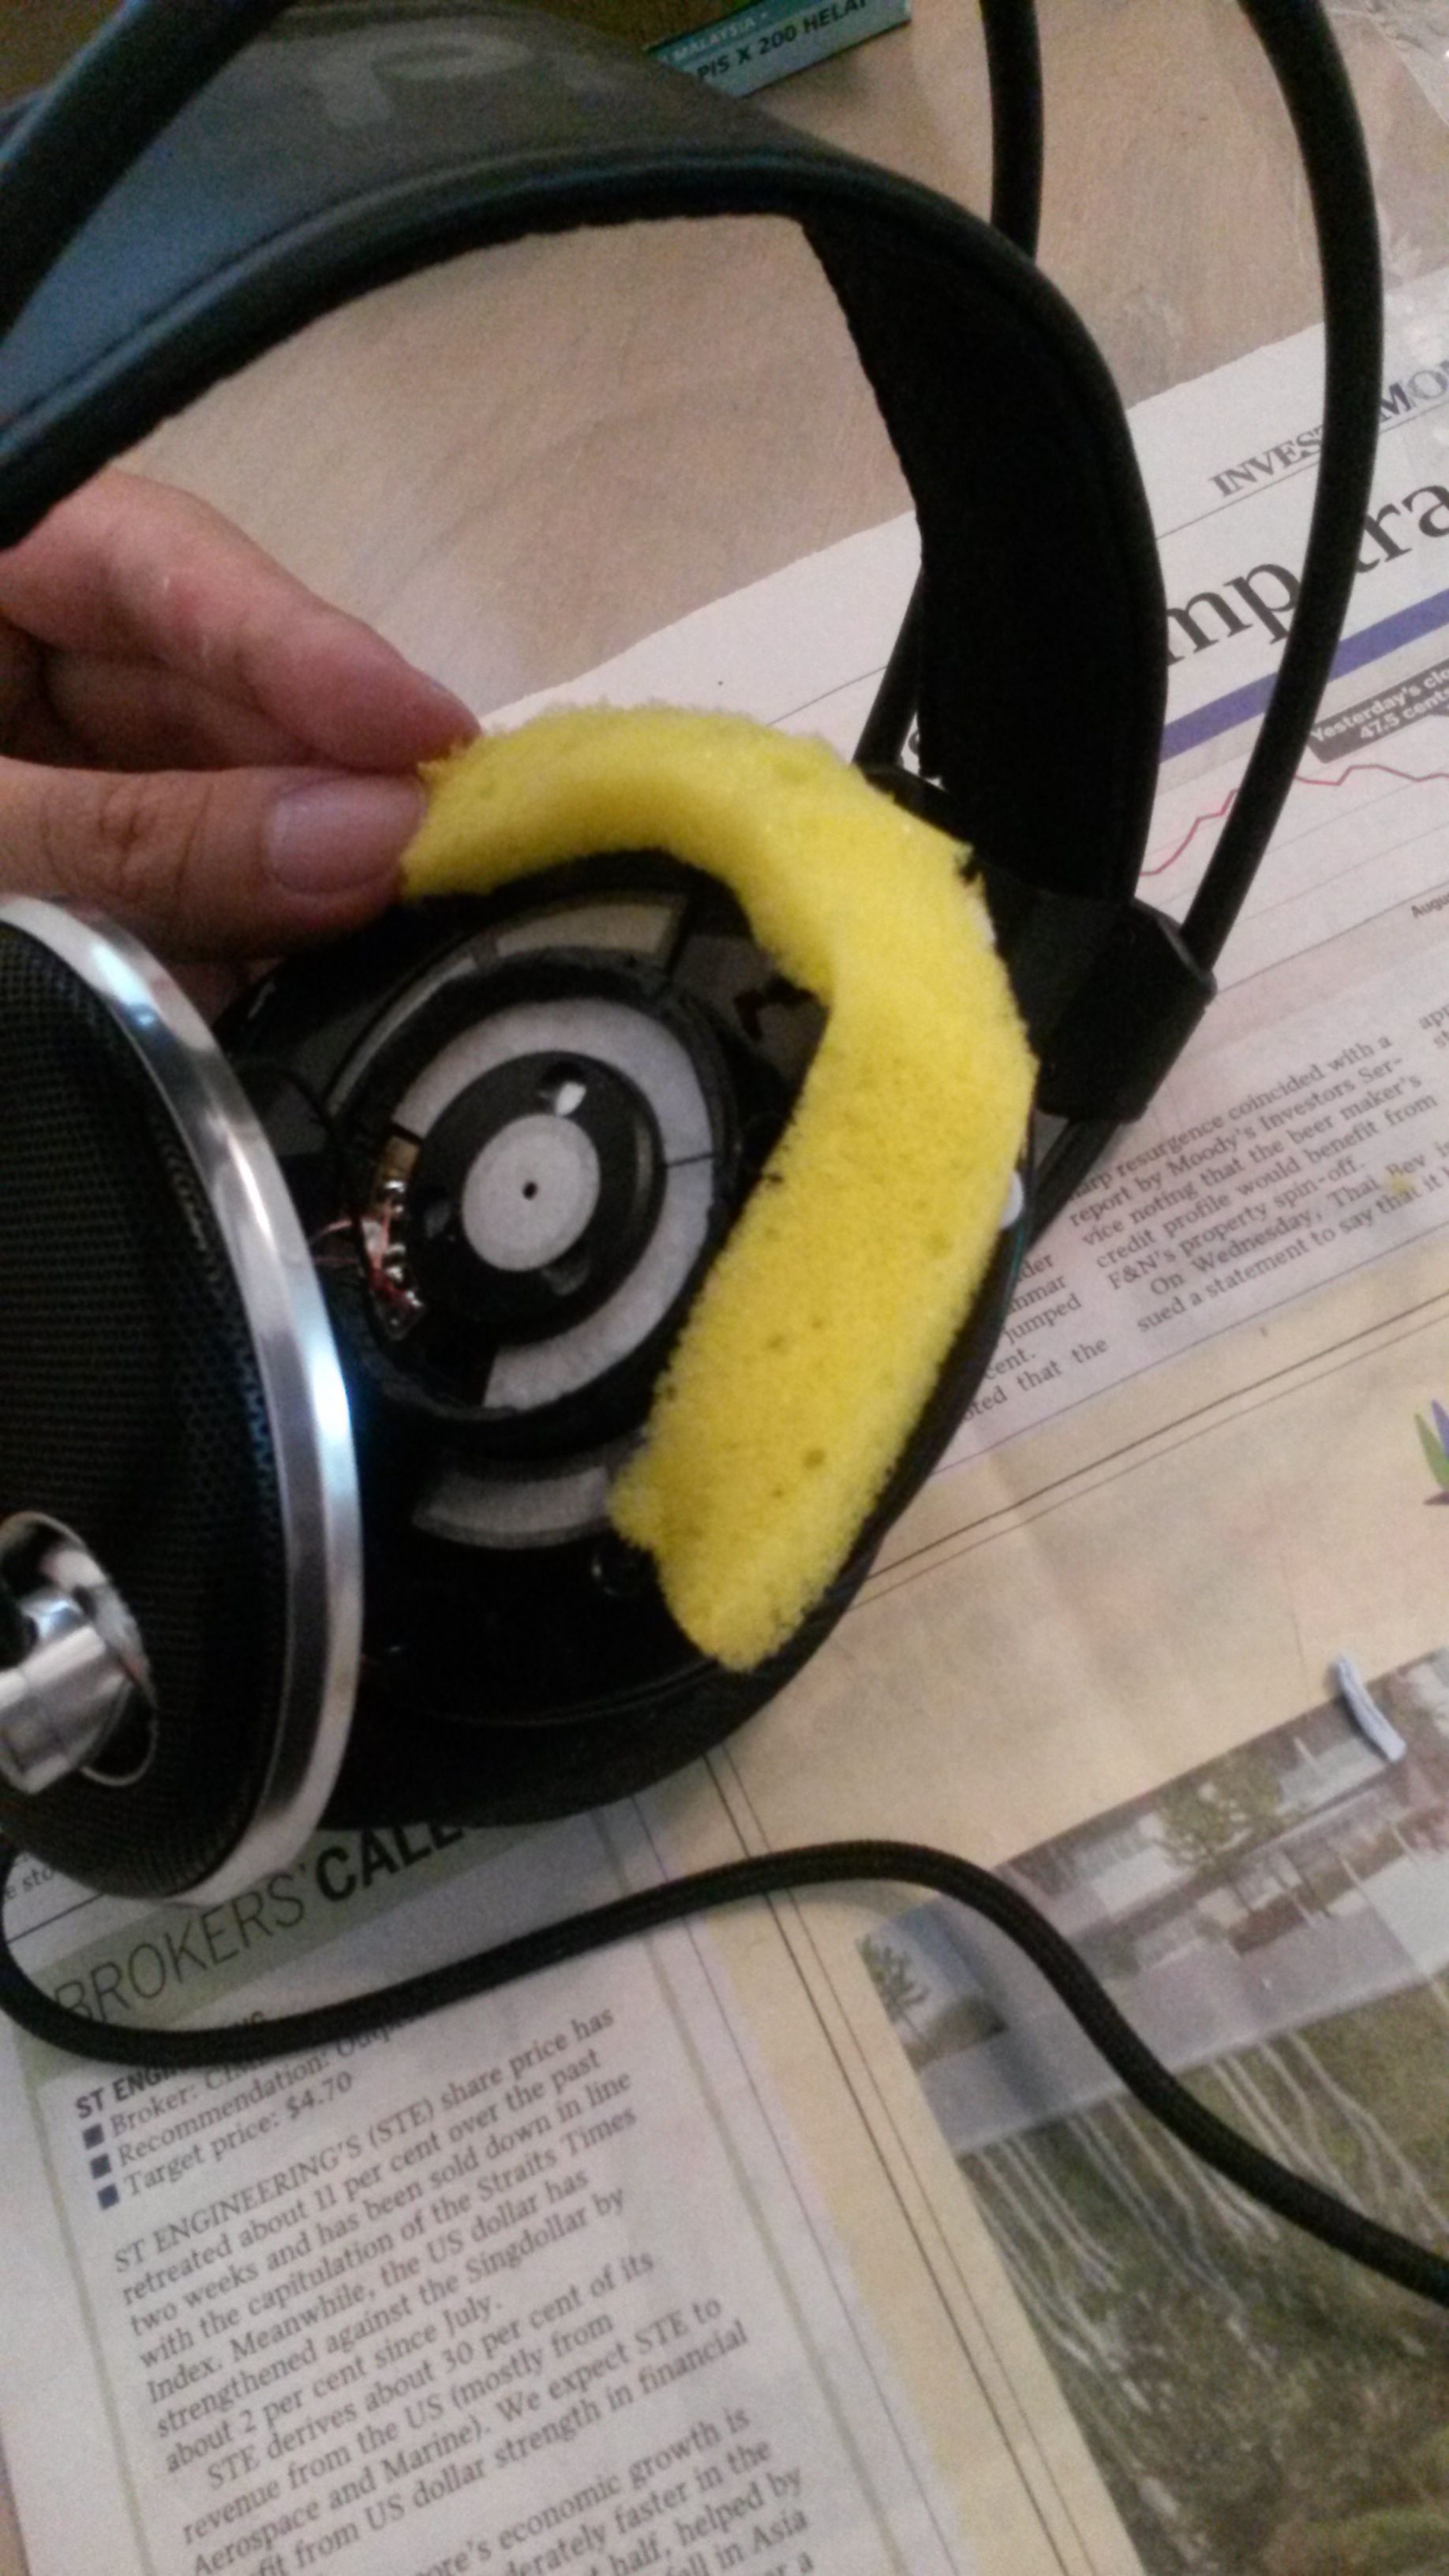
6.  to fix the poor sound proofing of the drivers - i unscrew the shell (4 screws on left, 4 on right) - till i saw the driver.  The driver is seated inside a plastic shell. This is the problem.  the sound gets leaks and resulting in poor bass.   Here's why i did to improve it.   Get some blue tack - lined the blue tack along the circumference of the driver against the wall of the plastic. So the blue tac seals the drivers circumference against the housing shell.    ** you will immediately notice a 20 percent ** improvement in sub bass region and the bass has better tighter impact.
 
here's the instructions and photos ( i dissaemble everything to show you again)
 
1.  Remove earcups and remove 4 screws of the left and right plastic drivers housing
2 . Warning !! - there is a small spring in between the housing (the spring is for the 2 rods angle adjustment that attached to the headband..   So when you have remove the 4 screws, gently pry it open .. don't lose that small spring.
3. once open , you will see the speakers driver ** in the sample photo**.
4.  the speaker drivers was glued to the plastic housing.   to prevent sound leaking - use blu tack and lay it on the circumference of the driver to create the seal between housing and drivers.
** in my photo it was black colored blu-tack.. see my index finger pointing to it.. ** - just lay enough blu-tack to lined it to seal the gap between driver and plastic housing.. after all it's just to prevent sound leak from driver outwards..
5.  you can try on one side of the headphone first .. then assemble it and i hope you will notice the differences (before & after).   Mid and bass is tighter (previously mids too sharp and loose) and wide soundstage remains the same. 
 
6. Enjoy !!


Sep 28, 2013 at 1:21 PM Post #693 of 1,082
radi9red,
 
Thank you so much for going through the effort to show up more pictures.  It means a lot!  I will try to do this tonight and report back as soon as I can.
 
Thanks again for getting the modding started on these cans!  
atsmile.gif

 
IBJamon 
 
Sep 28, 2013 at 1:27 PM Post #694 of 1,082
Let me know how that does - if the bass in these cans can be improved a bit without sacrificing soundstage I may end up liking these even more than I already do (which is considerable) and they are inexpensive enough that I am not afraid to try that (normally I would be afraid of trashing an expensive purchase which is why I am leaving my DT990 alone).
 
Sep 28, 2013 at 8:47 PM Post #695 of 1,082
Let me know how that does - if the bass in these cans can be improved a bit without sacrificing soundstage I may end up liking these even more than I already do (which is considerable) and they are inexpensive enough that I am not afraid to try that (normally I would be afraid of trashing an expensive purchase which is why I am leaving my DT990 alone).


hi phishin, its a tough call to get quantity bass (closed cans) vs wide soundstage n imaging open airy on ( open air design). senn hd650 is the only can that i think makes it right, the dt880 990 is quite top quality. dt 880 n 990 were top league top selling models for many years in the beyer range so that speaks the truth. pioneer se-a1000 is open can design by default and unless you mod the caps to a semi closed to restrict air flow to create the bass boom, theres a limit of much the bass can be produced.

The only mods is to retain as much bass n low frequencies as possible by

1. c hanging to thicker in thickness but if possible same outer diameter but smaller inner diameter earpads
2. ensuring the sound out from the drivers > earcups> ears are properly sealed.thats why some heasphones has angled drivers design..

the blu tack mod in drivers seal can only help this much.. n changing good pads may cost same or more than the earphones itself.

interestingly, this pioneer does well after amping.. I think thats becos it was meant for home theatre and mostly connected into av receivers. if you have a cheap amp. it helps to improve bass tightness toi
 
Sep 28, 2013 at 8:50 PM Post #696 of 1,082
I have a project sunrise II Tube amp on the way with some extra tubes, mainly for my 990's but I am very interested in seeing ( hearing ) what it does for these as well.
 
Sep 28, 2013 at 9:19 PM Post #697 of 1,082
I am in the middle of working on some of these mods (I am putting in the tack now) and I decided to measure the wire resistance just because I am in there.
 
I can't believe it... but I guess 20 ft of cable really can have 2.6 Ohms of resistance!  That's way more than I would have expected!
 
IBJamon
 
Sep 28, 2013 at 11:14 PM Post #698 of 1,082
I am in the middle of working on some of these mods (I am putting in the tack now) and I decided to measure the wire resistance just because I am in there.

I can't believe it... but I guess 20 ft of cable really can have 2.6 Ohms of resistance!  That's way more than I would have expected!

IBJamon


Awesome stuffs on the resistance measurements ! ibjamon. i'm sure the 20ft cable chews up the low mw current from some low powered portable players..

I given up on making the drivers angled-it has a risk of breaking the plastic earshell that holds the drivers.

i am devising another mod-will share it once I have positive success evaluating the sound performance.. its a 10 min low risk job and easily reversible.
 
Sep 29, 2013 at 11:37 AM Post #699 of 1,082
After a series of mod , which i have shared-   the headphone has improved on
 
 
1.  Reducing the harsh highs treble which on several tracks sounded shouty and sibilance . Now it has the micro details but much more controlled.  Signature is still classified as "lively" - comparable to typical open air cans ( hd 600 / hd 650) . 
 
2.  improved depth and presentation - previously , the headphone out of box sounding thin on mids , lack of 3d depth and very much lacking in sub bass region and sub mid levels.
 
3. Sound stage - wide but not so airy .  out of box was really way airy for me. 
 
4.  Low frequencies bottom -  it has more rounded and solid bass bottom - but IT IS NOT the senn hd 650/600 type of classic senn bass. especially the sub bass and the depth of the bass is no where comparable to senn hd 650. 
 
Pioneer SE A100 Comparison to other headphones
If you had several headphones beside from pioneer Se a1000, you will noticed that the pioneer se a1000 strengths is it's amazing detailed and bright clear highs and extremely airy soundstage and that gives you a perception of wide imaging.   Most songs sounds airy with very laid back mids and the quantity of the mids is petty thin and subtle.   The depth of the bass is pretty deep / subtle but lacking in the upper bass region.  Its a U shape - extremely wide soundstage airy signature but with very light weight subtle bottom.  that's how i conclude this headphone to be.
 
Okay folks,  sharing on my last and possibly the final mod.
This mod is a major mod which really ! alters the Pioneer SE A1000 signature - however, this mod is easily reversible .  So i really recommend you to try it out.
 
Mod 7 :   Adding foams to air inlet to create tightening of mids and bring out sub bass region
 
Objective :  To restrict air flow and air leak between the headphone shells (left and right)


Explanation of what this mods does to the sound signature:
this mod changes the following;
1. Reduces the highs frequencies by 20percent. 
2. increases mid quantity and allow the mids to come forward by around 30 percent - vocals sounds warmer and tighter and less floaty. 
3. increases the upper bass region by 40 percent. the oomph of the drums has arrived !!
4. Sound stage remains the same - extremely wide.. but the feel of airy is much reduced.
 
Again ,  if you like the original detail clear sharp high,   subtle laid back mids .. subtle bass , airy feel , which  - you don't need this mod at all.
 
If you think you like the above mod changes mentioned,  here's the instructions of the mod 7.
 
1.  Gently unscrew the 4 screws and pry open the shell
2.  prepare 2 stripes or 1 long strip of sponge foam -  ( identical to those used for car washing) - length of the strip will be to cover the circumference of the shell.   thickness of the sponge foam to be around 1.5cm thick - width will be the shell spacing as long it donesnt cover the drivers.
 
why sponge foam ?  Reason is to restrict air intake but yet still allowing drivers to breathe.
 
3. Lay & stick the stripe sponge foam along the circumference of the plastic shell . ** shown in photo - you can see i done halfway.  you can completely lay the foam over the entire circumference of the shell **. you can use 1 long stripe for the entire circumference.  For me i use 2 strips per shell (2 for left, 2 for right) . you can see the foam is laid over the plastic shell.  IT must NOT cover the drivers. 

 
4.  Once you completed it -  Assemble back the shell by screwing back the 4 screws -  So the final product - the sponge foam is supposed to be sandwiched between the shells.   this is to reduce the air intake and prevent sound leak from the sides.
 
See photo of the completed product - side view :  Sponge is now sandwidched between shells (reduce air intake and sound leak from sides)   Don't worry about the air intake - the open can design is still drawing huge amount of air from the back of the plastic headphone casing (where the 2 rods are). 
 
If you managed to find black or grey sponge foam - of course it looks more beautiful than mine (yellow)


okay guys . give it a try if you like this new sound signature !
 
I'm really enjoying this sound signature.  It's very balanced & lively bright background ( different from my audeze lcd2 which is darker background) .  this sound reminds me of the ATh w1000x that i'm still using except mids on ath w1000x has more character and depth.    I'm listening to ray charles - the pianos and cymbals are much more controlled - less harsh and overly sparky compared previously.  No more shouty after i tested on several genres.     Vocals part - are amazing with ticker depth- it's more forward but still in between the bass and treble where i like it to be..   the drums (bass drums and the toms) has much better texture now.  Previously it was too laid back and overly airy and messy..
 
Note : if after the mod - if you find the mids too forward .  what you may do is instead of filling up the shell circumference with sponge , reduce it to 70percent of the circumference- leave some gaps in between the sponge pieces.
 
have fun !
 
Sep 29, 2013 at 8:06 PM Post #701 of 1,082
Is the foam sponge in addition to or instead of the blue-tac around the drivers?


blu tack is to seal the rims of the driver for sound proofing. see my previous photo marked in red..
the choice of blu tack versus example.using rubber tape is as a damper to reduce vibrations-especially in all plastic housing.the sound can be very shrieking.

the mod 7-sponge foam is on the outer rim shell... additional to the blu tack mod, is for different purpose. it is to reduce the ridiculous amount of air entering the driver section. if now you look at the side way view of the left or right section of the earcups. you will see the shell has a huge slot of space. the sponge foam is to added in between.
 
Sep 29, 2013 at 9:15 PM Post #702 of 1,082
I really love the logic here, add bit of dampening = MOAR BASS. Not to knock on your efforts but any measurements to back up the claims? You do realize that adding more dampening onto the back of the housing plate with a limited spacing housing such as these decreases other aspects of the sound? You're better off removing the foam and felt, add some dynamat to the front of the driver ring and the around the back of the driver housing plate to remove backwave reflections and seal off any ports on the external headcup grill housing to prevent sibilance on demanding/multi-layer mixed tracks. Also if you want more bass, get rid of those pads and get some leather angled pads, earpads provide more sound changes than adding/removing felt, dampen foam etc.
 
Sep 29, 2013 at 11:30 PM Post #704 of 1,082
Or the Denon pads, Beyer gel pads can also be fitted on (bit rough though and not as good looking), would be cool if I had these still to try my spare LCD2 pads for shiggles but I don't think it will work due to the inner o ring structure.
 
Sep 30, 2013 at 1:29 AM Post #705 of 1,082
I really love the logic here, add bit of dampening = MOAR BASS. Not to knock on your efforts but any measurements to back up the claims? You do realize that adding more dampening onto the back of the housing plate with a limited spacing housing such as these decreases other aspects of the sound? You're better off removing the foam and felt, add some dynamat to the front of the driver ring and the around the back of the driver housing plate to remove backwave reflections and seal off any ports on the external headcup grill housing to prevent sibilance on demanding/multi-layer mixed tracks. Also if you want more bass, get rid of those pads and get some leather angled pads, earpads provide more sound changes than adding/removing felt, dampen foam etc.


wow..I'm enlightened. would you mind posting some effective mods with photos and instructions you did for the pioneer se-a1000 then ? ill be happy to remove all my mods done so far and implement yours. alternatively, I can buy a new set from amazon so that I can receive nirvana teaching from mod teacher like you on this headphone. quick quick show me some photos of your mods on this pioneer !!
 

Users who are viewing this thread

Back
Top