Modifying the Xiang Sheng 708B [56K!!!!]
Feb 15, 2007 at 2:05 AM Post #16 of 223
Quote:

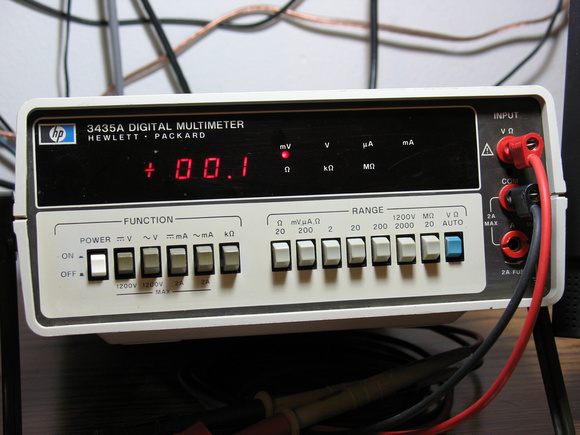
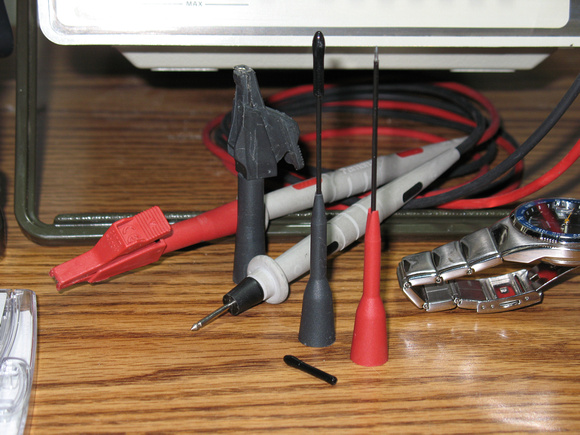
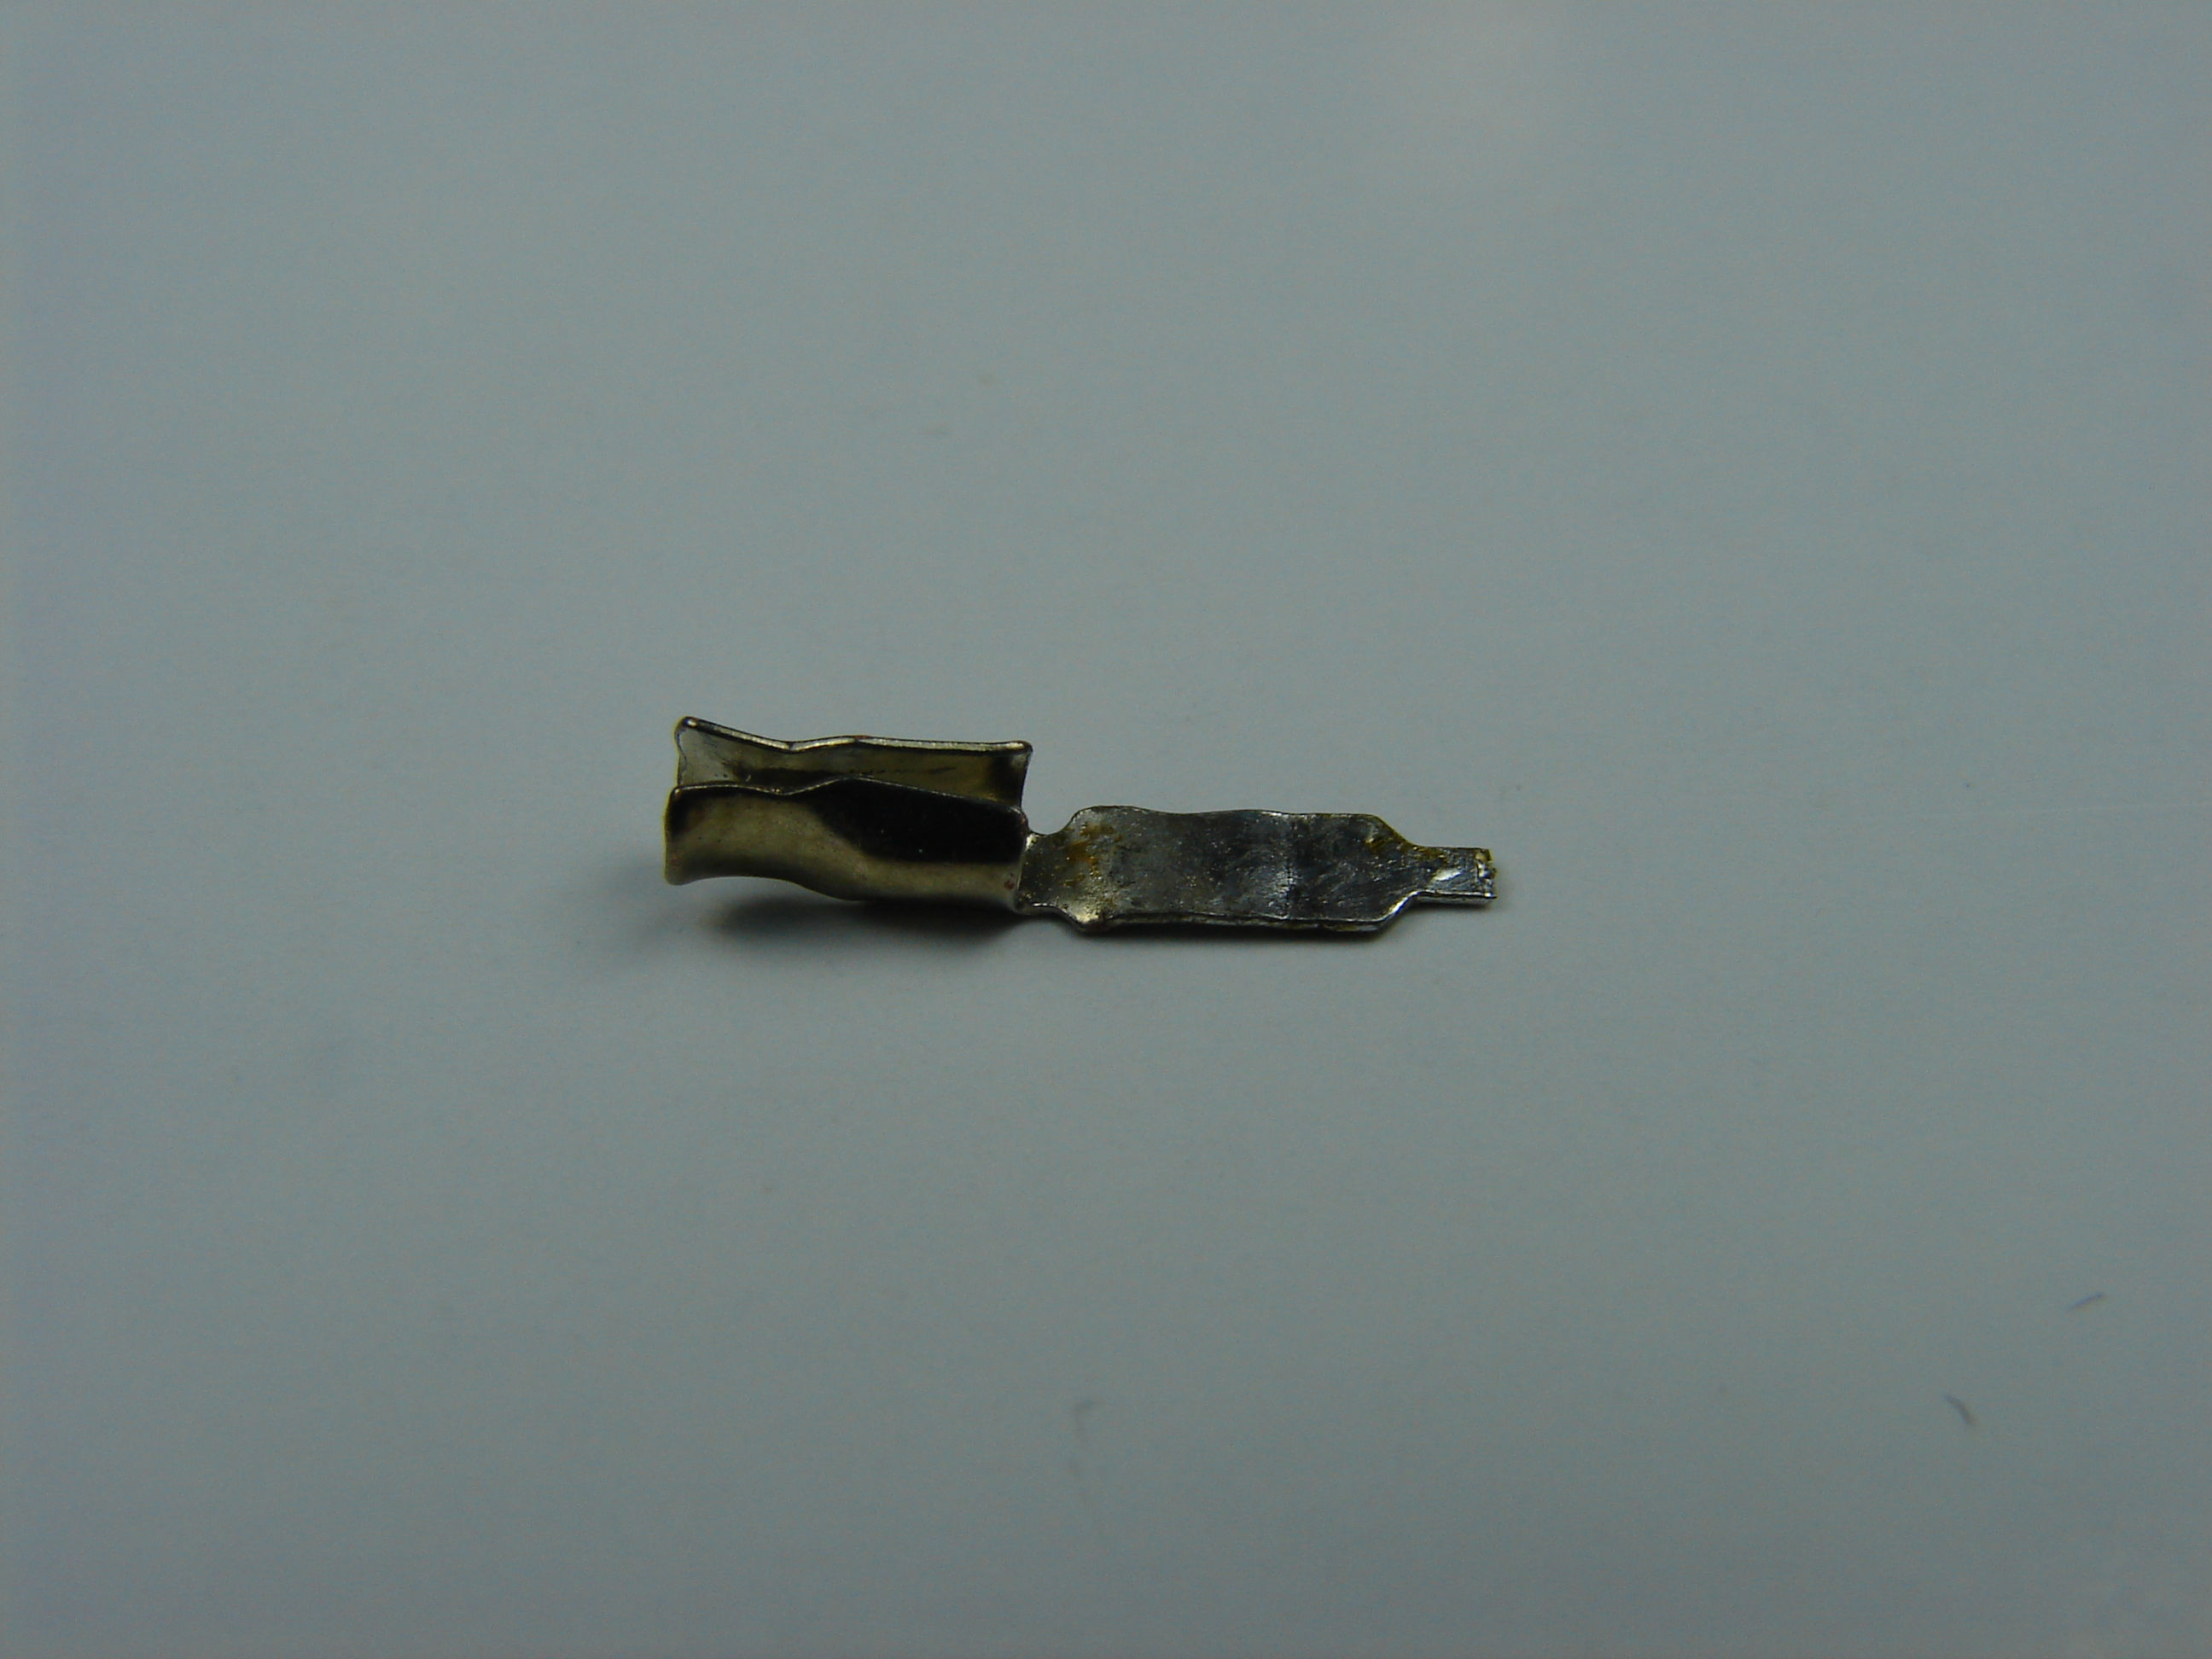
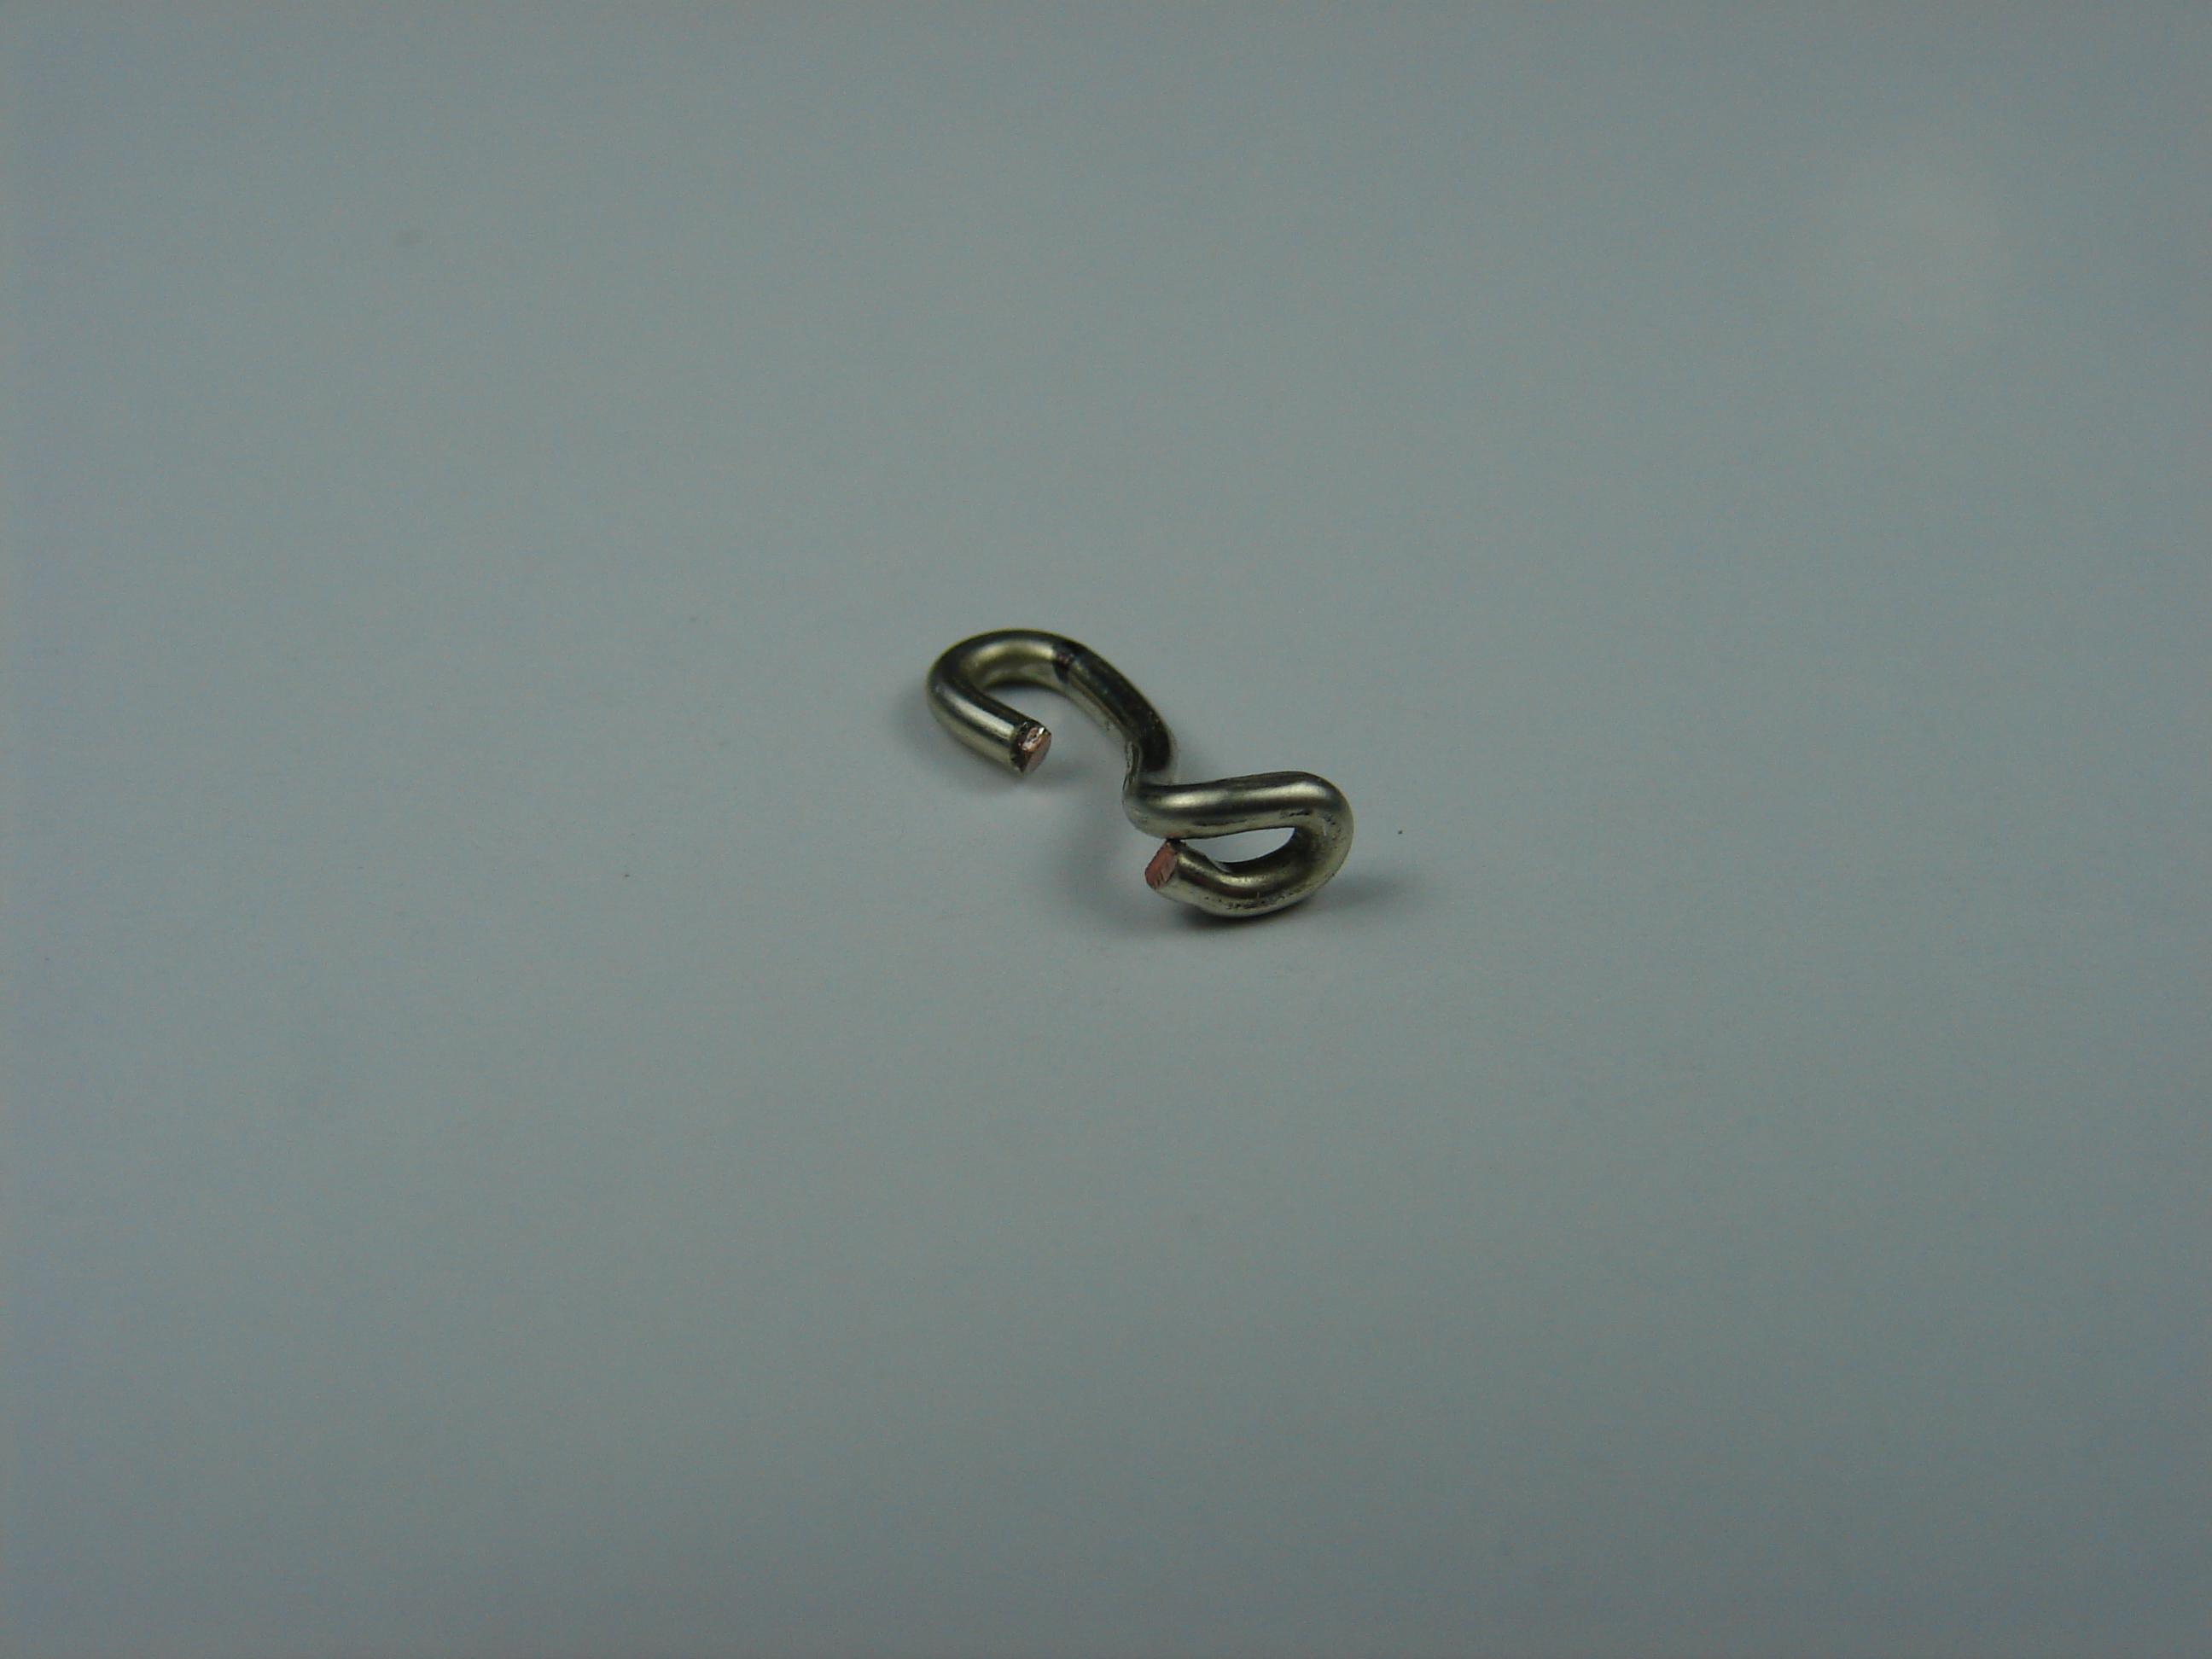
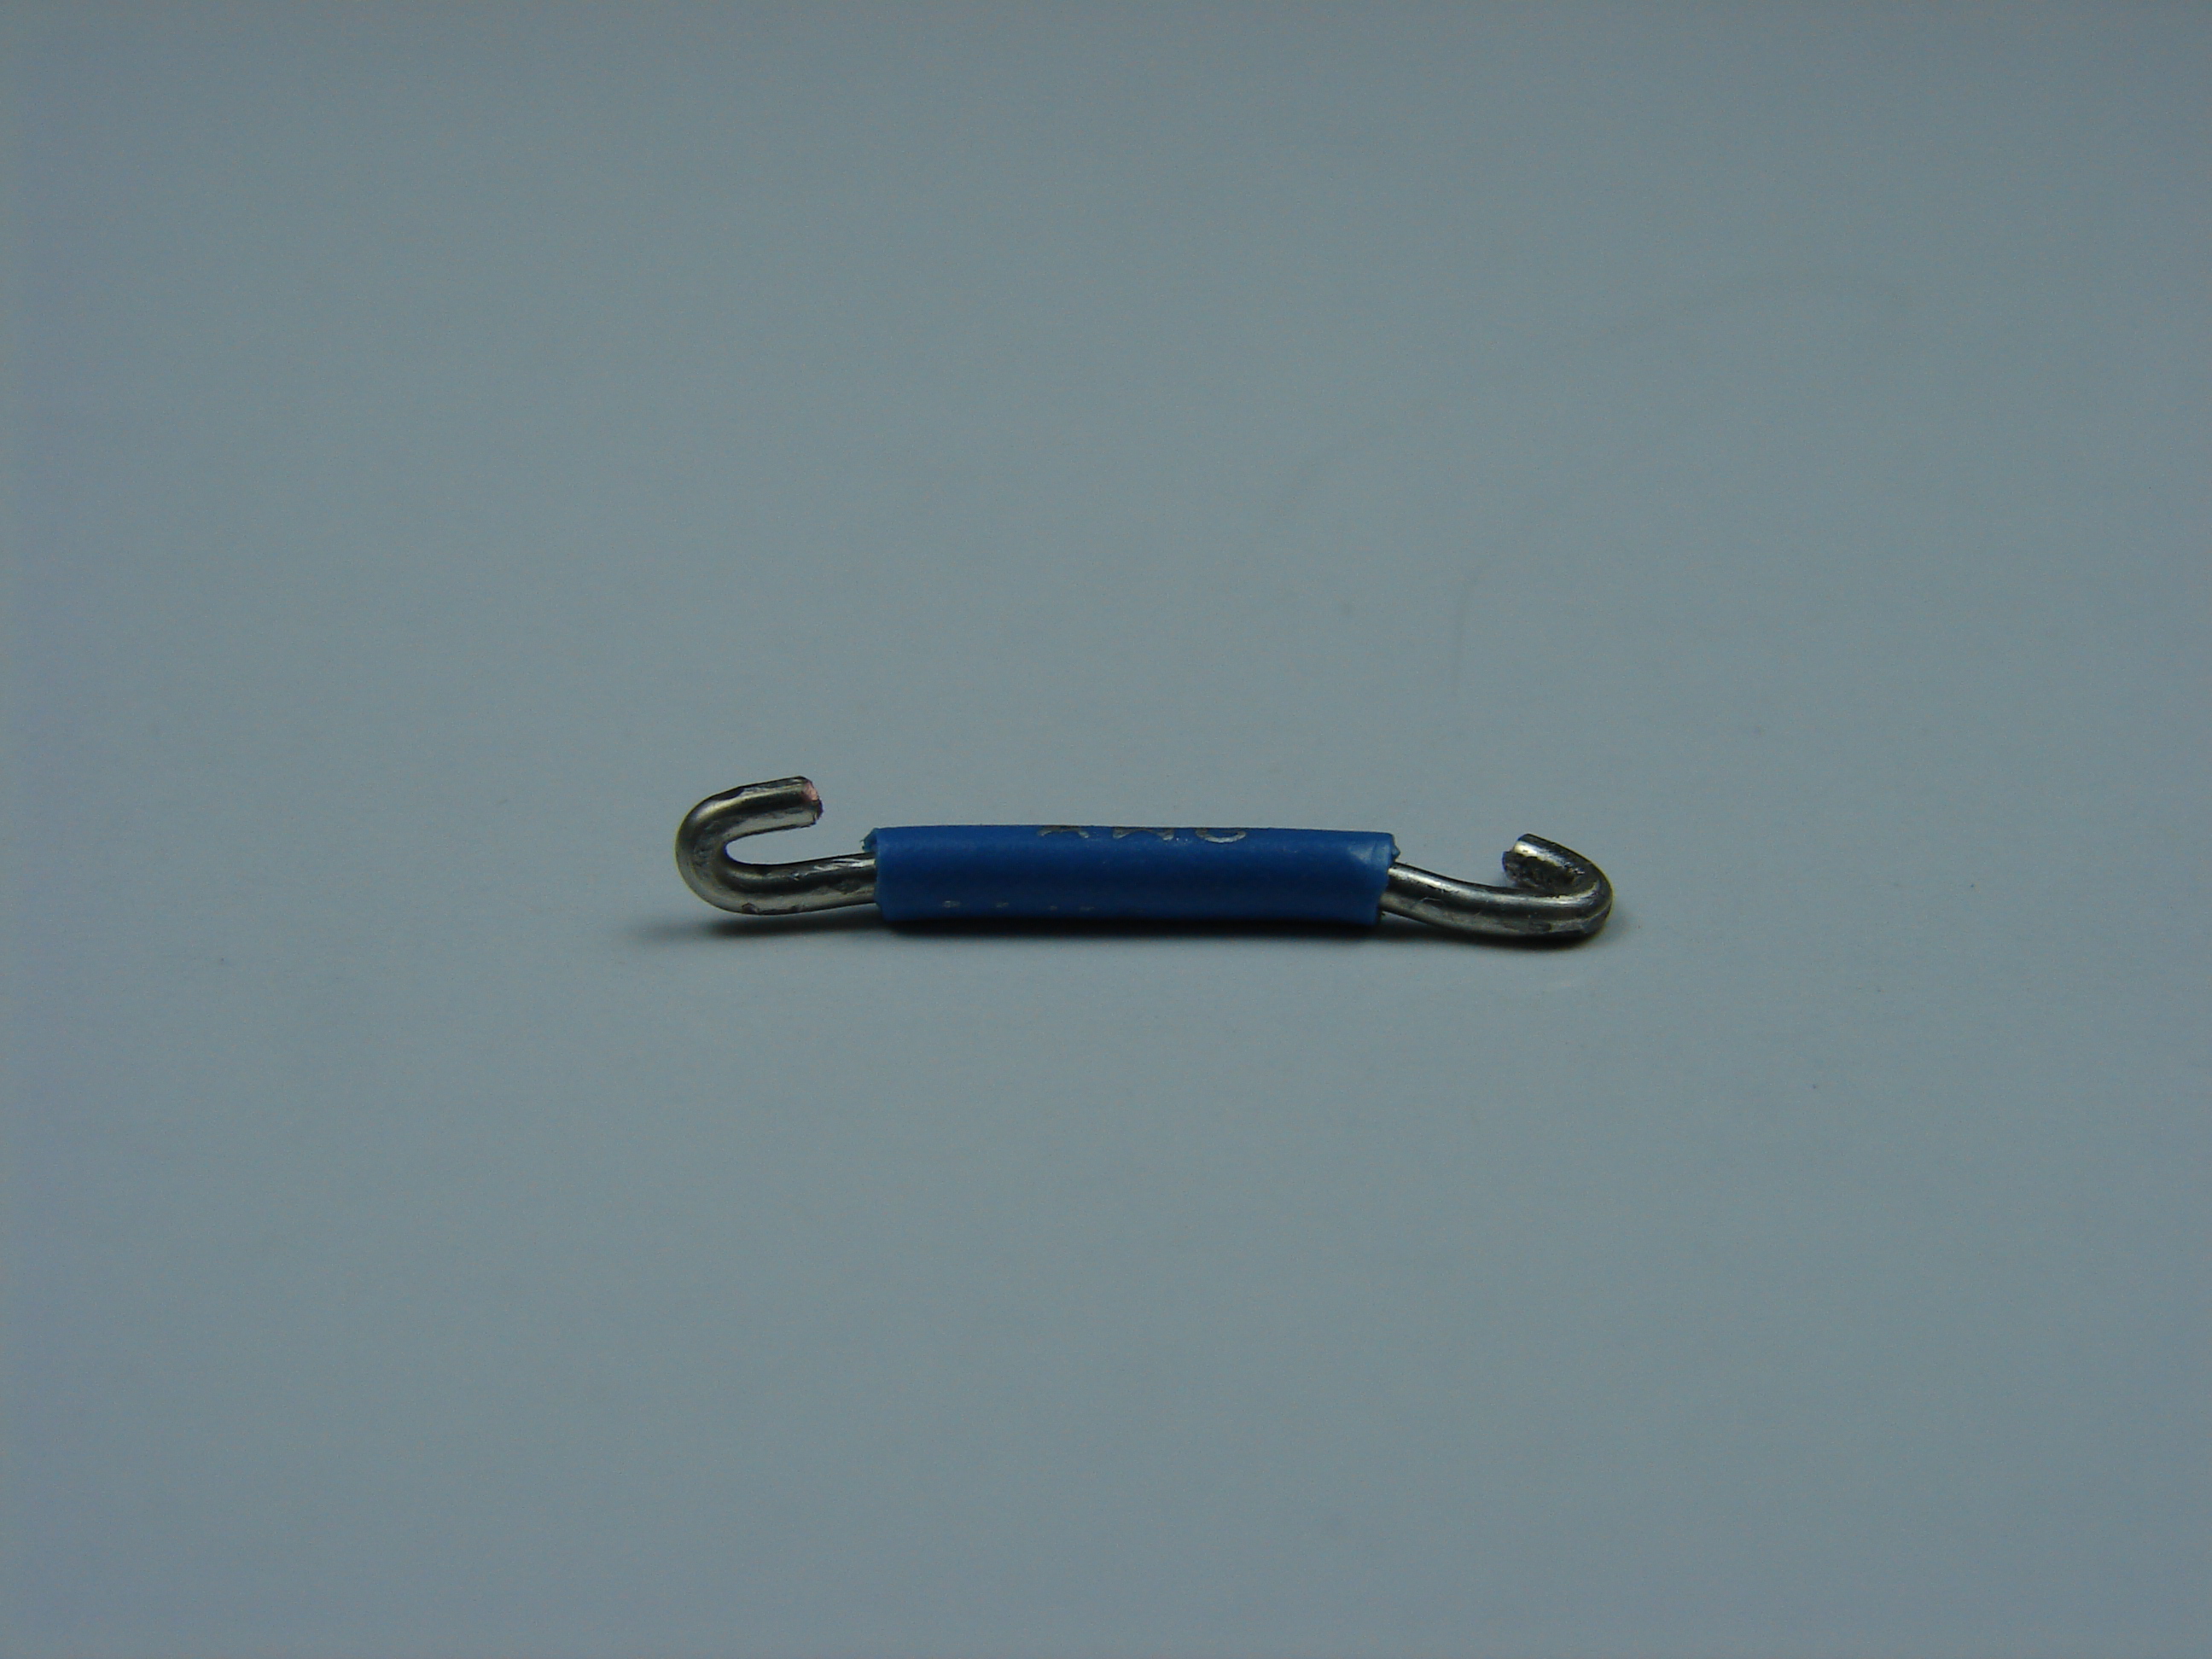
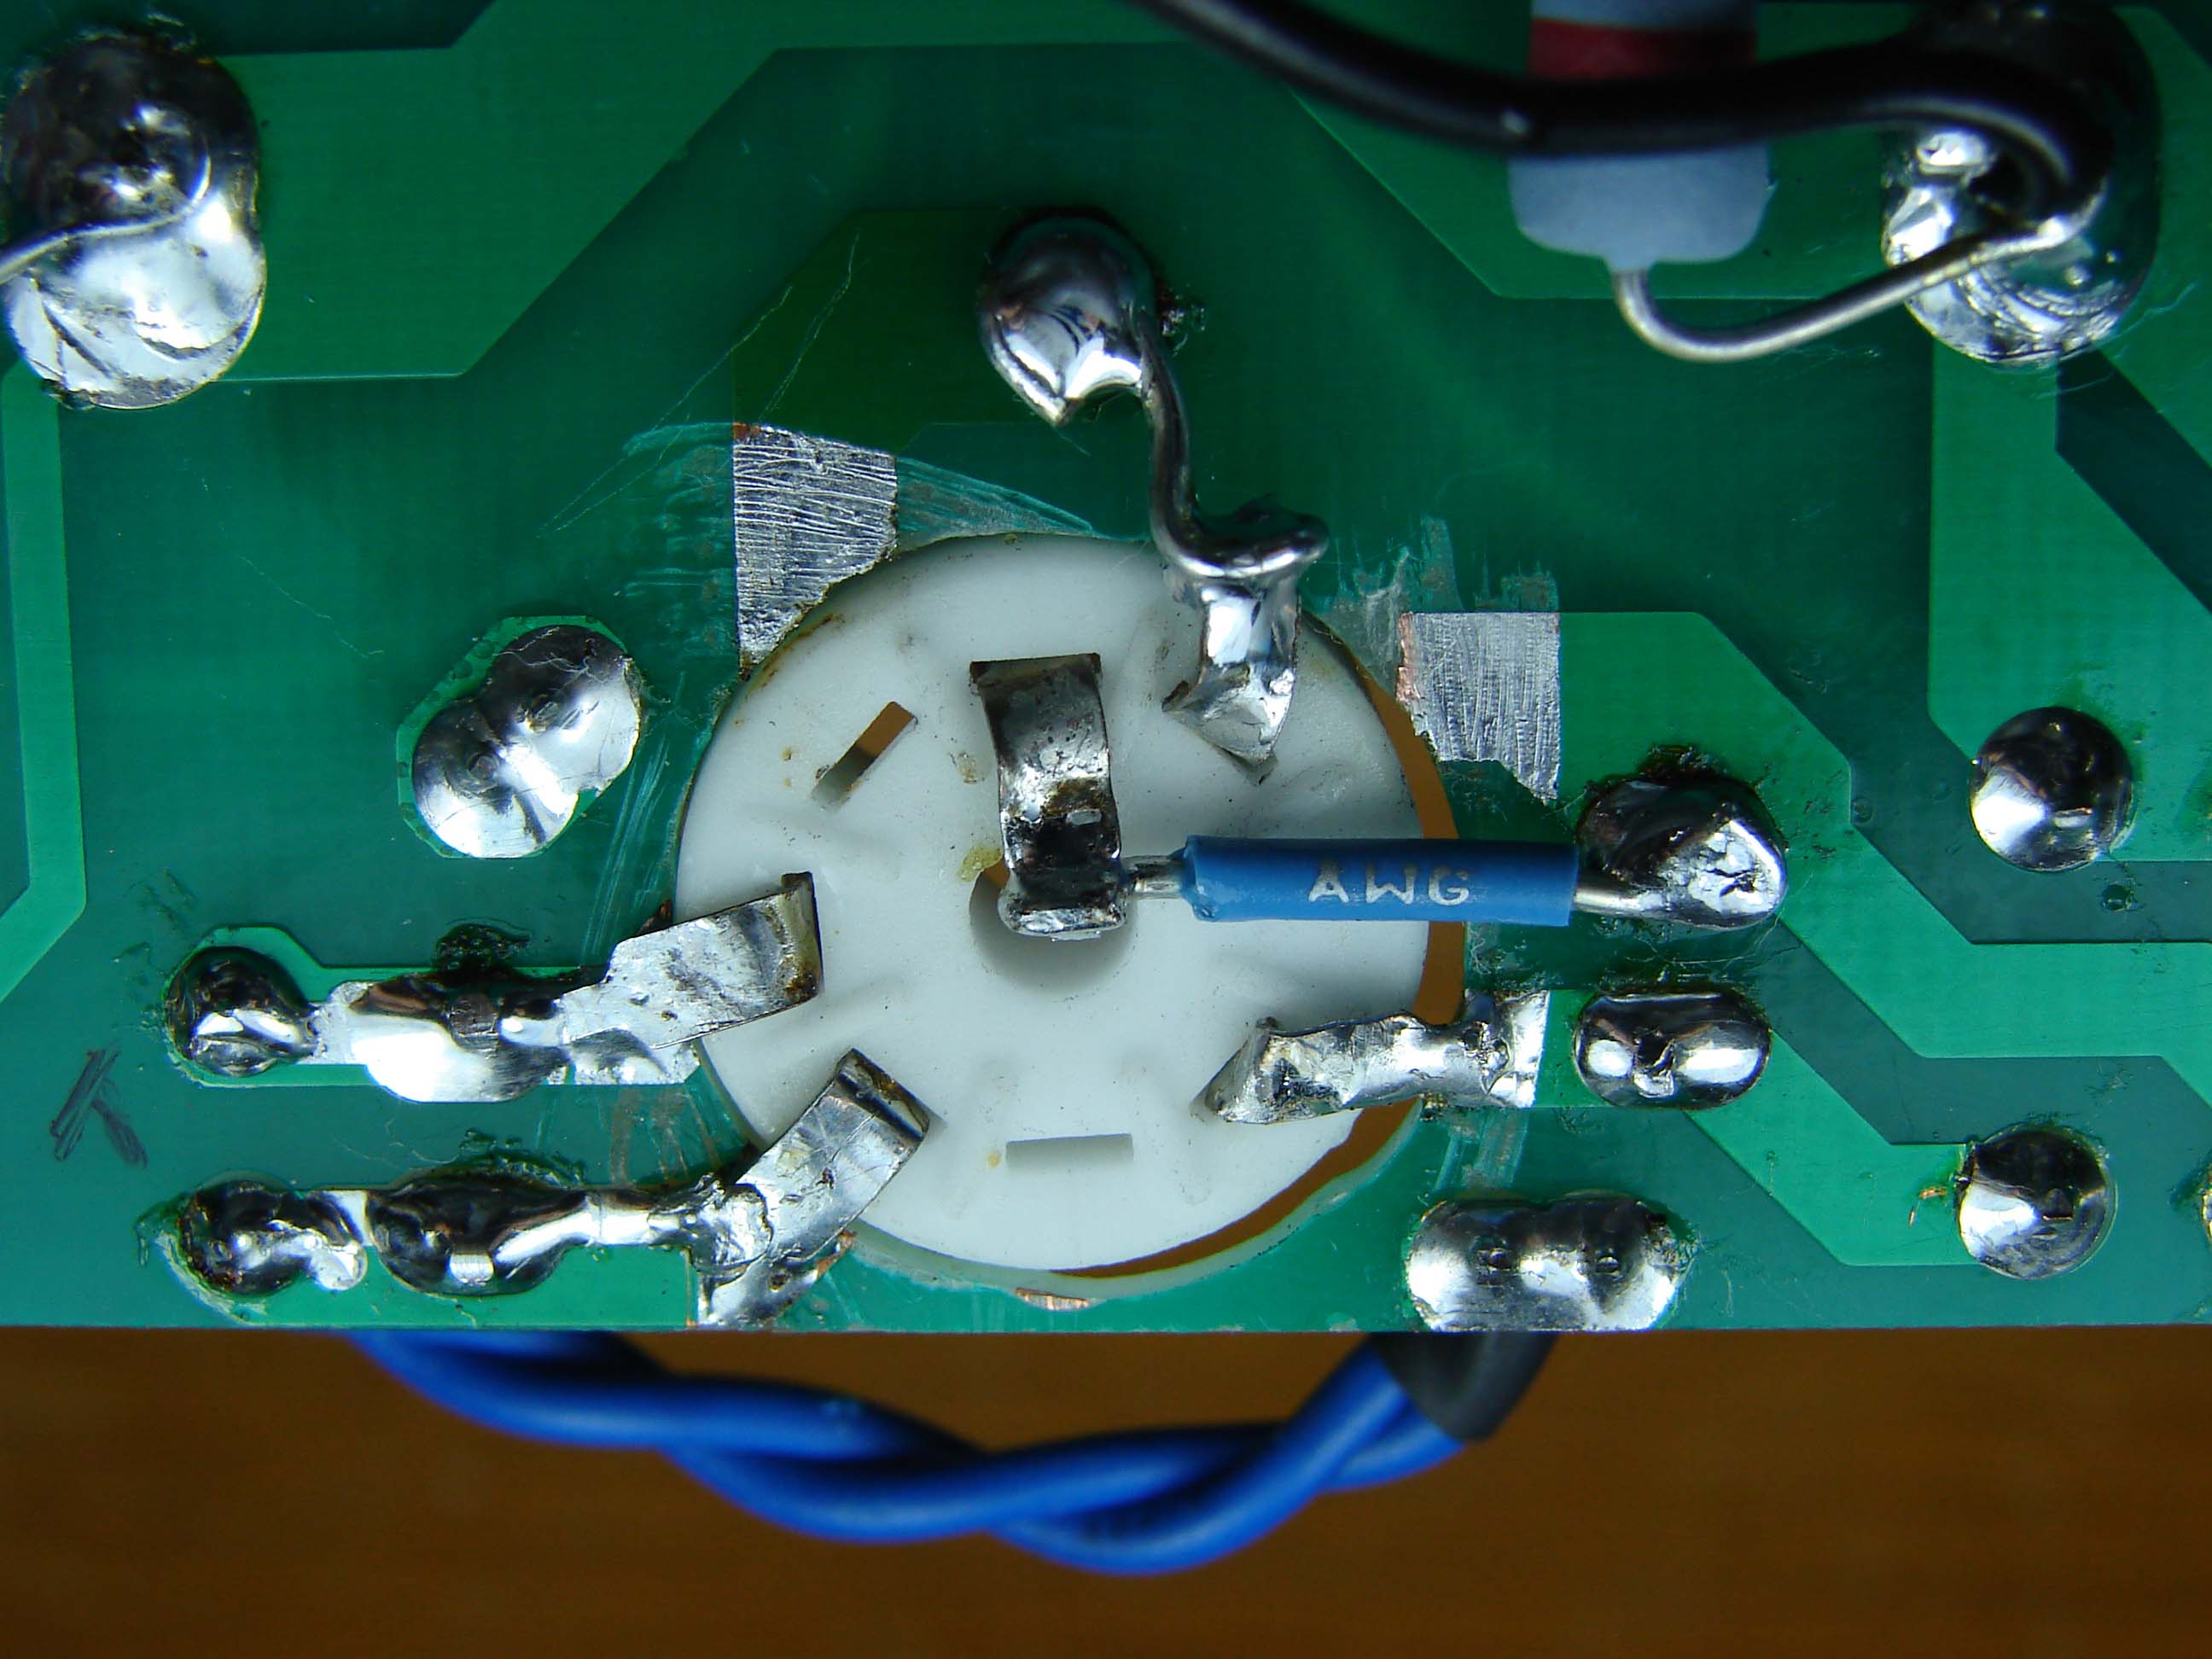
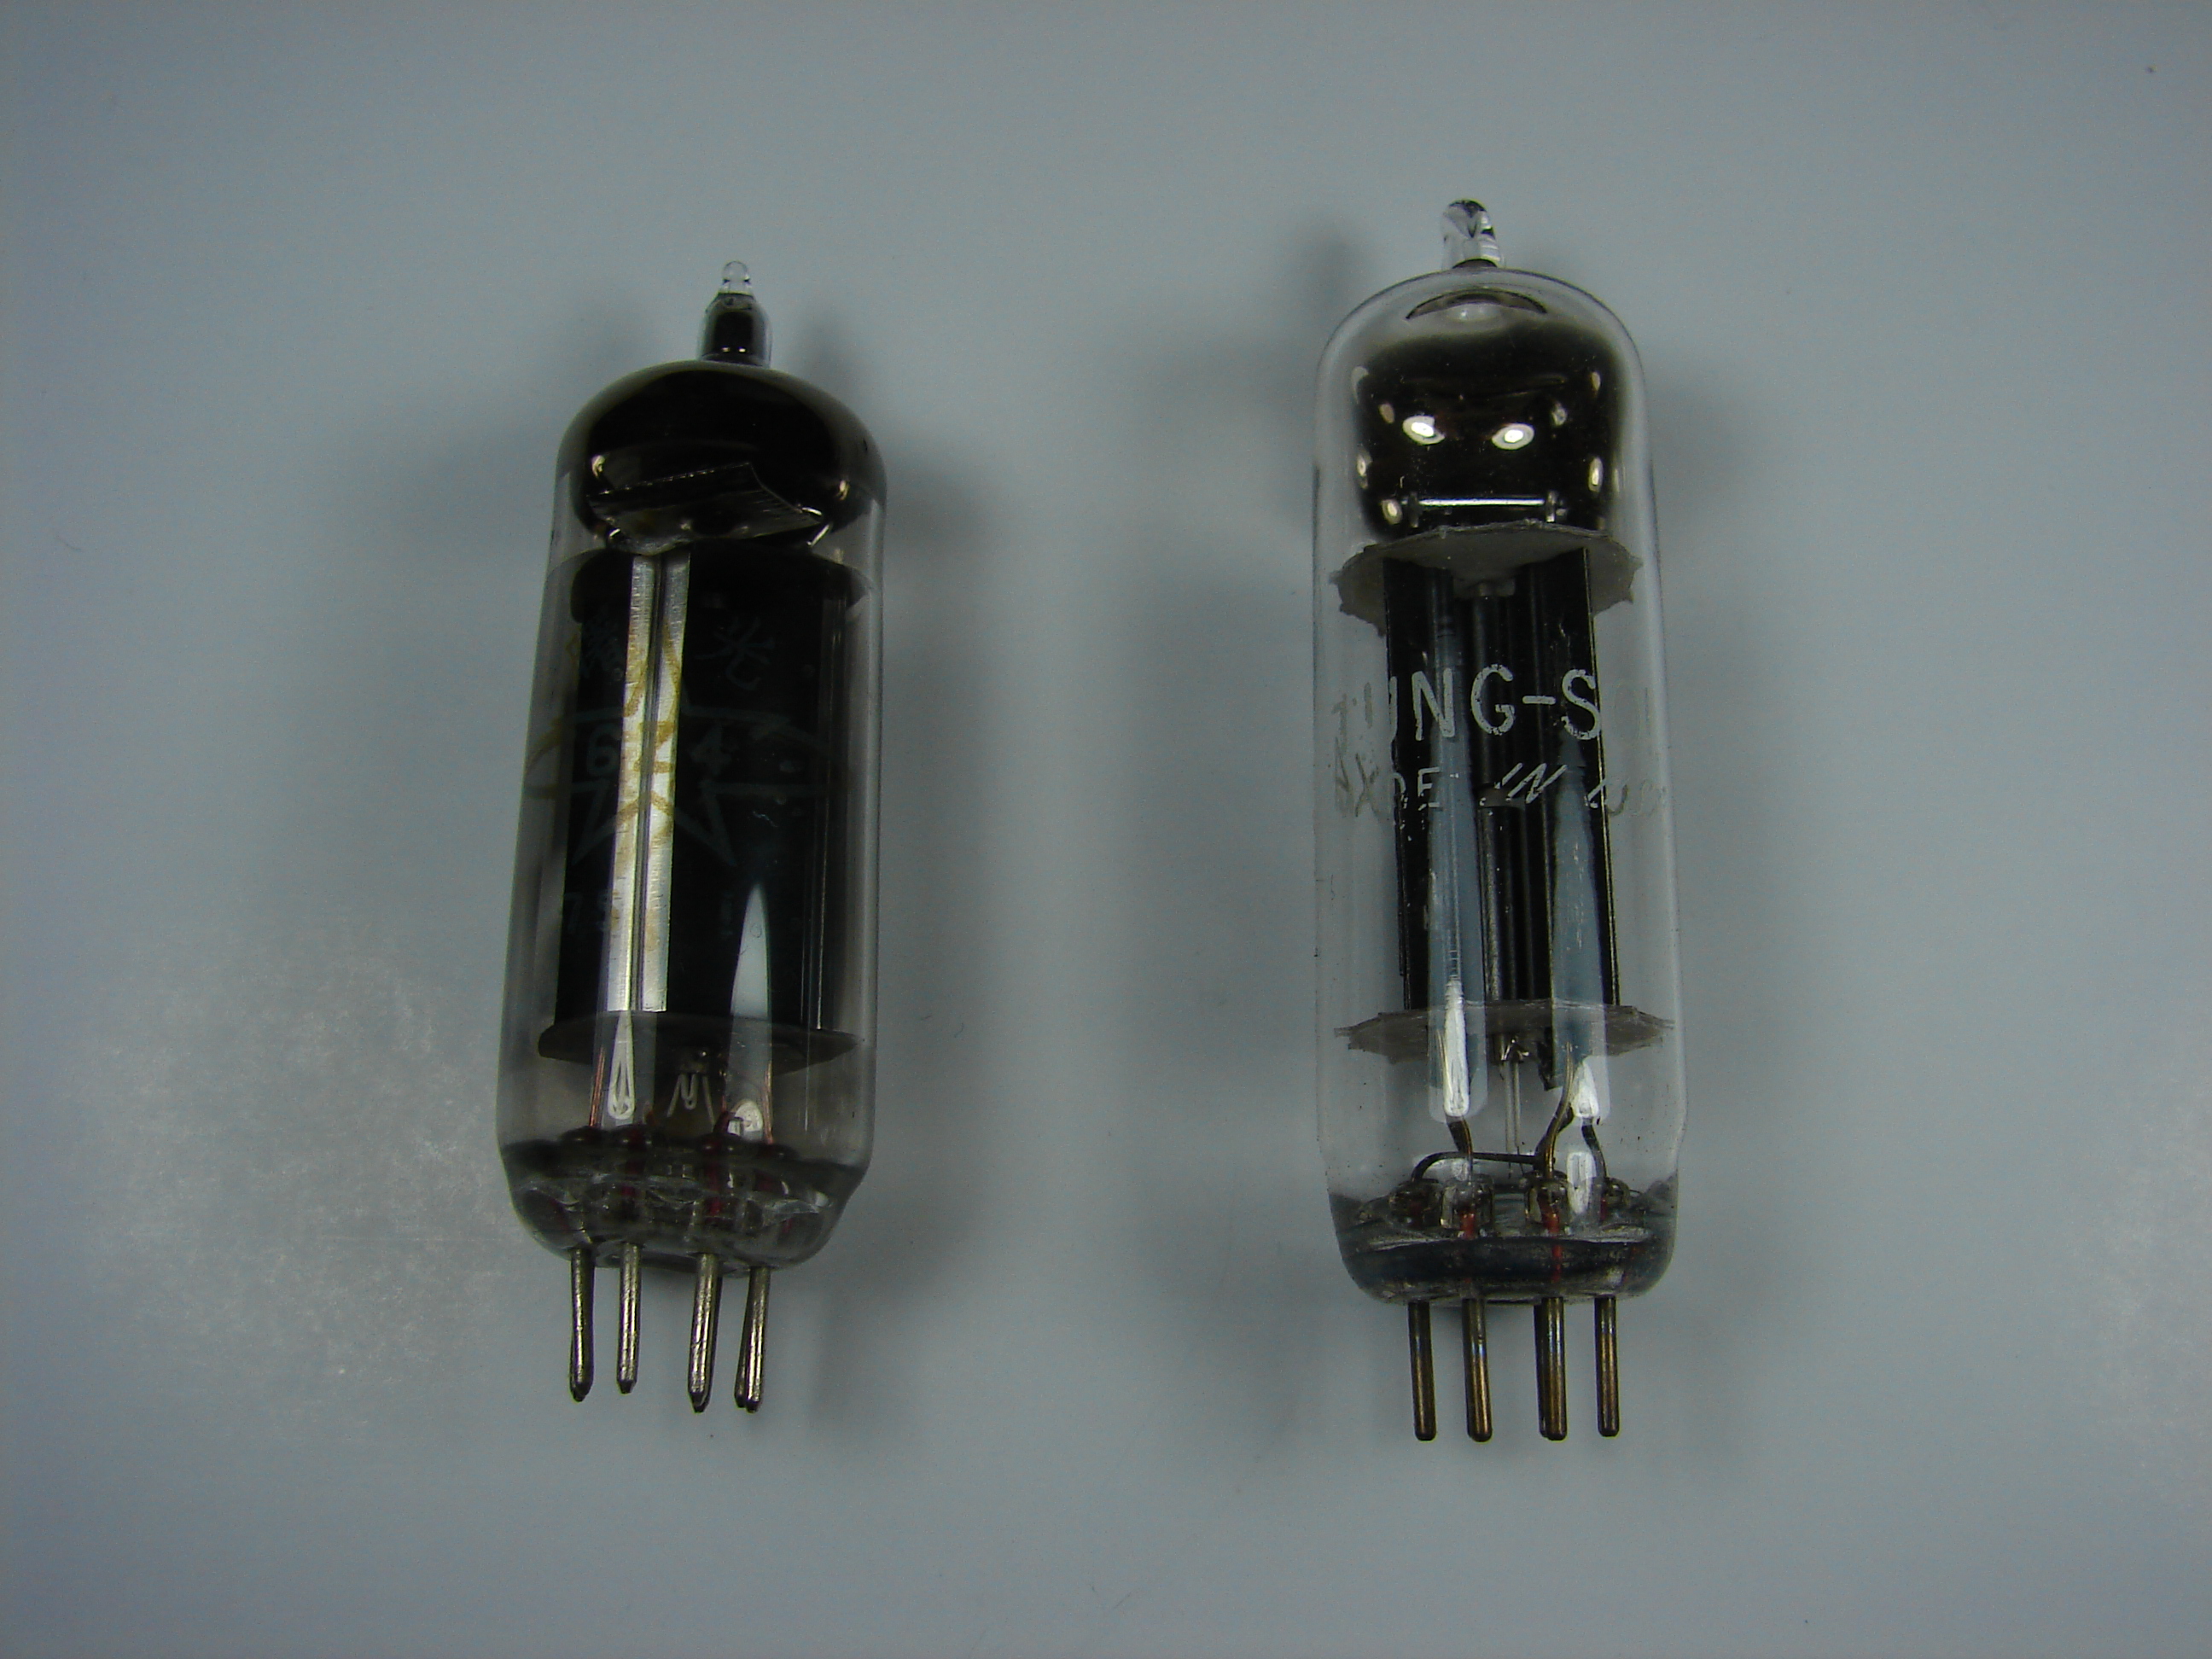
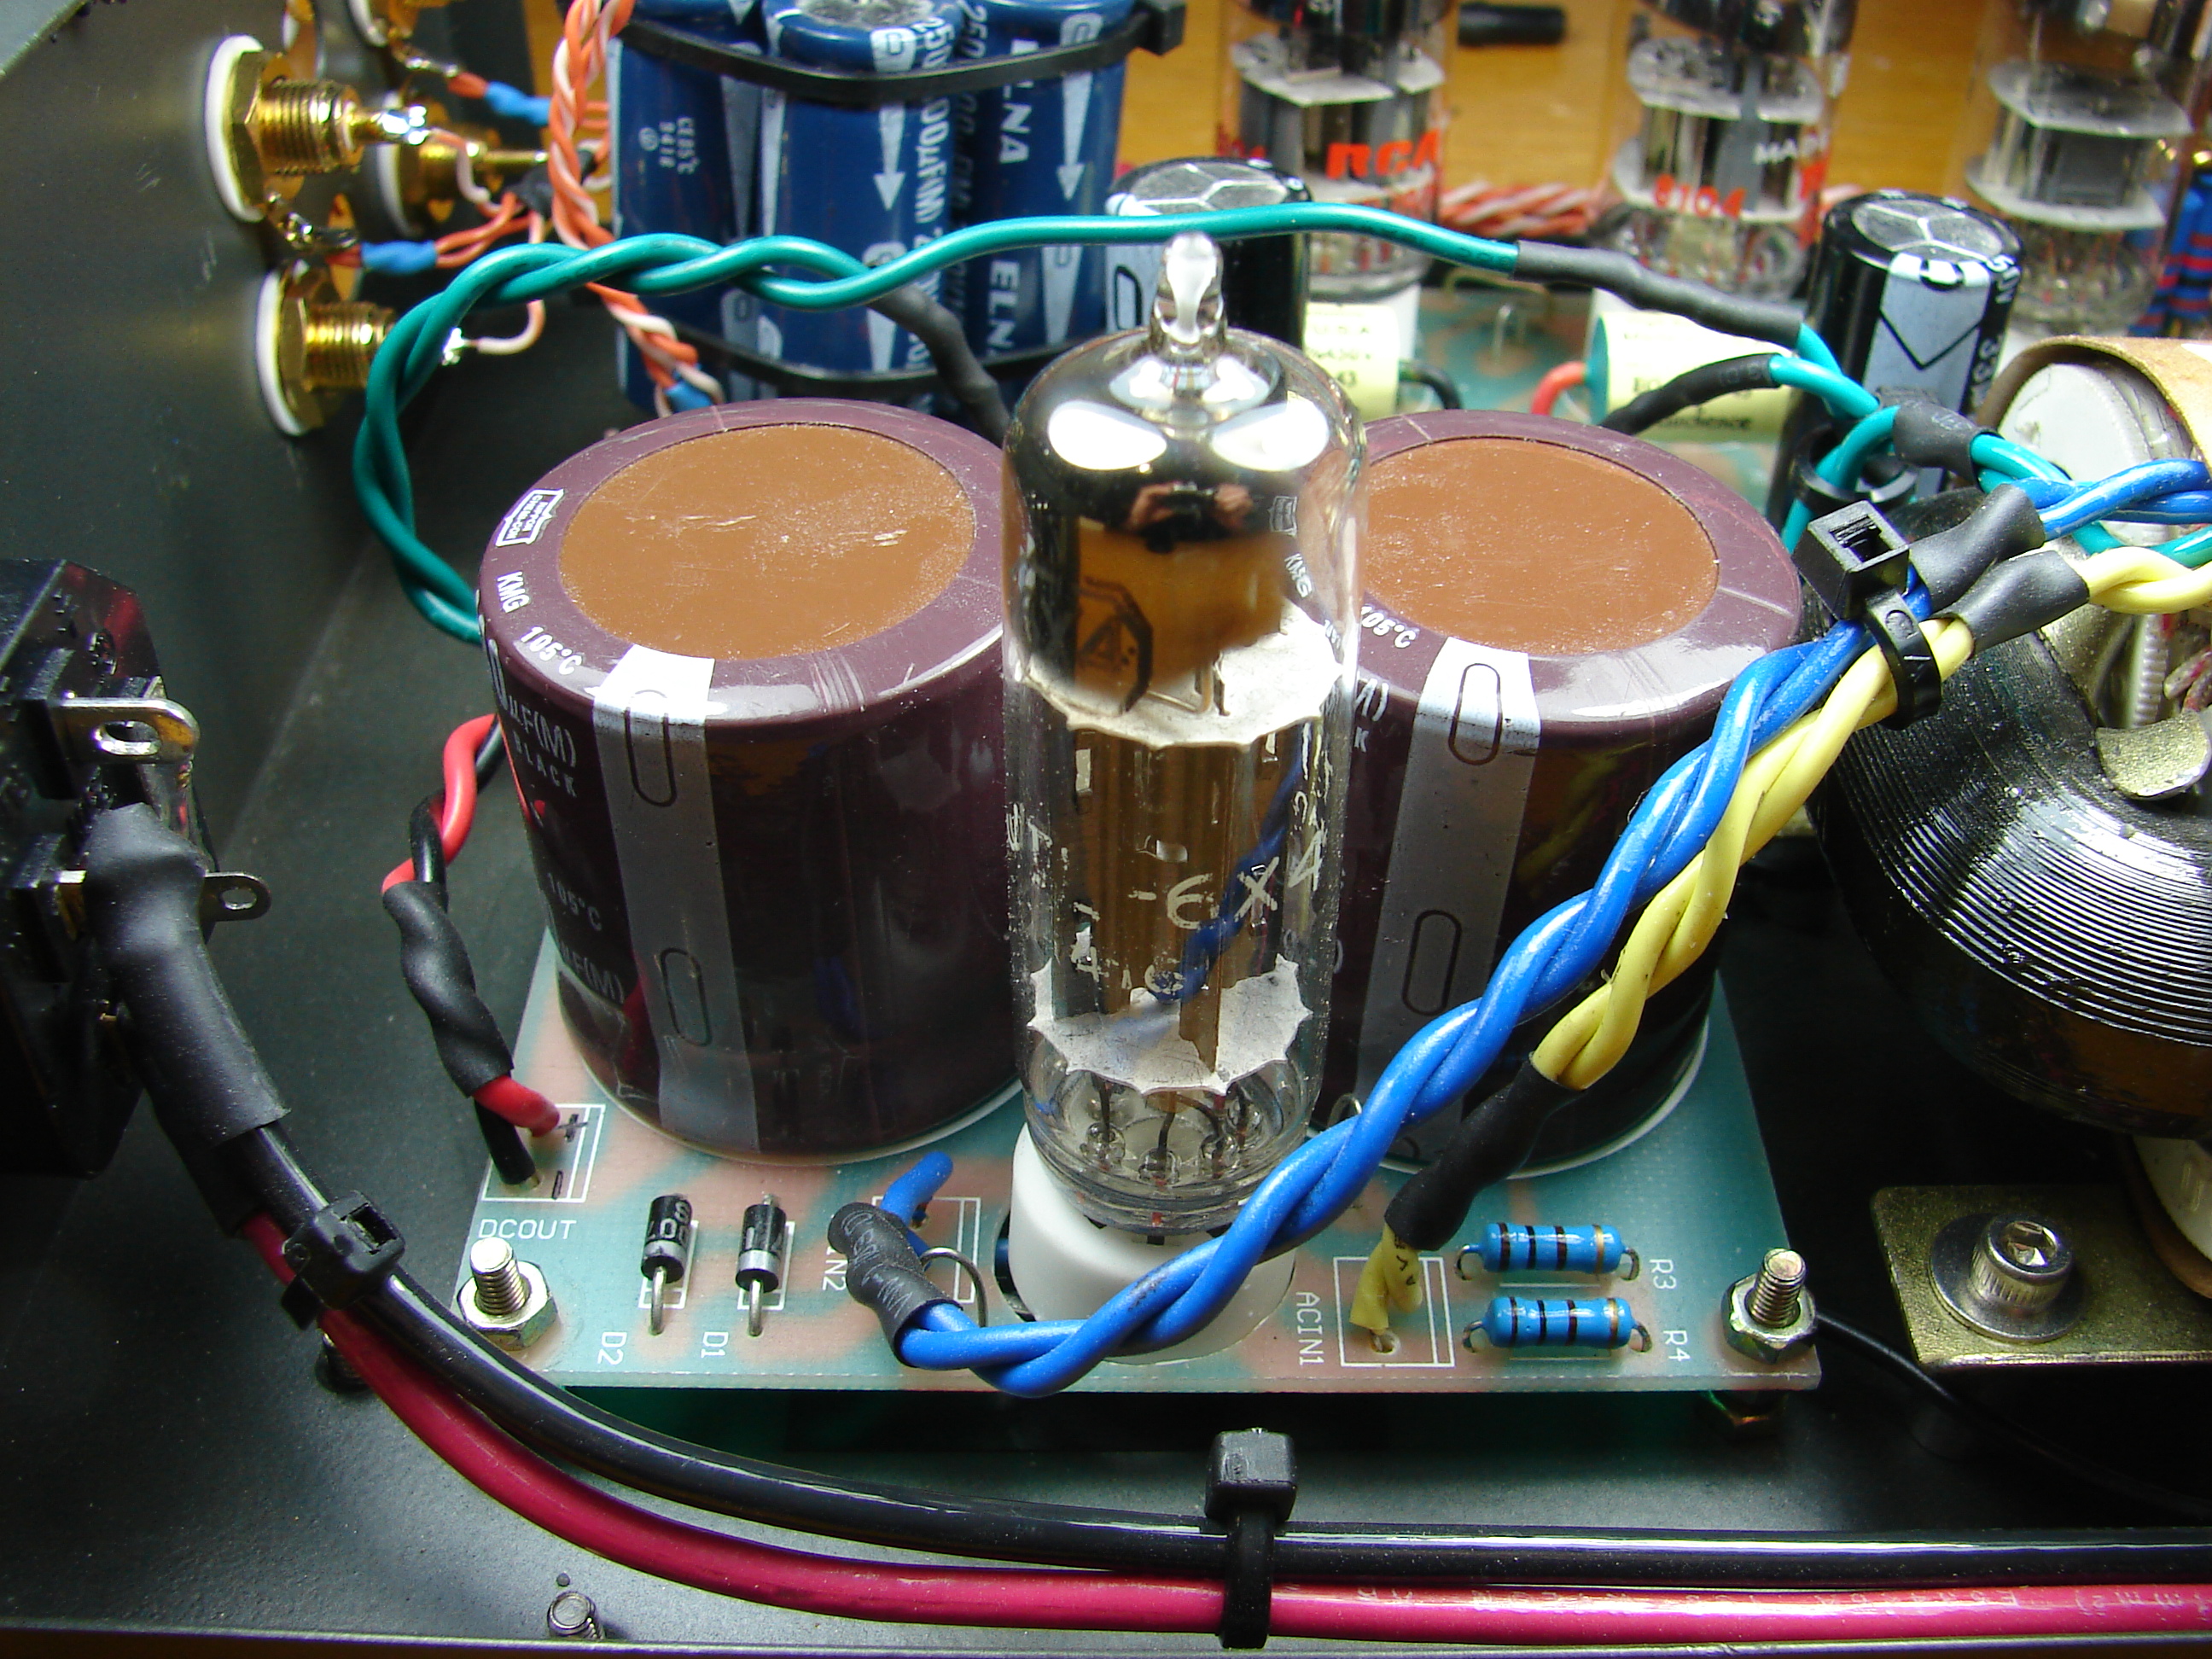
Originally Posted by dcheming /img/forum/go_quote.gif
I finally picked up a 6X4 rectifier tube today. I was planning on building an adapter to use this tube in place of the 6Z4, but they didn't have any 7-pin sockets there. Since I really want to try this much better tube today I've decided to just modify the socket pins on the PS board itself. This mod is pretty easy since the two pins that need to be swapped are in the perfect place to do so. The only thing that I'm worried about is that the heater in the 6X4 draws 600mA which is right at the limit of what the heater winding is rated for. Hopefully the transformer can handle it.
plainface.gif


I'll post my listening impressions later on tonight when I get it done.


Pictures pictures pictures
very_evil_smiley.gif
 
Feb 15, 2007 at 2:46 AM Post #17 of 223
Cool dcheming! I hope that transformer doesn't give you any problems. I'd really hate to hear that it burned up or something.

BTW, look how serious I'm getting with all of this modding! Donated by my father who has about half a dozen different types of these MMs.
biggrin.gif


p750416660-3.jpg
 
Feb 15, 2007 at 6:55 AM Post #19 of 223
What an amazing thread, you are a wonderful tutorial writer! I did not understand about 70% of the posts, but the pictures are nothing short of incredible. What a high level of detail, this amp doesn't have anything left to improve now! Thanks for the good read. =)

That must sound amazing, the best amp I have heard is a go-vibe. I have yet to spend the money to experience a tube amp or a spendy solid state amp.
 
Feb 15, 2007 at 10:02 AM Post #20 of 223
Thanks for the kind words guys.
cool.gif


I was worried that I posted too many pics, but this page doesn't take that long at all to load, with a cable connection at least. My goal with this thread is to make it as easy as possible for anyone looking to mod this amp to find the info that they need. I still have a few more mods that I want to do so I'll be adding additional sections as those progress. If anyone needs more detailed info on what I've already done or if you just have a question feel free to ask.


zer061zer0,

I didn't get a chance to play around with the new rectifier since I was working on another project all night. I'm definitely doing it tomorrow though and I'll be posting detailed pics of the mod procedure to use the 6X4.


Chops,

If the transformer does burn up then I'll have to get one of those Hammonds that we were talking about earlier.
evil_smiley.gif


That's a pretty sweet DMM you got there; blows away my cheap Velleman for sure. You're lucky your dad has so many of them. Even though it's huge I prefer them that way since you can stack it neatly on your workbench shelf as you get more test equipment later.

I also picked up a bunch of different valued 5W and 10W resistors from Norvac today. After I get the 6X4 up and running tomorrow I'm going to play around with adjusting the heater voltage for the audio tubes some more. I'm sure the heater voltage feeding the 6X4 will be too high also so I'll adjust it as well.
 
Feb 15, 2007 at 7:34 PM Post #21 of 223
Guys I have a question for some of you. You are spending quite a bit on things like caps and resistors but all of you seem to have fitted an Alps Blue pot. Whilst it's a decent pot it is by no means the best. Why has nobody tried a Noble or a TKD or an Alps Black? The volume pot is one of the major components that affects sound quality of a pre-amp after all.
 
Feb 15, 2007 at 8:16 PM Post #22 of 223
Excellent tutorial! Very well written and with all the photos it is first rate. Thank you for posting this thread.
 
Feb 15, 2007 at 9:23 PM Post #23 of 223
Quote:

Originally Posted by Miller-8 /img/forum/go_quote.gif
Guys I have a question for some of you. You are spending quite a bit on things like caps and resistors but all of you seem to have fitted an Alps Blue pot. Whilst it's a decent pot it is by no means the best. Why has nobody tried a Noble or a TKD or an Alps Black? The volume pot is one of the major components that affects sound quality of a pre-amp after all.


I got the Blue Velvet way back when I first started modding this amp and I wasn't really sure how much money I wanted to put into it at the time. Considering how much the ALPS helped I think it would definitely be worth it to get an even better one and I would love to try a TKD when I have the money.
 
Feb 15, 2007 at 10:08 PM Post #24 of 223
Quote:

Originally Posted by dcheming /img/forum/go_quote.gif
I got the Blue Velvet way back when I first started modding this amp and I wasn't really sure how much money I wanted to put into it at the time. Considering how much the ALPS helped I think it would definitely be worth it to get an even better one and I would love to try a TKD when I have the money.


x2

I too wanted to wait and see how much the amp improved with the mods I did before deciding to get a TKD or Black Beauty, which BTW I was originally planning on getting before deciding on the Blue Velvet.

However, with the way things have turned out so far with this amp, I'm now very seriously considering the TKD for an upgrade. This amp really IS that good.
cool.gif
 
Feb 16, 2007 at 2:25 AM Post #26 of 223
Well apparently I had looked at the pinout diagram of the 6X4 wrong. I thought this mod would only require two wire jumpers, but one of the two pins that needs to be swapped has to actually be moved to a new spot in the socket itself. Thankfully this extra step is very easy due to the design of the socket.


6X4 Rectifier Modification

Rectifier Pinouts

The difference between the 6Z4 and the 6X4 is that one of anodes and the cathode are connected to different pins. The 6X4 draws 600mA for it's heater and I assume the 6Z4 draws 300mA, but I have no idea since I can't find a data sheet for it.

9934930.jpeg


Stock Layout

Here is the stock layout using the 6Z4 for reference.

9934931.jpeg


Step 1

The first thing you'll have to do is de-solder pin 5 from the PCB. Try to clean the majority of the solder off it too.

9934932.jpeg


Step 2

Bend the pin straight up and remove if through the other side of the socket.

9934933.jpeg


Step 3

Next de-solder pin 7 from the PCB and bend it a bit to the left like shown in the pic.

9934934.jpeg


Step 4

This step is just a safety precaution against possible shorts. Scrape away the corner of the trace near pin 7 as shown in the pic using a heavy Xacto knife or a small file.

9934935.jpeg


Step 5

Craft a little wire jumper similar to the one in the pic. This will be used in step 6.

9934936.jpeg


Step 6

The jumper will be connecting pin 7 to the trace that pin 5 did originally.

9934937.jpeg


Step 7

This is where we reinsert the pin that we took out in step 2. Put it in the hole for pin 6 and bend the tab towards the center of the socket as shown in the pic. To avoid excess play make sure it is fully seated before you bend the tab.

9934938.jpeg


Step 8

Craft a little wire jumper similar to the one in the pic. This will be used in step 9.

9934939.jpeg


Step 9

For the final step, run the little jumper from pin six over to the trace that pin 7 originally connected to as shown.

9934940.jpeg


Comments

This mod is fairly easy to do if you've worked with jumpers before. It's a little tedious to get them to fit right, but just take your time crafting them. If you plan on doing this mod keep in mind that you'll have to disconnect the heater in the 6N1 up front or you will burn up the transformer. The heater winding feeding the 6Z4 and the 6N1 is only rated for 600mA and since the 6X4 draws 600mA by itself, there's no way you can have the 6N1 connected too. You could probably leave the orange LEDs in the front window connected since they draw so little power.

Please be careful about keeping your work clean since these pins carry HV. Needless to say, [size=small]I assume no responsibility or liability for damage to you, your amp, or your other equipment by doing this modification. If you are not confident in your soldering ability PLEASE don't attempt this mod.[/size]


Results

So far everything is running smoothly. I've been listening to the amp for about two hours and the transformer isn't overly warm, but I'll keep a close eye on its temp.

At this early stage, I would say that the amp does indeed sound better with the 6X4. The sound seems a bit more crisp and overall the sound seems a bit more detailed, but I want to give it some more time before I judge it.


Stock 6Z4 vs. Tung-Sol JTL-6X4

9934941.jpeg


PS with 6X4
9934942.jpeg
 
Last edited:
Feb 16, 2007 at 11:19 PM Post #28 of 223
Well I ran the amp for 7 hours last night and the transformer stayed at the same operating temp. So far so good.
smily_headphones1.gif


I measured the heater voltage going to the 6X4 and it was about 7.12VAC. This isn't quite as high as the 7.42VAC that was feeding the audio tubes, but I still want to fix it also. Getting the heaters in the three audio tubes and in the new rectifier to the proper 6.3VAC is the next mod on my list.
 
Feb 16, 2007 at 11:28 PM Post #29 of 223
Since we'll both be lowering the voltage on these heaters and NOT the grids, then the sound should pretty much remain the same. Am I correct?

Also, do you have anymore thoughts on the sound of the new 6X4?

I just remembered something kinda important... I think I might need a 6X4 for myself before I do this socket rewire mod that I was planning on doing this weekend.
blink.gif
 
Feb 17, 2007 at 12:38 AM Post #30 of 223
"Since we'll both be lowering the voltage on these heaters and NOT the grids, then the sound should pretty much remain the same. Am I correct?"

I'm not exactly sure how the sound is affected by going from too high of a heater voltage to normal. I didn't really notice anything dropping down to the 6.63VAC that I'm using now for the audio tubes, but you'll just have to critically listen to yours when you do it to see.

Speaking of dropping voltage, the 6X4 seems to drop more voltage than the 6Z4 did since the B+ now measures around 195VDC instead of around 220VDC. Since the HV was too high due to the 110V transformer anyways, this will probably be for the best. I really need to find out what B+ this amp is supposed to have and go from there.


"I just remembered something kinda important... I think I might need a 6X4 for myself before I do this socket rewire mod that I was planning on doing this weekend."

LOL! I was actually thinking last night how easy it would be to do this mod and forget this fact.
tongue.gif
That would be a bummer for sure since your amp would down until you got a 6X4.
 

Users who are viewing this thread

Back
Top