iPod/iPhone LOD Internals Gallery
Mar 26, 2009 at 11:42 PM Post #16 of 55
here's mine, just for a 3g nano and a 6th gen classic 160gb so doesn't feature the resistor. Very first bit of soldering and diy ever, hence its ina fat lod, I used up all the slim ones I had pulling the wrong pins out by mistake
frown.gif
lol, this lod uses just pins 2,3 and 4

do the ones which have the resistor and will allow use with a 2nd gen iphone work with all iphones and ipods i.e. its a universal ipod/iphone lod?

DSC02825.jpg
 
Mar 26, 2009 at 11:50 PM Post #17 of 55
Quote:

Originally Posted by dazzer1975 /img/forum/go_quote.gif
do the ones which have the resistor and will allow use with a 2nd gen iphone work with all iphones and ipods i.e. its a universal ipod/iphone lod?


I've tested on all but a 1st Gen iPhone, so other than that, the answer is yes it's universal. So if you think you might use one in the future, may as well put a 4 cent resistor in there just in case!
 
Mar 26, 2009 at 11:53 PM Post #18 of 55
Quote:

Originally Posted by Good Times /img/forum/go_quote.gif
So if you think you might use one in the future, may as well put a 4 cent resistor in there just in case!


exactly, only made one lod so far but if the resistor makes it a universal, its a no brainer to use that for future upgrades etc.

Thanks for that mate.
 
Mar 28, 2009 at 4:10 PM Post #21 of 55
hey guys; got some internal shots for yas. the putty is still curing, so no finished pics yet; but was really happy with this result for use with a T4

used a 22k and 47k in series as I dont have any 68k resistors at the moment; need to go to Jaycar to pick some cheapies up as they arent in the signal path there is no need to go audiophile on it. sorry about the crappy pics

beforewires.jpg
kept it nice and flush to the connector as this is for a low profile version. also see I have trimmed off one side to allow it to be even closer and all pins bar the audio pins are also trimmed right down

wireson.jpg


readyforshrink.jpg

^^ added the wires with ground going down first and connecting both ground wires to the solder bridge between 11->15


epoxysealed.jpg


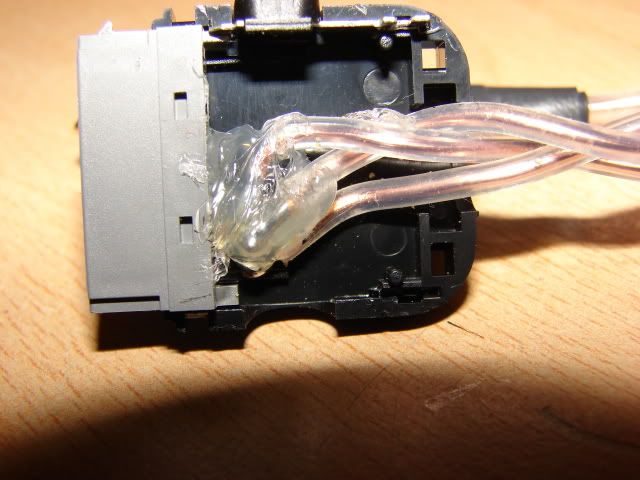
^^ added some epoxy; you can clearly see how I have stacked both silver ground wires on top of each-other to use the space as efficiently as possible. and at this point I added some epoxy to the solder joints and insulated them with heatshrink. I didnt bother with the silver grounds as they are bothe grounds anyway so they dont really need to be insiulated from each0other; just the others. the epoxy helps with strain relief but also in the case of jena or other clear coated chigh purity copper this seals it off from the air to avoid discoloration

epoxyadded.jpg


^^ all ready to be braided

skipped a few steps here, but this isnt a tutorial; if people would like a full tutorial let me know; I have pretty much enough pics to do it properly. at this stage obviously i have terminated it and added shrink for strain relief on the mini which has also been modified by trimming the casing down about 5mm-7mm. for this application the straight mini was more suitable for use with the T4 than a RA, as its very slim and will sit right back flush with the top of the iphone. it needs to plug in at the amp at 37mm so pretty close
tongue.gif


so anyway i'll add the finished LOD pics when its all shaped and given its enamel and resin coat
actually probably cant post any more pics as i'm an MOT. i'll have to clarify if I can post a full tutorial with jude or whether I would have to pay to do that LOL
 
Mar 28, 2009 at 6:19 PM Post #23 of 55
its the regular slimlibne one. not the new smallest one, but the thin shielded one. I get all my LOD connectors from qables as if you live outside of the EU they are the cheapest. also I really like dealing with hans; hes a top guy. I dont use the case though; only the innards as I use epoxy putty to form a solid plastic case and then carve/sand into shape; I do this to allow me to use thicker wire
 
Mar 28, 2009 at 11:14 PM Post #25 of 55
I'll take a pragmatic approach: if it works, it works. As long as the tolerance keeps it to whatever the iPhone pins require, you're good. I don't believe anyone's done any hard testing to see what range of resistance is allowable for the iPhones and iPod touches (66k to 68k seems to be the concensus), so you'll have to guess judging from what people have been posting. 68k seems to be the central figure, so you probably want to keep the tolerance tighter than not. Maybe it's too early to tell since we've only known about this resistor value for so long.

Lots of wind later: You could probably put any old resistor there, but you don't want just any old resistor.
 
Mar 29, 2009 at 2:54 AM Post #26 of 55
69 also works I used 47+22 in that LOD ^^ i've done that twice and its worked both times
 
Mar 29, 2009 at 9:12 AM Post #27 of 55
I usually use 68k 1% but got stuck once and had to go to Dick Smith (!) who had 5%. They were fine.

Quality is not an issue as qusp says, there's no audio going through them, it's just switching the ipod's mode.
 

Users who are viewing this thread

Back
Top