


bigfatpaulie
Headphoneus Supremus
Hello,
Hardwiring my HD800's is something I've long considered and I have never seen a full complete guide on how to do it. I get the impression that there is an unspoken rule of if you aren't confident enough to do it on your own, don't do it. Maybe that's a good rule.
Anyway, I finally summoned up the courage to do it to mine today. What really urged me to do it was the right connector was loose on my HD800's and the cable kept slipping out dropping the channel which became very annoying. That, and the price of them used is pretty low so if I messed them up it wasn't the end of the world!
So here it is.
First, the 'donation' cable. It's an OCC copper Double Helix Complement 4, 10 feet long with a 4 pin Eidolic connector. I've had this cable for years and despite also having the silver version of the Complement 4, this one is really my favorite with the HD800's. I don't think I would ever replace it so I feel good permanently joining the two. Some people would call this is crazy. Some people might be right.

As with any project, I planned it out first and gathered everything I would need. Pretty basic stuff, a soldering iron, helping hands, pliers, strippers, a small (special) screw driver, a multimeter to test for continuity, zip ties for strain relief and so on.

The first step was disassembling the HD800's. The first thing to do is remove the dust guard. That just pulls out. The pads also have to be removed and they also just pull out. You have to just go for it. Taking the pads off the HD800's is like asking a girl out - you just have to go for it and with confidence.

Next we have to remove the cups from the headband but we are met with some odd screws...

Hmmm... I have a myriad of odd fiddly screw drivers and nothing seemed to work - except one. That's right, that 'special' screwdriver.

Yes, that is a tri-tipped screw driver. Where did I get such an oddity? Ebay for about $1.99 including shipping. It's designed to open Nintendo security screws so just search for "Nintendo Screwdriver" and order anyone. What are the odds?!
Here is the full assembly, well, disassembled.

Next we have to remove the silver plastic ring from the inner driver cup. That just pops off, much like the pads.

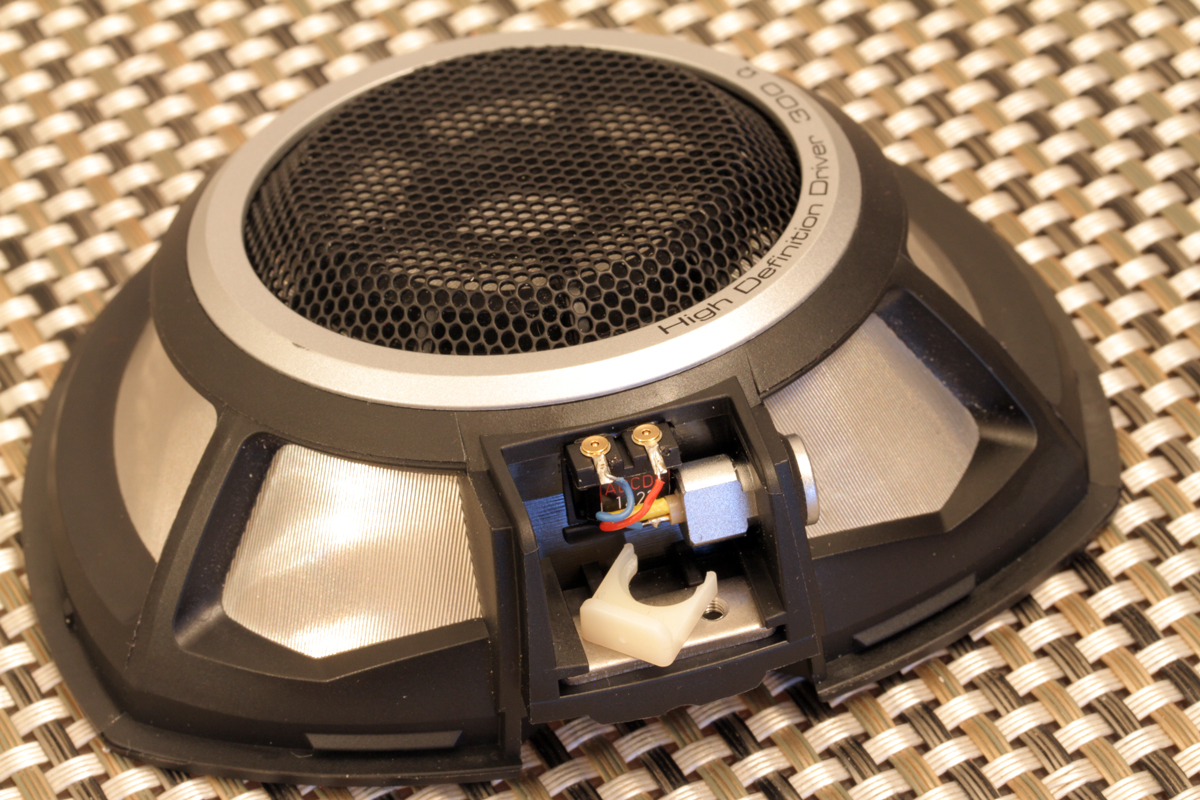
Now we are faced with the real enemy, the wiring.

Take note which wire goes where - each driver doesn't match, believe it or not. Next we have to remove the connector tube.

That white plastic U clip just pulls out.

And the tube is friction set in the cup so just gently pull it out with plyers.
The next step was to get the cable ready. I have a newfound respect for DHC's stuff. This thing was surprisingly well made. Three layers of shrink wrap and each wire was wrapped with teflon. The workmanship is really exceptional on these cables. I very much appreciate where so much of the cost goes.

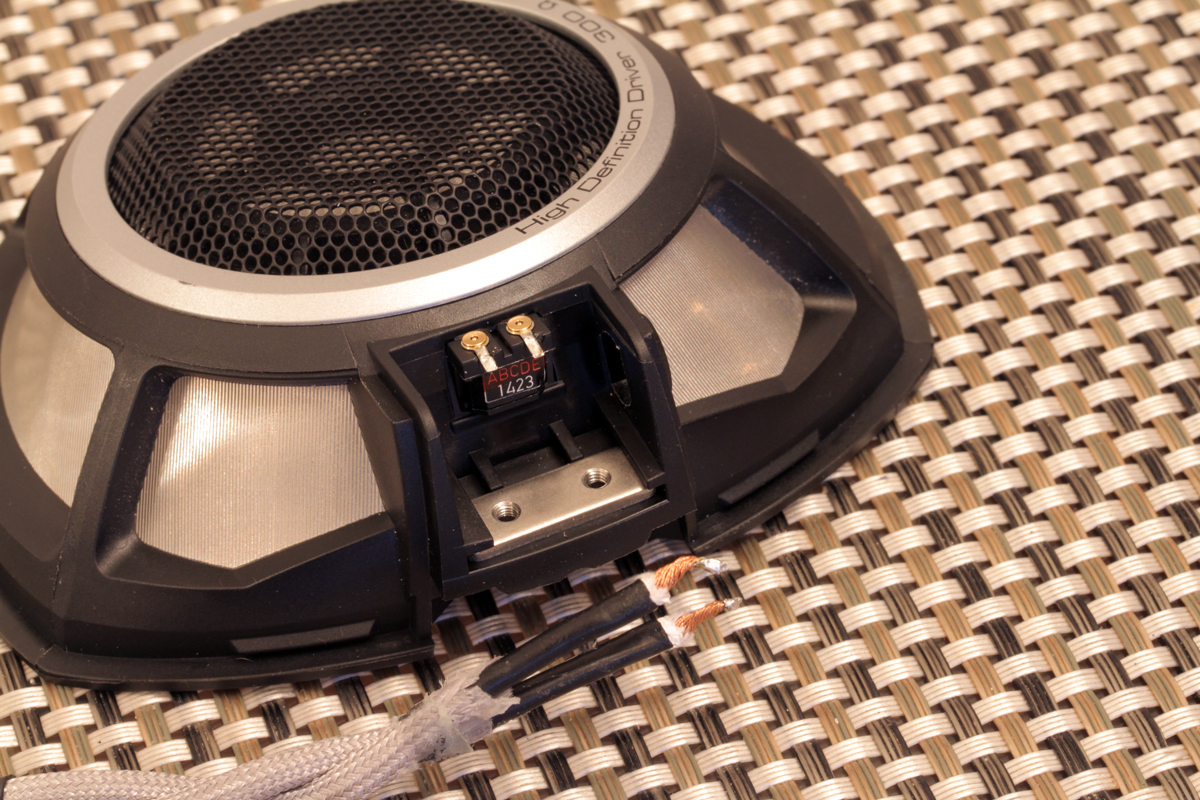
Again, make note of which wire goes to which pin on the connector and with which pin that corresponds to on the driver. I don't know if it really matters in all honestly, but I did it. So here you go, all ready for the scary soldering part. You have to be delicate here because you don't want to melt the super thin wires or driver inside the HD800.

After carefully pulling the cable through the bottom hole, I very gingerly did it. I tested for continuity, then plugged them for a quick sound test and SUCCESS! I also pre-tinned the wire and I think that is the way to go.

Rinse and repeat with the other side, reassemble everything and add in your strain relief. In my case I used zip ties.

And we are done! A fully working hardwired HD800!

The whole process took about an hour and the results are really surprising. I didn't think it would make a difference but the clarity of the drivers has undeniably improved. There is absolutely a sonic benefit to this mod, and that was something I was not expecting!
Anyway, there you go! Happy modding!
-Paul
Hardwiring my HD800's is something I've long considered and I have never seen a full complete guide on how to do it. I get the impression that there is an unspoken rule of if you aren't confident enough to do it on your own, don't do it. Maybe that's a good rule.
Anyway, I finally summoned up the courage to do it to mine today. What really urged me to do it was the right connector was loose on my HD800's and the cable kept slipping out dropping the channel which became very annoying. That, and the price of them used is pretty low so if I messed them up it wasn't the end of the world!
So here it is.
First, the 'donation' cable. It's an OCC copper Double Helix Complement 4, 10 feet long with a 4 pin Eidolic connector. I've had this cable for years and despite also having the silver version of the Complement 4, this one is really my favorite with the HD800's. I don't think I would ever replace it so I feel good permanently joining the two. Some people would call this is crazy. Some people might be right.
As with any project, I planned it out first and gathered everything I would need. Pretty basic stuff, a soldering iron, helping hands, pliers, strippers, a small (special) screw driver, a multimeter to test for continuity, zip ties for strain relief and so on.
The first step was disassembling the HD800's. The first thing to do is remove the dust guard. That just pulls out. The pads also have to be removed and they also just pull out. You have to just go for it. Taking the pads off the HD800's is like asking a girl out - you just have to go for it and with confidence.
Next we have to remove the cups from the headband but we are met with some odd screws...
Hmmm... I have a myriad of odd fiddly screw drivers and nothing seemed to work - except one. That's right, that 'special' screwdriver.
Yes, that is a tri-tipped screw driver. Where did I get such an oddity? Ebay for about $1.99 including shipping. It's designed to open Nintendo security screws so just search for "Nintendo Screwdriver" and order anyone. What are the odds?!
Here is the full assembly, well, disassembled.
Next we have to remove the silver plastic ring from the inner driver cup. That just pops off, much like the pads.
Now we are faced with the real enemy, the wiring.
Take note which wire goes where - each driver doesn't match, believe it or not. Next we have to remove the connector tube.
That white plastic U clip just pulls out.
And the tube is friction set in the cup so just gently pull it out with plyers.
The next step was to get the cable ready. I have a newfound respect for DHC's stuff. This thing was surprisingly well made. Three layers of shrink wrap and each wire was wrapped with teflon. The workmanship is really exceptional on these cables. I very much appreciate where so much of the cost goes.
Again, make note of which wire goes to which pin on the connector and with which pin that corresponds to on the driver. I don't know if it really matters in all honestly, but I did it. So here you go, all ready for the scary soldering part. You have to be delicate here because you don't want to melt the super thin wires or driver inside the HD800.
After carefully pulling the cable through the bottom hole, I very gingerly did it. I tested for continuity, then plugged them for a quick sound test and SUCCESS! I also pre-tinned the wire and I think that is the way to go.
Rinse and repeat with the other side, reassemble everything and add in your strain relief. In my case I used zip ties.
And we are done! A fully working hardwired HD800!
The whole process took about an hour and the results are really surprising. I didn't think it would make a difference but the clarity of the drivers has undeniably improved. There is absolutely a sonic benefit to this mod, and that was something I was not expecting!
Anyway, there you go! Happy modding!
-Paul


