crinacle's IEM FR measurement database
Mar 31, 2018 at 4:15 PM Post #751 of 1,335
I have warned anyone I could about that issue in the past. I hope your experience will serve as a lesson for new comers too. Thanks for the heads up and sorry for your loss.

I'm back, with a new iMM-6 microphone. But this time I reinforced it so it is impossible to fall apart at the tip.

I wanted to share how I did it, as I know many others use the iMM-6.

The body of the iMM-6 is made of rubbery plastic (or is it plasticy rubber lol). But the cap at the end (that holds the microphone capsule) is aluminum. The only thing holding it on is glue. While this is fine for open air measurements, there is a high risk of the cap separating from the rubber body when repeatedly inserting and removing the iMM-6 in various couplings for FR measurement.

The basic idea is to insert (2) small screws, mechanically binding the aluminum cap to the body. This way, the risk of ripping the cap from the microphone body is eliminated when you push/pull/twist the microphone to insert/remove it in and out of couplers.

You'll need to find some small screws - I'm talking ridiculously small screws. Like the ones that are commonly used with various laptops components. They are generally around 1.25mm-1.5mm in diameter. The difference is the laptop ones are usually machine thread - you want non-machine thread (like the threads of a wood screw or drywall screw).

I used recycled screws (whenever I have electronics that go bad, I try and salvage anything of use from them (li-ion batteries, LEDs, electrical components, etc). I have a collection of hundreds of various ridiculously-tiny screws, nuts, bolts, etc - they take up hardly any room, and are useful for many projects like this (I keep them all in an empty pill bottle). If you don't have anything like that, I'm sure you can buy screws on Aliexpress (look for M1.25 or M1.5 screws, but make sure they're not machine thread).

The LENGTH is the critical part. They MUST between 2mm-2.25mm in length. Any longer, and you will damage the wiring. The absolute longest they can be is 2.5mm, so that's why I say 2.25mm max. That gives you a 0.25mm margin of error on each side (which is not very much, but if you follow my directions it will be perfectly fine). If you need to shorten your screws, do so (I had to shorten mine, because they were 3mm long). I just cut them down using wire cutters, and sanded the end smooth using a Dremel tool sanding drum.

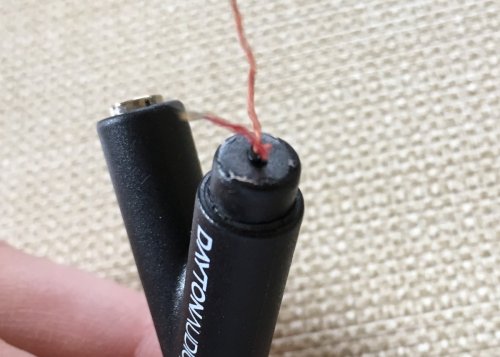
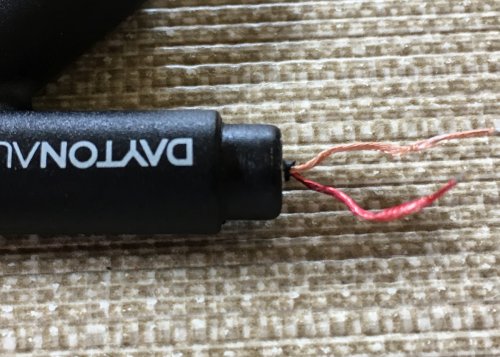
So to get an idea of where we will be adding the screws, I'll show you what we're dealing with by showing my 1st iMM-6 that ripped apart. See the area by the wires? See how it's encased in a section of solid rubbery plastic? This is where we are going to insert the screws. The key is going deep enough to sufficiently bite into the iMM-6 body, but not deep enough to cut into the wires.
IMG-1475.JPG
IMG-1476.JPG

You also need some micro drill bits. You can order them on Aliexpress for about $2/set. I have an assorted set of carbide micro bits that range in size (graduated from 0.3mm to 1.2mm). Alternatively, if you own a Dremel tool, you may already have similar drill bits (if not, you can buy an assortment set made by Dremel as well).

You need to drill a hole through the thin aluminum cap ONLY, using a bit that is barely larger than the diameter of your screw shaft. So for example, if your screw has a 1.5mm diameter, make the hole in the aluminum cap 1.75 mm. Be sure you don't drill into the rubber body - your objective is to only pierce through the aluminum cap.

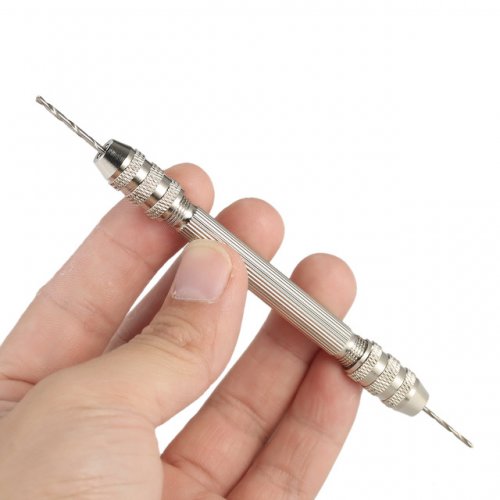
Also, you will be drilling all holes by hand. Use a twist drill mandrel for the drilling (you can buy on Aliexpress for a dollar or so). If your drill bits are sharp enough, and you go slow enough, this will only take a few seconds of twisting per hole.

Here is what a twist drill mandrel looks like (also called a twist drill pin vice):
twist-drill-holder.jpg

Here's a link to one that includes the pin vice and micro drill bits: https://www.aliexpress.com/item/Min...teel-Drill-Bit-Holder-Double/32818707913.html

You'll be making (2) holes in the aluminum cap - 1 on each side (ie 180 degrees opposite to one another).

Once you have made your small hole in the aluminum cap, use a SMALLER drill bit to drill a very small pilot hole into the rubber body. Again, I used my twist drill mandrel for this, and only drilled into the rubber body 2mm max. As far as drill bit diamater, if for example your screw has a 1.5mm diameter, use a 1mm drill to make the pilot hole in the rubber body. This will give plenty of rubber for the screws to bite into and secure the cap nice and tight.

Once you have all of your holes, it's a simple matter of inserting the screws and gently tightening them (you can use a drop of loctite or super glue as extra measure if you wish, but I found it unnecessary). If you over tighten the screws however, you will strip the fragile rubber and you are screwed (no pun intended).

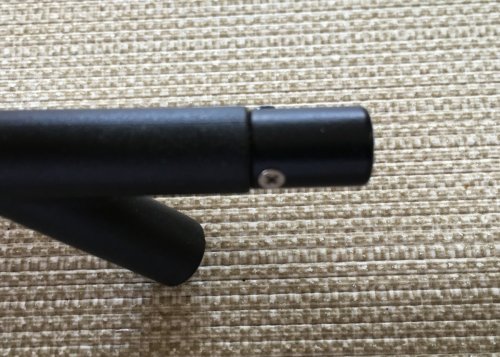
Here is the finished product (on the new iMM-6, not the ripped apart one). It should be bulletproof now :)

IMG-1477.JPG
IMG-1478.JPG

If you attempt this, you do it at you own risk. I'm not trying to scare you, as it worked perfectly fine for me. But if you use screws that are big or too long, drill into the rubber body deeper than 2.5mm, or use anything over than your hands, overtighten the screws, etc I cannot be to blame.

But learn from my exprerience (and others). I'm out $25 for the 1st destroyed mic, and another $25 for the replacement mic. Spend a few dollars and a few minutes of your time and protect your investment.
 
Last edited:
Mar 31, 2018 at 4:40 PM Post #752 of 1,335
I'm back, with a new iMM-6 microphone. But this time I reinforced it so it is impossible to fall apart at the tip.

I wanted to share how I did it, as I know many others use the iMM-6.

The body of the iMM-6 is made of rubbery plastic (or plasticy rubber). But the cap at the end (that holds the microphone capsule) is aluminum. The only thing holding it on is glue. While this is fine for open air measurements, there is a high risk of the cap separating from the rubber body when repeatedly inserting and removing the iMM-6 in various couplings for FR measurement.

The basic idea is to insert (2) small screws, mechanically binding the aluminum cap to the body. This way, when you pull on the microphone to remove it from the coupling, there is no risk of the cap pulling off of the microphone body.

You'll need to fine some small screws - I'm talking like ridiculously small screws. Like the ones that are commonly used with various laptops components. They are generally around 1.25mm-1.5mm in diameter or so. The difference is the laptop ones are usually machine thread - you want non-machine thread (like the threads of a wood screw or drywall screw).

The LENGTH is the critical part. They MUST between 2mm-2.25mm in length. Any longer, and you will damage the wiring. The absolute longest they can be is 2.5mm, so that's why I say 2.25mm max. That gives you a 0.25mm margin of error on each side (which is not very much, but if you follow my directions it will be perfectly fine). If you need to shorten your screws, do so (I had to shorten mine, because they were 3mm long). I just cut them down using wire cutters, and sanded the end smooth using a Dremel tool sanding drum.

So to get an idea of where we will be adding the screws, I'll show you what we're dealing with by showing it on my 1st iMM-6 that ripped apart. See the area by the wires? See how it's encased in a section of solid rubbery plastic? This is where we are going to insert the screws. The key is going deep enough to sufficiently bite into the iMM-6 body, but not deep enough to cut into the wires.


You also need some micro drill bits. You can order them on Aliexpress for about $2/set. I have an assorted set of carbide micro bits that range in size (graduated from 0.3mm to 1.2mm). Alternatively, if you own a Dremel tool, you may already have similar drill bits (if not, you can buy an assortment set made by Dremel as well).

You need to drill a hole through the thin aluminum cap ONLY, using a bit that is barely larger than the diameter of your screw shaft. So for example, if your screw has a 1.5mm diameter, make the hole in the aluminum cap 1.75 mm. Be sure you don't drill into the rubber body - your objective is to only pierce through the aluminum cap.

Also, you will be drilling all holes by hand. Use a twist drill mandrel for the drilling (you can buy on Aliexpress for a dollar or so). If your drill bits are sharp enough, and you go slow enough, this will only take a few seconds of twisting per hole.

Here is what the twist drill mandrels look like (also called a twist drill pin vice):


Here's a link to one that includes the pin vice and micro drill bits: https://www.aliexpress.com/item/Min...teel-Drill-Bit-Holder-Double/32818707913.html

You'll be making (2) holes in the aluminum cap - 1 on each side (ie 180 degrees opposite to one another).

Once you have made your small hole in the aluminum cap, use a SMALLER drill bit to drill a very small pilot hole into the rubber body. Again, I used my twist drill mandrel for this, and only drilled into the rubber body 2mm max. As far as drill bit diamater, if for example your screw has a 1.5mm diameter, use a 1mm drill to make the pilot hole in the rubber body.

Once you have all of your holes, it's a simple matter of inserting the screws and gently tightening them (you can use a drop of loctite or super glue as extra measure). If you over tighten the screws however, you will strip the fragile rubber and you are screwed (no pun intended).

Here is the finished product. Bulletproof.


If you attempt this, you do it at you own risk. I'm not trying to scare you, as it worked perfectly fine for me. But if you use screws that are big or too long, drill into the rubber body deeper than 2.5mm, or use anything over than your hands, overtighten the screws, etc I cannot be to blame.

My unit is shipping to me and this is perfect timing really, thanks for the info. I will be extra careful with it and I will try to protect that connection but I'm not going to use screws (mostly to avoid ruining my day if something were to go wrong, not that I couldn't just buy a new one but still). I was thinking - maybe use super glue and put some thin cloth around the metal/plastic contact which acts like plastic once dried. Maybe this could give it enough additional protection while avoiding the chance to damage anything. This is just an idea, can't say that it would work.
 
Mar 31, 2018 at 4:57 PM Post #753 of 1,335
My unit is shipping to me and this is perfect timing really, thanks for the info. I will be extra careful with it and I will try to protect that connection but I'm not going to use screws (mostly to avoid ruining my day if something were to go wrong, not that I couldn't just buy a new one but still). I was thinking - maybe use super glue and put some thin cloth around the metal/plastic contact which acts like plastic once dried. Maybe this could give it enough additional protection while avoiding the chance to damage anything. This is just an idea, can't say that it would work.

It could work, but it's doubtful.

The issue is that glue is a poor way to join those dissimlar materials - rubbery plastic/plasticy rubber is one of the most difficult materials to bond. Super glue won't cut it.

There is 1 more way to do it DIY. You could mechanically "pin" the cap to the body. It would involve drilling 2 parallel holes through the body, and driving in a wire/pin (a small paper clip would be perfect). Then you just snip off any excess. The wire/pins would be friction fit. This is common in the machining, tool, and automotive industry (look up "roll pins", "wire lock fastener", etc).

You would be drilling the holes away from the wires, parallel to one another, like this crude illustration:

Untitled drawing.jpg

Also, be aware that the risk of the cap ripping apart is highest if you are constantly inserting/removing your mic from couplers. If you simply insert it into your couper (say a piece of tubing), and leave it there (basically permanently), you will be fine.

I was breaking down my testing rig for storage every time, as well as testing numerous different types of couplers. I inserted and removed my 1st mic probably 50+ times into various couplers before it ripped apart.

Dayton Audio could easily fix this during manufacturing. In addition to gluing it, they could crimp the aluminum cap on at the bottom, causing the bottom lip of the aluminum cap to fold inwards and "bite" into the rubber body. But that would be something that would have to happen during manufacture, and it isn't realistically going to happen.
 
Last edited:
Mar 31, 2018 at 5:36 PM Post #754 of 1,335
It could work, but it's doubtful.

The issue is that glue is a poor way to join those dissimlar materials - rubbery plastic/plasticy rubber is one of the most difficult materials to bond. Super glue won't cut it.

There is 1 more way to do it DIY. You could mechanically "pin" the cap to the body. It would involve drilling 2 parallel holes through the body, and driving in a wire/pin (a small paper clip would be perfect). Then you just snip off any excess. The wire/pins would be friction fit. This is common in the machining, tool, and automotive industry (look up "roll pins", "wire lock fastener", etc).

You would be drilling the holes away from the wires, parallel to one another, like this crude illustration:


Also, be aware that the risk is highest if you constantly insert and remove your mic. If you insert it into your couper (say a piece of tubing), and leave it there, you will be fine.

I was breaking down my testing right for storage every time, as well as testing numerous different types of couplers. So I inserted and removed my 1st mic probably 50+ times into various couplers before it ripped apart.

Dayton Audio could easily fix this during manufacturing. In addition to gluing it, they could crimp the aluminum cap on at the bottom, causing the bottom lip of the aluminum cap to fold inwards and "bite" into the rubber body. But that would be something that would have to happen during manufacture, and it isn't realistically going to happen.

I think that screw method is better because it's less intrusive. I have a hard time understanding the use of glue instead of a small screws like you did, but ok, we are getting a solid mic for a very small amount of money. I can't guarantee that I won't be trying a bunch of diy couplers before I settle for one, but even if I could, I would never trust glue to do the job in this case due to material of the housing.

I have to say that I didn't even notice the metal before your previous post, I thought that it was all one solid piece of plastic.
 
Mar 31, 2018 at 5:59 PM Post #755 of 1,335
I think that screw method is better because it's less intrusive. I have a hard time understanding the use of glue instead of a small screws like you did, but ok, we are getting a solid mic for a very small amount of money. I can't guarantee that I won't be trying a bunch of diy couplers before I settle for one, but even if I could, I would never trust glue to do the job in this case due to material of the housing.

I have to say that I didn't even notice the metal before your previous post, I thought that it was all one solid piece of plastic.

Yes, I agree that the screw method is the best. It’s BS that Dayton Audio just glued these.

The calibration file is also a joke, so be prepared to make your own (which is an adventure in and of itself). And since my 1st mic is junk, all of the time I invested in building a calibration file was wasted. The new mic will need the whole process repeated again. Yes, it’s a learning experience, but there’s nothing worse than repeating the same lengthy and tedious process over again if it could have just been avoided in the 1st place. If anything, that’s the biggest incentive to bulletproof the mic - the time you'll spemd making a proper calibration file.

I guess like most things “you get what you pay for”.
 
Last edited:
Apr 1, 2018 at 3:00 AM Post #756 of 1,335
I'm back, with a new iMM-6 microphone. But this time I reinforced it so it is impossible to fall apart at the tip.

I wanted to share how I did it, as I know many others use the iMM-6.

The body of the iMM-6 is made of rubbery plastic (or is it plasticy rubber lol). But the cap at the end (that holds the microphone capsule) is aluminum. The only thing holding it on is glue. While this is fine for open air measurements, there is a high risk of the cap separating from the rubber body when repeatedly inserting and removing the iMM-6 in various couplings for FR measurement.

The basic idea is to insert (2) small screws, mechanically binding the aluminum cap to the body. This way, the risk of ripping the cap from the microphone body is eliminated when you push/pull/twist the microphone to insert/remove it in and out of couplers.

You'll need to find some small screws - I'm talking ridiculously small screws. Like the ones that are commonly used with various laptops components. They are generally around 1.25mm-1.5mm in diameter. The difference is the laptop ones are usually machine thread - you want non-machine thread (like the threads of a wood screw or drywall screw).

I used recycled screws (whenever I have electronics that go bad, I try and salvage anything of use from them (li-ion batteries, LEDs, electrical components, etc). I have a collection of hundreds of various ridiculously-tiny screws, nuts, bolts, etc - they take up hardly any room, and are useful for many projects like this (I keep them all in an empty pill bottle). If you don't have anything like that, I'm sure you can buy screws on Aliexpress (look for M1.25 or M1.5 screws, but make sure they're not machine thread).

The LENGTH is the critical part. They MUST between 2mm-2.25mm in length. Any longer, and you will damage the wiring. The absolute longest they can be is 2.5mm, so that's why I say 2.25mm max. That gives you a 0.25mm margin of error on each side (which is not very much, but if you follow my directions it will be perfectly fine). If you need to shorten your screws, do so (I had to shorten mine, because they were 3mm long). I just cut them down using wire cutters, and sanded the end smooth using a Dremel tool sanding drum.

So to get an idea of where we will be adding the screws, I'll show you what we're dealing with by showing my 1st iMM-6 that ripped apart. See the area by the wires? See how it's encased in a section of solid rubbery plastic? This is where we are going to insert the screws. The key is going deep enough to sufficiently bite into the iMM-6 body, but not deep enough to cut into the wires.


You also need some micro drill bits. You can order them on Aliexpress for about $2/set. I have an assorted set of carbide micro bits that range in size (graduated from 0.3mm to 1.2mm). Alternatively, if you own a Dremel tool, you may already have similar drill bits (if not, you can buy an assortment set made by Dremel as well).

You need to drill a hole through the thin aluminum cap ONLY, using a bit that is barely larger than the diameter of your screw shaft. So for example, if your screw has a 1.5mm diameter, make the hole in the aluminum cap 1.75 mm. Be sure you don't drill into the rubber body - your objective is to only pierce through the aluminum cap.

Also, you will be drilling all holes by hand. Use a twist drill mandrel for the drilling (you can buy on Aliexpress for a dollar or so). If your drill bits are sharp enough, and you go slow enough, this will only take a few seconds of twisting per hole.

Here is what a twist drill mandrel looks like (also called a twist drill pin vice):


Here's a link to one that includes the pin vice and micro drill bits: https://www.aliexpress.com/item/Min...teel-Drill-Bit-Holder-Double/32818707913.html

You'll be making (2) holes in the aluminum cap - 1 on each side (ie 180 degrees opposite to one another).

Once you have made your small hole in the aluminum cap, use a SMALLER drill bit to drill a very small pilot hole into the rubber body. Again, I used my twist drill mandrel for this, and only drilled into the rubber body 2mm max. As far as drill bit diamater, if for example your screw has a 1.5mm diameter, use a 1mm drill to make the pilot hole in the rubber body. This will give plenty of rubber for the screws to bite into and secure the cap nice and tight.

Once you have all of your holes, it's a simple matter of inserting the screws and gently tightening them (you can use a drop of loctite or super glue as extra measure if you wish, but I found it unnecessary). If you over tighten the screws however, you will strip the fragile rubber and you are screwed (no pun intended).

Here is the finished product (on the new iMM-6, not the ripped apart one). It should be bulletproof now :)


If you attempt this, you do it at you own risk. I'm not trying to scare you, as it worked perfectly fine for me. But if you use screws that are big or too long, drill into the rubber body deeper than 2.5mm, or use anything over than your hands, overtighten the screws, etc I cannot be to blame.

But learn from my exprerience (and others). I'm out $25 for the 1st destroyed mic, and another $25 for the replacement mic. Spend a few dollars and a few minutes of your time and protect your investment.

I just popped off the cap (being careful not to break the solder), applied some superglue onto the insides and slid the cap back on. Haven't needed a replacement since starting the database.
 
Apr 1, 2018 at 4:16 AM Post #757 of 1,335
I just popped off the cap (being careful not to break the solder), applied some superglue onto the insides and slid the cap back on. Haven't needed a replacement since starting the database.

How hard was it to pop the cap off?
 
Apr 1, 2018 at 4:24 AM Post #758 of 1,335
How hard was it to pop the cap off?

Not that hard, initially. Just loosen by twisting (though not too far) and pull. The first time I popped the cap off was when I wasn't aware of the poor sealing and I was trying to remove my tubing coupler. Luckily the solders didn't get ripped off then so I just superglued the contact area and shoved it back in.
 
Apr 2, 2018 at 3:16 AM Post #760 of 1,335
Here's an update to the upcoming headphones FR database project.

I've been engaged in quite a bit of discussion with some gurus and hardware geeks on the subject the past week or so. While I've stated in the GoFundMe that I would be using miniDSP EARS, I've asked miniDSP for an analog version that doesn't require a USB hub but unfortunately they can't custom build me that kind of rig due to the high costs and difficulty. That puts a wrench in my works as the point of the project is to use a portable rig for in-store measurements; the EARS themselves are already quite bulky and having to lug a laptop on top of that is not practical for this use-case.

Other options that have been explored is the use of an in-canal microphone, an IEC60318-1 system and various bin-aural microphones that can be found cheaply due to the ASMR boom. Unfortunately, none of them balanced practicality, accuracy and cost to a reasonable extent so those ideas were scrapped.

So, to those who donated expecting data points based on the miniDSP EARS, I am truly sorry. If you donated on that basis and aren't happy with the current developments, do contact me personally and I'll be happy to send out a refund. HOWEVER, the project is far from dead and in fact is looking even more alive than before.

I have decided to go with the original idea of using a non-commercial, custom built system revolving around my pre-existing IEC60318-4 compliant/approximated system. What is in the works is a foldable U-shaped bracket that will hold the in-ear simulator/microphone, allowing for single channel measurements (at a time). A pinnae simulator can also be installed but I'm having trouble finding someone who sells something reasonably approximated to ITU-T P.57, so for now the system is a "flatplate". Concept on the bracket below:

headphone portable rig concept 2.png
Each component is drawn to scale. Final product is expected to have minor changes.

So, why this setup over the EARS? Two key plus-points:
  • Portability: The new system can be folded. The microphone does not require a USB hub to function and can even be used with the iPhone for maximum portability.
  • Accuracy: A topic up for debate, but the use of an IEC60318-4 simulator does bring the rig more in line with professional equipment as opposed to the EARS' reliance on a compensation file to account for the lack of an in-ear simulator. Again, you can argue that the compensation file is more than enough but this is just me covering all bases.
Now, the caveats. As the headphones are fully expected to be measured under store conditions, the only metric I will be measuring is FR. Let the big boys like Innerfidelity and @jude handle the real in-depth stuff that I assume follow the IEC60268-7 protocols to a T, which I will clearly be unable to.

More updates to follow as the bracket is being built.
 
Apr 5, 2018 at 6:02 AM Post #761 of 1,335
Got a bag of goodies from @ryanjsoo recently (excluding the TF10 and Bella). Here's some new toys.

Hyla CE-5
iBasso IT01
Nguyen Custom Monitors Bella
Rose Mini2
Rose BR5 Mk2
TFZ King Pro
Ultimate Ears Triple Fi 10 "TF10"

Short impressions before my real writeups over at the ranking thread:
  • Hyla CE-5: A surprising beast. A U-shaped signature with a vocal bump, probably a W-response? Excellent clarity and resolution with easily the best bass I've ever heard. Docked some points for an unusually thin midrange and vocal presentation, but otherwise a very very solid performer.
  • iBasso IT01: A V-shaped Chinese dynamic, no surprises here. Would call it run-of-the-mill for a $100 IEM. No complaints.
  • NCM Bella: Been swapping between the Bella and CE-5 a lot thus far. Bass response isn't as good as the CE-5 but has a decidedly sweeter midrange, though loses out in cohesion and smoothness. Very good treble too. I have high hopes.
  • Roses Mini2: Warm neutral. A little soft on the transients but great for easy listening and very cohesive in its presentation. Docked points for staging.
  • Rose BR5 Mk2: A little all over the place. Possibly mid-forward? Very forward presentation, at least. Quite intense, wouldn't exactly call it a winner.
  • TFZ King Pro: Another V-shaped Chinese dynamic. Definite boost in clarity and resolution over the IT01. Worth the extra money?
  • Ultimate Ears TF10: The classic holds up real well amongst the new kids on the block. UE has certainly nailed timbre and tone in their tuning more than a decade ago. Still an amazing warm IEM today, reminds me of the Andromeda (on low OI) without the last octave air and sparkle.
 
Last edited:
Apr 5, 2018 at 8:23 AM Post #762 of 1,335
Got a bag of goodies from @ryanjsoo recently (excluding the TF10 and Bella). Here's some new toys.

Hyla CE-5
iBasso IT01
Nguyen Custom Monitors Bella
Rose Mini2
Rose BR5 Mk2
TFZ King Pro
Ultimate Ears Triple Fi 10 "TF10"

Short impressions before my real writeups over at the ranking thread:
  • Hyla CE-5: A surprising beast. A U-shaped signature with a vocal bump, probably a W-response? Excellent clarity and resolution with easily the best bass I've ever heard. Docked some points for an unusually thin midrange and vocal presentation, but otherwise a very very solid performer.
  • iBasso IT01: A V-shaped Chinese dynamic, no surprises here. Would call it run-of-the-mill for a $100 IEM. No complaints.
  • NCM Bella: Been swapping between the Bella and CE-5 a lot thus far. Bass response isn't as good as the CE-5 but has a decidedly sweeter midrange, though loses out in cohesion and smoothness. Very good treble too. I have high hopes.
  • Roses Mini2: Warm neutral. A little soft on the transients but great for easy listening and very cohesive in its presentation. Docked points for staging.
  • Rose BR5 Mk2: A little all over the place. Possibly mid-forward? Very forward presentation, at least. Quite intense, wouldn't exactly call it a winner.
  • TFZ King Pro: Another V-shaped Chinese dynamic. Definite boost in clarity and resolution over the IT01. Worth the extra money?
  • Ultimate Ears TF10: The classic holds up real well amongst the new kids on the block. UE has certainly nailed timbre and tone in their tuning more than a decade ago. Still an amazing warm IEM today, reminds me of the Andromeda (on low OI) without the last octave air and sparkle.
A Tier S- for Hyla ?
 
Apr 11, 2018 at 6:51 AM Post #763 of 1,335
Been thinking about it for a while, let me hear your thoughts.

Since I have an IEC60318-4 simulator/microphone now (well, for a while now, almost a year actually), I'm planning to essentially "press the reset button" on my database and redo everything from scratch. Of course, the IMM-6 measurements will still be available under a "legacy" section, but all new IEMs going forward (and the old ones too, whenever possible) will be done on the more accurate system since:

a) I still have access to all of the previous IEMs since most of them are in-store
b) I need some things to do during the holidays
c) I can.

Any violent objections?
 
Last edited:

Users who are viewing this thread

Back
Top