ClieOS's Random DIY Build Thread - [Updated: Oct.1st, 23] - Sony E282 Reproduction Shell Kit Build
Oct 10, 2019 at 11:38 AM Post #62 of 168
@ClieOS Thank you for giving incentive otherwise I would have given up modding the MMCX sockets.
The 3D printing will suffice, quality would most likely be better at 3 times the cost from mainstream printing services.

Here's the final result.
Sennheiser PX headband, HD414 foam pads, MMCX cables and version.2 3D printed grills.

Gikovcc.jpg


...and the v.2 grill.

DGNAxv5.jpg
 
Oct 10, 2019 at 6:00 PM Post #63 of 168
@ClieOS Thank you for giving incentive otherwise I would have given up modding the MMCX sockets.
The 3D printing will suffice, quality would most likely be better at 3 times the cost from mainstream printing services.

Here's the final result.
Sennheiser PX headband, HD414 foam pads, MMCX cables and version.2 3D printed grills.

Gikovcc.jpg


...and the v.2 grill.

DGNAxv5.jpg

If there's a vintage gear contest in the future at HF, please use this pic and you'll get our vote easily!
 
iFi audio Stay updated on iFi audio at their sponsor profile on Head-Fi.
 
https://twitter.com/ifiaudio https://www.instagram.com/ifiaudio/ https://ifi-audio.com/ https://www.youtube.com/@iFiaudiochannel comms@ifi-audio.com
Oct 10, 2019 at 6:14 PM Post #64 of 168
If there's a vintage gear contest in the future at HF, please use this pic and you'll get our vote easily!
Thanks, much appreciated but....credit goes to the designer of the bracket & grill and those who provided encouragement with their modded headphones, I had given up the MMCX mod until I saw their handiwork..
 
May 12, 2020 at 1:14 PM Post #69 of 168
An excuse if I was unable to find it anywhere but do you mind making an instruction for this short balanced cable?

Not really sure if there really is any need for instruction - the most basic and difficult part of the cable is the ability to solder small part together. This is a skill that requires both learning and practice - Youtube has plenty of tutorial for that. Beyond that, MMCX plugs, 4 conductors wires, Y-splitter, 2.5mm plug and UV Glue are all obtainable via Amazon, eBay or AliExpress. Once you know how to solder, it is but a simple matter of putting them together.
 
Jul 20, 2020 at 1:26 PM Post #70 of 168
DSC_0020.jpg


Sometime you do things because you can, and this is one of those time. I recent acquired the OE Audio WS-1 TWS adapter with 0.78mm pins connector, and I have been listening to mostly a pair of earbud that I have tuned myself but it is in MMCX - so I thought I just put an extra 0.78mm socket to the earbud in order for it to take both 0.78mm when I wanted to use the TWS adapter as well as MMCX when I wanted a wired connection.

It is a little crazy and I like it.
 
Last edited:
Jul 20, 2020 at 1:59 PM Post #71 of 168
DSC_0020.jpg

Sometime you do things because you can, and this is one of those time. I recent acquired the OE Audio WS-1 TWS adapter with 0.78mm pins connector, and I have been listening to mostly a pair of earbud that I have tuned myself but it is in MMCX - so I thought I just put an extra 0.78mm socket to the earbud in order for it to take both 0.78mm when I wanted to use the TWS adapter as well as MMCX when I wanted a wired connection.

It is a little crazy and I like it.
Yup. It's a little crazy :grinning:
The idea is so cool. Maybe if the "neck" of the earbuds is a bit shorter then will look like IEM-Earbud hybrid shell.
Anyway... nice works man:beerchug:
 
Nov 15, 2020 at 11:15 PM Post #72 of 168
DSC_0020.jpg

Sometime you do things because you can, and this is one of those time. I recent acquired the OE Audio WS-1 TWS adapter with 0.78mm pins connector, and I have been listening to mostly a pair of earbud that I have tuned myself but it is in MMCX - so I thought I just put an extra 0.78mm socket to the earbud in order for it to take both 0.78mm when I wanted to use the TWS adapter as well as MMCX when I wanted a wired connection.

It is a little crazy and I like it.
Wow
 
Mar 7, 2021 at 8:50 AM Post #74 of 168
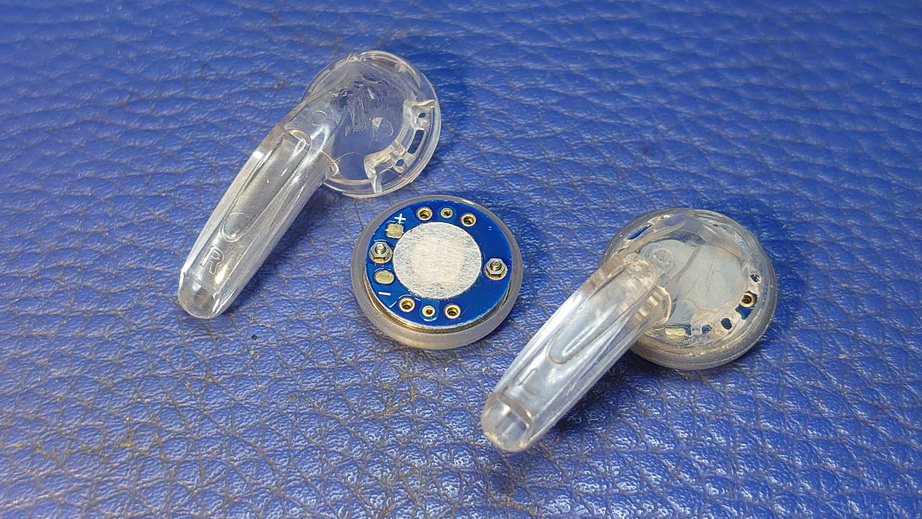
It has been almost 2 year ago that I challenged myself to fit a planar magnetic transducer into an earbud shell. The result, while good, can only be considered as 75% successful because of fit and sound. After all these time, I thought it is time to give it another go - with the same $120 planar magnetic transducer sourced from Aliexpress, but with a more ear-friendly shell - a MX500 type shell to be exact.

Parts Requirement:
1) 14.2mm planar magnetic driver x2
2) Transparent MX500 shell
3) Small rotary tool, i,e,. Dremel and small and small sanding bits
4) Normal soldering supply
5) Glue. In this case, the E8000, UV cured glue as well as thin 3M double sided tape.

PE2-01.JPG


PE2-02.JPG


As you can see, the 14.2mm transducer can fit into the front plate of the MX500 shell (*typically housing 15.6mm transducer) without any issue, but the back chamber will required heavy modification. Basically, all the side vents of the back chamber need to be sealed off with UV glue, then all the extra bit of plastic surrounding the back vents need to be sanded off until the planar magnetic transducer can fit completely inside with the front plate closed. While difficult, it is not impossible - though do be careful not to over-sand and penetrate the wall of the shell.
PE2-03.JPG


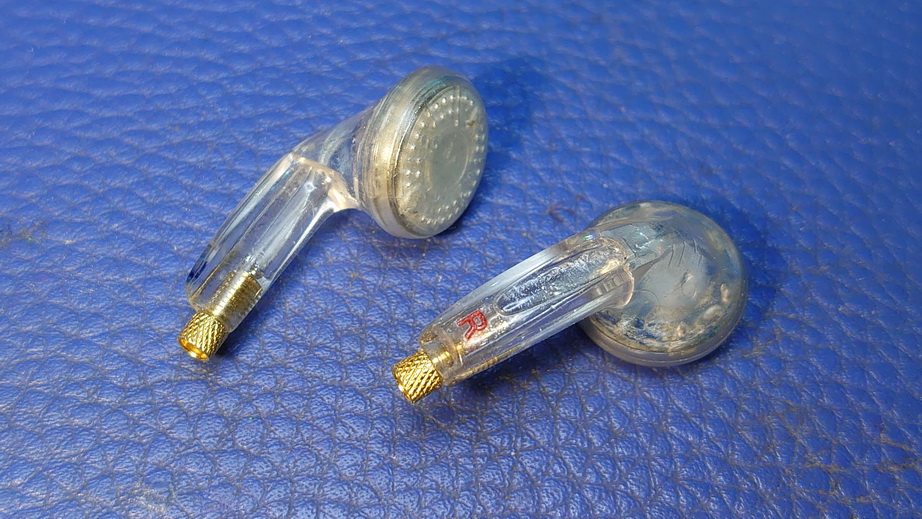
Lastly, the back vent of the shell is opened up (*many MX500 shell has a vent structure in the back but it is actually fully closed) to replaced the closed side vent. MMCX socket is fitted and soldered to the transducer. The transducer's side is fitted with double-sided tape to secured it into the back chamber, then the front plated is glued to the shell with E8000. Before the transducer is sealed in, the paper filter on the back of the transducer is moved to the front of the transducer to act as dampening filter / tuning.

Afterthought: As it stands, I'll call this a 90% success. First, fit has been dramatically improved from the wooden shell I used before. The new version required less critical fit to get a good sound out - which means I can use it more like a regular MX500 style earbuds which looser fit doesn't affecting SQ. Secondly, SQ has also improved as the new tuning has a more forgiving and relaxing sound than the old tuning. On its own, It is still a bit on the thin and bright side of presentation. With a bit of bass boost using EQ however, it sound rather balanced and neutral - definitely not something for bass-head, but otherwise a second to top-tier contender. The reason I called this a 90% success is because it does need the bass EQ to sound great, and I felt that I have pushed this particular transducer to its limit as far as an earbuds' transducer goes. To really address its weakness in bass, it will either be re-tuned as a driver or have a dedicated 2nd dynamic bass driver for a hybrid configuration.


----------------------


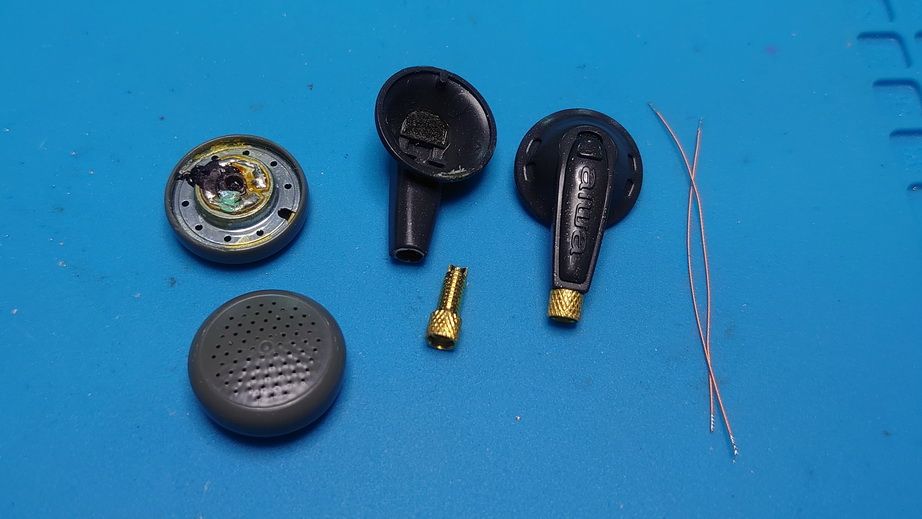
I found this particular unfinished old Aiwa earbud on Taobao - as far as I can tell, the driver is supposed to be used as mono headset, possibly as an accessory for portable radio and such. Since it is meant to be used as mono headset, there is no left / right side - so the easy part is just buy two of them and re-cable them for a stereo earbuds setup, but I take it one step further and re-terminate them into MMCX.

Parts Requirement:
1) Old Aiwa driver x2
2) Small rotary tool, i,e,. Dremel and small sanding bits
3) Thin MMCX socket x2, plus a bit of wires (Estron wires in my case)
4) Normal soldering supply
5) Heat gun

MA1-01.JPG


MA1-02.JPG


The front plate is glued fairly tight to the main chamber, but a bit of gentle warming from a heat gun will loosen it up. The housing is on the smaller size of thing so the cable exit needs to be widen up with a small rotary drill / sanding it order for it to fit a *small* MMCX socket. The tiny piece of foam on the vent is close to perish, so I replace them as well, using nozzle filter that normally meant for IEM. Without any filter / foam, the earbud will sounds to mid-centric. It can be tuned to a very neutral'ish sound by fully sealing the vent, though I opted for something closer to the original warmish tuning. The rest is pretty easy - just solder the MMCX socket to the driver, then glue them back together

MA1-03.JPG


MA1-04.JPG


Afterthought: I have never listened to any of those legendary old Aiwa earbuds before, so I have no idea how this particular pair compared them. But for the $20 or so I spent for parts cost, I reckon this pair of Aiwa doesn't sound too bad, though I won't go rushing out to recommend it to everyone either. One problem I did run into when I re-terminating the earbuds is that first two drivers I used have an slightly non-matching mid-range that I only found out after MMCX conversion. So I ended up re-terminating one more driver to create a matching pair (which means I have one extra driver wasted). As this was originally used as mono headset, matching is really a non-issue. But for converting to stereo setup, matching is a must and therefore you should get extra drivers as spare just in case of you ever want to do the same re-termination.
 
Last edited:
Mar 16, 2021 at 3:11 AM Post #75 of 168
It has been almost 2 year ago that I challenged myself to fit a planar magnetic transducer into an earbud shell. The result, while good, can only be considered as 75% successful because of fit and sound. After all these time, I thought it is time to give it another go - with the same $120 planar magnetic transducer sourced from Aliexpress, but with a more ear-friendly shell - a MX500 type shell to be exact.

Parts Requirement:
1) 14.2mm planar magnetic driver x2
2) Transparent MX500 shell
3) Small rotary tool, i,e,. Dremel and small and small sanding bits
4) Normal soldering supply
5) Glue. In this case, the E8000, UV cured glue as well as thin 3M double sided tape.

PE2-01.JPG

PE2-02.JPG

As you can see, the 14.2mm transducer can fit into the front plate of the MX500 shell (*typically housing 15.6mm transducer) without any issue, but the back chamber will required heavy modification. Basically, all the side vents of the back chamber need to be sealed off with UV glue, then all the extra bit of plastic surrounding the back vents need to be sanded off until the planar magnetic transducer can fit completely inside with the front plate closed. While difficult, it is not impossible - though do be careful not to over-sand and penetrate the wall of the shell.

PE2-03.JPG

Lastly, the back vent of the shell is opened up (*many MX500 shell has a vent structure in the back but it is actually fully closed) to replaced the closed side vent. MMCX socket is fitted and soldered to the transducer. The transducer's side is fitted with double-sided tape to secured it into the back chaember, then the front plated is glued to the shell with E8000. Before the transducer is sealed in, the paper filter on the back of the transducer is moved to the front of the transducer to act as dampening filter / tuning.

Afterthought: As it stands, I'll call this a 90% success. First, fit has been dramatically improved from the wooden shell I used before. The new irritation required less critical fit to get a good sound out - which means I can use it more like a regular MX500 style earbuds which looser fit doesn't affecting SQ. Secondly, SQ has also improved as the new tuning has a more forgiving and relaxing sound than the old tuning. On its own, It is still a bit on the thin and bright side of presentation. With a bit of bass boost using EQ however, it sound rather balanced and neutral - definitely not something for bass-head, but otherwise a second to top-tier contender. The reason I called this a 90% success is because it does need the bass EQ to sound great, and I felt that I have pushed this particular transducer to its limit as far as an earbuds' transducer goes. To really address its weakness in bass, it will either be re-tuned as a driver or have a dedicated 2nd dynamic bass driver for a hybrid configuration.
Simply wow! Extraordinary build there mate. Keep them coming. Cheers.
 

Users who are viewing this thread

Back
Top