Cavalli-Kan Kumisa III help? CK2III
Jun 15, 2009 at 4:44 AM Post #46 of 96
Quote:

Originally Posted by Chaos4 /img/forum/go_quote.gif
Henmry,

All voltages should be measured with respect to star ground. If star ground and the ground you are using are the same potential all is good.

I looks like you are measuring the op-amp correctly.

I am going to suggest you try shorting across R15 (assuming you are working with the left channel) and see if you can get the voltages to stabilize to a single value. I don't think this should hurt anything, but you will want to be carefull, also this is just for test purposes. You will not want to leave the short there permanently. Unless AMB or someone else thinks this is a bad idea, it may at least settle the voltages down a bit so we can see what went wrong.


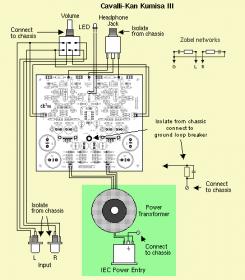
Hi. Yes, the star ground and the power strip ground should have the same potential, and measuring power strip ground - star ground gives a reading of 0.00mV, so it should be okey. I will be away for two weeks this time, but will try your suggestion when I get back. Thanks.
 
Jun 17, 2009 at 1:13 AM Post #47 of 96
o.k.,
super bone-headed mistake - i soldered Q12, Q25, Q13, and Q26 all backwards. no wonder why i couldn't turn up the output current with the 1K pots. are they toast? anything else a gonner as well? it might be easier to de-solder the pins by snipping them from the body and start all over with new ones.
 
Jun 17, 2009 at 2:42 AM Post #49 of 96
Quote:

Originally Posted by nightanole /img/forum/go_quote.gif
well to be honest thats what we do at work. Better to cut the lead to a "maybe" part, then ruin the board trying to desolder it all at once.


the transistors tested fine and are snipped and re-soldered - just waiting for the alcohol scrub to dry before power-up. i'm not sure if 0.85 mV from B-C in circuit with test leads reversed is o.k. though. i had some wiggle room with the off-board heatsink mounting holes to mount the ends of the snipped pins on the PCB pads.
 
Jun 17, 2009 at 3:08 AM Post #50 of 96
smile.gif
smile.gif
smile.gif
all is good!!! a rough quiescent current dialed in. the transistors are heavily heatsinked and will need to be tweaked after all the wiring is complete.
 
Jun 28, 2009 at 3:48 PM Post #51 of 96
Quote:

Originally Posted by fishski13 /img/forum/go_quote.gif
smile.gif
smile.gif
smile.gif
all is good!!! a rough quiescent current dialed in. the transistors are heavily heatsinked and will need to be tweaked after all the wiring is complete.


The text on BD140/139 are supposed to face AWAY from the board right?
 
Jun 28, 2009 at 5:23 PM Post #52 of 96
Quote:

Originally Posted by Henmyr /img/forum/go_quote.gif
The text on BD140/139 are supposed to face AWAY from the board right?


The grounding side should be facing away or down, from the main board, depending on how you mounted them. I just mounted mine to the bottom of the chassis, so my grounding side faced down. If you mounted them in a way that if you bend them over, they would short to the chassis, you mounted them correctly.
 
Jun 28, 2009 at 7:22 PM Post #53 of 96
Quote:

Originally Posted by Henmyr /img/forum/go_quote.gif
The text on BD140/139 are supposed to face AWAY from the board right?


i don't remember. the emitter is lead #1. the data sheet has pictures: http://www.fairchildsemi.com/ds/BD/BD136.pdf.
 
Jun 28, 2009 at 9:15 PM Post #55 of 96
Quote:

Originally Posted by fishski13 /img/forum/go_quote.gif
it might be easier to de-solder the pins by snipping them from the body and start all over with new ones.


I put one of my voltage regulators in backwards and that is what I had to do to get it out. Luckily I had an extra.
 
Jun 29, 2009 at 3:56 AM Post #56 of 96
Quote:

Originally Posted by amb /img/forum/go_quote.gif
For both BD139/BD140 and MJE243/MJE253, the labels should face the board, not away.


Very strange. I could have sworn I really thought it all over before I put them in. Looked in this one:
http://www.datasheetcatalog.org/data...f0kfs5i8wy.pdf
and I "think" I put it in with the emitter of Q12 facing the edge of the board.

Will have to look more into that later.

Doh! IT IS different from this one: http://www.fairchildsemi.com/ds/BD/BD136.pdf . Both can't be right
frown.gif
 
Jun 29, 2009 at 6:58 AM Post #57 of 96
Both specs are correct and telling the same:
BD136/BD138/BD140 with the labels face up, from left to right, the pins designation are: Emitter – Collector – Base.

amb is correct. For this type of transistors, the labels should face the PCB.
wink.gif
 
Jul 2, 2009 at 4:57 PM Post #58 of 96
I measured before and had 15,00V at V+ and 15.37V at V-. Are these values correct? Can I assume that the powersupply is okey, and that the problem is elsewhere?

I will soon mount the BD140/139 the correct way.

Edit:
The removal of the BD150/139 didn't go well, the result was lots and lots of broken solder pads. I ended up "repairing" them all by soldering snipped resistor legs at other places. I now have 12 resistor legs coming through the holes where the output transitors should be. Well at least I can't damage the pads again now. Next step will be to solder the output transitors to the resistor legs.

It sure is a fun little project though
smily_headphones1.gif
 
Jul 20, 2009 at 7:18 PM Post #59 of 96
I have now soldered BD140/139 in place and now have my first case again, where the -V first read -15.3 but soon drop many volts.

There is still dc offset at OL and OR., but more at OL.
 
Jul 21, 2009 at 11:37 AM Post #60 of 96
The only thing I would suggest is to double-check that you have the correct parts installed everywhere, in the proper orientations, and check for soldering problems (cold joints/solder bridges). You mentioned that you had damaged pads and traces from removing the transistors. Keep in mind that some pads need connectivity on the top and bottom sides, so you must be mindful of that when "repairing" the damage.
 

Users who are viewing this thread

Back
Top