SR60-Mod
Feb 6, 2011 at 6:12 PM Post #1,261 of 5,004
See if you can guess what I'm making 
wink.gif


Feb 6, 2011 at 6:19 PM Post #1,263 of 5,004
Quote:
Anybody know where to get some spring steel for a headband?


"DIY" stands for "Do it Yourself"
 
Seriously though, look around. If you find something that works, report back. We're not here to hold your hand.


How do you do something yourself without any parts? Answer me that and I'll shut up and never ask another question relating to things I'm planning.
 
Feb 6, 2011 at 6:23 PM Post #1,264 of 5,004
Quote:
How do you do something yourself without any parts? Answer me that and I'll shut up and never ask another question relating to things I'm planning.


First you chop down some trees with your bare hands, then you make some wooden tools and use them to mine some iron, then build a furnace to smelt the iron ore into steel strips. Simple.
 
/minecraft
 
Feb 6, 2011 at 7:18 PM Post #1,265 of 5,004
Too much snow and ice to grow a tree now, I have none on my property, and I'd get in trouble for stealing a tree from someone else's property. So to do it now, I need someone to supply me anyway...

But back to the point, nobody here does everything on their own, or there'd be no actual market, everyone would make their own magnets, voice coils, and all that as well as the housings, headbands, and everything else we're doing here.
 
Feb 6, 2011 at 7:23 PM Post #1,266 of 5,004
What did you use to paint them white? Are you going to put another color over white?
 
Quote:
See if you can guess what I'm making 
wink.gif

 
 *snip*


Feb 6, 2011 at 8:27 PM Post #1,267 of 5,004
Too much snow and ice to grow a tree now, I have none on my property, and I'd get in trouble for stealing a tree from someone else's property. So to do it now, I need someone to supply me anyway...

But back to the point, nobody here does everything on their own, or there'd be no actual market, everyone would make their own magnets, voice coils, and all that as well as the housings, headbands, and everything else we're doing here.


This raises a valid question: Where does one draw the line between DIY and buying it from somebody else?
 
When I first got into headphones, I would have assumed that the whole thing is about buying the best set of cans.  Let the experts do it.  But so much of this is a revolving door.  You buy this, then get talked into buying that.  It never ends and your wallet just groans.  Rinse, lather, repeat.
 
But then you start noticing that brands imitate each other, and that tiered product lines have enhancements you could DIY for a song.  If you really get restless, you end up tweaking, then modding, your little baby to make it better.
 
Headband - Right now, the best source I know of is JMoney but JM only did three colors - black, brown and camel - and has recently narrowed it to two (Don't ask me which).  If you want a different color - or you want to break free of the mold - you have to DIY or borrow something from a different brand.
 
Cabling - Grado comes with a perfectly legitimate cable, though it's not going to compete with all of the uber-expensive after-market specials.  With the "i" upgrade, Grado has significantly improved its standard cabling.  Unless you're scraping rock bottom with the SR60, Grado offers four- and eight-conductor cables that either offer four-wire (split common-wire) standard or four-wire double-strand 24 awg copper.  On the upper models, it's UHPLC wire, which is either OCC or OFHC.  If you want more, there's silver, which you can either buy commercial or DIY.  I'm a big fan of the DIY.
 
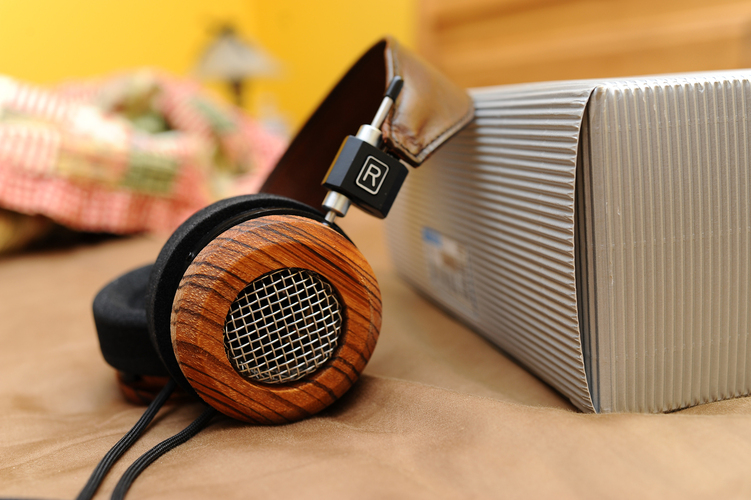
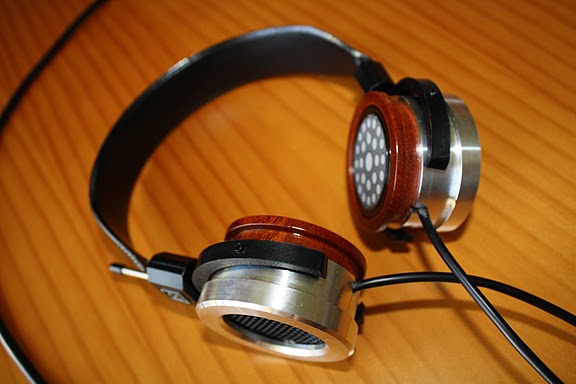
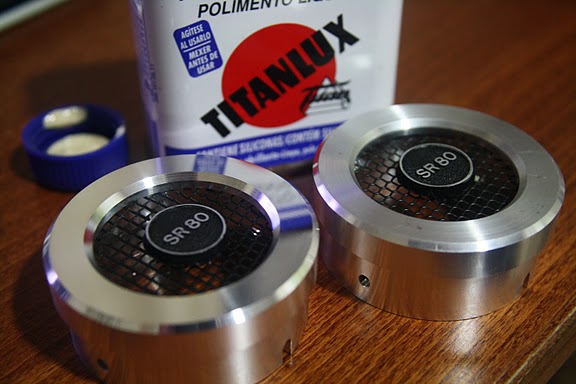
Cups - The cheapest Grado woody is the RS2i at $500, with the venerable RS1 at $700.  Depending on how close you are, it may be cheaper to either upgrade to these or mod what you've got with the right wood.  The Rolls-Royce of woody modding is Headphile, which does exceptional work but is also the most expensive ($200-$300).  JMoney also does a slide-on cup for $129.  Having perused their website, I can't deny that JM does fine work, too.  You can DIY these for less, but only if you have a drill press or lathe of your own.  I admire anybody who can do it with a hand-held saw (I nearly lost a foot trying to do this).  If you have the right equipment, it's just a matter of finding the right wood, finding the time, doing careful work and then sanding and sealing what you've done.  I used to use poly but found it too slow to harden and never quite hard enough. I've since moved to laquer, which I've tried in both the spray and brush variety.  I'm come to believe I'm more of a brush guy (more organic).
 
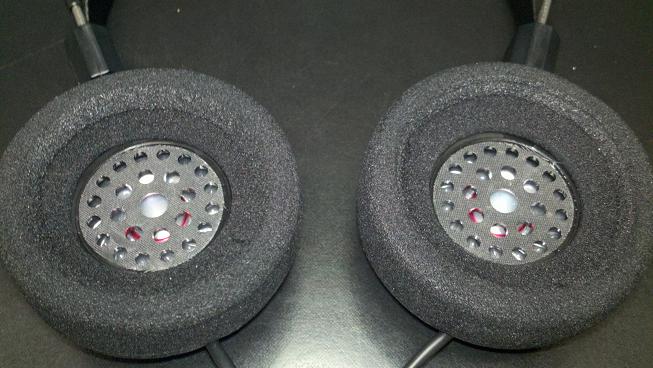
Venting and Damping - This is an easy one for the DIY crowd.  Opening the cups is fairly straight forward.  Dynamat is cheap and easily available.  Put a hunk of goodness on the back of the magnet plate and you're halfway home.  I'm a venter/puncher.  I love the difference it gives to the bass.
 
Pad Swapping - I don't know too many people who make their own pads, though I'm becoming one of them.  The Grado pads are cheap enough ($10, $25, $45) that pad swapping is an easy thing to do without having to go into the foam-cutting business.  I found that I could cut foam with the drill press as long as I secured the foam and lowered the hole saw slowly.  I've also found this useful for quarter modding comfy pads and getting that perfect hole.  In time, I'm hoping that leather will become my new go-to material for pads.  With leather, I can increase ear/driver distance (for more space) but without sacrificing bass.
 
Cloth Removal - I'm just paranoid enough to think that the lower-end Grados are "clothed" with inferior grill cloth, so I began removing mine a while back.  I've never regretted doing so.  It always seems to clear up the presentation.  This is totally DIY.
 
Rod Locks - This is where DIY is taking over.  Grado hasn't used rod locks since the HP1000 - though it should.  We all love our knobs and these rod locks are great for securing the headset.  In the absence of innovation bravery from Team Grado, DIYers have had to take matters into their own hands.
 
I can't think of anything else.  Anyone?  Anyone?
 
Feb 6, 2011 at 8:40 PM Post #1,268 of 5,004


Quote:
What did you use to paint them white? Are you going to put another color over white?
 
Quote:
See if you can guess what I'm making 
wink.gif

 
 *snip*


Nope, everything that was black is now white, I can't wait to see how they'll look put together 
biggrin.gif

 
Feb 6, 2011 at 8:58 PM Post #1,270 of 5,004
I used heat shrink tubing on the cable, and the headband probably won't be flexed all to much so I'm not worried about cracks there. But I'll post results tomorrow once it's all put together. In the mean time, I really need help finding white ear pads!
 
Feb 6, 2011 at 11:13 PM Post #1,271 of 5,004
I bought some Dynamat and found some cool uses for it.  Over the weekend, I'd candied some shells up and, as part of the process of modding up this set of SR60i's, I put the Dynamat onto the magnet plate.


But this time, I decided to use more of it, to compensate for all of the plastic that would remain on these cans.


Following the lead of some of you modders, I used the Dynamat to damp the plastic inner.  This turned out to be an interesting reinforcement material, one that could make gluing unnecessary.


On this shell, it's doing double duty as a damping device and anchor for the metal grill.  I've found that the more dynamic the headphones, the more problematic the screen becomes.  It needs to be secured.  Otherwise, it becomes an independent source of buzzing.  The Dynamat does a nice job of holding down the fort.


The result is a pretty decent all-around job of sound damping.  But there's more . . . . 


I also wrapped the outside of the front/inner.  Some may see this as a waste of precious Dynamat but I like the sound.  I wish had some way of taking a measurement of the output. I'm pretty sure something is happening.  I couldn't begin to prove it but I think the Dynamat is helping to suppress certain artifacts that track back to the plastic.  With the cocobolo shells and full ten-hole vent, I'm getting monstrous bass but without any buzzing or honking.  I do think it's worth the extra cost.
 
Feb 7, 2011 at 12:56 AM Post #1,272 of 5,004


Quote:
  I couldn't begin to prove it but I think the Dynamat is helping to suppress certain artifacts that track back to the plastic.  With the cocobolo shells and full ten-hole vent, I'm getting monstrous bass but without any buzzing or honking.  I do think it's worth the extra cost.


Hello Bill, are you moving away from the two stage type shells like the ones I have on order from you in favor of this latest one piece design that keeps the plastic driver "jail" intact? 
 
Feb 7, 2011 at 1:03 AM Post #1,273 of 5,004
 
Quote:
  I couldn't begin to prove it but I think the Dynamat is helping to suppress certain artifacts that track back to the plastic.  With the cocobolo shells and full ten-hole vent, I'm getting monstrous bass but without any buzzing or honking.  I do think it's worth the extra cost.


Hello Bill, are you moving away from the two stage type shells like the ones I have on order from you in favor of this latest one piece design that keeps the plastic driver "jail" intact? 


No, I'm just trying to make the best out of a compromised situation.  I still think that the best place to start the shell is right there with the driver.  If you think about it, the whole reason for the distancers in the MS1000 mods is to compensate for that missing part of the shell.  If you start with wood and stay with it through the secondary shell, you end up with all the wood you need, without having to run a really long secondary shell.
 
But, a lot of people are scared to liberate their plastic drivers, so the question then becomes, "How do I make this work better if this is as good as it gets?"
 
Feb 7, 2011 at 2:06 AM Post #1,275 of 5,004
so how do the wooden shells make them sound? amplify the bass? deaden treble or viceversa. 
 

Users who are viewing this thread

Back
Top