RnB180
Member of the Trade: RnB Audio
- Joined
- Jul 2, 2004
- Posts
- 4,339
- Likes
- 15
up

| Originally Posted by shiggins I did the flood and suck technique; flood one side with solder then remove it with braid/sucker to leave a nicely soldered chip. Well, that was the idea. Flood - easy. Suck - erm, yeah. I used approximately 1 mile of desoldering braid only managing to remove the solder one particle at a time. |
| Originally Posted by bryman79 I've had excellent results with the flood-and-suck technique using a basic de-soldering pump and iron. What exactly did you have trouble with? |


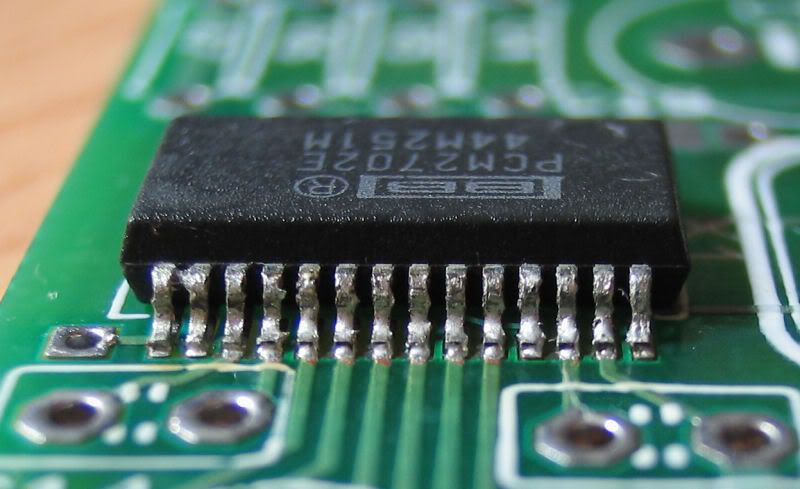
| Originally Posted by shiggins Here's a pic of the PCM2702 on one of the Guzzler's USB DAC's I built. http://img.photobucket.com/albums/v165/shiggins/Head-Fi/IMG_0905-small.jpg[IMG] I was impressed with the soldering, but the pro's may have something to say about that. It was a right pain in the arse to solder (tiny bloody pins). I did the flood and suck technique; flood one side with solder then remove it with braid/sucker to leave a nicely soldered chip. Well, that was the idea. Flood - easy. Suck - erm, yeah. I used approximately 1 mile of desoldering braid only managing to remove the solder one particle at a time. A stiff back, dizzy head (desoldering braid smells rather nice) and a few hours later I was done. The DAC itself is still sitting there uncased (another one of those half-finished projects) but atleast I get to post a picture of my handy work! Edit: Before any smartass says, I am aware the two pins on the far left are shorted but I gave up with them and they're connected on the PCB anyway.[/i] [/td] [/tr] [/table] What you need is FLUX!!!! Soldering SSOP shouldn’t take more than a few minutes at most When the flux is burnt out of the solder it becomes real brittle and tacky and is very prone to bridging when it shouldn’t like in your picture, put some flux and reflow the joints will make the solder very smooth and liquidy and it will only stick to what it is meant to and leave you with professional joints every time Using extra flux I can easily solder those SSOP size chips without any use of desolder braid or suckers at all, the solder just doesn’t want to bridge in the first place |
| Originally Posted by shiggins Here's a pic of the PCM2702 on one of the Guzzler's USB DAC's I built. http://img.photobucket.com/albums/v165/shiggins/Head-Fi/IMG_0905-small.jpg[IMG] I was impressed with the soldering, but the pro's may have something to say about that. It was a right pain in the arse to solder (tiny bloody pins). I did the flood and suck technique; flood one side with solder then remove it with braid/sucker to leave a nicely soldered chip. Well, that was the idea. Flood - easy. Suck - erm, yeah. I used approximately 1 mile of desoldering braid only managing to remove the solder one particle at a time. A stiff back, dizzy head (desoldering braid smells rather nice) and a few hours later I was done. The DAC itself is still sitting there uncased (another one of those half-finished projects) but atleast I get to post a picture of my handy work! Edit: Before any smartass says, I am aware the two pins on the far left are shorted but I gave up with them and they're connected on the PCB anyway.[/i] [/td] [/tr] [/table] IMHO you didn't use enough solder on that chip.I like for the edges of the pins not to be visible - for the solder to just round down so there's no real corner, if you know what I mean. Should work just fine though. And it shouldn't take you that long for a single chip... I think it took me maybe 3 minutes when I built my usb dac... I'm wondering if your iron might be too weak? Not sure. |
| Originally Posted by DaKi][er What you need is FLUX!!!! Soldering SSOP shouldn’t take more than a few minutes at most When the flux is burnt out of the solder it becomes real brittle and tacky and is very prone to bridging when it shouldn’t like in your picture, put some flux and reflow the joints will make the solder very smooth and liquidy and it will only stick to what it is meant to and leave you with professional joints every time Using extra flux I can easily solder those SSOP size chips without any use of desolder braid or suckers at all, the solder just doesn’t want to bridge in the first place |
| Originally Posted by 1UP I thought flux is already in the solder? Do you have to use extra? Re: soldering ICs - can you not just do this leg by leg using an itty bitty tip (instead of the flood/suck desoldering)? |
| Originally Posted by 1UP I thought flux is already in the solder? Do you have to use extra? Re: soldering ICs - can you not just do this leg by leg using an itty bitty tip (instead of the flood/suck desoldering)? |


