CMoy using Joshatdot PCB - With Parts List
Oct 28, 2007 at 8:12 AM Post #46 of 115
I agree... I'm not using silver solder for more performance, I just wanted a smaller gauge to prevent accidentally getting solder everywhere (
biggrin.gif
). I already own both the Radio Shack 60/40 and 63/37 eutectic solder, and for the most part, I've enjoyed working with them. The only problem is that the gauge of the solder wire tends to be even bigger than the holes I'm soldering.

I've never used standalone flux before, but it seems that with such a small surface as this PCB, I'd want to do the work as quickly as possible. If the flux can help to speed up the soldering process, I'll definitely buy some.

It looks like Welborne Labs has some interesting parts at decent prices. Thanks for the heads-up, slowpogo. I may do some ordering from them at some point.
 
Oct 29, 2007 at 3:16 AM Post #47 of 115
I have tomorrow off, I'll head down to RS and get a small/cheep breadboard w/wires, and a assorted pack of resistors and see what one looks 'best' with the LED in my BOM @ 18v & 9v.
 
Oct 29, 2007 at 3:23 AM Post #48 of 115
Gauge doesn't matter much, IMO as I apply mostly from my tip for very fine work (SMD), and not from the roll unless it's a "big ass" joint or a through hole connection. I use 0.032" RS 60/40 primarily as I'm trying to use my stash up (I have 2 rolls of 8oz, so it's going to last me a while, in addition to my 0.025" 63/37 Kester). I actually use my RS for most things.

I don't know what this PCB looks like, but I can use the RS just fine with plated through hole (basically a small ring around the leads).

As for shiny joints with RS solder. I have no problems with it, even with a Radio Shack iron. So, I don't know what to say there. Sure, some solder is more eutectic but it's usually 60/40 or 63/37 for electronics. 60/40 will always be at the same melting point. 63/37 will always have it's own melting point as well, a hair lower than 60/40. If you *need* 63/37, invest in a new iron if DIY is going to be your primary hobby.

I think it's more important to have a better iron than it is to concern yourself with the type of solder you use. Aside from the iron, technique is important. 60/40 solder melts around 370F (regardless of brand). 63/37 around 360F (regardless of brand). You should have a working temp of 550F with an iron that won't drop in temp considerably once working, either that or take long breaks between joints...like I did with my RS iron before I upgraded. For tips, I tend to prefer "pointy". Also, don't be afraid to go back and re-flow the joint.

I wouldn't worry about standalone flux. I really only use it for SMD soldering, and yes with my cheap 60/40 RS solder. I think you're worrying to much about extra stuff that you don't need to. Focus on technique, practice like NelsonVandal says, if you've never soldered before (it sounds like you haven't). Your RS solder will be rosin core. If you don't have rosin core, then you should get flux as your solder will have none. That will make soldering very difficult, without rosin core or standalone flux.

I can't recall if Indiana has a Fry's Electronics. I got my Kester stuff from Fry's some time ago (read years, yes, that's how long my cheap solder is lasting me), FWIW.


Another FWIW, the holes may look small, but once you start working on it, the holes become the size of the Grand Canyon. I've never come across a through-hole project that ever scared me. A CMoy will never come close to scaring anybody. It's like a toy Chihuahua that barks alot at the newbies, compared to the other projects in the world. So, fear not. Man up and kick some ass. Drink Red Bull, it gives you wings.
 
Oct 29, 2007 at 3:24 AM Post #49 of 115
Quote:

Originally Posted by Joshatdot /img/forum/go_quote.gif
I have tomorrow off, I'll head down to RS and get a small/cheep breadboard w/wires, and a assorted pack of resistors and see what one looks 'best' with the LED in my BOM @ 18v & 9v.


LOL, dedication!
smily_headphones1.gif


I use this instead. http://www.ngineering.com/LED_Calculators.htm

For SuperBright, go for an MCD around 20 or so. If you got the water clear lenses, it'll always be bright if you look at it, unless you make it so weak that it looks bad. If brightness is a concern, go for the diffuse lenses. FWIW, I did some experiments with my Mini3 when building. I was building 4 of them, and each build I used different resistor values for the LEDs. I can't say it was very noticeable in terms of brightness, as I was using some SuperBright water clear LEDs and I used values from 10K-20K. I could see the difference, but if I looked right at it, it's still bright. Diffuse lenses wouldn't have that issue.
 
Oct 29, 2007 at 6:12 AM Post #50 of 115
I built a Tangent CMoy using resistor leads as jumpers with one of those Radio Shack boards cut in two, so this should be a little easier. I guess I paid close enough attention to soldering, because the amp worked 100% on the first try.
biggrin.gif


I started with a Radio Shack iron (can't remember the wattage), but it was awkward to use and the heat left burn marks on the board itself, in addition to lifting one of the traces. After a handful of solder joints, I had difficulty wetting the tip with solder, and even when it was tipped, I had to apply pressure to the joint in order for it to work. I even tried sanding down the black oxidation on the tip, but it still wouldn't wet, and the iron itself didn't work very well to begin with. So, I upgraded to this Weller, which was my only local alternative. It came with a bunch of extra tips and worked much better, but my favorite tip has already stopped wetting.

Your technique using the solder on a tinned tip sounds like a great idea, but I'm not sure that it will be possible with my cheap iron, and I don't have the budget for another upgrade at the moment.

I already own the RS 60/40, 63/37, and 62/36/2 solders, and they are all rosin core. I just thought that extra flux might help since my iron isn't so great.
 
Oct 29, 2007 at 4:55 PM Post #51 of 115
Your Weller should be fine, just take breaks between touches to allow it to reheat. If the tip is small, you may want to use the broadside of the tip to re-flow instead of the tip of the tip (hard to explain, but hopefully you can visualize). The reason is because of the tip mass. Weak irons with small masses can't transfer heat well because there isn't a reserve, so the tip temperature drops as the heat transfers to the solder and the item being soldered, and the PCB and since the iron is weak, it can't heat up. Good irons with hefty heating elements can afford to have small tips because it heats up to operating temperature in less than a minute.

If you're going to use a cheap iron, it's best to get one with a good size of metal underneath the tip. Look at the ECG irons, for what I'm talking about. The tip that sticks into the iron is about 3-4" long and about 1/4" in diameter. After the iron, it either tapers down or steps down to the tip. The huge chunk of metal inside the iron maintains heat and acts like a buffer...think of it as a buffer for an opamp that doesn't have the current capacity to drive low-impedence headphones. Same idea. The ECG still takes a long time to fully heat up, but the heat dissipation between touches isn't as great due to the reserve in the metal mass of the tip.

The issues you described about lifting pads, etc. is primarily technique. When I de-solder, I keep a count. If I hold for 10 seconds, it's too much. I prefer to hold no more than 5 or so for soldering. Not only can you damage pads, but you can overheat active components (transistors, etc.) and set yourself up for some debugging. Count to 5 or 10, lift off, whether or not you are done. Look at the problem and figure out another attack method (angle, tips, etc.). If you need to hold longer, get some needle nose pliers, lay it on the item as a makeshift heat-sink.

If your tip isn't tinning, and you're going to replace anyway, take some sandpaper to it. For some of my tips on my other irons (ECG) which have hefty tips, I hit it with a Dremel and reshape, since there's tons of metal to do that, it won't be perfect, but I find I don't need a perfectly shaped tip. It just needs to tin.

I used my RS iron to de-solder 4 SOIC opamp chips on my X-Fi and then solder them down. Burning a PCB is tough, it might just be flux (brownish gunk) that'll wash off with isopropyl alcohol. Flux burns and smokes, and changes color from light brown to dark brown to black. Desoldering the capacitors were difficult, due to the effective heat sink of the PCB, and I wouldn't bother without a better iron....and I didn't.

In short, if you're able to burn the PCB or lifting pads, you are generating enough heat for the touches. Just work on technique.
 
Oct 29, 2007 at 6:11 PM Post #52 of 115
What do you use to clean your tip infinitesymphony? If you are using a damp sponge...that will shorten the lifespan of the tip alot, what with the heating then cooling down alot when touching the sponge and trying to heat up again to accept solder.

I only use a copper brillo pad to clean my tip/irons, and I never get black oxidation or non-wet-ness.
 
Oct 29, 2007 at 8:54 PM Post #53 of 115
Thanks for the suggestions, guys. I'm willing to admit that my technique is not good (yet).
biggrin.gif


The lifted trace was the result of holding the iron to the board for too long, and you may be right about the brownish stuff just being flux. I never bothered to clean the board with isopropyl alcohol, but I see that removing the leftover flux is an important step.

I've been using the smallest tip that came with the Weller because it was a lot easier to hold steady on such a small area, but I'll probably switch to the long silver metal tip for these next CMoys, since the longer tip might help to conserve the heat.

And yes, I had been using a slightly damp sponge, since that's what the construction of the soldering stand seemed to imply would be a good idea. I'll definitely try the copper brillo.

My Digi-Key order shipped today, so that's one step closer.
lambda.gif
 
Oct 30, 2007 at 6:13 AM Post #54 of 115
Quote:

Originally Posted by Joshatdot /img/forum/go_quote.gif
I have tomorrow off, I'll head down to RS and get a small/cheep breadboard w/wires, and a assorted pack of resistors and see what one looks 'best' with the LED in my BOM @ 18v & 9v.


WOW. Talk about support.

Really man, you deserve a bit of recognition for that.
 
Oct 30, 2007 at 6:48 AM Post #55 of 115
So far, I have Joshatdot's boards and the parts I ordered from amb. Only a few days and I'll have everything.
biggrin.gif


Now I just have to figure out how I'm going to make the case. I've never been good at shearing the metal of an Altoids tin, and the Hammond enclosures are out of my budget (I'd probably crack the plastic anyway
tongue.gif
). I don't even think a unibit would save me, and it's also a little expensive just for this one purpose.
 
Oct 30, 2007 at 7:03 AM Post #56 of 115
just out of curiosity, where did you guys learn all about biasing and decoupling and what not?

i'm a computer engineer but most of my work has not been in circuit design.. but i kinda wish i did more in that area. any good resources online?
 
Oct 30, 2007 at 8:38 AM Post #57 of 115
Quote:

Originally Posted by infinitesymphony /img/forum/go_quote.gif
So far, I have Joshatdot's boards and the parts I ordered from amb. Only a few days and I'll have everything.
biggrin.gif


Now I just have to figure out how I'm going to make the case. I've never been good at shearing the metal of an Altoids tin, and the Hammond enclosures are out of my budget (I'd probably crack the plastic anyway
tongue.gif
). I don't even think a unibit would save me, and it's also a little expensive just for this one purpose.


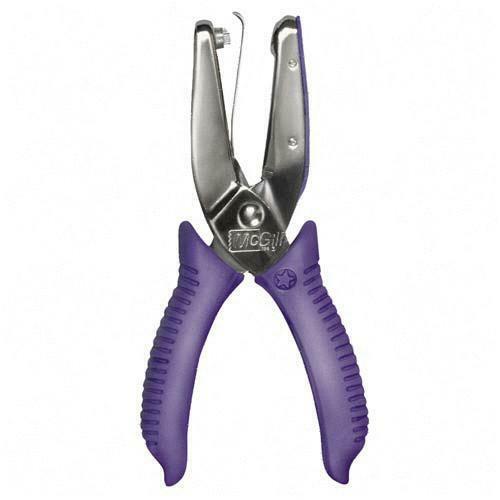
Get yourself a Office Max/Depot Paper Hole Punch. It works perfectly for in/out jacks. All you have to do for the ALPS or prolly any other POT, is nip the hole punch a tiny bit bigger with the same punch.

11964679.jpg
 
Nov 1, 2007 at 6:16 AM Post #58 of 115
My parts from Digi-Key arrived today, which means that I'm now ready to begin building the amplifiers. I'll post a few pictures as I go.

-----------

I went to Office Max and Staples, but could only find the store brand hole punches. Do these work well enough? I ask because I bought a different generic punch and couldn't make a single cut in the side of an Altoids tin.
 
Nov 3, 2007 at 7:45 AM Post #59 of 115
I have old skool hole punch...no rubber grip! I used leather gloves to soften the grip. I did thought had to grip tightly to 'hole punch' the tin.
 

Users who are viewing this thread

Back
Top