Quote:
Cool.... Well based on my fiddling around and inability to control the toggle well on the H140, I am not surprised that many others have been looking for solutions for trying to improve the toggle's traction and control.
But, I thought I had come up with a couple of decent possibly "original" ideas I was going to share.... seems I am way behind the times on originality.
My first idea was the rubber bumpers as mentioned in the link you attached.
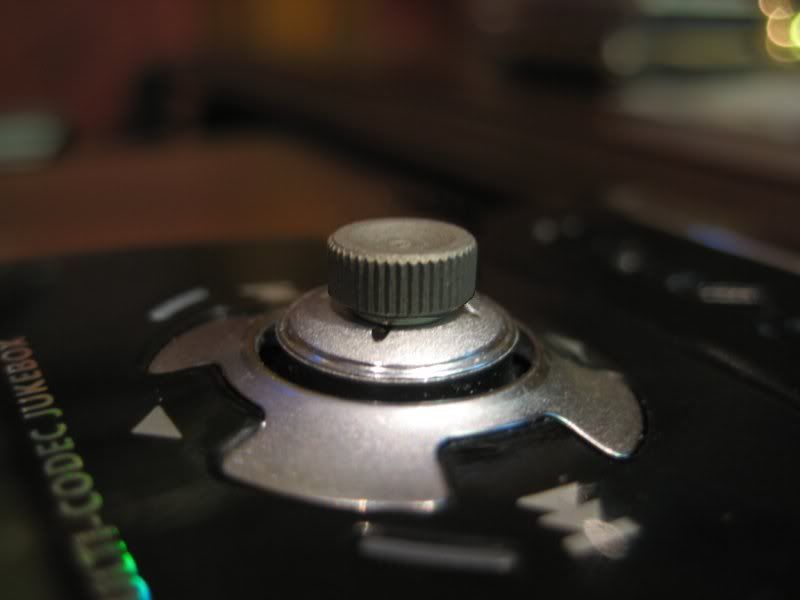
I had some rubber bumpers used for glass table tops, but they are a little weird shaped and pointy. So, I shaved the tip off and made it about the right shape and size (????). Here is what I had come up with so far:
It might be a bit lower profile than I prefer. I have not glued it on yet to see how well it might work, but it has a nice "Tack" that improves grip and control quite a bit.
When you say: "rubber cement", I am not sure exactly which glue you are referring to. Are you talking about contact cement? I had not thought of that, but I have some. If it holds well AND still has the ability to be scraped of if needed at a later time, that might be a very good thing.
I had considered using "Goop" if you are familiar with that glue. It holds to rubber pretty well. But, you are right that there are only a few types of glue that hold rubber very well.
The other option I considered was to use a spare "Thumb Stud" from a folding knife. (I also collect knives). Here is one I have (also not glued, just for consideration so far):
It offers PLENTY of traction and would work well for just bumping in any direction. Plus, it actually has a recessed crown that allows for center control when pressing in. But, it might be a bit tall.
It would be very easy to grind it down a bit. I have a bench-top belt grinder/sander. So, the following is a quick photoshop of what that might look like:
With the metal thumbstud, I could use a few different types of glue as metal to metal is much easier to glue together. Crazy glue, epoxy, Goop, and many other options would work. Ability to remove... that is another question.
Just ideas for now. I am not sure which I will go with or try first.
----------------------
The other thing I have been working on since I received my H140 and while waiting for the optical cable was a pouch to carry the combo rig - since for me, the idea was for portable rig use. I generally use my rig at the gym. I had been using just an iPod Classic for the last 3 years or so with my Shure SE530's and had always wanted to upgrade with an amp.... then that turned into replacing my iPod - which I only recently considered with the newer DAC/Amp combos, but I am very happy to be done with itunes. And even MORE happy with the sound quality improvements!!!!
The whole rig is a bit larger than I was originally targeting, but it is worth it for the sound.
I had been on Xin's Reference wait list for the last couple years or however long it has been. But, happy to have moved on from that.
Anway, I found a Case Logic Camera pouch that was about the right size.
Prior to receiving my optical cable, it fit VERY nicely. With the optical cable, it is a bit tighter than I thought it would be and would prefer, but I can still squeeze the whole rig in.
I cut a smaller hole at the top and while waiting for my optical cable, I added a small zipper to allow access for the earphones and volume without having to access through the LARGE zipper. I load the rig into the pouch through the large zipper, but it would be too prone to falling out with that zipper half open. In hind-sight, I would have done the added zipper a bit different, but it is functional.
This pouch has a front small pocket that I think will work GREAT for possibly cutting a small hole to access the H140's toggle. So, I can skip songs as I prefer more easily without having to unzip the large zipper. I could leave the small front pocket zipper open without any concerns of the rig falling out or being loose.
I haven't cut the hole out yet, but the toggle lines up ideally with where I could cut in the pocket:
This pouch also actually has a back pocket that perfectly fits my Blackberry 8900. You can barely see the back pocket zipper in the 1st pouch pic.
Carrying the Blackberry adds a lot of extra weight to an already dense pouch. I weighed my H140/D10 combo at 12.45 ounces (vs. only 5.45 ounces for my iPod Classic), but sometimes I need to have my phone handy and would rather not add multiple pouches to my carry belt while at the gym. Most people like a simple iPod shuffle or as small as possible. That is what my wife uses. She thinks I am strange for carrying a big pouch for music. But, she has never listened to even my Shure SE530's let alone my whole rig. Money has been tight lately and I think she is afraid to listen to my earphones and rig. She tends to be frugal and likes to view things as if good enough, why create more wants and ways to spend money. .... it can be good to have a frugal wife.
-------------------------
My other concern about the H140/D10 combo is that to carry it vertically (as ideal) in a pouch like above with headphone and volume control at the top, is that the optical cable is at the bottom.
I talked to Joseph about my concerns for the safety of the cable at the bottom of a rig like this. He felt it should be fine which is a testament from him about the durability of the cable (????).
Still, I am not comfortable with the combo sitting on the cable without extra protection.
The bottom of the Case Logic camera case is padded, but my concern is just the weight of both the H140 and D10 sitting on the cable.
So, I have been working on ideas for foam protection custom fitted around the bottom of the combo and better suited to keep weight and movement off of the optical cable.
This is still a work in progress as I have come up with some foam cutout that effectively take any weight off the cable, but they are 3 pieces of foam that I still need to glue together and shape into a single block. And I haven't come up with a great way to keep it attached (temporarily) to the combo while still being able to remove and re-attache quickly and easily as needed. For now, I will just stack the pieces on the bottom and sit the combo in the carry case. Gluing the 3 pieces together and shaping a bit will be an easy next step. But, I don't know about keeping the foam block attached and centered well yet (????)
Here is what I have so far:
3 cut pieces of foam:
1st foam layer around optical cable and other protrusions:
2nd layer:
3rd layer is barely notched out and seen here stacked from the side:
Once I glue the 3 layers together, I can shave the 3 pieces to look more like a single block (electric knives are very good at cutting foam
)
Anyway, that is where I am for now....
.


.gif)