


kalbee
Headphoneus Supremus
- Joined
- Nov 21, 2011
- Posts
- 2,973
- Likes
- 80
Alright! So I've actually done this mod a while ago... I finally got myself to take the pictures so here goes.
Before I get started though, I am guessing there are very little of these guys left. The plastic hinges used on these headphones are rather brittle; a good number of owners might have already broken them. Mine's are on the verge of.. Either I refashion some in wood (unlikely), or try to make something out of K'nex eventually

So these headphones actually sound rather pleasing. They are on the bassy side, and are really easy to drive. The problem is the bass bleeds and overall makes the sound muddy, veiled. This mod won't fix the problem completely, but I do believe they make a pretty good improvement. So for all those that already own a pair... feel free to try! It's reversible!
For those who do not know, this is the HA-M750

Notice that these have cables from both sides... this makes modding them so much easier! So for starters, let's remove one of the cups for workability.

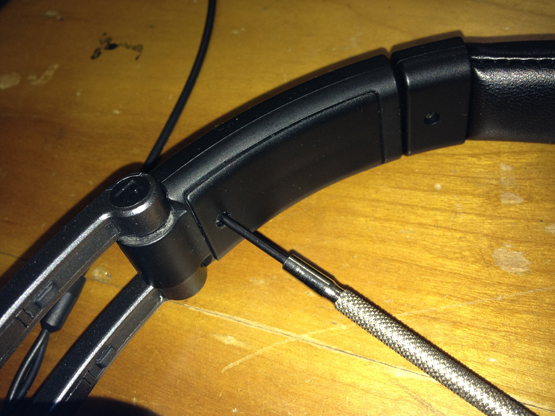
The screws are kind of hard to remove at first. The trick is to get a larger screwdriver and press against it while turning it. Pressing hard against it will be almost essential for every screw, whether fastening them on or removing them. Once the screw removed, use a thin flat head driver to wedge it out. You will only get about the same amount out as in the picture above.

Notice the part where the stainless steel band joins the plastic? Push that part in to get the cover off. In this picture it is already partially pressed in. Once opened, it should look like this (below):

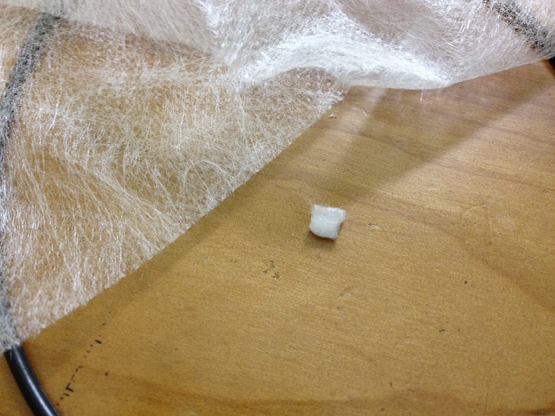
Take note: the clicker on the steel band is only held on by pressure. It can fall off! Putting it back is just... putting it back. Very simply. Just don't lose it if you still want to be able to adjust your band.
Now remove the earpad.


If you haven't already done the elementary mod of removing the foam ring, do so now. Yank it off gently; if you rip it, then it's not reversible anymore (you can stick them back so they're reversible). If you've already removed it previously, I hope you kept it because you will need it in my mod! Remove the 4 screws and open it up; there's nothing holding the baffle and the cup together so utmost caution is not required.
Here is how the inside looks like (I reversed the mods a bit to post this, so note that the blue tack is already there, as well as a circular mark for the foam rings).

I did not do anything on the baffle side; it would be very easy to build upon this mod and add blue tack there to further tame the bass, etc. For the blue tack on the cup side, you will notice initially the center rectangle is lifted higher than the rest of the cup. Take half a stick of tack for each upper and lower side of the cup. The tack should level flat with the rectangular center, and also flatten out at the extremities. This was as far as my first mod went; you can stop here for simply reducing some bass.
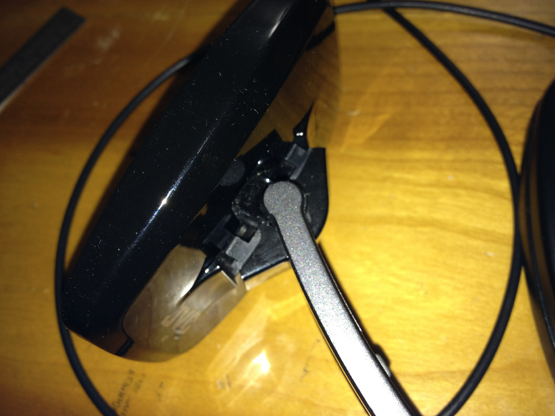
Next step: see the two screws? The hold the cup to the headband. Unscrew them. Once done, push the headband sideways to pop out the cover like so (left):


The picture to the right shows the pieces you just freed. Now that that's out of the way, it will be easier to work with the cups. The cover on the exterior will no longer be used; you can store them away. Note that this may cause you to lose some isolation. If you like to have an airy soundstage, remove that cover and you can put everything back together. This was the end of my second mod.
While the soundstage increased almost dramatically, I found it a bit too unrestrained. It has it's benefits, but I wanted to try something different. I took a fibrous sheet that I got from work and cut them into small rectangles and folded them up. You can use foam too, it will look nicer.

I cut out about 2cm x 8cm and cut them into 8 strips. You should be able to figure out how I split them.
Now with the pieces folded over a few times, use a flat head screw driver to place them in.

The folded side went in the cups. much easier to work this way. You -could- do it from the inside out, makes little difference. They will stick out a bit on the inside but that is fine. Filling these holes up will bring the airflow a bit back like the way it was originally. I may have put too thick of an amount in there... try with different combinations to not lose too much soundstage.
By the way, see where the bass ports are? they practically blocked usually...
Now flip the cup over and grab those foam rings you removed earlier.

Place them like this around the center of the inner-cup. Press it down a bit so it is held well by the blue tack. Remember to use adhesive side down--the shape will be more uniform this way. The mod is done!
To put the whole thing back together, remember to put things back in the same orientation.

See the protruding part? This is the lock mechanism, to keep the cup from pushing further into the plastic hinge. Make sure it's aligned; you can try holding them together by hand and moving it.

The pads also have sides. I actually never noticed it until taking it apart to take these pictures! It's not very obvious on the pictures, but there is likely to be one side thicker than the other on the flaps... the nook you see on the headphone can be used to facilitate putting the pads back.
And voila! The end result.

As you can see, the piece holding the hinge to the cup is exposed as the cover has been removed. This piece is pretty strong though, so I don't think you will have any problems with it unless you bang it hard?? I think the hinges would break first still!
As for the sound, it might take a bit of time to get used to since it feels pretty different from stock, especially after placing the foam ring inside the cups. Overall I'd say they sound a good deal better satisfaction not guaranteed however.
Well, since these cans aren't exactly super popular and all, and break easily, I know this thread may as well end up a wasteland. If any of you out there with these headphones want to try it out though, feel free to! I think for the current going price, they are pretty worth it. I bought it not long after it's release!! the price difference today is just amazing...
The absolute ease to work on these phones is great I think, and I believe they may have more potential than I've even reached. Well, enjoy modding and enjoy the new sound!
Before I get started though, I am guessing there are very little of these guys left. The plastic hinges used on these headphones are rather brittle; a good number of owners might have already broken them. Mine's are on the verge of.. Either I refashion some in wood (unlikely), or try to make something out of K'nex eventually
So these headphones actually sound rather pleasing. They are on the bassy side, and are really easy to drive. The problem is the bass bleeds and overall makes the sound muddy, veiled. This mod won't fix the problem completely, but I do believe they make a pretty good improvement. So for all those that already own a pair... feel free to try! It's reversible!
For those who do not know, this is the HA-M750
Notice that these have cables from both sides... this makes modding them so much easier! So for starters, let's remove one of the cups for workability.
The screws are kind of hard to remove at first. The trick is to get a larger screwdriver and press against it while turning it. Pressing hard against it will be almost essential for every screw, whether fastening them on or removing them. Once the screw removed, use a thin flat head driver to wedge it out. You will only get about the same amount out as in the picture above.
Notice the part where the stainless steel band joins the plastic? Push that part in to get the cover off. In this picture it is already partially pressed in. Once opened, it should look like this (below):
Take note: the clicker on the steel band is only held on by pressure. It can fall off! Putting it back is just... putting it back. Very simply. Just don't lose it if you still want to be able to adjust your band.
Now remove the earpad.
If you haven't already done the elementary mod of removing the foam ring, do so now. Yank it off gently; if you rip it, then it's not reversible anymore (you can stick them back so they're reversible). If you've already removed it previously, I hope you kept it because you will need it in my mod! Remove the 4 screws and open it up; there's nothing holding the baffle and the cup together so utmost caution is not required.
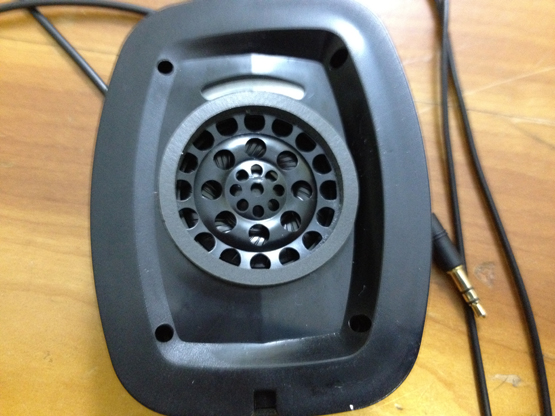
Here is how the inside looks like (I reversed the mods a bit to post this, so note that the blue tack is already there, as well as a circular mark for the foam rings).
I did not do anything on the baffle side; it would be very easy to build upon this mod and add blue tack there to further tame the bass, etc. For the blue tack on the cup side, you will notice initially the center rectangle is lifted higher than the rest of the cup. Take half a stick of tack for each upper and lower side of the cup. The tack should level flat with the rectangular center, and also flatten out at the extremities. This was as far as my first mod went; you can stop here for simply reducing some bass.
Next step: see the two screws? The hold the cup to the headband. Unscrew them. Once done, push the headband sideways to pop out the cover like so (left):
The picture to the right shows the pieces you just freed. Now that that's out of the way, it will be easier to work with the cups. The cover on the exterior will no longer be used; you can store them away. Note that this may cause you to lose some isolation. If you like to have an airy soundstage, remove that cover and you can put everything back together. This was the end of my second mod.
While the soundstage increased almost dramatically, I found it a bit too unrestrained. It has it's benefits, but I wanted to try something different. I took a fibrous sheet that I got from work and cut them into small rectangles and folded them up. You can use foam too, it will look nicer.
I cut out about 2cm x 8cm and cut them into 8 strips. You should be able to figure out how I split them.
Now with the pieces folded over a few times, use a flat head screw driver to place them in.
The folded side went in the cups. much easier to work this way. You -could- do it from the inside out, makes little difference. They will stick out a bit on the inside but that is fine. Filling these holes up will bring the airflow a bit back like the way it was originally. I may have put too thick of an amount in there... try with different combinations to not lose too much soundstage.
By the way, see where the bass ports are? they practically blocked usually...
Now flip the cup over and grab those foam rings you removed earlier.
Place them like this around the center of the inner-cup. Press it down a bit so it is held well by the blue tack. Remember to use adhesive side down--the shape will be more uniform this way. The mod is done!
To put the whole thing back together, remember to put things back in the same orientation.
See the protruding part? This is the lock mechanism, to keep the cup from pushing further into the plastic hinge. Make sure it's aligned; you can try holding them together by hand and moving it.
The pads also have sides. I actually never noticed it until taking it apart to take these pictures! It's not very obvious on the pictures, but there is likely to be one side thicker than the other on the flaps... the nook you see on the headphone can be used to facilitate putting the pads back.
And voila! The end result.
As you can see, the piece holding the hinge to the cup is exposed as the cover has been removed. This piece is pretty strong though, so I don't think you will have any problems with it unless you bang it hard?? I think the hinges would break first still!
As for the sound, it might take a bit of time to get used to since it feels pretty different from stock, especially after placing the foam ring inside the cups. Overall I'd say they sound a good deal better
satisfaction not guaranteed however.Well, since these cans aren't exactly super popular and all, and break easily, I know this thread may as well end up a wasteland. If any of you out there with these headphones want to try it out though, feel free to! I think for the current going price, they are pretty worth it. I bought it not long after it's release!! the price difference today is just amazing...
The absolute ease to work on these phones is great I think, and I believe they may have more potential than I've even reached. Well, enjoy modding and enjoy the new sound!


