
brydon10
New Head-Fier
- Joined
- Jan 21, 2011
- Posts
- 47
- Likes
- 15
This tutorial is for people who want to use the very minimum buffer lengths and also be 100% sure they are not going to get any glitches. Having the lowest latency possible is important for your audio. I think you will find that you can use rather small values. I will be using foobar2000 for my audio app with WASAPI and ASIO4ALL.
Program used for stress testing: Prime95 http://files.extremeoverclocking.com/file.php?f=103 (will not harm your cpu in any way)
I am going to assume you already have the WASAPI dll in your foobar component folder and that you already have asio4all installed and working.
First we will test WASAPI buffer length. Make sure you have Prime95 downloaded and extracted.
Start up foobar and go to Output, select your WASAPI device and set the Buffer length to the minimum setting (50 ms).
Now you want to start up Prime95. This window will pop up:

Set the test to Small FFTs (as shown in the picture). The number of torture test threads to run will vary by computer, it depends on how many cores your cpu has. Mine only has 2, so 2 test threads will be run. It will auto detect your cpu.
Now hit OK and the torture test will begin. This test will put an extreme load on your cpu and will allow you to test glitches in the toughest environment you will ever use on your pc.
Now as the test is running, go back to foobar or w/e media player you are using and start playing a song. While the song is playing and the test is running, you are going to hit CTRL+ALT+DELETE and bring up the blue page (windows vista/7) and then just hit ESC out of it. You are going to want to do this at least 10 times. If you hear a glitch/crackle/pop you are going to have to increase your Buffler Length. I recommend increasing it by 50ms each time until you no longer hear any glitches while hit ctrl alt delete and bringing up the window (remember to test at least 10 times each 50ms stage).
That's it for the WASAPI buffer. Congrats on your perfectly set buffer length! I was able to get it glitch free at 150 ms
Now for ASIO4ALL (I only can do USB dac settings)
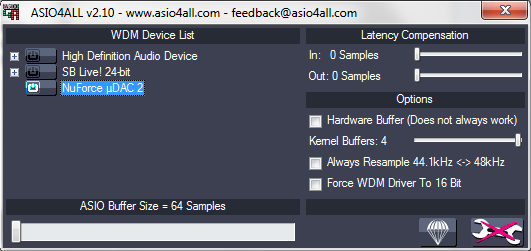
Set your asio4all settings to look like this:

Yes we are starting at 64 sample buffer.
After more testing, 128 Sample buffer size is a better place to start.
I have recently read that for playback only, you are fine to set the ASIO Buffer Size to the maximum (2048 Samples). So if you are finding that you are getting way too many glitches, go ahead and set this to the maximum.
Start Prime95 and hit OK on the Small FFTs test (pic above)
This is the exact same stress test as above. We are also going to start at 50 ms Buffer length and increase by 50ms each time we still have glitches bringing up ctrl alt del (at least 10 times like before, until glitch free) in foobar2000.
I was able to get this glitch free using 128 samples buffer size in ASIO and 250 ms buffer length in foobar.
If you are still getting glitches doing the test with 500 ms buffer length in foobar, I'd recommend to start increasing the ASIO Buffer at that time, by around 20 samples or so each time.
Good luck and I hope you find this tutorial useful and easy enough to follow.
Edit: If you care to test the buffer length longer you can just surf the web and do whatever while you are running the Prim95 test and playing music, but you're computer may act very sluggishly because the cpu will be at 100% usage from the test.
Program used for stress testing: Prime95 http://files.extremeoverclocking.com/file.php?f=103 (will not harm your cpu in any way)
I am going to assume you already have the WASAPI dll in your foobar component folder and that you already have asio4all installed and working.
First we will test WASAPI buffer length. Make sure you have Prime95 downloaded and extracted.
Start up foobar and go to Output, select your WASAPI device and set the Buffer length to the minimum setting (50 ms).
Now you want to start up Prime95. This window will pop up:
Set the test to Small FFTs (as shown in the picture). The number of torture test threads to run will vary by computer, it depends on how many cores your cpu has. Mine only has 2, so 2 test threads will be run. It will auto detect your cpu.
Now hit OK and the torture test will begin. This test will put an extreme load on your cpu and will allow you to test glitches in the toughest environment you will ever use on your pc.
Now as the test is running, go back to foobar or w/e media player you are using and start playing a song. While the song is playing and the test is running, you are going to hit CTRL+ALT+DELETE and bring up the blue page (windows vista/7) and then just hit ESC out of it. You are going to want to do this at least 10 times. If you hear a glitch/crackle/pop you are going to have to increase your Buffler Length. I recommend increasing it by 50ms each time until you no longer hear any glitches while hit ctrl alt delete and bringing up the window (remember to test at least 10 times each 50ms stage).
That's it for the WASAPI buffer. Congrats on your perfectly set buffer length! I was able to get it glitch free at 150 ms
Now for ASIO4ALL (I only can do USB dac settings)
Set your asio4all settings to look like this:
After more testing, 128 Sample buffer size is a better place to start.
I have recently read that for playback only, you are fine to set the ASIO Buffer Size to the maximum (2048 Samples). So if you are finding that you are getting way too many glitches, go ahead and set this to the maximum.
Start Prime95 and hit OK on the Small FFTs test (pic above)
This is the exact same stress test as above. We are also going to start at 50 ms Buffer length and increase by 50ms each time we still have glitches bringing up ctrl alt del (at least 10 times like before, until glitch free) in foobar2000.
I was able to get this glitch free using 128 samples buffer size in ASIO and 250 ms buffer length in foobar.
If you are still getting glitches doing the test with 500 ms buffer length in foobar, I'd recommend to start increasing the ASIO Buffer at that time, by around 20 samples or so each time.
Good luck and I hope you find this tutorial useful and easy enough to follow.
Edit: If you care to test the buffer length longer you can just surf the web and do whatever while you are running the Prim95 test and playing music, but you're computer may act very sluggishly because the cpu will be at 100% usage from the test.


