bangraman
Headphoneus Supremus
- Joined
- Oct 3, 2002
- Posts
- 10,305
- Likes
- 65
NB: PM's about this will be deleted, so please don't. Post in this thread, or create a new one if you have a query.
I was asked by a techno-timid friend to email him instructions on upgrading the Nomad Jukebox 3's drive. I'm posting it here in case it helps someone. It really is very easy. Just be patient and do thing slowly if you've never done this sort of thing before. Please note that I accept no responsibility for anything that may happen as a result of using these instructions.
The hard disk you'll need is a 9.5mm high 2.5" IDE type. 60Gb is good, although of course if you don't need that much you can put in 40Gb or even 30gb. Keep it in the packaging until you're ready to use it. Remember that a hard disk is a delicate item: Don't drop it or bang it during installation.
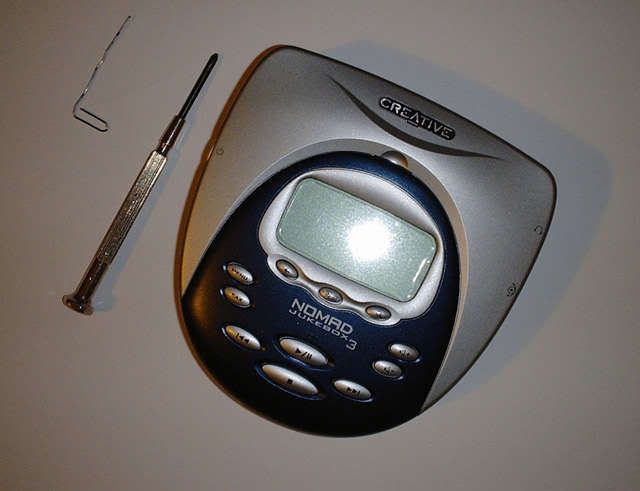
You'll need to get a screwdriver as close to the size of the one I've shown above, since this is the ideal one for the job. The driver is 2.9mm and Philips (cross) head. You'll also need to bend a paperclip into a fairly long wire that can prod the reset button of the NJB3, and you will also have to download the latest firmware off Creative's website, and I do advise you do it before you take the NJB apart. If you haven't done this before, don't follow the instructions as you're doing it. Read it all the way through a few times. You will also need to have the NJB3 power supply plugged in and ready near the PC. The PC needs to be on and ready. The firmware update you downloaded should already be unpacked. The PC needs to be the one which you used Playcenter with and have synchronised previously with the NJB3.
o------------------------o
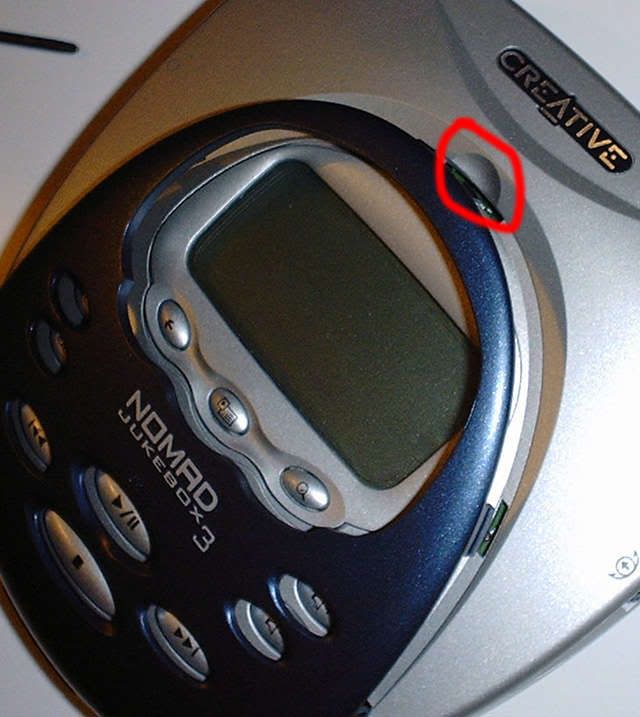
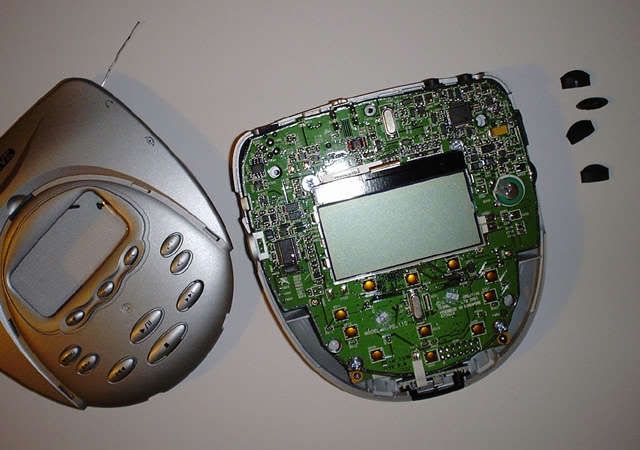
First, remove the battery compartment cover and the battery. Next, remove the fascia by pulling up from the indentation in the centre of the front panel.
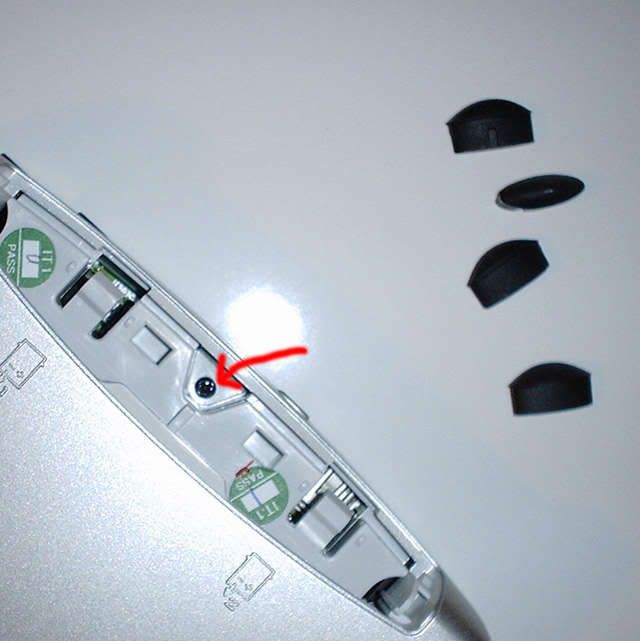
Now, turn the NJB3 over and pull off the rubber feet. They aren't glued or anything, and should slide out eventually. Under each foot you'll find a screw.
You'll notice that each foot has different notches in it. They're keyed to their respective locations on the NJB's underside. So it makes it easy to put them back the right way when you've finished. Gently unscrew all the screws from under each foot, and remove the screws. The last screw you need to undo is located within the battery compartment.
The top half of the NJB3 is now loose. So hold it carefully, turn it over and take off the top half.
Note how the power switch attaches to the PCB. It will probably drop off during removal of the PCB so make sure you see how it's attached right now.

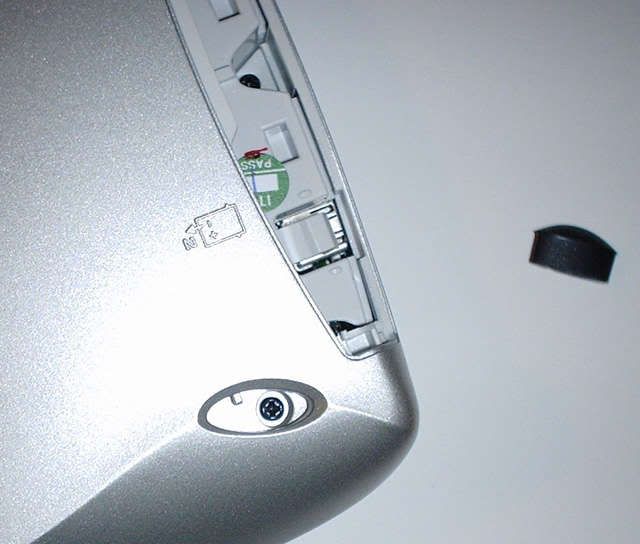
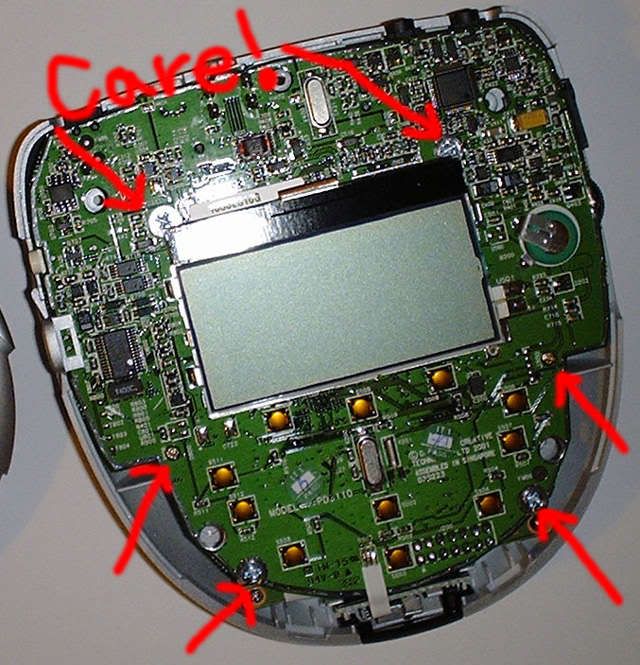
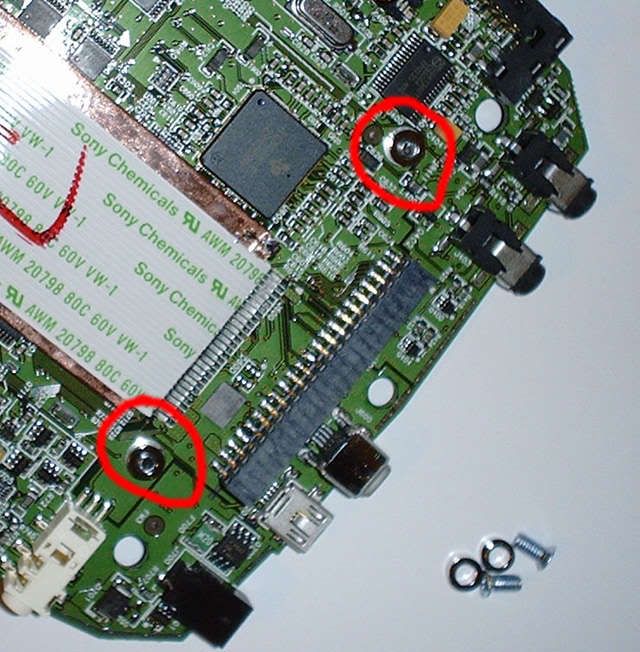
Now, it's time to unscrew the hard disk and the PCB (circuit board). Carefully unscrew all the screws marked, taking special care with the top two partially below the display. This is why it's important to have a fairly narrow screwdriver as the glass is easily marked/chipped. Those two screws won't come out, just unscrew them as much as you can. The rest you can remove. The silver screws hold the hard disk to the PCB. The two small gold screws hold the PCB to the NJB3 body.
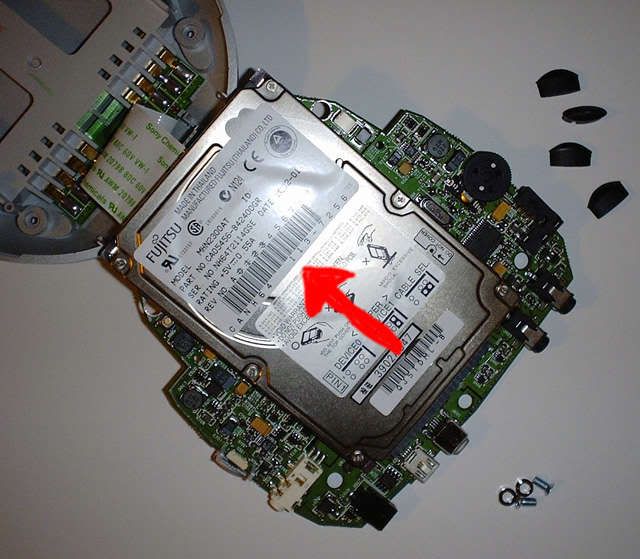
Once you've removed the screws, you can lift out the entire PCB and turn it over, taking care with the ribbon cables which still attach the PCB to the NJB3 body. Some or all of the metal spacers which were between the hard disk and the silver screws may drop out. Don't lose them. The power switch may also drop off. Retain this too obviously.
Now, gently pull the hard disk away from the long black connector on the NJB3 in the direction indicated. Don't pull up unnecessarily. You'll probably notice that the hard disk without the screws has angled slightly upwards. Don't pull it up any further. Control the amount of force you put on and do it very slowly if you've never done this sort of thing before.
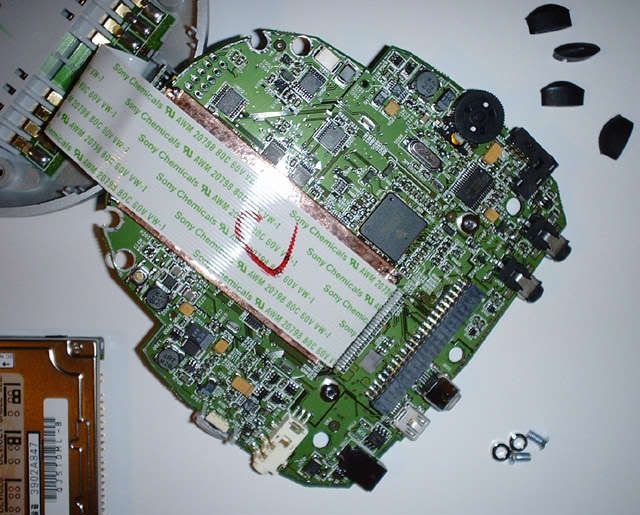
Successfully pulled off the disk? It should look like this now.
Unwrap your new hard disk. Now, make sure that the two round spacers are properly seated on PCB. The narrower end of each spacer goes into the PCB side.
o----------------------o
After this there are no illustrations. The pictures above should be a sufficient guide.
Note on the disk there is a series of pins, then a break and 4 more pins. These 4 pins don't get connected anywhere, so don't try. Slide the hard disk gently and securely into the long black connector. Holding the hard disk lightly in place for as long as you can, turn over the PCB, replace the power switch if it dropped out during the whole process, and gently seat it back onto the NJB3 body.
Replace the two front round metal spacers between the hard disk and the PCB using the bent paperclip to slide them into the correct place if necessary. Note once again that the narrow end of the spacers fits into the PCB. Now, do up all the silver screws so that the hard disk is properly attached to the PCB. Once again, take special care with the two silver screws near the display. On all screwdriver operations, don't feel the need to apply a death grip... It just needs to be secure. Next, double-check that the power switch is correctly in place and then do up the smaller gold screws.
Put the top cover back on. If you've fitted the screws correctly this should go back on without any problems. Carefully turn over the unit, and replace the black screws. Replace the feet, noting once again that each rubber foot is keyed to a specific location. Replace the screw in the battery compartment.
Turn over, and snap the fascia back on. Replace the battery and the battery compartment cover. Turn the NJB3 on. After a while, you will be faced with the emergency menu, which will have among others the Format All option on it. Choose the Format All option. Once it's finished, connect the NJB3 with the PC and the power supply. Close down Playcenter if it starts automatically. Run the firmware update from the PC. It will probably say that the current version of the firmware does now allow updates and that the software will temporarily replace the drivers. Allow it to do so, and the firmware update will take place.
You will be prompted to reset the NJB3 eventually, on the NJB3's screen. Do so with the bent paperclip, pressing the reset switch on the bottom of the NJB3. Once the NJB3 has rebooted, the software on the PC should tell you that the upgrade is complete. That's it. Disconnect the NJB3 from the PC, re-connect and re-sync your music using Playcenter or Notmad.
What to do with the disk you took out?
Buy a USB or Firewire 2.5" drive enclosure.
Put the drive in, and you now have somewhere to back up your documents (which you never did until now, right?
 )
)
I was asked by a techno-timid friend to email him instructions on upgrading the Nomad Jukebox 3's drive. I'm posting it here in case it helps someone. It really is very easy. Just be patient and do thing slowly if you've never done this sort of thing before. Please note that I accept no responsibility for anything that may happen as a result of using these instructions.
The hard disk you'll need is a 9.5mm high 2.5" IDE type. 60Gb is good, although of course if you don't need that much you can put in 40Gb or even 30gb. Keep it in the packaging until you're ready to use it. Remember that a hard disk is a delicate item: Don't drop it or bang it during installation.
You'll need to get a screwdriver as close to the size of the one I've shown above, since this is the ideal one for the job. The driver is 2.9mm and Philips (cross) head. You'll also need to bend a paperclip into a fairly long wire that can prod the reset button of the NJB3, and you will also have to download the latest firmware off Creative's website, and I do advise you do it before you take the NJB apart. If you haven't done this before, don't follow the instructions as you're doing it. Read it all the way through a few times. You will also need to have the NJB3 power supply plugged in and ready near the PC. The PC needs to be on and ready. The firmware update you downloaded should already be unpacked. The PC needs to be the one which you used Playcenter with and have synchronised previously with the NJB3.
o------------------------o
First, remove the battery compartment cover and the battery. Next, remove the fascia by pulling up from the indentation in the centre of the front panel.
Now, turn the NJB3 over and pull off the rubber feet. They aren't glued or anything, and should slide out eventually. Under each foot you'll find a screw.
You'll notice that each foot has different notches in it. They're keyed to their respective locations on the NJB's underside. So it makes it easy to put them back the right way when you've finished. Gently unscrew all the screws from under each foot, and remove the screws. The last screw you need to undo is located within the battery compartment.
The top half of the NJB3 is now loose. So hold it carefully, turn it over and take off the top half.
Note how the power switch attaches to the PCB. It will probably drop off during removal of the PCB so make sure you see how it's attached right now.
Now, it's time to unscrew the hard disk and the PCB (circuit board). Carefully unscrew all the screws marked, taking special care with the top two partially below the display. This is why it's important to have a fairly narrow screwdriver as the glass is easily marked/chipped. Those two screws won't come out, just unscrew them as much as you can. The rest you can remove. The silver screws hold the hard disk to the PCB. The two small gold screws hold the PCB to the NJB3 body.
Once you've removed the screws, you can lift out the entire PCB and turn it over, taking care with the ribbon cables which still attach the PCB to the NJB3 body. Some or all of the metal spacers which were between the hard disk and the silver screws may drop out. Don't lose them. The power switch may also drop off. Retain this too obviously.
Now, gently pull the hard disk away from the long black connector on the NJB3 in the direction indicated. Don't pull up unnecessarily. You'll probably notice that the hard disk without the screws has angled slightly upwards. Don't pull it up any further. Control the amount of force you put on and do it very slowly if you've never done this sort of thing before.
Successfully pulled off the disk? It should look like this now.
Unwrap your new hard disk. Now, make sure that the two round spacers are properly seated on PCB. The narrower end of each spacer goes into the PCB side.
o----------------------o
After this there are no illustrations. The pictures above should be a sufficient guide.
Note on the disk there is a series of pins, then a break and 4 more pins. These 4 pins don't get connected anywhere, so don't try. Slide the hard disk gently and securely into the long black connector. Holding the hard disk lightly in place for as long as you can, turn over the PCB, replace the power switch if it dropped out during the whole process, and gently seat it back onto the NJB3 body.
Replace the two front round metal spacers between the hard disk and the PCB using the bent paperclip to slide them into the correct place if necessary. Note once again that the narrow end of the spacers fits into the PCB. Now, do up all the silver screws so that the hard disk is properly attached to the PCB. Once again, take special care with the two silver screws near the display. On all screwdriver operations, don't feel the need to apply a death grip... It just needs to be secure. Next, double-check that the power switch is correctly in place and then do up the smaller gold screws.
Put the top cover back on. If you've fitted the screws correctly this should go back on without any problems. Carefully turn over the unit, and replace the black screws. Replace the feet, noting once again that each rubber foot is keyed to a specific location. Replace the screw in the battery compartment.
Turn over, and snap the fascia back on. Replace the battery and the battery compartment cover. Turn the NJB3 on. After a while, you will be faced with the emergency menu, which will have among others the Format All option on it. Choose the Format All option. Once it's finished, connect the NJB3 with the PC and the power supply. Close down Playcenter if it starts automatically. Run the firmware update from the PC. It will probably say that the current version of the firmware does now allow updates and that the software will temporarily replace the drivers. Allow it to do so, and the firmware update will take place.
You will be prompted to reset the NJB3 eventually, on the NJB3's screen. Do so with the bent paperclip, pressing the reset switch on the bottom of the NJB3. Once the NJB3 has rebooted, the software on the PC should tell you that the upgrade is complete. That's it. Disconnect the NJB3 from the PC, re-connect and re-sync your music using Playcenter or Notmad.
What to do with the disk you took out?
Buy a USB or Firewire 2.5" drive enclosure.
Put the drive in, and you now have somewhere to back up your documents (which you never did until now, right?
