FrankenZERO - A bang for buck exploration with a DIY Heart !
Mar 14, 2009 at 12:42 AM Post #361 of 428
Quote:

Originally Posted by hobbang819 /img/forum/go_quote.gif
What did you use to cut it? I was going to use a hand saw with a metal cutting blade.


That's how I did it. Problem is, I can't cut straight with a Hack saw, even if you had a freakin' gun to my head. Then I had to try and get it straight with a Dremel. I'm still workin on my Plan for POT # 2.

So I guess what I'm really saying is, "DON'T PAY ANY ATTENTION TO HOW I DID IT, SINCE I BORKED MINE!!

.
 
Mar 14, 2009 at 2:30 AM Post #362 of 428
Quote:

Originally Posted by goldfinger1111 /img/forum/go_quote.gif
Hi,

should the points in those blue circles be connected?
Upper and mid circle are, but right now there is no connection to the burnt pad in the bottom circle.
Since the board is pretty much burnt, I'm not sure if there's supposed to be a connection. It would connect the 3rd and 4th pin on the CCON5...


Can I replace the UF4997 with HER108?
Datasheet
Can I replace just the 2 diodes or would I have to change those 4 or even all of them?


I'm not 100% sure but the lack of a second filter cap in the mains section may be the reason why the diodes cooked. I'm almost positive the circuit requires both caps...one being the +V reserve of the supply while the other is the -V (or 22V +-) of the circuit.

The diode you selected as long as it matches the UF4007 specs closely should be fine as a replacement. Add that second filter cap along with the fresh diodes and cross your fingers. You'll note the polarity of each large filter cap is flipped in the install. I think that may have been your mistake (leaving that cap out of the circuit). Do you have another of the same brand value and rating to use ?

Peete.
 
Mar 14, 2009 at 2:39 AM Post #363 of 428
Quote:

Originally Posted by goorackerelite /img/forum/go_quote.gif
Peete, you'd be happy or horrified to know that I've not slept since my last post. I've been suckling on Frankies lactating sonic mamaries ever since, taking quick 30 minutes here and there to freshen up, but, now I finally must get some rest or I will become looney. As evidenced by my previous and soon to be censored comment. It's been like errr 24 hour listening marathon, my ears and brain are mush.... thank god I listen at low volumes (~65 DB) or else I'd be deaf by now.

I hope I don't get any of electronic gremlins in the future, all I gotta worry about is the residual resin eating away at my board. I made the mistake of removing the only 4 caps in stage 2 that did not need to be removed. I realized that they (the red caps) only needed to be PIO'd. I then put the caps back in and lifted a pad while bending a PIO leg back to the board, (Hommer Simpson moment) now that one solder joint is brittle, and I don't want to compromise the joint by tooling with a tooth brush around that delicate area. Oh well....... cheers to great audio while it lasts, transience is beautiful!!

Viva la Frankie!!!!


LOL....cool...
biggrin.gif


Have fun with it ! I certainly know the feeling your currently experiencing.
smily_headphones1.gif


Peete.
 
Mar 14, 2009 at 9:11 AM Post #364 of 428
Quote:

Originally Posted by Pricklely Peete /img/forum/go_quote.gif
I'm not 100% sure but the lack of a second filter cap in the mains section may be the reason why the diodes cooked. I'm almost positive the circuit requires both caps...one being the +V reserve of the supply while the other is the -V (or 22V +-) of the circuit.

The diode you selected as long as it matches the UF4007 specs closely should be fine as a replacement. Add that second filter cap along with the fresh diodes and cross your fingers. You'll note the polarity of each large filter cap is flipped in the install. I think that may have been your mistake (leaving that cap out of the circuit). Do you have another of the same brand value and rating to use ?

Peete.


Sorry, should have said that the second large cap was on the board, when it happened.
I took it out later to have more space to clean the board and check the lead underneath.

So I'm gonna give it another try, maybe this evening.
Open chassis, one hand on the plug to unplug if the smoke returns.


Just to be sure:

-coaxial ground connected to chassis ground is ok?
- the upper burnt diode(with the blue circle in my last post) is only connected to one of the yellow caps and the middle pin coming from the transformator on the upper side of the board?


Does anybody know if the coaxial terminal is soldered at 2 or 3 points to the board? I removed it and have now only 2 wires. One for signal, one for ground.
No extra wire from board to chassis ground.
I'm pretty sure, there were only 2, just want to double check here.
 
Mar 14, 2009 at 2:59 PM Post #365 of 428
Hi,

just wanted to let you guys know that everyting is back in place and WORKING!!!
atsmile.gif


Put 2 new diodes,the removed cap and PIOs in, added 2 jumpers for the come-off leads, checked everything for shorts with my DMM and now it's as good as new.
icon10.gif

Thanks for the help!

I won't post pictures of it's current state, because it looks rather frightening with those burnt pads and additional jumpers.


I still don't know what caused the failure.
confused_face(1).gif

One fault I've found though.
One of the cables from power to headamp section came lose.


The new Alps pot seems to provide lower output than the stock pot.
Where I had 60% with the stock pot I have to adjust it to almost all the way up to get he same output.
Doesn't bother me, because I listen through a PA2V2 and not the ZEROs headamp. Just noticed it.

For now I'm off, listening to some fine and wonderful sounding music.
L3000.gif
 
Mar 15, 2009 at 3:51 AM Post #367 of 428
Quote:

Originally Posted by hobbang819 /img/forum/go_quote.gif
Finally put the finishing touches on and am now finished!

_HRH7564.jpg

With the new knob.


That knob looks good. Did you have to cut the shaft? What did you use?

Where did you buy the knob?

.
 
Mar 15, 2009 at 3:57 AM Post #368 of 428
Yea, the shaft had to be cut down and the knob had to bored out with a 1/4inch bit as well.

Bought it on ebay from hongkongsuperseller. A search for "30x22 Aluminum STEREO Hi-Fi VOLUME CONTROL KNOB" will bring it up.
 
Mar 15, 2009 at 4:06 AM Post #369 of 428
Quote:

Originally Posted by hobbang819 /img/forum/go_quote.gif
Yea, the shaft had to be cut down and the knob had to bored out with a 1/4inch bit as well.

Bought it on ebay from hongkongsuperseller. A search for "30x22 Aluminum STEREO Hi-Fi VOLUME CONTROL KNOB" will bring it up.


I think I bought those in Campaign for my DV 337SE.

.
 
Mar 15, 2009 at 5:07 AM Post #370 of 428
Quote:

Originally Posted by goldfinger1111 /img/forum/go_quote.gif
Hi,

just wanted to let you guys know that everyting is back in place and WORKING!!!
atsmile.gif


Put 2 new diodes,the removed cap and PIOs in, added 2 jumpers for the come-off leads, checked everything for shorts with my DMM and now it's as good as new.
icon10.gif

Thanks for the help!

I won't post pictures of it's current state, because it looks rather frightening with those burnt pads and additional jumpers.


I still don't know what caused the failure.
confused_face(1).gif

One fault I've found though.
One of the cables from power to headamp section came lose.


The new Alps pot seems to provide lower output than the stock pot.
Where I had 60% with the stock pot I have to adjust it to almost all the way up to get he same output.
Doesn't bother me, because I listen through a PA2V2 and not the ZEROs headamp. Just noticed it.

For now I'm off, listening to some fine and wonderful sounding music.
L3000.gif


First of all Congrats on the fix...that's great news !!!!
beerchug.gif


I think it's possible one of the diodes was bad (of the 12 UF4007's sent in the kit but that's a really rare occurrence to have a bad one) or both but the most likely logical cause was some stray solder missed during clean up causing a short or the printing on that part was incorrect WRT anode/cathode identification. I'm not saying it's human error at all just trying to think of all the possibilities. Static damage (the diodes come in anti static bags when they are delivered in large quantity, 144 diodes for 10 kits for example) is another loooooooong shot...

It's really tough to say what the cause might have been. Anyway I'm glad you were able to get your Frankie up and running. Let me know what you think of it's sound quality vs stock in a couple of days (and the members here of course).

I had assumed you didn't install the second filter cap...sorry about that.
redface.gif


Once again good job with the repair now it's time to enjoy the fruits of your labor
smily_headphones1.gif
!!!
bigsmile_face.gif


Could someone maybe write a small review for the Frankie ?

That really would be appreciated big time.

Peete.
 
Mar 15, 2009 at 5:16 AM Post #371 of 428
Quote:

Originally Posted by goldfinger1111 /img/forum/go_quote.gif
Sorry, should have said that the second large cap was on the board, when it happened.
I took it out later to have more space to clean the board and check the lead underneath.

So I'm gonna give it another try, maybe this evening.
Open chassis, one hand on the plug to unplug if the smoke returns.


Just to be sure:

-coaxial ground connected to chassis ground is ok?
- the upper burnt diode(with the blue circle in my last post) is only connected to one of the yellow caps and the middle pin coming from the transformator on the upper side of the board?


Does anybody know if the coaxial terminal is soldered at 2 or 3 points to the board? I removed it and have now only 2 wires. One for signal, one for ground.
No extra wire from board to chassis ground.
I'm pretty sure, there were only 2, just want to double check here.


Just the two spots....look at the jack removed to determine which spot is what. You only need to connect the + signal to the plus pad and the - (gnd) to it's spot where the previous assembly was soldered in. You don't want to use any other gnd connection for this digital input. The closer you can get the gnd connection to the + signal the better. I like to call any gnd on the main pcb as audio ground vs the chassis ground which is the green wire attached to the chassis from the IEC terminal. Do not ground the COAX input to the IEC chassis ground point.

As for the diodes you have to remember that this pcb has two separate circuit topologies, one for each side. What you see on the top is only half the electrical picture.

Peete.
 
Mar 16, 2009 at 12:57 AM Post #372 of 428
Hi, Fellow Frankies!

I am in the process of performing this mod after a week's delay. So far, I have performed the Phase 3 Headphone amp operation and am currently working on desoldering during the Phase 1 PSU operation. Then on to Phase 2!

Man, those holes are small but I think I have got the hang of the desoldering now. Slow and sure as the turtle goes will get this done tonight or tomorrow.

So far I have only burned my fingers 3 times.
smily_headphones1.gif
And not one of our cats has been burned yet either!

Now, taking a break for dinner and then back to the operating table!
 
Mar 16, 2009 at 6:47 AM Post #373 of 428
Excellent ED !!!

Good luck with the mod and it's outcome
smily_headphones1.gif


Peete.
 
Mar 16, 2009 at 8:33 AM Post #374 of 428
Hey Peete, can you possibly give a quick and dirty comparison of the Franken Zero's Dac section with that of the compass? I'm thinking of getting one, but it would certainly have to far surpass the Franken's Dac capabilities.
 
Mar 17, 2009 at 4:06 PM Post #375 of 428
Ok, surgery has been completed but my Frankie will not respond.

I thought I covered everything pretty well but may have fried something somewhere on the board. I did all 3 phases and the mod to my earth HDAM as well as grounding the HDAM and grounding the volume control.

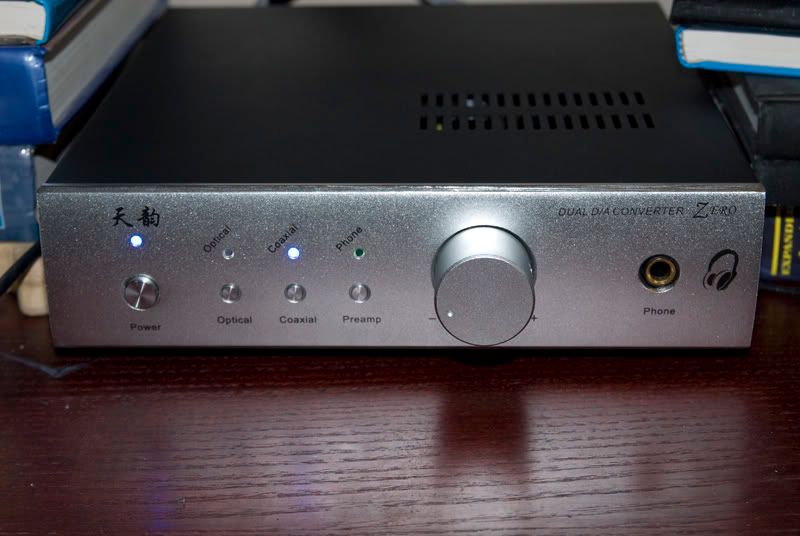
When I first "finished", only the 2 lights on the mainboard would light up - the lights on the HP board would not. I fixed that when I tightened the screws down for the mainboard. All 4 lights were lit but no sound through coax or tos. I tried with both the onboard HP jack and out to my my Gilmore. I did hear static when adjusting the knob
frown.gif


So, I made things worse. I removed the board and proceeded to reflow my solder work. I had noticed what might be lack of solder contact on the upper side (component side) of various added parts. While trying to solder from the top at one of the diodes near the 25v Nichicon, I got a spark from the Nichicon to the diode. One of them evidently had a charge from when I tested it. My bad. Diode or more fried?

Then, I found that a Panasonic 47uf replaced at the top center left of the main board was giving me trouble resoldering from the bottom of the board. As I heated and tried to get it to flow the solder refused to flow. I tried to clean the connectors and was able to resolder. In the process, I cratered a small part of the board around those connections so I may have fried the component or trace.

Now it will turn on but still no sound and now the HP board lights refuse to light up.

During the initial process, I went slow. All my solder points appeared clean and shiny - much better than the original board work. I didn't lose any of the little round solder pads or lift any traces. I cannot see any dull or cracked solders nor any stray solder splash.

I also noted that the DAC chip used (1364) did not ever get warm to the touch much less get hot. I used this in place of the HDAM in case everything blew up when tested. Does taht mean that it is not getting a signal to convert? No signal converted = no sound? I figure the problem is on the main board.

Application of the PIOs went extremely well and seem to be ok.

Can any of you more skilled surgeons out there give some advice (help!). I can try to post photos later this afternoon or evening.
 

Users who are viewing this thread

Back
Top