First time building an amp, thinking of the Millet Hybrid Max
Sep 22, 2012 at 11:52 PM Thread Starter Post #1 of 10

Knavish

New Head-Fier
Joined
Sep 7, 2012
Posts
3
Likes
0
This looks like a fun project and in addition to its obvious use, it will be an interesting conversation piece on my desk at work!  I'm thinking about ordering the V1.2 PCB, tubes, and tube sockets from beezar.  I'd think the rest of it should be easy to get from Digikey, Newark, etc.  This will also give me an excuse to buy one of those nice Chinese Fluke knock-offs like the Unitrend 61e. 
 
I haven't soldered anything in a few years, but it looks like a pretty simple through-hole PCB so hopefully it'll be a good way to build my soldering skills
smile.gif

 
Any suggestions for a new builder?
 
Sep 23, 2012 at 1:44 AM Post #2 of 10
Knavish,
I was just like you about 3 weeks ago.  Never built any DIY audio equipment at all.  I started with the MOSFET MAX myself.  It's fairly easy to build, as you said, it's all through-hole mounting, no SMD.  Using the BOM on diyforums.org for the Max makes it easy to order.  If you are going with the MOSFET MAX, there are a few items on the BOM that are no longer per the BOM though.  I ended up ordering a matched quad set of (2) 2SK170BL and (2) 2SJ74BL JFETs from AMB Audio (amb.org/shop) as well as the IRFZ24N and IRF9Z34N complementary pair of power MOEFETS and the 2N5486 JETs.  I had to order some 5088 and 5087 from ebay, I bought 100 of each, since they were relatively inexpensive, but I didn't need that many.  I did screw up putting a couple in, so I'm glad I had more than the minimum for the board, but that was because I wasn't paying attention.
 
I found Mouser had the better prices for most items than Digikey.  I just decided to order what I could from mouser.
 
Read everything on diyforums.org about the hybrid max.  I'm presuming you're going with the mosfet instead of bjt for the output stage, but either way, the build should be similar, just different BOM.  If you read the entire setup page before starting, that will really help.  Just follow the directions and it's very easy.
 
I just finishing up my case now, I've spent a few hours listening so far and really enjoying it.  I know you'll enjoy it too.  Tom at beezar is very easy to work with too, but a bit behind, so it may take a few days.  Don't worry, he's there working your order.  Oh and get the color change LED from beezar if you like the lights, it's really trippy.
 
Check out my build here: http://www.head-fi.org/gallery/album/view/id/691846
 
Sep 26, 2012 at 10:18 PM Post #3 of 10
Hi bwshockley -- thanks for the reply.
 
Yes I am going for the mosfet version.  I need to keep reading other comments on this board as well as start digging into the parts list and ordering stuff!  I'm still shocked at the price of the Alps potentiometer, but I guess it's probably the only one that fits the board.  While I do want to use quality components, I also want to avoid the type of components that are "hand made by hobbits and dipped in magical audiophile quality pixie dust."   For example, I am a firm disbeliever in "oxygen free" copper wire.  (I have no desire to argue with people who do believe in such wire or other components, but that's just not my thing.)
 
Your amp enclosure looks nice so far.  Did you mount it on a 1/4" aluminum plate?  How are you going to finish the wood?
 
Sep 26, 2012 at 10:44 PM Post #4 of 10
Just an FYI, but you'll find that a 50K Alps RK27 pot runs the same price with any us of that carry it.  It's pretty much a custom manufacturing item that has to be ordered in high volume from Alps in Japan and it takes a couple of months to get them.  I don't think you'll find a 50K Alps RK27 any cheaper from those of us who happen to sell it in the DIY culture.  Look around and you'll find a few of us that have it.
wink.gif

 
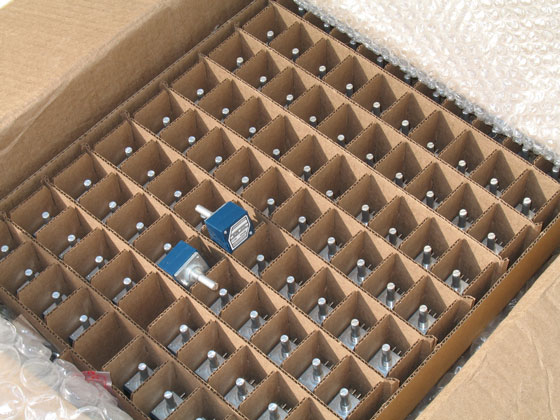
Some things are not gold-plated or filled with magic dust.  They just happen to cost what they cost because of the high quality and because they perform better than almost anything else short of a stepped attenuator (in the case of the Alps RK27).  Even the boxes they come in are impressive in quality for the razor-cut dividers and the hinged lid:
 
AlpsRK27-box-sm.jpg

That's double-boxed, by the way, and how they come from Japan.
 
Sep 26, 2012 at 11:09 PM Post #5 of 10
the potentiometer is the first thing your input signal sees after your source besides your rca jacks, so its relatively important to have a high quality one. if you have to choose between some botique cap or a solid pot, choose the pot. you can spend much more, but the alps is quite good. and not just for the price.
 
Sep 27, 2012 at 2:28 AM Post #6 of 10
As others have noted, if you want quality parts it costs some. However, there are ways to reduce your costs on the build, without sacrificing quality. There is a section for input switching that you don't necessarily need if you are never going to use either an onboard DAC or second analog input. I don't have the board or BOM in front of me right now, but I can list out the parts tomorrow. If you aren't going to utilize the fuse, you can keep that off the BOM, but I'd recommend sticking with it.

Thanks, the amp is mounted to .375" thick aluminum. I drilled and tapped some 6-32 holes and use 3/4" machine screws and some 3/8" spacers to hold the board to the base. I'll add more photos to the build tomorrow. I'm going to finish the wood with a coat of satin polycyclic. I like the wood's natural color, the poly will darken it just a bit. Only thing left is to receive my knob, amp feet, and I'm going to try using some 5mm x 2mm neodymium magnets (8 each part) to hold the top to the base. Dril out the 5mm holes in the aluminum, epoxy the magnets in, same with wood top. I'm hoping that holds well enough.
 
Sep 27, 2012 at 5:26 PM Post #7 of 10
Okay, after reviewing the BOM and board, if you aren't going to have the input switching, it's as easy as not purchasing anything in the "INPUT Control" section of the BOM: RS1...to the 2-pos terminal block.
 
 
Sep 27, 2012 at 9:12 PM Post #8 of 10
Quote:
Okay, after reviewing the BOM and board, if you aren't going to have the input switching, it's as easy as not purchasing anything in the "INPUT Control" section of the BOM: RS1...to the 2-pos terminal block.
 

This is true.  Even further, there's nothing that says you can't build a MiniMAX with MOSFETs.  It's the same board with even shorter traces - everything compressed down to the bare necessities and yet still remains through-hole.  The only restriction on the MiniMAX is if you want to use the custom-machined Beezar/Lansing case.  That's only 1" high (inside clearance) and restricts the height of heat sinks, the primary limit for MOSFETs.  However, if you don't use the case, there's nothing to stop you from using 1-1/2" high heat sinks and other parts, using the MiniMAX PCB.  It's smaller, cheaper, but gives you same the performance at a little less flexibility (no onboard DAC and no relay input switching).
 
Oct 2, 2012 at 10:32 PM Post #9 of 10
Thanks for the advice on the pot.  I'm swamped at work, but now I'm finally ordering the tubes, sockets, pot, and PCB from beezar.  I'll try my luck with the regular components from a mouser/digikey/etc.  They're always easy to unsolder and replace if I want to get experimental...
smile.gif

 
Oct 6, 2012 at 8:43 PM Post #10 of 10
Quote:
Thanks for the advice on the pot.  I'm swamped at work, but now I'm finally ordering the tubes, sockets, pot, and PCB from beezar.  I'll try my luck with the regular components from a mouser/digikey/etc.  They're always easy to unsolder and replace if I want to get experimental...
smile.gif

thats definitely the way to go. plus when you get upgradeitis, you can get some real nice caps and maybe some boutique resistors for the signal path, or some nicer tubes. its fun to experiment with high end components!
 

Users who are viewing this thread

Back
Top