A $70 Audio Player?
Jan 23, 2016 at 5:51 PM Thread Starter Post #1 of 125

silvrr

100+ Head-Fier
Joined
Apr 28, 2013
Posts
275
Likes
249
I used to listen to music on my 2-channel speaker setup, however, hearing the HVAC kick on, the dog chewing on a bone or other noises of the house led me to headphones (and Head-Fi!).  However, I was now always sitting at my desk instead of the nice comfy couch.  Although it was fine for when I was sitting on the computer working; when I wanted to sit back relax and listen to some tunes it wasn't quite the same.  Then I stumbled on to RuneAudio, it would allow me to use my Raspberry Pi as a music player and since it could use a number of storage options and worked wirelessly I could take it anywhere in the house.  To me, nothing beats kicking back in a comfy chair with a nice beverage and listening to an album.  I have seen some people looking for something similar but I am guessing the perceived complexity of putting it all together may scare some people off.  Hopefully, this post will shed some light on it and provide a guide to getting going with what I think is a really simple and great sounding player.  


There are a number of software versions and hardware options to set something similar up.  I am going to post what I use and what works for me.   Please feel free to add what works for you.  I have no connection to RuneAudio and don’t get any kickback for the links I provided to Amazon, I’m simply sharing what worked for me. 
 
HOW DOES IT WORK?:


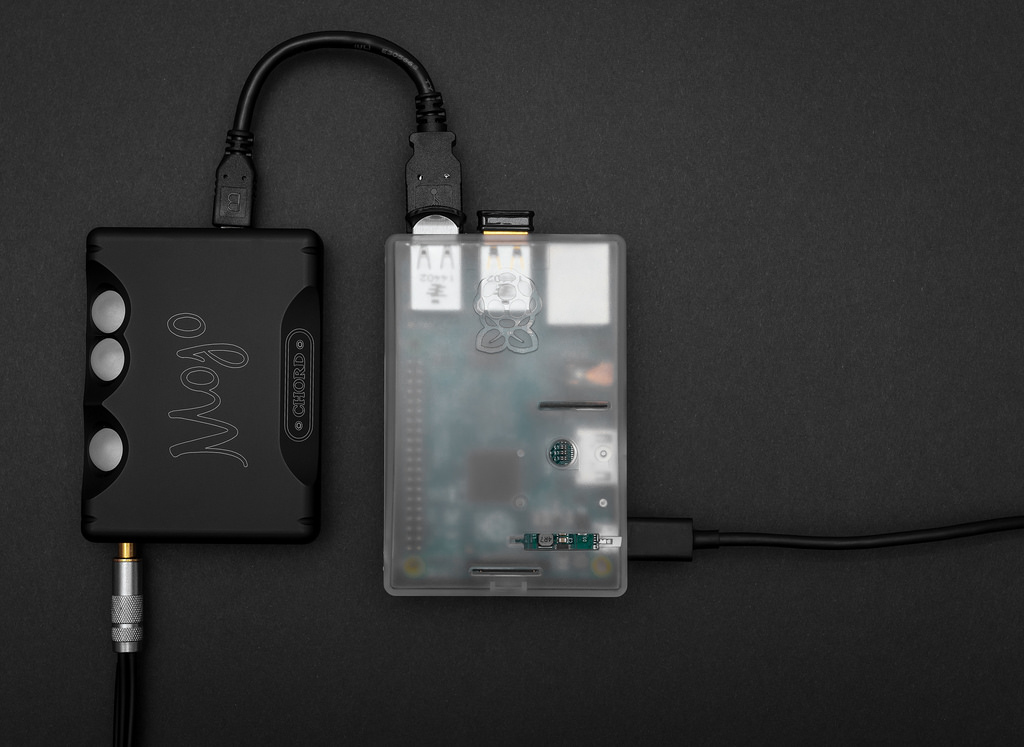
RuneAudio a piece of open source software that is basically a stripped down version of Linux that is made to only play audio.  It runs off a Raspberry Pi and is headless (no monitor needed) and you interface with the software (select songs, start, stop, etc.) through a web browser.  You can provide music through USB storage options, Network Attached Storage (NAS), share it from another computer or though Apple’s AirPlay.  Connect your DAC, AMP and Headphones and using the Web User Interface (WebUI) it is like any other player. 


HOW DOES IT SOUND?:
$70.00? DIY? Does it perform?  I think so.
Really the best summation of how it sounds comes from another review I found: “ The Raspberry Pi2- MPD sounds like nothing else. Actually sounds like nothing.”  With the silent background and the Pi simply feeding bits to your DAC of choice it shouldn’t sound like anything. 
 
Both my desktop and my laptop produce a slight hiss with my Modi when I have nothing playing and crank the volume all the way up on my Magni.  However, with this setup that hiss is gone, it’s dead silent. 
 
The RuneAudio developers claim bit-perfect playback, and I am not in a position to refute that.   I have played up to 24/192 content on it without a glitch.   Even with 24/192 content the Raspberry Pis processor is barely being stressed.   I have watched it as I play content and skip songs and I don’t think I have seen a single core go over 30% or so and usually only one core is working.  Skipping songs and providing the initial playback buffer seem to provide a spike in usage (the 30% I noted above) and while playing usually a single core is operating at the 5-7% range. 
 
Other reviews:
 
Part Time Audiophile:
https://parttimeaudiophile.com/2015/05/23/review-raspberry-pi-2-as-music-streamer/
 
LINUX? DIY? SOUNDS SCARY/COMPLICATED:
While it’s not as plug and play as some other options, it is not as complicated as it may seem.  The hardware assembly is as easy as putting together a sandwich and the software side of things is pretty smooth and well documented.   I will say I wouldn’t give my Grandpa the hardware and instructions and let him try it on its own.  You need to know basic computing, what the different hardware parts are, how to download something and basic computer operation. 
You do not need to know how to run Linux. You can really use this setup without ever interfacing with the Linux side of things.  The WebUI really has all the options to change your settings and get music playing.  I really needed to interface with the Linux side of things for a few tweaks and when I was monitoring CPU usage.  My Linux experience is limited to following instructions and goggling when I run into issues.   The Raspberry Pi has a huge and very mature support community and if you do screw something up, reload the software to the MicroSD card and start over, it’s a 10 minute process at best.
 
I will say that the software for RuneAudio (and any other software I mention) is in Beta and is not without bugs.  However, after my initial setup and sorting through one power issue I have had smooth sailing. 
 
It is also relatively cheap if you decide it’s too much for you or doesn’t suit you.  Half the cost is in the Raspberry Pi which resells pretty easily.  The rest of the items could either be sold with the Pi, as most people need them for a Pi project, or used for other things.  
 
WHAT PROBLEMS HAVE YOU RUN INTO?
DAC Compatibility:  My first run at this was actually with Volumio which is a sister/mother/cousin of RuneAudio.  The combination of the DAC chip in the Modi 2, and the Raspberry Pi2 do not play nice together, basically I just got static.  A Google search is your friend here, the most common DACs often are on a compatibility list or you can find someone else using one. 
 
Connectivity Issues/Wi-Fi Sleeping:  This drove me absolutely up a wall for a while.  Turns out the Wi-Fi dongle I use (and you should too!) has an option to let it sleep when not in use.  Which doesn’t work well when you need to connect remotely all the time.  There is a quick and simple fix and I haven’t had the issue again.  The fix is included in the software setup section below. 
 
Not an issue specifically with this setup but Linux in general is Wi-Fi USB adapters.  When I used Linux for a few other things the Wi-Fi dongle has been the biggest headache.  Use the one I link or find one that is for sure plug and play with Linux.  Finding drivers and working in an operating system that you may not be familiar with is not fun. 
 
Startup Hangs:  My previous setup would occasionally hang when I started it up.  I had an overclock, was running extra USB current an I think it was to much all at once.  With the overclock turned off I tried 5-6 reboots in a row with everything hooked up and had no issues.  
 
OK, I WANT TO GIVE THIS A TRY, WHAT DO I DO?
 
Here are links to posts to help you get started:
 
What to buy / Hardware you will need: http://www.head-fi.org/t/795895/a-70-bit-perfect-audio-player#post_12279031
 
Software You will Need to Download: http://www.head-fi.org/t/795895/a-70-bit-perfect-audio-player#post_12279031
 
Setting up RuneAudio: http://www.head-fi.org/t/795895/a-70-bit-perfect-audio-player#post_12279032
 
Network Mounts / Sharing: http://www.head-fi.org/t/795895/a-70-bit-perfect-audio-player#post_12281435
 
Frequently Asked Questions: http://www.head-fi.org/t/795895/a-70-bit-perfect-audio-player#post_12279060
 
 
Jan 23, 2016 at 5:52 PM Post #2 of 125
HARDWARE YOU WILL NEED:


clip_image002.jpg

Raspberry Pi: http://amzn.com/B00T2U7R7I
Edimax Wi-Fi Adapter: http://amzn.com/B003MTTJOY
Micro SD Card: http://amzn.com/B000SMVQK8
Power Supply: http://amzn.com/B00MARDJZ4
Raspberry Pi: Case: http://amzn.com/B017OVLKX8
Grand total for the linked parts is $67.87 and shipping should be free if you order it all together.
 
OTHER HARDWARE YOU LIKELY ALREADY HAVE:
Storage: http://amzn.com/B00YFI1EBC
Ethernet Cable: You likely already have this, any cable should work.
DAC: See below in the notes, most DACs will work.
Amplifier: this should be self-explanatory and no different from any other setup.
Headphones/Speakers: this should be self-explanatory and no different from any other setup.
Something with web browser: Phone, Tablet, Computer, Laptop, you get the idea.
 
A few notes on the hardware:
The parts I listed above are the ones I used with the exception of the power supply and the case.  I had a spare iPad charger that I used, however, they are expensive and any power supply providing over 2 Amps (2000 milliamps) should work fine.  Any case compatible with the version of the Pi you choose should work.
Use the Wifi adapter I linked; it has worked fine in every room in my house and requires no setup.  I have spent hours trying to get other USB Wi-Fi dongles working for other Linux projects, not worth the hassle.  You can run this setup off the Ethernet port on the Pi, however that makes it much less portable and some report noise when using this option as the USB hub and Ethernet share a common bus.
 
Any MicroSD card will work, the RuneAudio page says “at least 4GB”.  The one I linked has a SD to MicroSD adapter which is handy as not everyone has a MicroSD reader on their computer.
 
Your storage is up to you, I linked what I personally use but there are a lot of options.  Any USB hard drive that is self-powered should work.  If you have a “portable” hard drive it may draw too much power off the Pi and cause problems, you may need to use a powered hub in which case you can ditch the power supply and run the Pi off the hub.  I have used a number of USB Flash Drives and haven’t had any issues with any of them, USB 2, USB3 included.   Network storage is an option too (A NAS, another computer on your network, etc.), I will get into that in another post. 
 
I chose a Raspberry Pi2 for the extra USB and extra processing power should I ever use it for another task.   Most of the software options have a download for each of the Pi options.  You can use any of the other boards similar to the Pi2 also (Beagle Bone Black, CuBox, Udoo and Odroid come to mind)  I also chose a PI2 because to me the Raspberry Pi support community seems to be more mature than the others, which is helpful when you have questions.  Most simple issues can be fixed with a bit of google-fu.
 
You can use the DAC you already have if it has a USB input.  Most DACs play nice with the hardware and software, however, before you make the purchase use your google-fu or ask on the RuneAudio forum to make sure.  If you want to use an optical input on your DAC Hifiberry makes a board that slips over the pins on the Raspberry Pi and gives you digital out options. (Hifiberry Digi+ http://amzn.com/B0147RPBXC $38.99)  Hifiberry also makes a standalone DAC that works with the Pi.  I used this and found it to be simple to setup and the sound quality was in the same league as my Modi to my ears.  (Hifiberry Dac+ http://amzn.com/B0147RA2PY $39.99)
 
SOFTWARE YOU WILL NEED:
RuneAudio: http://www.runeaudio.com/download/
Win32DiskImager: http://downloads.sourceforge.net/project/win32diskimager/Archive/Win32DiskImager-0.9.5-install.exe?r=http%3A%2F%2Fsourceforge.net%2Fprojects%2Fwin32diskimager%2F&ts=1453388745&use_mirror=iweb
(Optional) PuTTY: http://the.earth.li/~sgtatham/putty/latest/x86/putty.exe
 
A few notes on the software:
Choose the RuneAudio version that is designed for the hardware you chose.  They are a decent sized download so start the download while you assemble your hardware.  Volumio, MoodeAudio and other similar versions of the software all are options too.  I have had the best luck with RuneAudio working with my Schiit Modi 2.  They all work off the same idea of the Pi doing the lifting and you start, stop, and skip songs through a Web User Interface.  Volumio and RuneAudio were the same team at one point and split so they are very similar. 
 
I use Win32DiskImager because I am on Windows and it works.  If you need an option for a Mac OS or a Linux OS follow this link and under quick start is a document on how to complete each. http://www.runeaudio.com/documentation/
PuTTY is SSH client which allows you to remotely log-in to the operating system and make modifications.  This is useful for a few changes that I made and found useful but is not required.
 
Jan 23, 2016 at 5:52 PM Post #3 of 125
HARDWARE SETUP/ASSEMBLY:
Unpack everything, put the Pi in the case, plug in your Wi-Fi adapter and DAC and storage.  Once the SD card has been loaded with RuneAudio it can be inserted also.  That’s all, it’s pretty easy. 
 
You need to run the internet connection off of the Ethernet port for initial setup to get your Wi-Fi setup and connected.  If you don’t have Ethernet near your audio setup you can share the connection of a laptop or another computer by bridging the connection and plugging the Ethernet cable into your computer.  Follow the instructions here (http://windows.microsoft.com/en-us/windows/create-network-bridge#1TC=windows-7)
 
SOFTWARE SETUP:
The directions supplied by RuneAudio are decent to get started.  I have provided a step by step set of instructions if you prefer a bit more guidance.
http://www.runeaudio.com/documentation/quick-start/quick-start-guide/
Basics are load the software onto the MicroSD card, insert it and plug in the power supply to your Pi.  Give it 10-20 seconds to boot and then navigate to the WebUI.
 
Then enter http://runeaudio or http://runeaudio.local in your browser and the WebUI will appear.   If it doesn’t load you either forgot to plug in the Ethernet cable or MicroSD card.  I have yet to have any of the distros available fail at this point. 
 
From here navigate to the network tab and let the Wi-Fi setup find your preferred network and if its password protected supply the password.  From here you can shut the Pi down though the WebUI and remove the Ethernet cable, you shouldn’t need it from here on out. 
 
Always be sure to shut down or restart your Pi using the WebUI or through PuTTY.  If you just yank the power you can corrupt the MicroSD card and have to start over.
 
If you are using the Edimax USB Wi-Fi dongle I linked to earlier I strongly encourage you to change the power settings for the dongle.   I was getting very frustrated with my setup and actually stopped using it for a bit due to the hang ups I was having, turns out the Wi-Fi dongle can go to sleep and your Pi will stop responding through the WebUI. 
 
Download PuTTY and run it.  Enter IP address of your PI and click Open at the bottom of the PuTTY screen.  To find the IP address of your PI just log into your router and check the connected devices it should show up.  Once logged in the Username is: root and the Password is Rune. 
Follow the code entries here: https://www.raspberrypi.org/forums/viewtopic.php?t=61665.
From there sit back, listen to some of your tunes and navigate through some of the other screens.  From there it is tweaking to your preferences.  
 
Jan 23, 2016 at 5:52 PM Post #4 of 125
1.    Download RuneAudio, Win32DiskImager and PuTTY, plug in your MicroSD card and find is appropriate letter designation.  You will need to un-zip the RuneAudio Download.  Win32DiskImager will need to be installed.


Here you can see all the downloads on the left side of the screen and my MicroSD card selected on the right as drive letter H. 


1.   2. Launch Win32DiskImager and select your MicroSD card by the drive letter.  (Be sure you have this 100% correct as it will erase and write over whatever you select).   Then Click the blue folder icon and navigate to your extracted rune audio file that ends in .img.  After you double check everything, click Write.  A prompt will pop up to confirm the overwrite of the drive you selected, click yes.


1.
  3. The writing of RuneAudio to the disk will take a minute or two. You should get a “write successful” message at the end. Click OK and eject your MicroSD card from your computer using the “safely remove hardware tool”


1. 4.   Insert your MicroSD card and your Wi-Fi dongle into the Raspberry Pi.  Connect to your local network via an Ethernet cable and power your Pi on by plugging it in. 
 
In any browser navigate to:
http://runeaudio/
or
http://runeaudio.local/
or
The IP address of your Raspberry Pi if you know it.
 
You should arrive to the screen below.


1.   5. In the upper right hand corner click the three lines next to menu and then select network.


1. 6.   Click the “WLAN0” with the red X. and a new screen will appear that will scan for wireless networks.  Select yours from the list by clicking on it. 
 
Enter your Wi-FI’s password in the password box.
 
(Optional: Under IP assignment, change the pulldown to static.  Enter an IP address that is not commonly used.  This gives you the ability to pull up the WebUI by IP address and also makes it easier to remember later if you want to map to the PI for file transfers)
 
Click “Save Profile” and you should be sent to a new screen.  Your WLAN0 should now have a green check next to it showing you have Wi-Fi access now.  


1.   7.  Again from the menu select “Power” and a box will appear.   Select “Shutdown”.  Give your PI 20 seconds or so to shut down, the yellow light will stop blinking, the red light will remain illuminated.  The red light will always be illuminated when there is power available. 
 
Remove the Ethernet cable.  Take your Pi to your listening station and hook up your DAC, your storage and then plug the power in again.  


After everything is connected and powered up again connect to RuneAudio using…
 
http://runeaudio/
or
http://runeaudio.local/
or
The IP address of your Raspberry Pi if you know it.


1. 8.   From the Menu select “MPD”.  


Under “Audio Output Device” Select your DAC.  Not that the HDMI works but the onboard headphone jack produces less than stellar results.  You really want to use a DAC in this case.
 
Under “Volume Control” select “Disabled”.  The volume control works just fine but I can hear a difference in the sound when using it at anything but 100%, so I recommend you disable it and use the volume control on your amp/preamp. 
 
Click “save and apply” at the bottom of the screen.


1.  9.    From the menu select “settings”


Update your time zone by selecting the correct option from the pulldown.  They are in alphabetical order.  Then click “Apply Settings”.  Note that your date and time can throw off the ability of networking functions with Windows so be sure to update this. 


1.10.    Music time!  In the lower left, select “Library” and then “USB storage”.  (I’m assuming you’re using USB storage at this point as we haven’t setup a network mount.
 
Note that I have my USB drive organized by folder starting with Artists, then moving down to individual folders to albums and inside those folders is the actual audio files.  If you have your music organized differently you may have a different look.


Click the three bars next to any folder and you can add it to your Queue using any of the options. Play around with this adding to your queue at different levels, a whole album, just one song, etc.  There is also a search function if your music is less organized.  


1. 11.   One more step if you are using the Edimax Wi-Fi dongle.  This will prevent the Wi-Fi from going to sleep and locking you out.
Open PuTTY by double clicking the file that downloaded. (it does not need to install)
Enter the IP address of your PI, then click “Open”


                   The following screen will appear, click “Yes”


1. 12.   Enter the username and password:
 
Username = root
Password = rune
 
You should now have a screen like below:


Copy the following text and paste it into putty (right click in putty to paste) then hit enter:
 
sudo nano /etc/modprobe.d/8192cu.conf


Copy the following and paste it into the new window.
 
# Disable power management
options 8192cu rtw_power_mgnt=0 rtw_enusbss=0
 
Then hit Control + X
 
Enter Y to save
 
And hit enter to exit.
 
Type reboot (this will reboot the Pi and ensure that the changes you just made are picked up)
 
You can close putty by clicking the red X in the upper right hand corner.
 
[Thanks to this site for providing the solution to this problem! https://www.raspberrypi.org/forums/viewtopic.php?t=61665]
 
1.    Sit back and listen to music for a while!  You can use anything with a browser to access the WebUI.  I have used my iPhone, Laptop (Chrome) and my wife’s kindle with no issues.
 
Jan 23, 2016 at 6:06 PM Post #5 of 125
FREQUENTLY ASKED QUESTIONS (FAQ):
 
Ask questions, ones that are frequently asked will go here!
 
What formats can RuneAudio Play? Including but not limited to FLAC, WAVE, MP3, AAC and ALAC
 
What bitrates can it play? I have personally played 16/44, 24/96 and 24/192.  Anything over 24/192 and people report issues.  
 
Jan 23, 2016 at 6:27 PM Post #6 of 125
This will be helpful for a lot people good work.
wink_face.gif

 
Did you tried instead of RuneAudio, RaspyFi, Pi MusicBox or simply Music Player Daemon?
 
Btw. I'm a big fan from Daphile for my main music system, but this only runs on x86 hardware not on ARM hardware like Raspberry Pi.
 
Jan 23, 2016 at 8:24 PM Post #7 of 125
 
This will be helpful for a lot people good work. :wink_face:

Did you tried instead of RuneAudio, RaspyFi, Pi MusicBox or simply Music Player Daemon?

Btw. I'm a big fan from Daphile for my main music system, but this only runs on x86 hardware not on ARM hardware like Raspberry Pi.


RaspyFi is what Volumio and later RuneAudio became from what I have read.  I tried Volumio and MoodeAudio but they both had issues with my Modi.  

Haven't tried straight Music Player Daemon, although all of these projects just build on MPD as a base.

Ive been meaning to look into Daphile, Ive read good things.  
 
Jan 24, 2016 at 4:06 PM Post #9 of 125
NETWORK MOUNTS:
 
WRITE ACCESS TO THE USB ATTACHED TO YOUR RASPBERRY PI:
 
This will allow you to send music to the USB attached storage on your Pi from your computer.  I use this when I get new music and want to have it on my Pi.
 
Click "File Explorer" from the start menu
 
Click "Map Network Drive"
 
Select a drive number that isn't used often.  (I used R for RuneAudio)
 
Enter \\192.168.1.13\music_store\USB\Music
 
In the example above...
 
192.168.1.13 = the IP address of your Pi
Music = the name of your usb drive.  To get the name of your USB drive access the WebUI and select sources from the menu in the upper right corner.  The name is after USB\  See below for an example. 


In this example, I have named my USB drive "Music".  If you didn't name your USB drive it will likely have a manufacturers name.


SETTING UP A WINDOWS FOLDER FOR SHARING:
 
Right click the folder you want to share.
 
Click the "Sharing" tab
 
Click "Advanced Sharing"
 
Click the "Share this Folder" box
 
Click Permissions.  Then click the "Full Control" box
 
Click "OK" on each box to let all the windows close.


READING FROM A NAS, DESKTOP OR OTHER NETWORK LOCATION
 
In the WebUI select "Sources" from the menu in the upper right hand corner.
 
Click "Add new mount" on the sources screen
 
Fill in the follwing as noted below:
 
Source Name = Anything you want it to be
Fileshare Protocol = SMB/CIFS
IP Address = The IP Address of your NAS or computer
Remote Directory = The name of your music folder.  Mine is stored at D:\My Music.  I would only enter "My Music"
Click Guest Access to turn it off. 
Username = Your Windows logon
Password = Your Windows password
 
Click "Save Mount" and you should now be able to access that folder form your Pi via the library. 


Jan 28, 2016 at 4:24 AM Post #10 of 125
I had the same idea with using a pi and hifi berry with a small display and battery powered to be fully portable with a portable dac and amp. But your idea is just as good as well.
 
Jan 29, 2016 at 3:35 PM Post #11 of 125
Is there jitter with this type of set up? I know bluetooth connection will produce jitter. I am not sure about wifi.
 
Jan 29, 2016 at 3:55 PM Post #12 of 125
  Is there jitter with this type of set up? I know bluetooth connection will produce jitter. I am not sure about wifi.

 
In the setup that I show all of the music is stored locally so the only role the Wi-Fi plays is to aid in displaying the WebUI.  The Wi-Fi is only used to send start, stop, etc. commands to the player, after I hit play on an album I usually don't bring up the WebUI again until I finish the last track. 
 
Now with the USB Drive, Wi-Fi dongle and DAC all playing on the same bus I guess there could be issues, however, I don't think they would be any worse than any other similar setup with multiple devices running on USB.
 
Jan 29, 2016 at 4:06 PM Post #13 of 125
Ok, It was just tl;dr. I might actually build one of these.
 
But I also found another good option Chromecast audio, https://www.google.com/chromecast/speakers/, it's a little device that has optical output and can stream via wifi and 35$. Now I think that set up can actually have jitter issues but the 35$ seems worth the risk to test out for me.
 
Jan 31, 2016 at 6:07 PM Post #14 of 125
Having used Rune and Volumio, Rune is the better option. They are both built on MPD. We use it in our office to stream audio over the overhead speakers. We use the HiFiBerry Dac+ with a Pi2 and a Class 10 MicroSD card. Works great for what it is. I did spend quite a bit more on a nice Dayton 200wrms amp for our speakers than the Schiit pictured here.
 
Feb 5, 2016 at 4:13 AM Post #15 of 125
What do you guys think about the hummingboard pro and radxa rock pro/lite?

The hummingboard Pro has coaxial s/pdif for external dac and lvds to connect a touch screen. It even has an msata port for mssd. Its a little expensive though.

I really like the radxa rock pro and lite. It is $59 for the lite and it basically does what your $70 pi does. It has features such as optical s/pdif and lvds to connect a touch screen.

The raspberry pi has only 1 gpio connector, adding s/pdif output takes up the valuable gpio connector and makes it thicker for a portable system and also it limits the kind of screens i can get.
 

Users who are viewing this thread

Back
Top