Hallman Labs©: Burson Audio's Play DAC/Amp vs. ES9038P + FUN01 (Singxer SU-1 Clone | XMOS)
Originally posted here: https://hallmanlabs.com/review-3-burson-play-dac-amp-vs-es9038pro-dac-fun01-v1-1-xmos-su-1-clone/
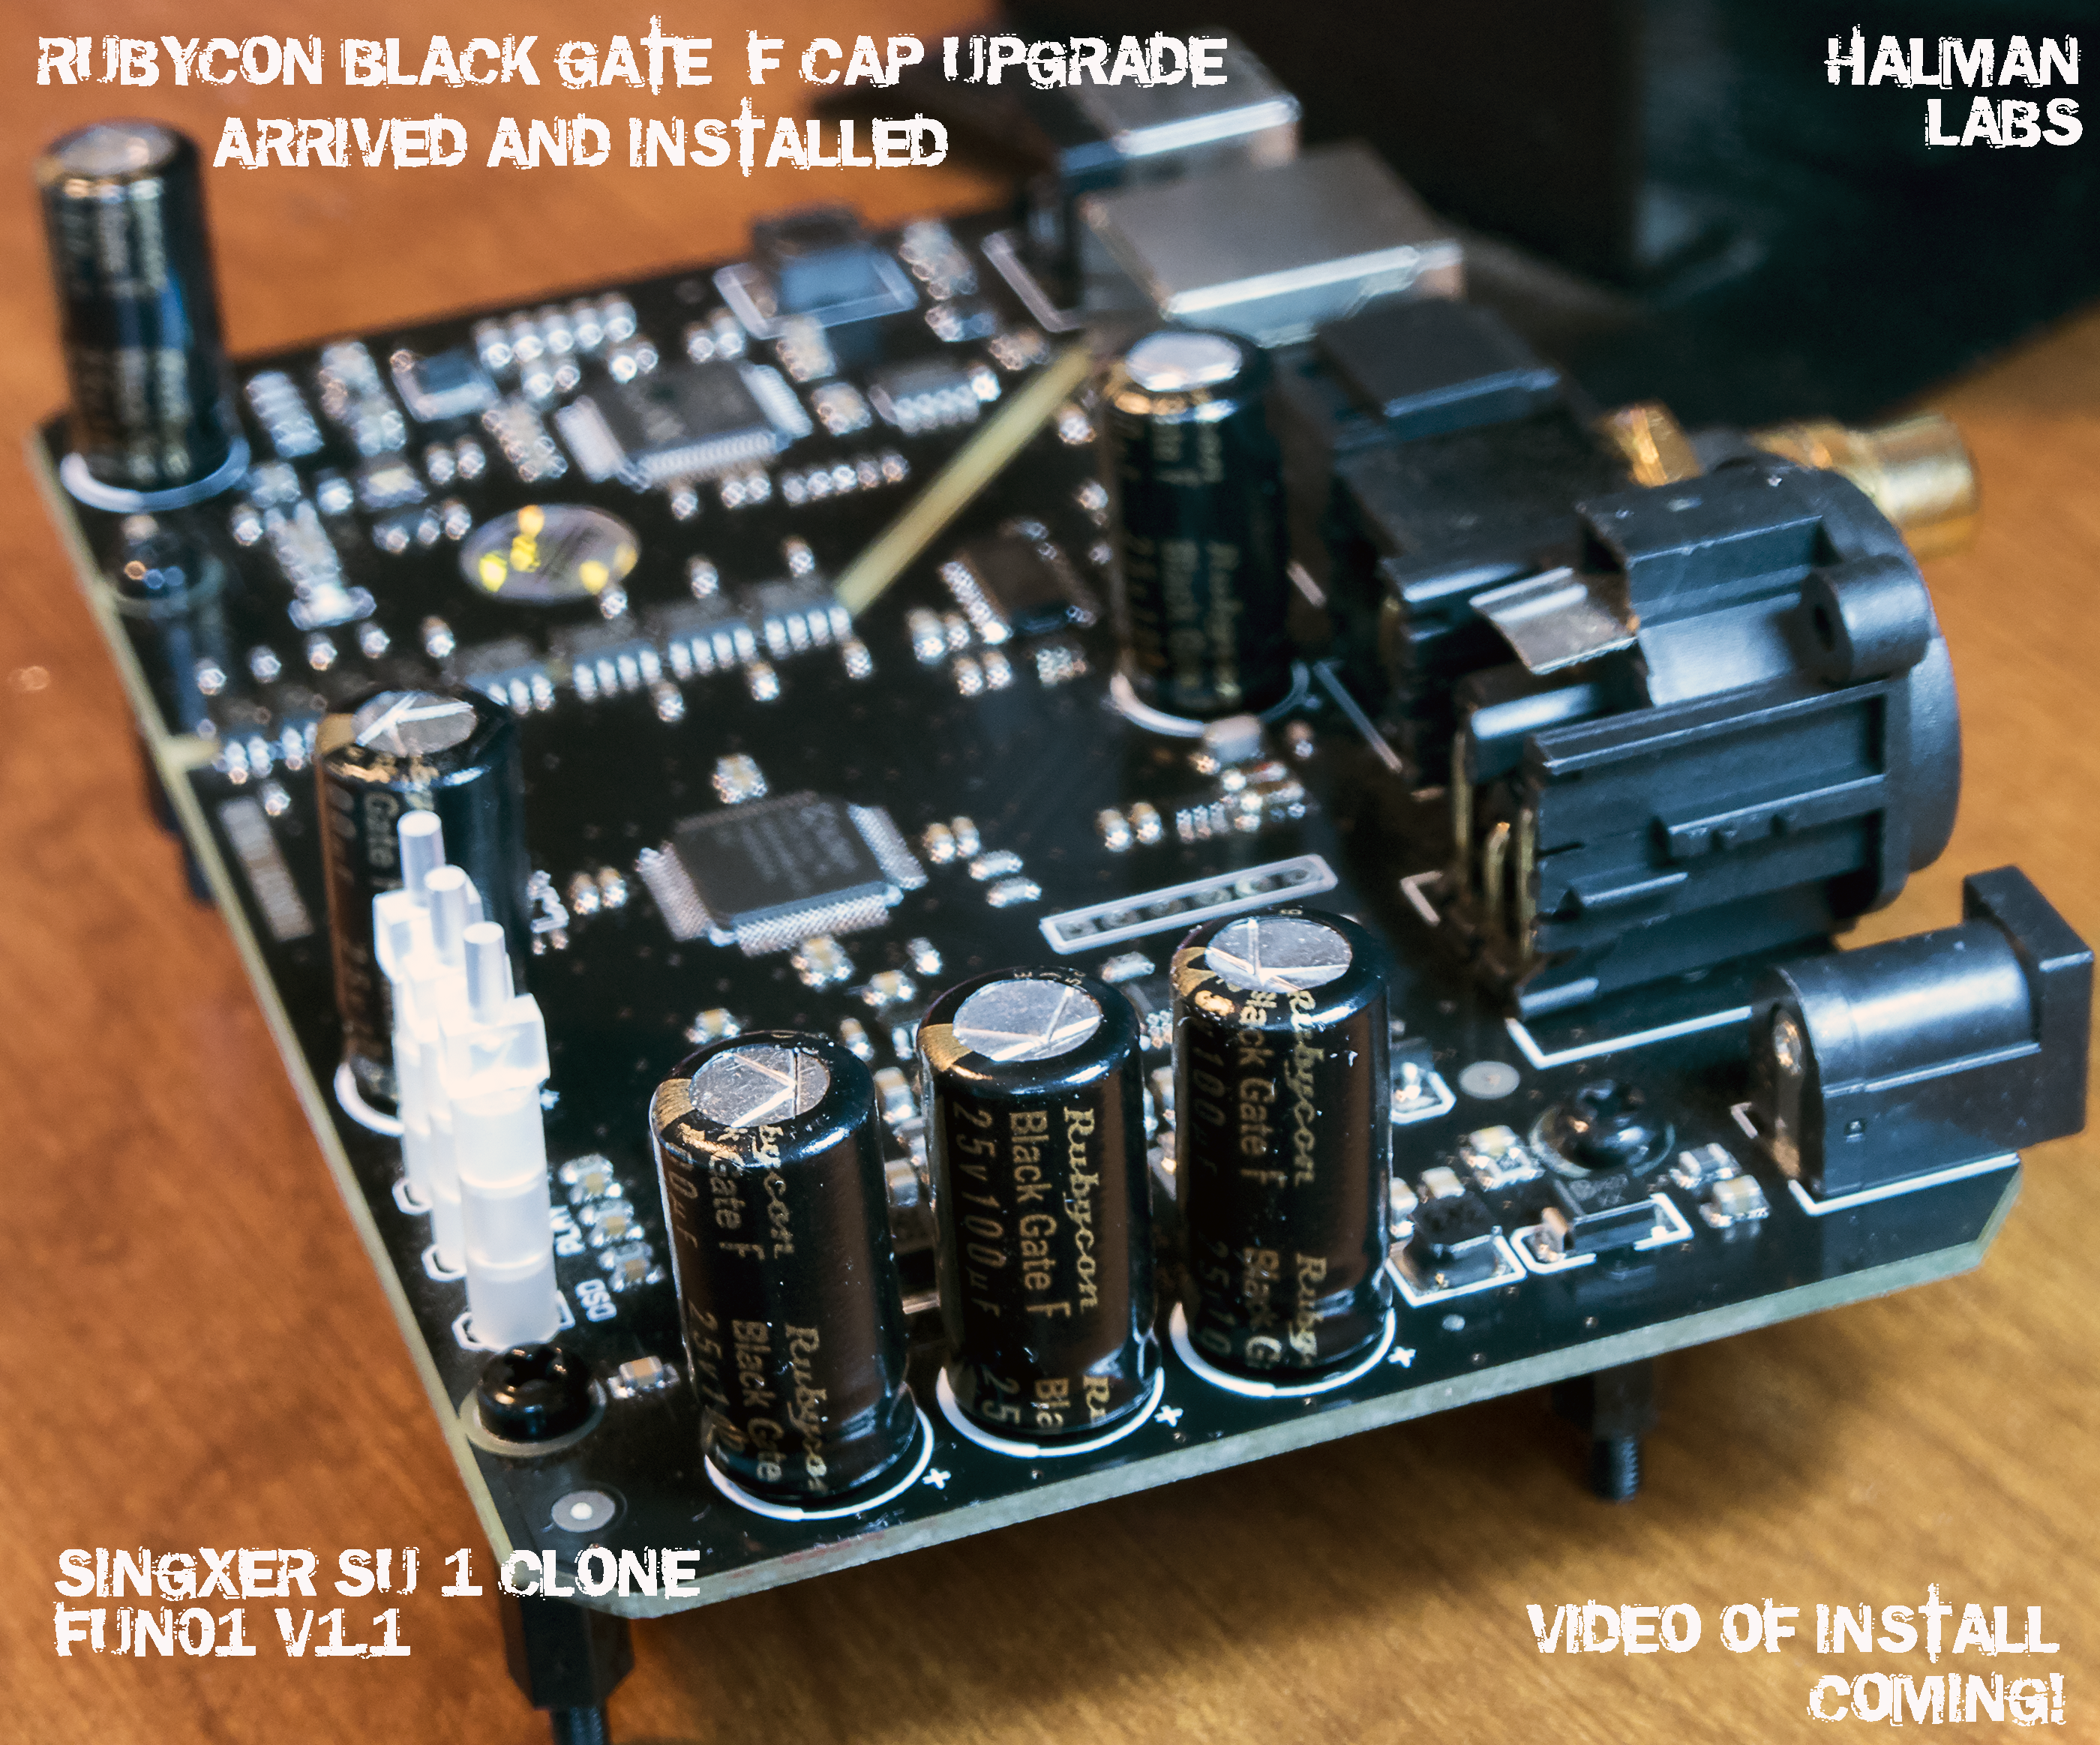
At the request of Burson Audio I am sharing my latest review to date. This is between the stout Burson Play w/ 5x V6 Classics and the ESS ES903Pro w/ 4x Sparkos Labs SS3601/SS3602 and the FUN01, a clone of the Singxer SU-1 without the power supply part. I up the ante even more when I came back to add Black Gate™ "F" capacitors all around on the FUN01. This heightened the clarity of the FUN01 even further than before, after a few weeks of burning in. Nothing in this review was rushed and I tried to verify what I heard more than once before sharing it. I wasn't paid to do this review, but I was provided review hardware.
K. Hallman (Owner - Operator of Hallman Labs©)

My review today is focused on Burson Audio’s “Play”, a potent DAC/Amp combo available in a variety of prices. Dependent on the op-amps chosen from Burson Audio, the price varies from $299 (no remote) up to $549 (with 5x discrete V6-OPA “Classic” op-amps + remote, the setup shown in this review)! The Play uses an XMOS chipset for USB/digital audio in and it has a full pre-amp and headphone amp, offering both ¼” and RCA outputs. You can run the ¼” output and the RCA output together/at the same time. This is similiar to how the ES9038P can do XLR and RCA out at the same time from one pre-amp.
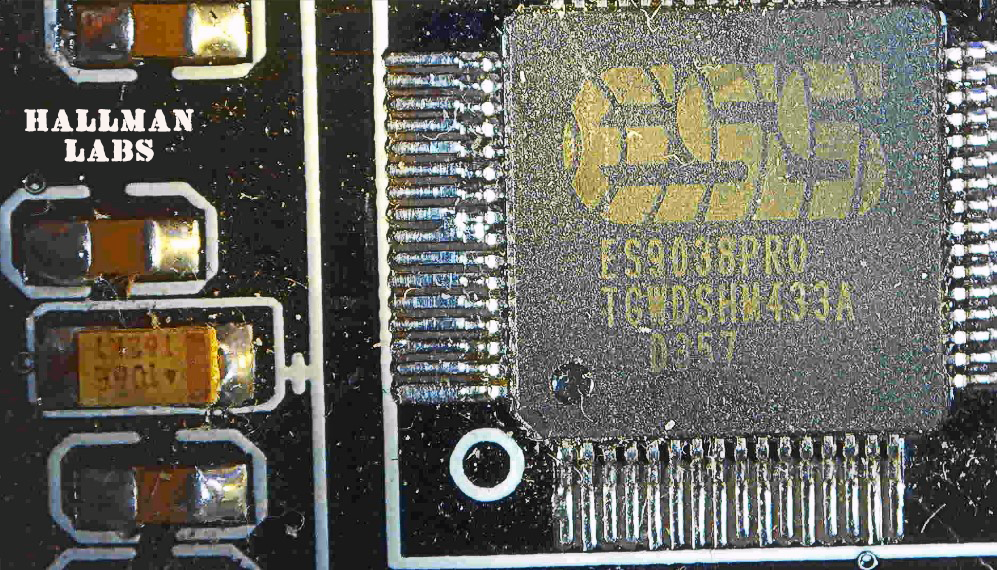
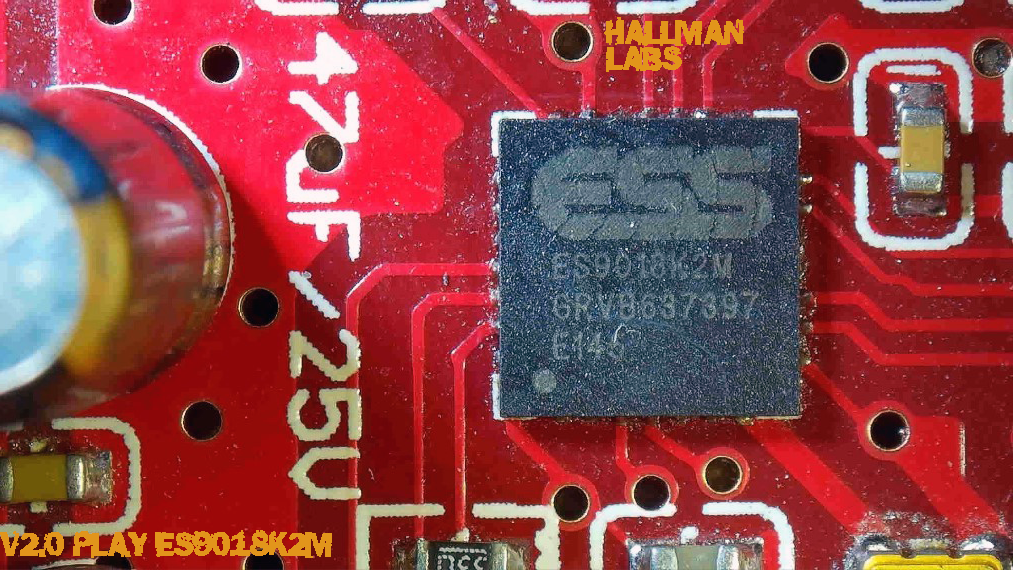
I confirmed with Alex at Burson that the XMOS unit talks to the main DAC using I2S! This is why you are able to play DSD128 with ease on foobar2000! The 64-pin ES9018K2M seen on the primary PCB (under the XMOS unit) is responsible for converting this I2S into analog wave-forms. We have a ton of different op-amp sockets to “Play” with (5 in total), yet it will still fit into a CD/DVD 5.75” drive bay in a PC case. I will be using the V6-OPA “Classic” line from Burson across the board inside the Play for this review. Burson Audio includes a standard 12V Molex power connection on the rear of the unit as well as a microphone input on the front. The 12V Molex connector allows for an easy power connection when the Play is inside your PC’s 5.75” drive bay. All of these features come together to give you the whole package in one very mobile footprint!
The microphone is powered by a small C-Media HS100B (thanks to Head-Fi.org for this correction). After connecting USB, most computers will see the ES9018 output and list it as a generic USB device. This ES9018 output is not meant to be used, so disable it. If you don’t choose the XMOS device (default) named “XMOS-XS1-U8 MFA (ST)”, you’ll never get any sound output. You can find the XMOS driver for the Play directly on Burson Audio’s website in the download section (found here https://drive.google.com/file/d/1RwVLfyNDo0u79erR3KaETreUnlemVhjn/view).

Competition Hardware Descriptions:
While looking at the hardware below keep in mind that the Play can do everything (except maybe DSD256) that the discrete rig below can do. By discrete, I mean we have dedicated components: DAC, USB Interface/XMOS, Power Amplifier, etc. This is one of the huge plus categories for the Play, cost effectiveness. For HiFi on a budget the $299 Play is hard to beat, especially knowing what you can get it to do with discrete op-amps!
Update: 6/25/18:
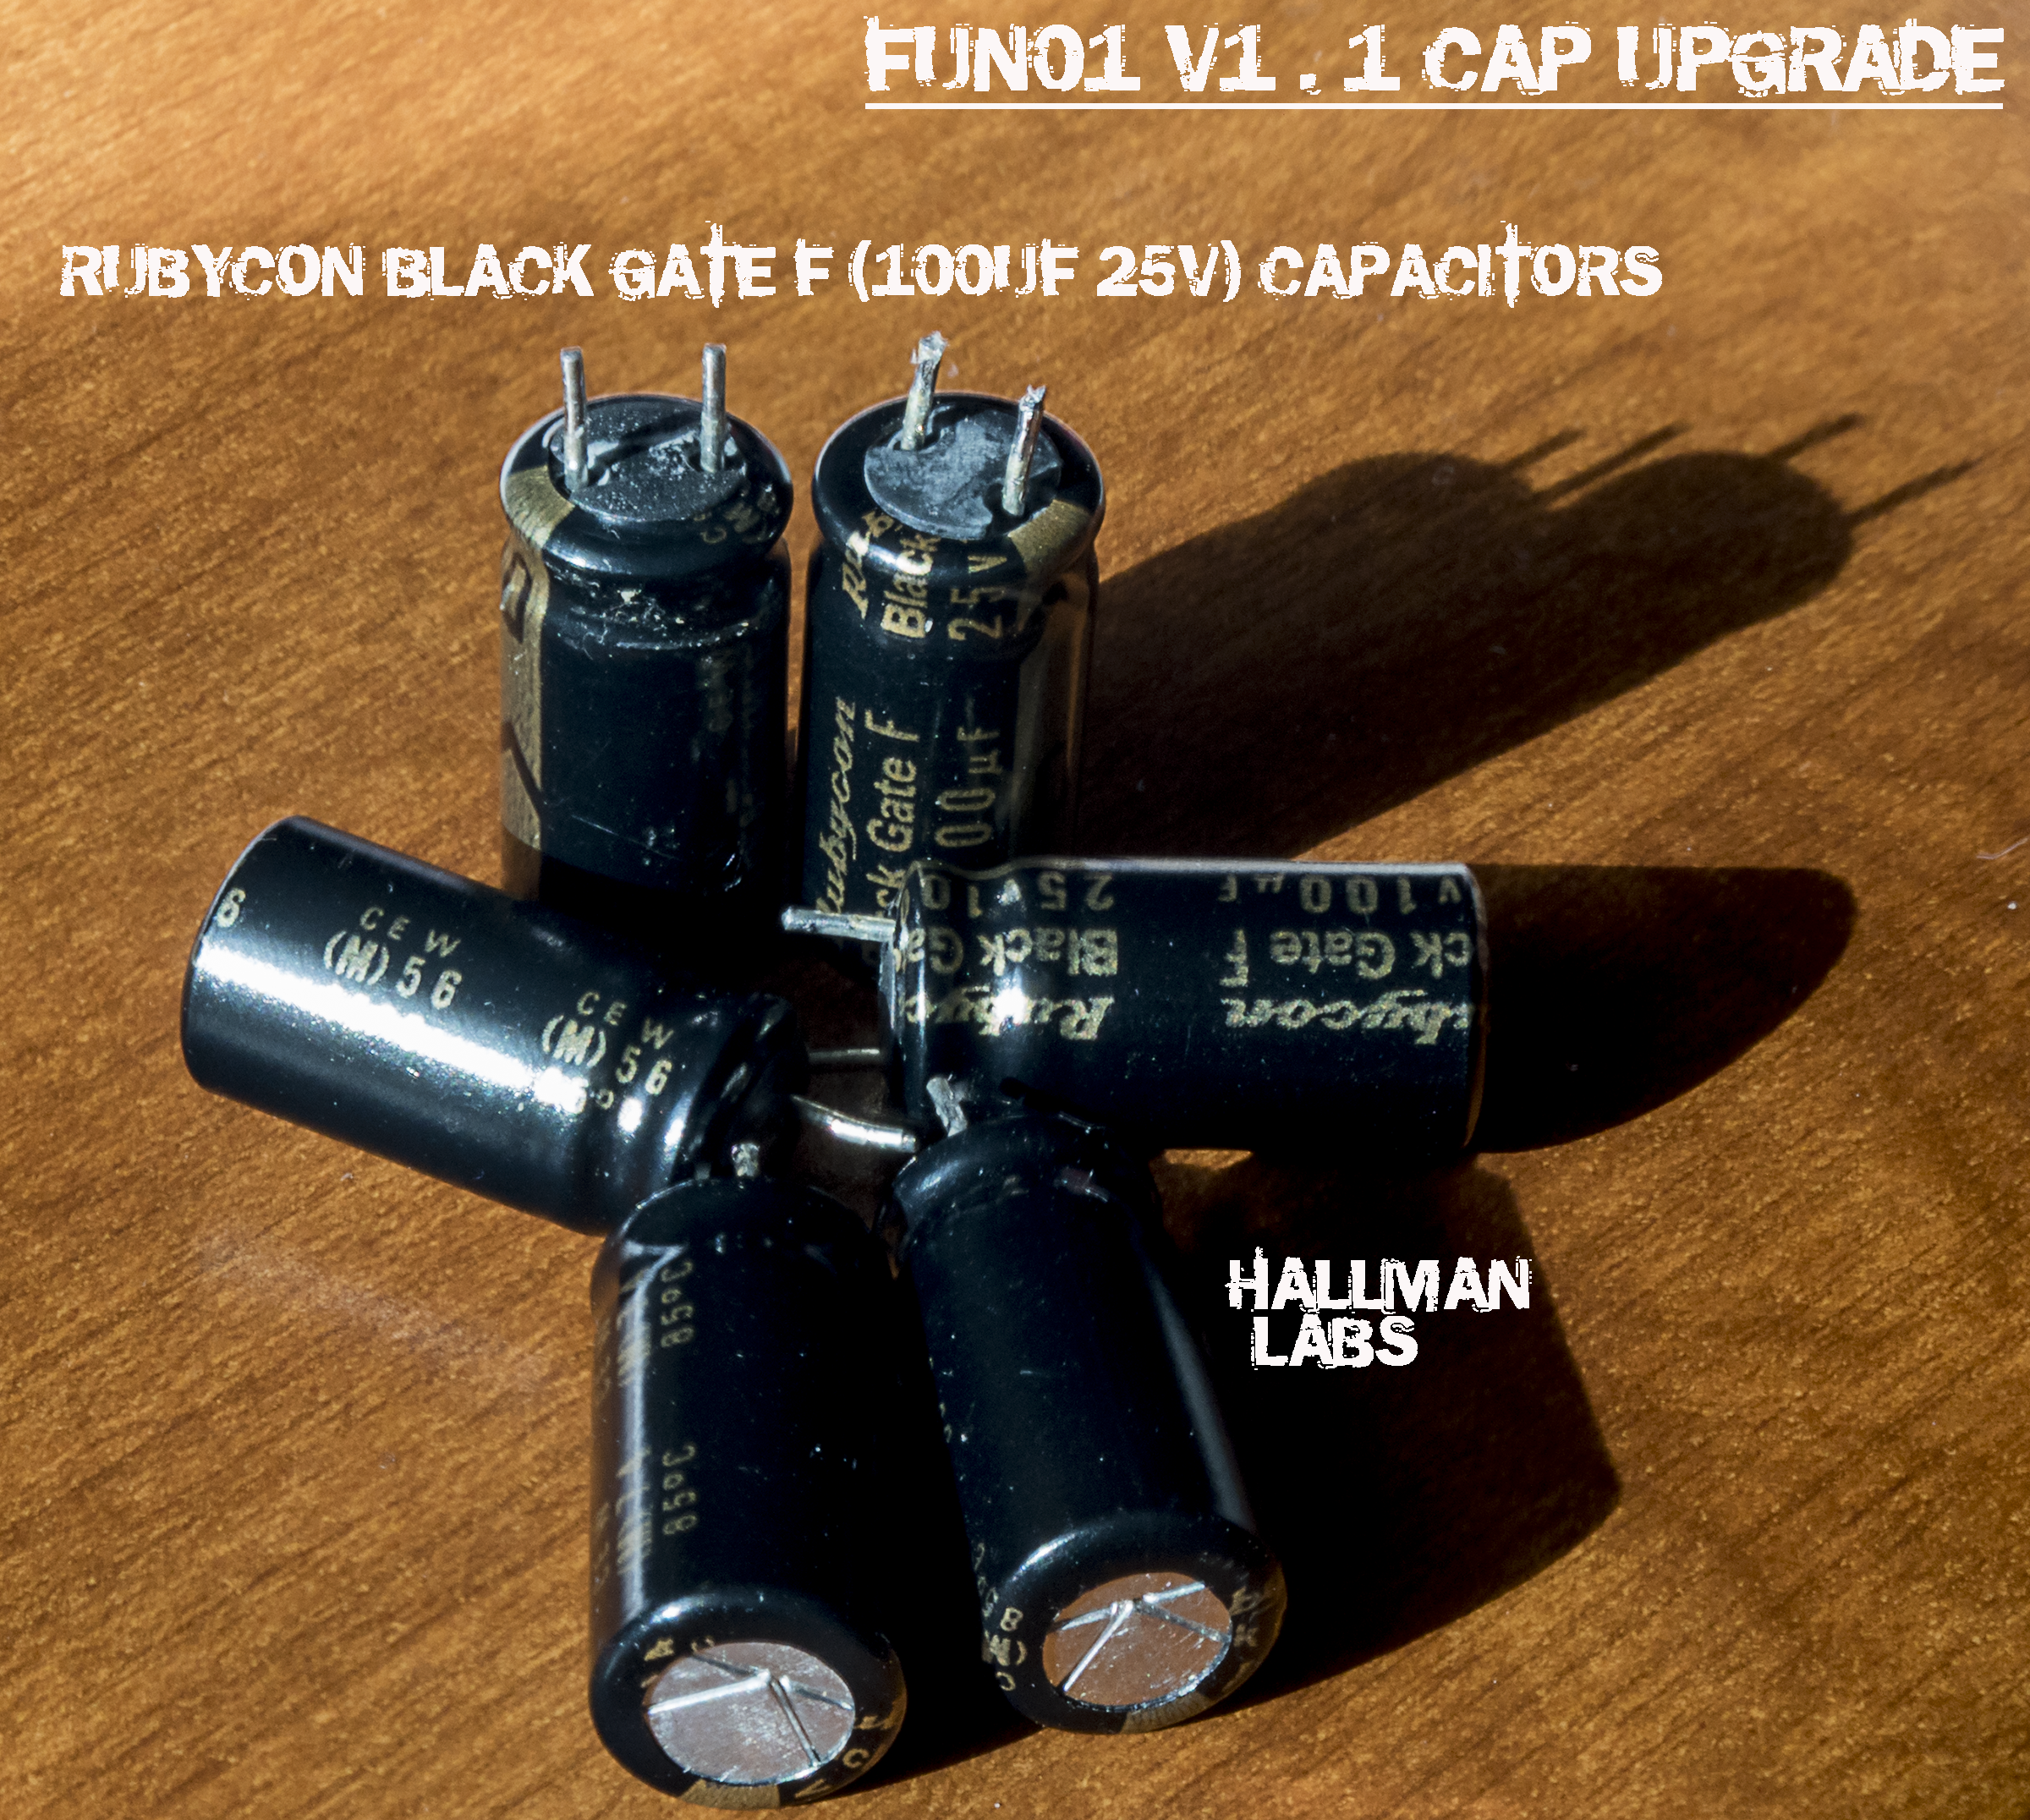
I have managed to run down 6 replacement capacitors for the Nichicon Muse stock caps below in the FUN01 XMOS module. Interested in finding out how this can/or if it will cause a change in the sound signature or quality. I found some Rubycon Black Gate™ “F” Series 100uF 25V (exact replacements to those installed below). I have never bought any Black Gates™ before because the cost of entry is usually so high, but I did once find some of the Non-Polar X (NX) versions for about $35 each, which is really good (same rating as these). Still looking for a good place to use those insanely good capacitors, but non-polar caps are pretty rare these days in digital audio circuits.
I really lucked out on this latest seller, because I found out that despite the fact they have been soldered in a PCB before, it was never used. They removed the capacitors from new circuit boards and as a result, besides testing, the capacitors are all new! These carry a price tag around $50-$100 on Ebay for NOS or New (Other) or New, expect about a 50% price drop for used. Or you can do like I do and sit and wait, always looking but only buying when you truly spot something worth your money. New Black Gate™ F Series capacitors for $20 a piece? Sure! Read a little more here.
I am providing some stout competition for the lonely “Play”. I will be utilizing my ES9038Pro DAC by ESS + “FUN01” v1.1 XMOS module (identical to Singxer’s SU-1). To keep this as even as possible, I will be making almost all head-to-head headphone comparisons using a single amplifier, when I’m using the internal Play amp I will notify the reader. The amp used on most parts is my S.M.S.L. “sAp-10” (a completely balanced headphone amplifier). Offering 2x 3-Pin XLR in + RCA in, with 1x 4-Pin XLR out and ¼” out. All loudspeaker comparisons will be made using my Pioneer “VSX-919AH” (4-Star WhatHiFi Winner) or my Yamaha “RX-V863” (I try both in the review), powering a pair of Wharfedale’s “Diamond 220” bookshelf speakers (5-Star WhatHiFi Winner). Throughout the review, Burson Audio’s impedance matching RCA-to-RCA Cable+™ will be connected between my modded Kenwood C-2 pre-amp (more on that here) and the power amplifier in use.

I will confirm observations I hear over the loudspeakers with my Audeze “EL-8” planar magnetic headphones; to make sure there is really a tonal shift, or distortion, etc. The EL-8 “space-age material” diaphragms (thinner than a human hair) lay above the Uniforce™ voice-coils, which give what Audeze calls, “near zero distortion”, making the EL-8s a perfect choice for reviewing high-end hardware where reference quality and flat frequency response is required!

The EL-8 also uses “patented Fluxor™ Magnet Arrays giving near double the power driving the diaphragm for even less distortion” along with Fazor™ elements as waveguides for a more “accurate waveform”. That is not to say the Wharfedale “Diamond 220” speakers are anything but exceptional, blowing away my Polk ”70s” in fidelity.
We want flat frequency response because anything other than that is in effect, an EQ on the incoming signal. In reality there is always some amount of EQ from the speakers or headphones, especially the speakers. As the Art of Digital Audio says, transducers, especially in loudspeakers, are what hold back audio the most from the next leap in innovation.
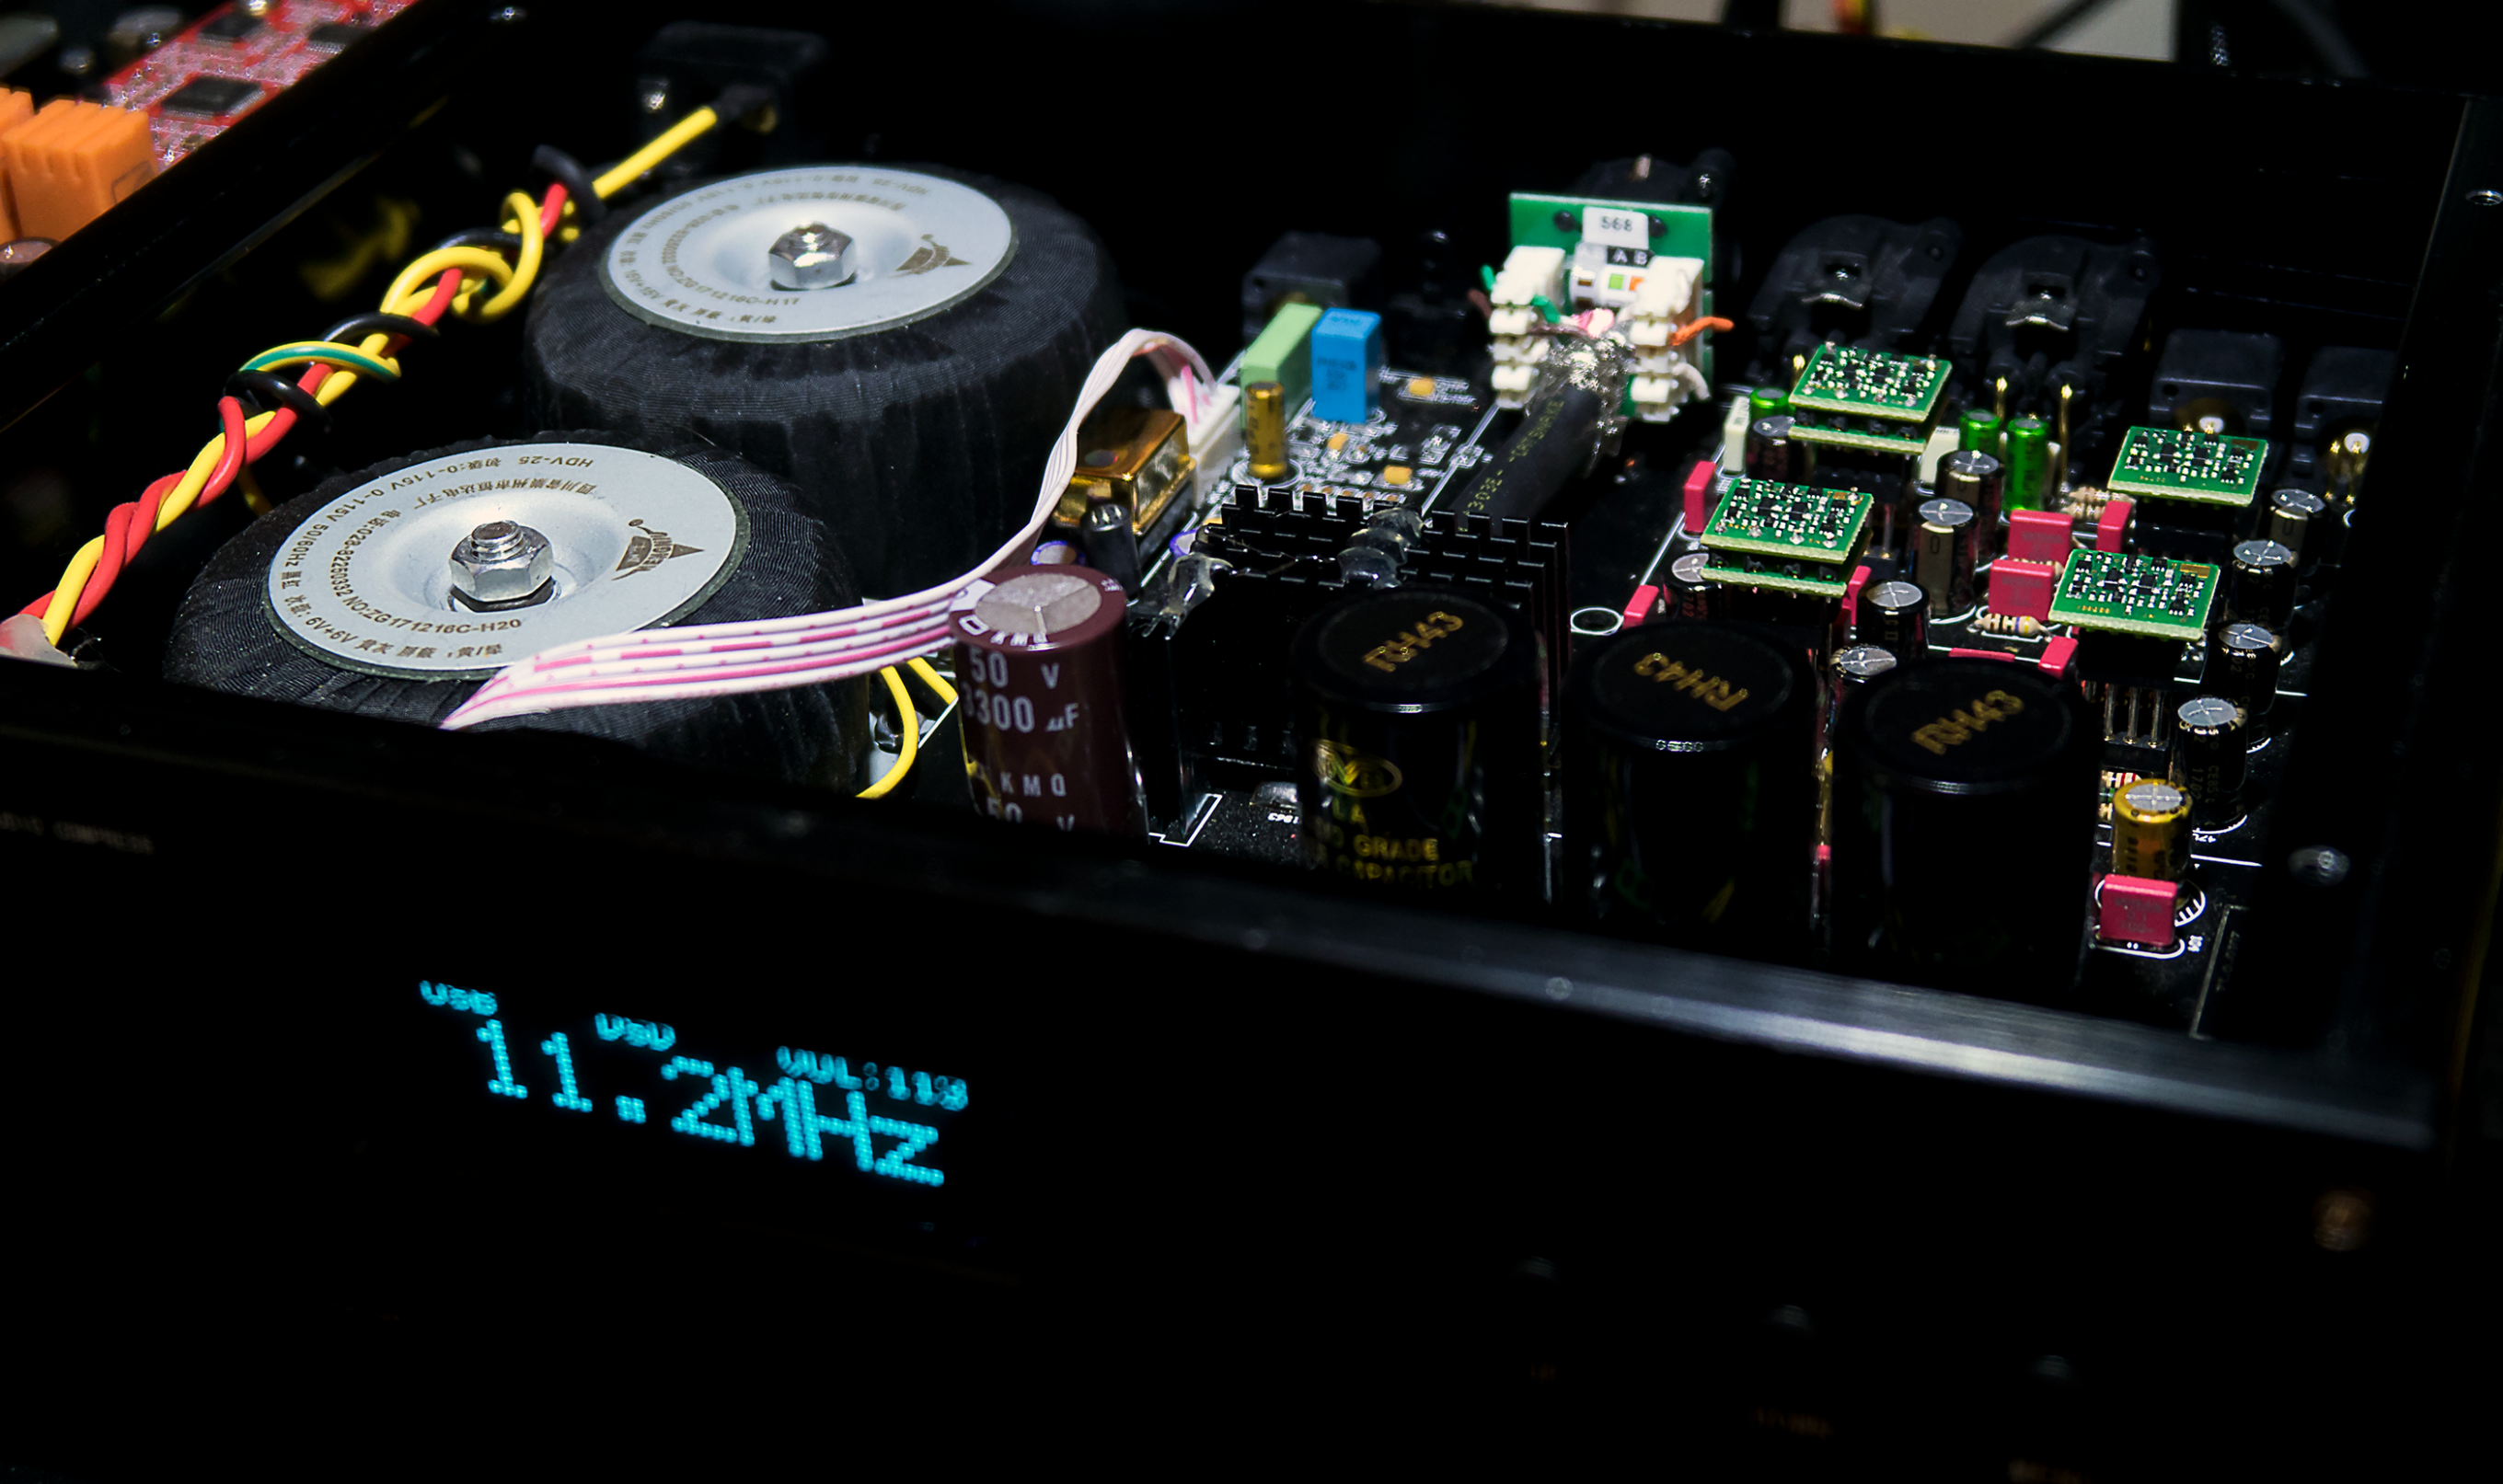
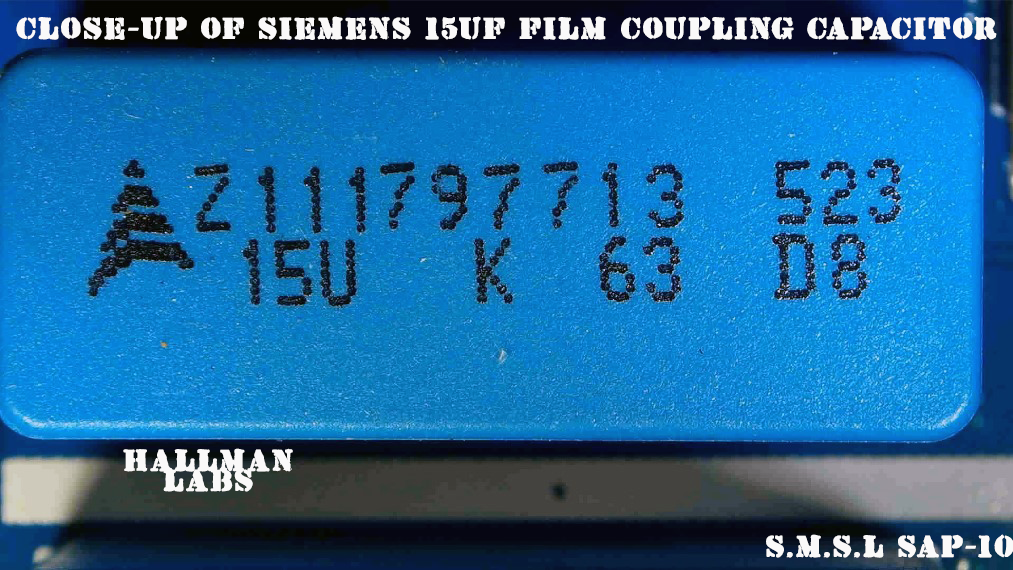
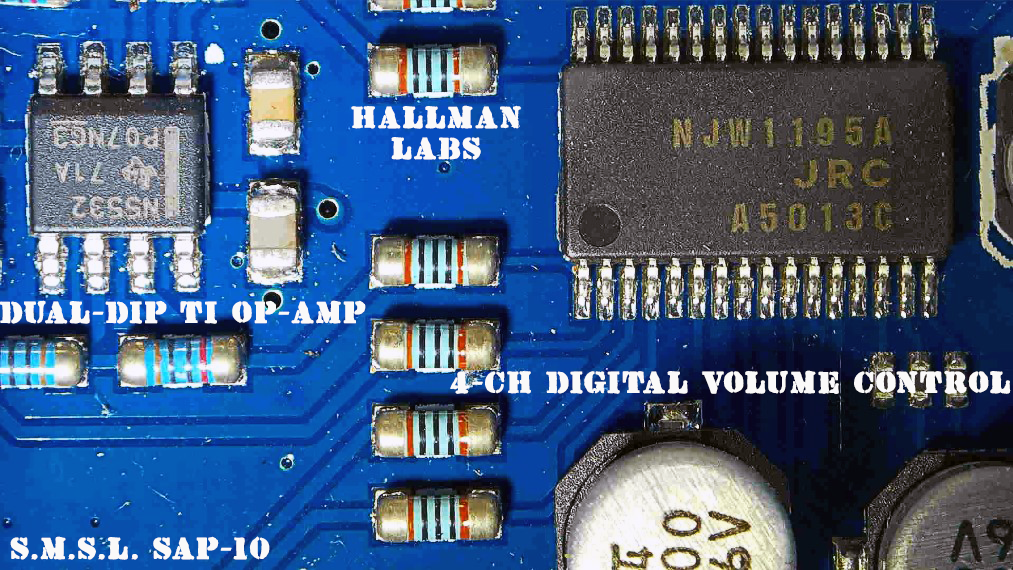
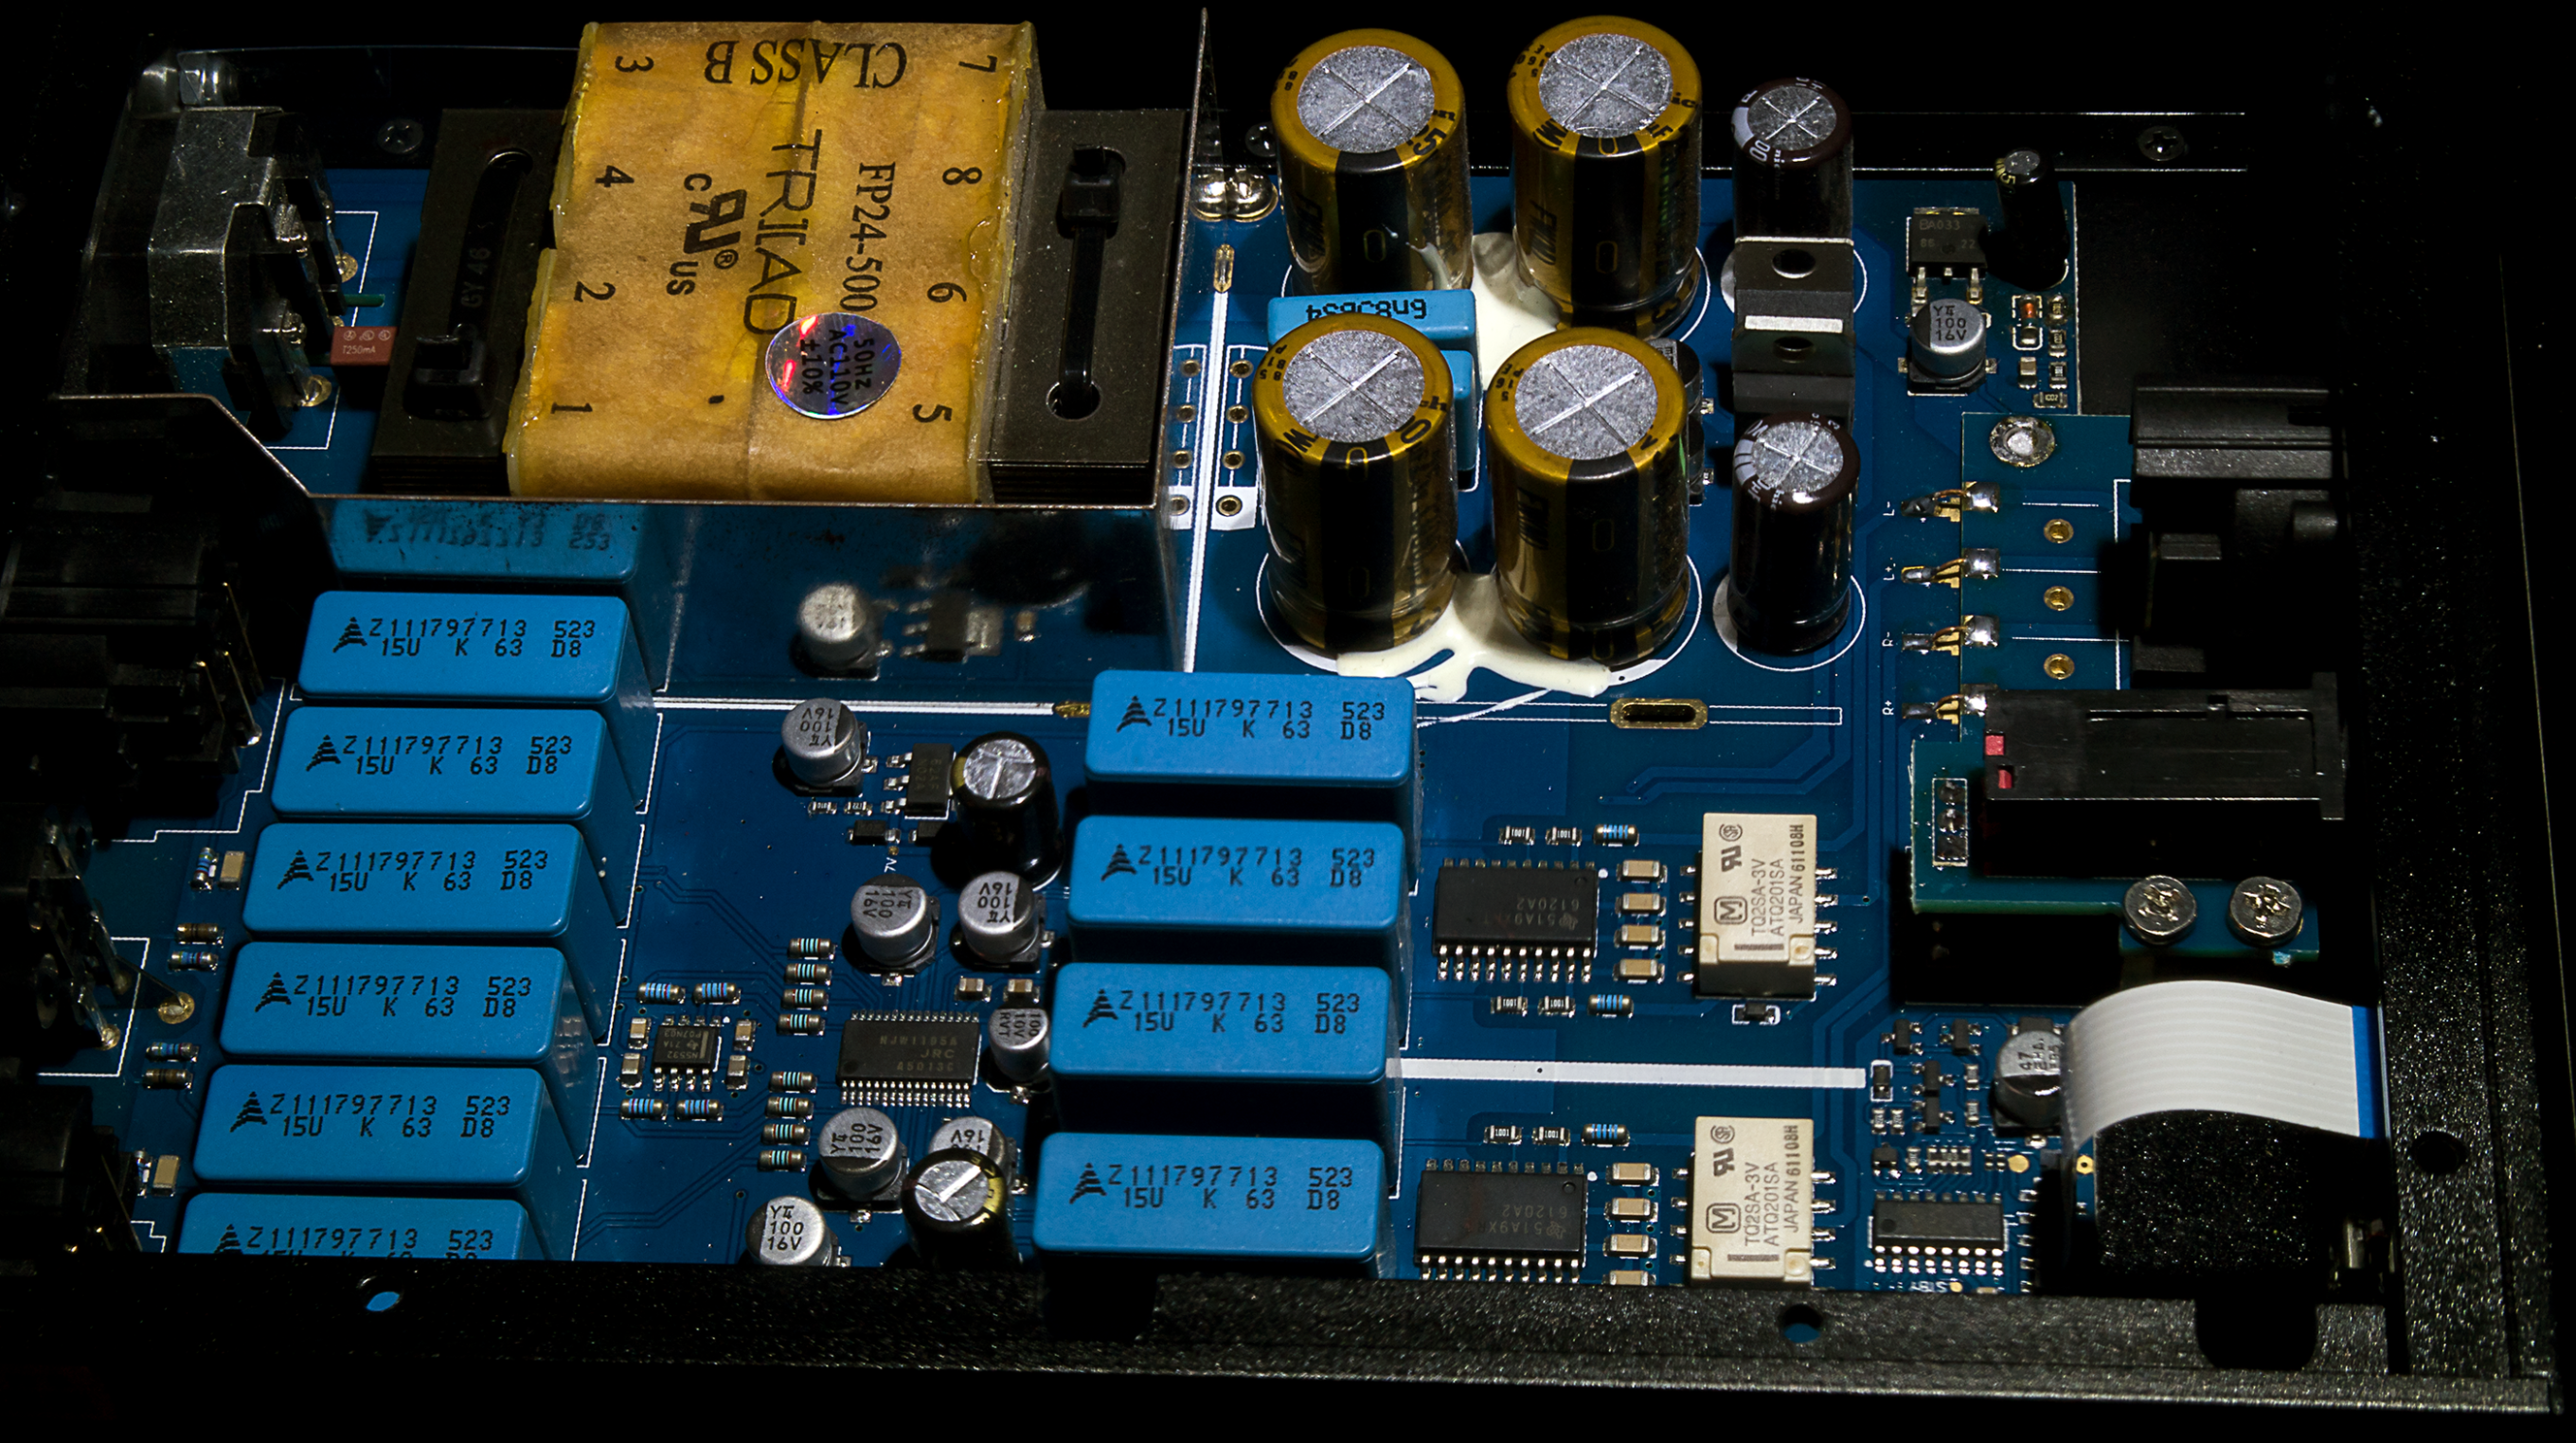
The “sAp-10” is a new device at Hallman Labs in a category of products I have been researching, balanced headphone amplifiers. This sAp-10 is an impressive piece of hardware, especially for only $199 (Amazon in May of 2018). The sAp-10 uses twin TI TPA6120A2 headphone amps, a TRIAD (FP24-500) US built transformer on board (and shielded), JRC NJW1195 four channel digital volume control with balanced phase, 2x Panasonic TQ2SA-3V Relays to prevent clicks/pops in output, 10x EPCOS (Siemens) film coupling capacitors, 3300uF Nichicon FW power supply capacitors and a lot more name brand parts.

This is a step up from my Schiit Audio “Magni2” ($99 at launch) and a good fit for this review since the amplifier in the Burson Play is so strong (with V6-OPA Classics). Running a dedicated amplifier ensures that we are only reviewing the DACs. As long as your DAC combo has analog outputs, such as RCA or XLR jacks, you can always bypass the internal amp. For the purposes of being fair/unbiased, I will be using RCA outs on both DACs since the Play doesn’t have XLR, also known as “balanced” outputs like the ES9038 DAC. This also keeps the exact same wiring for both DACs, including the Burson Cable+™ RCA-to-RCA cable.


The only difference between the two setups is the fact that the Play uses I2S (Inter-IC Sound, the latest and greatest) from the USB module and the ES9038 is still using coax from its XMOS. This was remedied before the review was finished, but not too long before. For the majority of the time all tracks in DSD were down-sampled to DSD64 (in foobar2000) because that is the maximum that the FUN01 can handle over Coax with the ES9038Pro using DoP (DSD over PCM). Note, this is how the review was run the majority of the time, even though it was corrected towards the end of the review.

Review Hardware Info: v2.0 vs. v1.6 Burson Audio Play
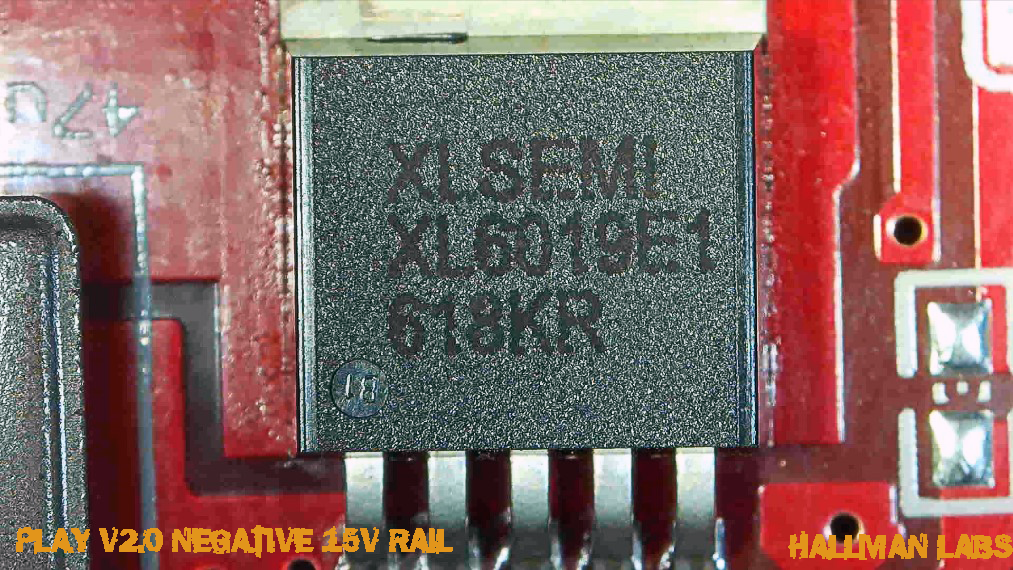
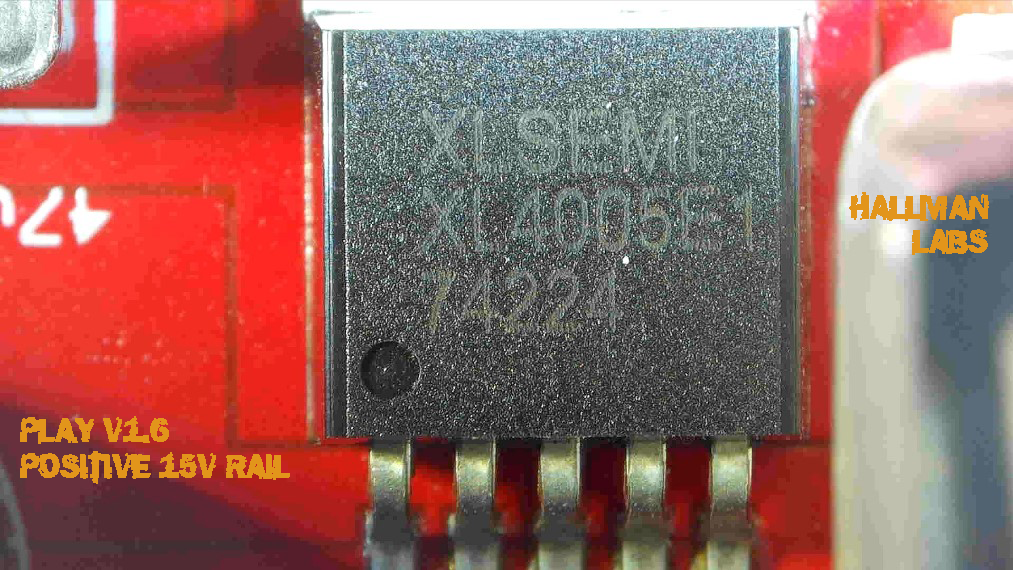
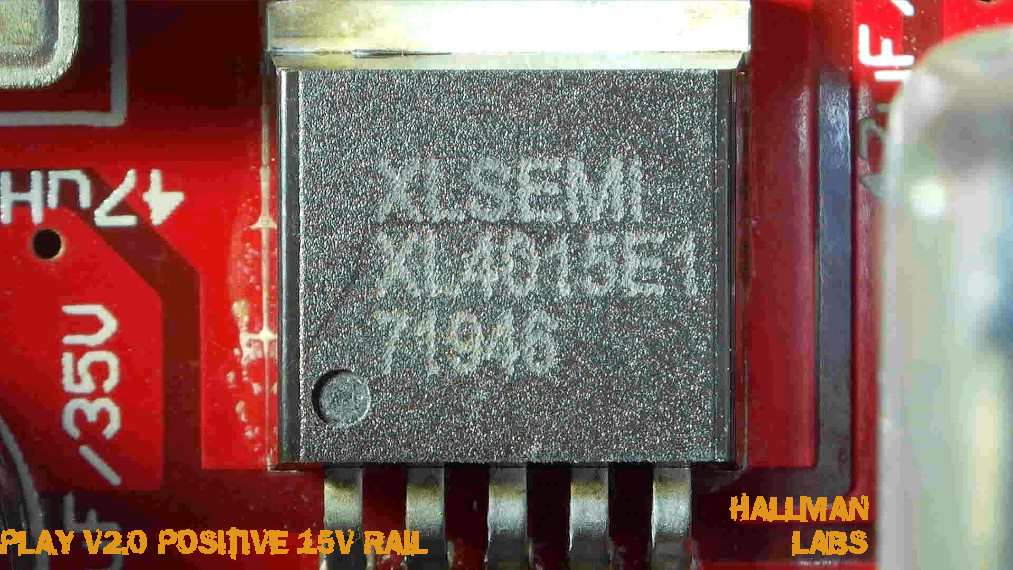
Burson Audio sent me a new revision of their Play’s primary PCB which is now v2.0 vs. v1.6. The primary upgrades were an increase in filtering by an increase in the number of ELNA SILMIC-II capacitors on-board. They replaced both Bourns trim pots with fixed Dale resistors (all other non-surface mounted resistors are Dales). For the -15V rail of the DAC/Amp, the v1.6 used an XL6008E1 while v2.0 uses an XL6019E1 IC. For the +15V rail of the DAC/Amp, the v1.6 used an XL4005E1 while the v2.0 model uses an XL4015E1 IC. The last two changes I noticed were the inclusion of an inline + removable 5A miniature-fuse with the 12V Molex connector and the 5W cement resistor was replaced with dual 2W carbon comp resistors in parallel. As you can guess from the names, most of these IC changes are newer revisions of the previous model (thus should be higher performing parts). From my conversations with Burson and what I have read, the main focus was lowering the noise floor without losing power. Increasing the quality of the power components will surely help out in this area.
I talked again with Alex from Burson Audio on the topic of what was changed from v1.6 to v2.0 (to confirm my observations) and as I thought from inspection, it mainly has to do with the ICs used for the power delivery of the positive and negative op-amp voltage rails. Burson also wanted to remove the trim-pots due to Dale resistors being less likely to cause noise in the signal path. This latest revision has excellent depth characteristics that shine during my PC gaming sessions. Surely a lower noise floor can help give the listener the purist audio possible (free of audible noise). I was also told that Burson is no longer making the v1.6 Play, so I stopped my detailed comparison between the two from a sound standpoint. If enough people want this comparison, I’ll bring it back.
Digital Noise/Mouse Distortion + Solution & Dedicated PC Power Supply: Fix that Hum Yourself!
I have not noticed any pops, cracks, echo distortion (distortion that follows right after original sound) or other general distortion. There was one issue with digital noise that increases in decibel with mouse movement. This is a very old issue with digital audio, especially for the PC users. Luckily the community at Head-Fi.org found a fix, rather quickly in fact! New user “Dżonel” first suggested this simple mod and a handful of other users confirmed the fix works, including myself (you can find more on that here). The DAC still has a ground, it’s either from the 12V Molex or the normal DC power input, whichever you are using gives the +5V in its return path to ground (there must be one by KVL, Kirchhoff’s Voltage Law). This mod simply negates a 2nd (and thus optional) ground from the system. If you cut open your USB cable and clip the black ground wire, this noise will cease, or at the very least, drop in decibel by 75%. Some XMOS modules require the GND from the USB cable, usually those without a grounded chassis, so pick the cable you cut up wisely! You can also kill the USB ground at the DAC, but this is a more permanent option.

The issue of mouse induced noise/artifacts is an issue that I have brought up to companies like Creative before the X-Fi series ever launched (over a decade). I am of the opinion that it has to do with high amperage draw GPUs and CPUs. There is the possibility that a noisy AC line/outlet could contribute as well. You can minimize this chance by minimizing the number of active components in your PC (and in your audio signal chain, start with a small, but high quality system). With regard to minimizing the number of components, I am speaking about the non – system critical hardware (as in don’t remove your CPU/RAM/Mobo/PSU). When we are dealing with high res audio, this noise usually isn’t an issue, but when dealing with a lower quality (like streaming) it sometimes is. I have also picked up on similar distortion when converting multi-channel audio to stereo with the Play. When noise on the digital line is an issue, the ES9038P is almost always the winner. According to “The Art of Digital Audio 3rd Rev.”, the ability of a DAC to reject noise/jitter/artifacts/aliasing/etc.. is the “greatest measurement of DAC performance”. But as we have already mentioned, it was simply a ground issue and was easily fixed, so not everything is so cut and dry.
I’ll do more tests using compressed audio tracks vs. high res audio to see if I can duplicate it. I found out that the ES9038P is able to do gain compensation dynamically and as a result, lower the THD (Total Harmonic Distortion). I am building a 2nd PC for Hallman Labs, nearly identical to the main PC except this one has an i5 3570K de-lidded (heat spreader removed and higher quality paste added) w/ Cooler Master V8 GTS + ASRock Z77 Extreme6 + G.Skill DDR3 2133MHz 16GB (4x4GB) + Corsair HX750 (750W/62A) + Corsair 650D rig, running the Linux tailored to Hi-Fi, Audiophile Linux (“AP-Linux” link here). This will allow us to see if this is an OS related issue, or truly just a hardware grounding problem (well, in theory it should allow us).
From the ESS datasheet “(The ES9038P has) Programmable THD compensation to minimize the THD caused by external components” and “Full-Scale manual/auto-gain calibration reduces device-to-device gain error.” This is exactly what Burson Audio said is causing the noise over a digital signal, gain offsets between devices. Alex said the next revision of the Play will be able to adjust this manually. Now we know after troubleshooting, the cause of our digital noise has to do with the ground in the USB cable.
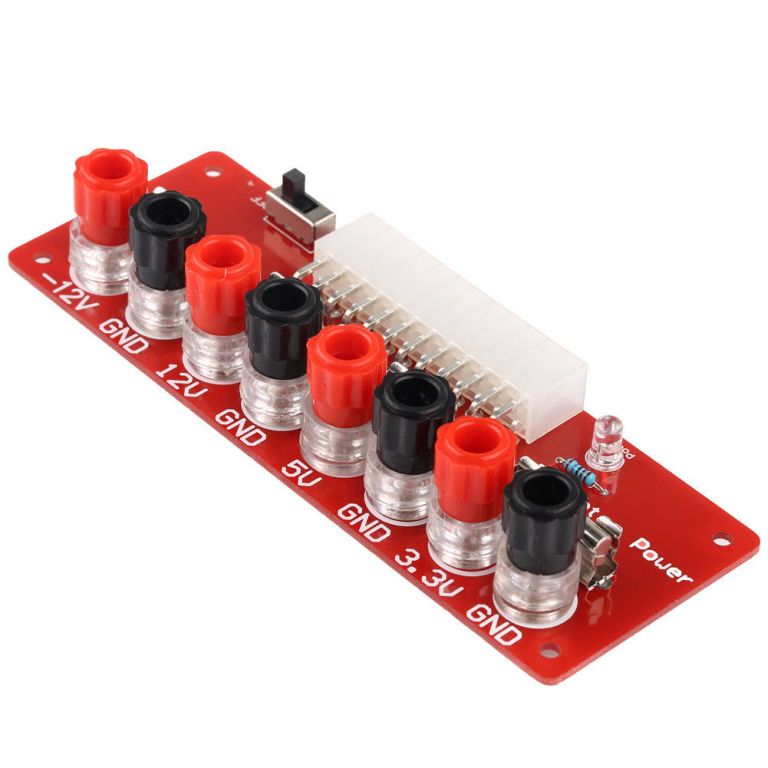
I also had to use a standalone power supply from a computer with a 24 pin lab PSU module with an on/off switch to give the 12 V Molex on the Play its power. I used a Corsair HX750 (high end PC PSU) for this to ensure the cleanest possible power (nothing else is drawing power, even the fan only runs when necessary). To make a long story short, I had a bad power brick and I ended up preferring how the PC power supply sounded over the replacement I got. I estimate having over 400 hours of use on the new revision of the Play. Even when putting it up against stout competition, the Play’s V6-OPA “Classic” op-amps really shine, especially as the amplifier. In fact, doing a direct comparison with just the Play and its internal amplifier vs. the entire other setup, the Play isn’t that far behind (using its own amp vs. the ES9038P on RCA out to sAp-10)!
Opening Thoughts on Voicing of Burson Play vs. ES9038Pro + sAp-10:
Switching from the SMSL sAp-10 + ES9038P + XMOS FUN01 combo to the Burson Play DAC/Amp combo has a noticeable tonal shift. I first noticed a high frequency extension of what seems to be an upper-mid to high frequency focused lift found in the Burson Play’s voicing (w/ V6-OPA “Classics”), not heard as prominently as in the other combo. I checked this with both DACs, the ES9038P + sAp-10 has slightly better low frequency extension and a mid-range lift vs. the slightly higher and a tad more detailed lift on the Burson Play DAC/Amp. I matched the volumes as close as possible without having to hook up the oscilloscope or multi-meter, by using the modded Kenwood C-2 (which has 2x V6-OPA-D “Vivid” op-amps running in the EQ amp and Flat Amp + 4x replaced stock 18V diodes with 16V Zener diodes). I also tried running 2x V5-OPA-S in the flat-amp using an adapter and flexible DIP-8 extensions. I ended up preferring the tone of the dual V5-OPA-S over the single V6-OPA-D “Vivid”.

The Kenwood C-2 has been instrumental in this review, matching volumes with its 4-gang ALPS potentiometer and matching voicings through its above average tone controls (running on 2x V5i-D op-amps). When we flip the ES9038P from RCA to XLR in the later parts of the review, we find that the RCA outputs are darker, with less sparkle. I bring up small details like this to ensure I give an unbiased and clear opinion.
The Burson Play’s performance in a movie or TV show usually comes off as more engaging, the upper-mid to high frequency extension causes environmental effects to echo/reflect around the room easier when using loudspeakers. In headphones they help give sound that extra sparkle and high frequency detail. Others may find the higher frequency focus as a distraction from the ideal flat line response, but at a time when High Resolution audio is king, I can understand the voicing selection.
We are also talking about Burson Audio V6-OPA “Classic” (5 of them) in the Play vs. Sparkos Labs SS3601 and SS3602 (two pair) in the ES9038P. Every single op-amp selection/swap is going to change the overall tone of the sound when used in system critical positions, like these components do. As I learned after the initial review was written, the digital interface used and whether or not you are using balanced or unbalanced inputs/outputs, all have an impact on voicing and sound stage. I was surprised to learn that XLR (balanced) vs. RCA (unbalanced) had more of an impact on sound quality than Coax vs. I2S did.
Listening Tests Streaming (Pt 1):
(ES9038 on Coax & RCA)
One of the things I have learned from doing multiple reviews is not to weight music too heavily. The people who do want to know about the music performance want to hear it across a broad range of different genre. The majority of people will use their hardware to do a lot more than just listening to music and the Play is focused on this fact. The main reason I can see to include a microphone is for the gamers and pod-casters, it allows you to have everything you need included in a plain 5.75” drive bay!

While listening to some streaming off of Netflix through a Windows 10 PC, I noticed I preferred the Burson Play over the other combo (while using Coax and RCA on the ES9038P). This tells me that depending on what you are using your device/s for, either of my combos could be on top of the other, fidelity wise. Hell if you blindfolded me and started switching DACs, I would be hard-pressed to guess right much over 50%, because they are honestly that close in fidelity, especially through my Diamond 220 bookshelf speakers. There are minute details (yep, that is how you spell minute) that come out with the ES9038P that sometimes get lost in the gain of the Play. This isn’t always true and depending on the situation, I would pick the Play.
When I am checking the differences between my two DAC combos I always turn off the tone controls of the Kenwood C-2 pre-amp so I can hear their voicing through just the flat amp of C-2 (where one of the Burson V6-OPA-D “Vivid” discrete op-amps are). The “Play” has this crispness to the sound, without being edgy and thus not fatiguing on the ears. The bass is also prominent and free of distortion. Usually when dealing with lower quality DACs you have to sacrifice either bass or treble to boost the other. This is not true with the Burson Play DAC/Amp combo, it seems both ends of the spectrum are here equally, as well as the mid-range. The Burson Play just has this lively feel to it that is truly musical in its qualities. One of the things I always try to keep in my mind is how the hardware sounds compared to being in person at a concert.

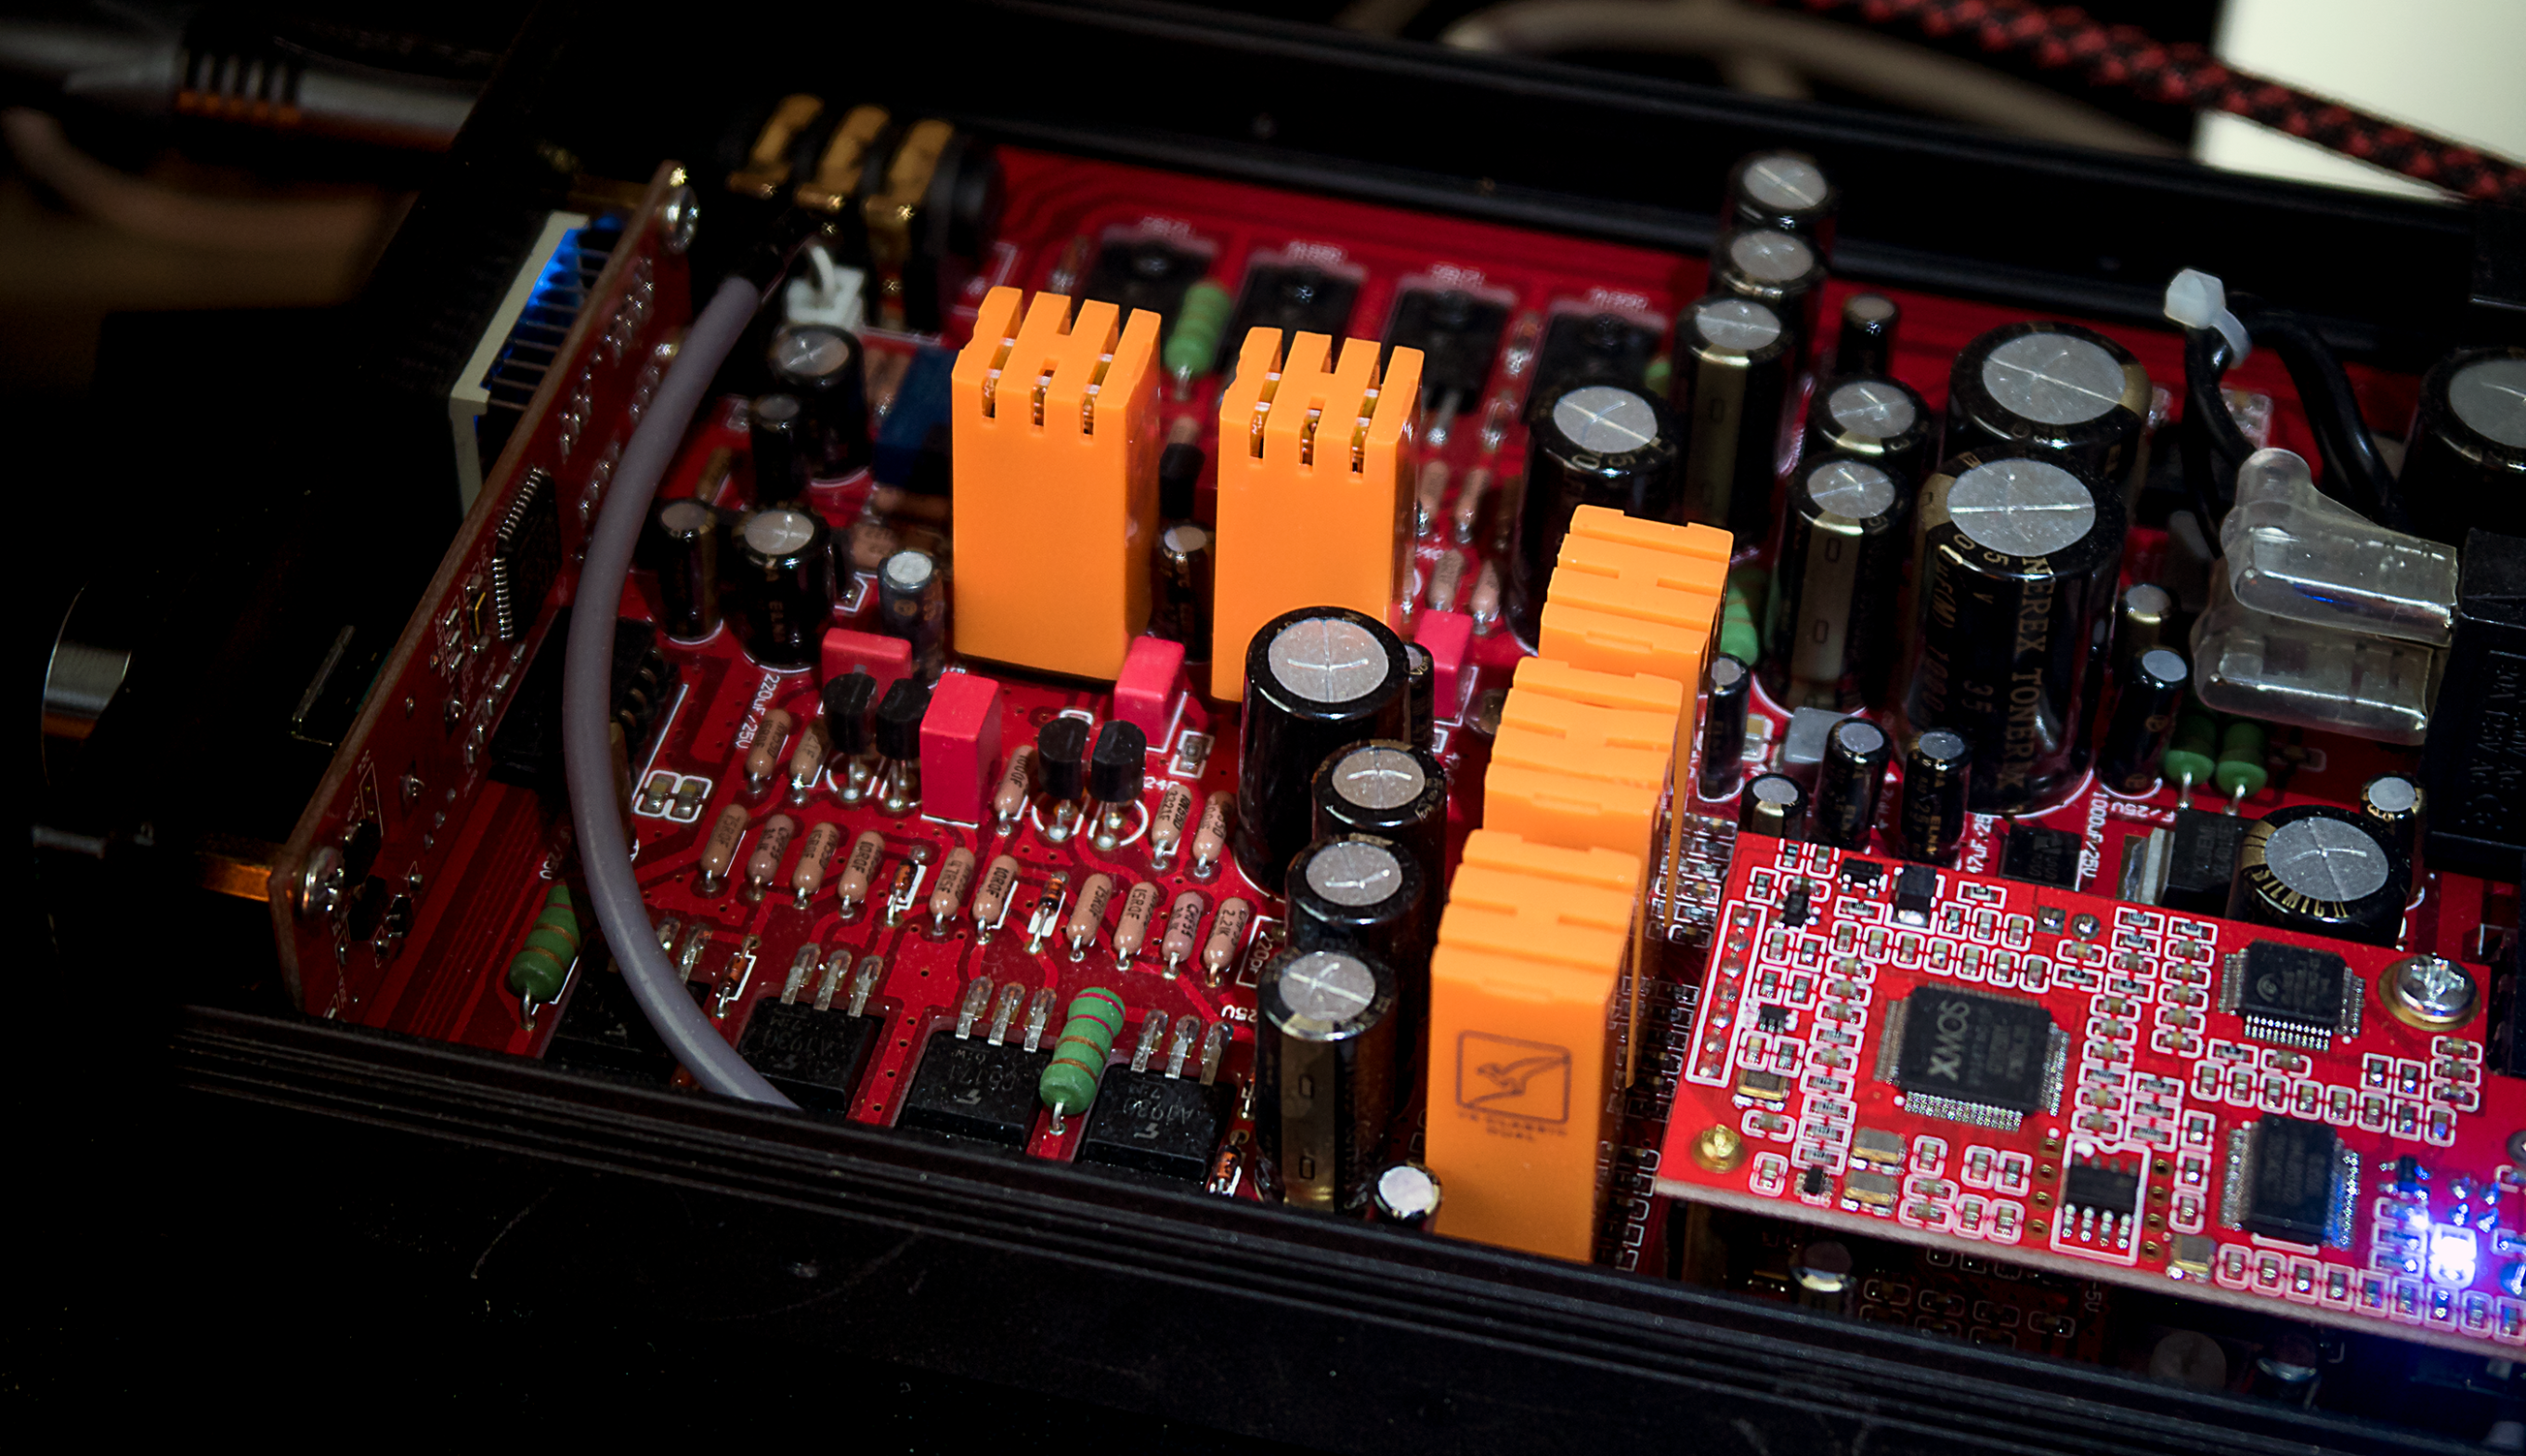
When I switch back to the ES9038P combo, the first thing I hear is the mid-range clarity of the speech and when there is nothing being played, the noise floor is seemingly non-existent (Note: through the ES9038P’s XLR outputs, there is no noise floor, period). I have mentioned this fact before that the ES9038P + FUN01 seems to deal with digital noise better than the Play and its XMOS through the use of hardware demanding oversampling and noise filtering. The FUN01 has the ground plane split between the digital and analog sides of the board, something not usually seen on budget to mid-range priced USB digital interfaces. The FUN01 connects the analog and digital sides through digital isolators.
System Critical Note: The FUN01 (clone of Singxer’s SU-1) requires power on both the digital/USB side AND on the analog side (5V power supply with center pin positive). This means you can’t use things like SBooster’s “VBus2” that kills the ground and power pins of the USB cable. The best you can do with a design like this is with something like AudioQuest’s “Jitterbug”. The Jitterbug is said to improve clarity and dynamics, bringing an overall more solid and precise sound. I was testing with and without, I’ve never been able to find any negative changes to the fidelity, so I usually run it. We are also Unable to use the modified USB cable for the Play (with the ground removed) with the FUN01.

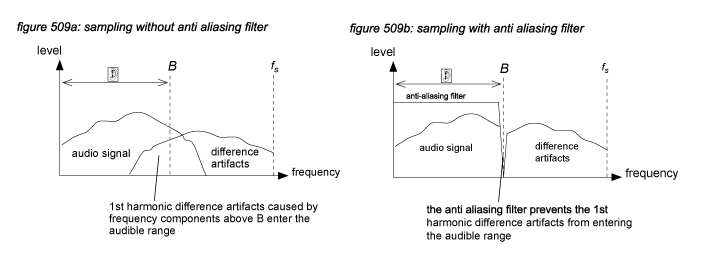
Oversampling is a crucial part of a modern DAC, especially the ES9038P which uses 4x oversampling in stereo or 8x in mono mode. The ES9038P has shown its ability to filter out noise that the Play allowed through. Now we know this digital noise has been brought on by having 2 paths to ground, one in the USB cable and one through the chassis ground (supplied by the power supply ground). Oversampling helps to push noise/distortion outside of the audio band, especially with modern filtering/shaping on top of oversampling. With specific shaped filtering you can filter out 50% more or so of the quantization noise than with a plain filter (Source: Art of Digital Audio)

In simple terms oversampling means to sample at a higher rate than is required by the Nyquist Rate (a little over two times the top input frequency). Quantization (signal processing) error happens when going from analog to digital (ADC). This involves taking a continuous signal and segmenting it into “boxes” or “bins”. “Such errors are an inevitable result of the classification of continuously varying analog voltages into discrete digital bins. This quantization necessarily adds this noise at the level of ½ LSB (Least Significant Bit).” Pg.694 Art of Electronics Lab Manual 3rd Edition Luckily for us, the entire process is digital, from the hard drive to the XMOS and then to the ES9038P (or ES9018K2M for the Play), where digital is then turned to analog (DAC).
Often after conversion from digital to analog (DAC), flat lines will have a roughness, also called “steppy edges”. This error can be smoothed out using a quality, low-pass filter. If you look on the back of the Play, this is what the “LP” means in the diagram. A common use of discrete op-amps, includes being used as high quality, low-pass filters with little effort.
Sampling Rate: In simple terms, sampling involves breaking the waveform/graph into smaller and smaller chunks. However, the sampling rate must be taken across the horizontal/time axis. Note: In audio, when signal frequencies begin close to zero, the highest frequency simply is the bandwidth. This tells us the sampling required for a given signal must be dependent on the highest frequency in the analog wave. If the wave is made up of more than one frequency (such as in audio), it is the highest frequency that we are concerned with (lower frequencies are much easier to sample). So, if you buy a high res PCM/FLAC album that is rated at 96 kHz, the highest frequency you should see on an oscilloscope of the DAC outputs should be right around 96 kHz.
Listening Test Music (Pt 1):
(ES9038 on I2S + RCA out & Play using internal amp)
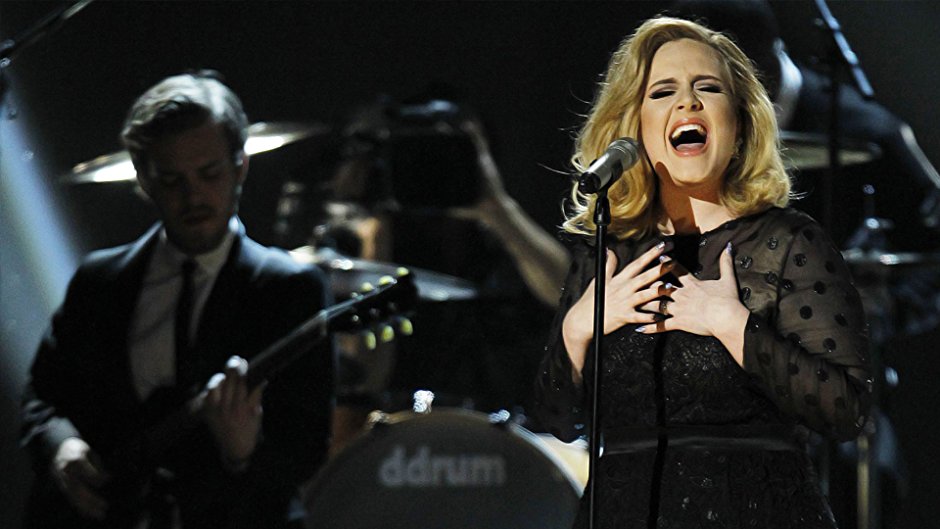
Adele Live at the Royal Albert Hall Blu-Ray (DTS-HD MA 5.1 to LCPM 2.0)
I have to admit I am a fan of Adele, she is one of the most powerful and spine tingling voices still with us. This Blu-Ray is an excellent showcase of her talents, from the power of “Don’t You Remember” to the country melody of the cover “If it Hadn’t Been for Love”, Adele never leaves you disappointed with this live album. I start out on the Burson Play using the internal amp into my EL-8s and there isn’t even a hint of distortion, noise, pop, cracks, etc. The EL-8s are so transparent on this album with the Burson Play, yet they maintain the body and depth of a live album. From the realism of the Royal Albert Hall echoes (time for a note to decay) captured, to the texture of her voice, this album transports you to London. Accurate imaging and timbre of the instruments intertwined with the powerful vocals, make this one of my favorite “reference” albums.
On the track “Turning Tables” we are greeted with a very rich and textured voice, thanks to Adele. The piano on this track seems to surround the vocals of Adele on both sides and the violins come in from what seems to be higher (off the ground) than the vocals and piano, like birds swooping in from on high. Switching to one of the higher paced tracks, “Rumor Has It” brings the bass and body without losing the precision of this album. This is one of the best tracks to hear the dynamic range and the snap/speed of transient response of the album. (Transients as defined by Head-Fi “the leading edge of a percussive sound. Good transient response makes the sound as a whole more live and realistic.”) In contrast, a bad transient response would come off smeared or muddy.

I switch over to the ES9038P + FUN01 and finally the ES9038P is able to pull ahead in the upper-mid to high frequency territory. I think the ES9038P has a better balance on this album than the Play does (tone controls are off on C-2) and it has better low level detail. At the top of the SPL (Sound Pressure level) the sound has a warmth and texture to it that is slightly lacking on the Play. It’s like you dialed the presence knob up when going between the Play to the ES9038P. To those who don’t play guitar, presence means how “close” the sound seems to you. Neither setups are really lacking, but we are doing a comparison here, which is far from easy with how strong each of the setups are.
I flip to the cover, “I Can’t Make You Love Me” and from the first note you feel like you are standing there watching her. The sweetness of her voice shines through on this track while maintaining pitch across her unbelievable vocal range. Only a few artist before her could even compete with her capacity and vocal stamina, such as Aretha Franklin or Whitney Houston. The overall realism of this album is up there with some of the best, from the echo of her voice around the hall to the crowd singing on the track “One and Only”. The dynamic range could be glass shattering, yet I don’t feel my ears getting tired/fatigued (when played at a reasonable level). Now we go back to the Play and cue up the song “I’ll Be Waiting”, as if on cue the chills go down my spine. It’s very hard to describe these changes in sound quality. It’s almost the way it “feels” vs. how it sounds, people use the word “musicality” to describe this sensation. The Play seems to have slightly more body to the sound, the small details seem more focused or just come out with less effort.

I noticed when I was playing the album over DTS-MA 5.1 (into LPCM 2.0) I kept hearing what sounded like sibilant distortion, but when I flipped to Dolby 2.0 it stopped instantly. This tells me that this issue has to do with down-sampling 5.1 into stereo using PowerDVD 17 Ultra. For whatever reason, this issue doesn’t seem to bother the ES9038P combo as prominently. Once I had that issue figured out I was left with a hard decision to make, deciding which DAC wins this section. There is a small downside for the Play, it lacks the complete blackness of the ES9038P’s background, even in between notes you can hear this difference. However, this is not a detail that you’d notice right off the bat, maybe not even the first few times playing the album. Still, for this reason I have to give this section to the ES9038P. If not for this little difference I would have called it a tie.

Listening Test Music (Pt 2):

Tedeschi Trucks Band Live from the Fox, Oakland (96kHz/24-bit FLAC)

I have seen Derek Trucks in both of his former groups, The Derek Trucks Band (twice live) and The Allman Brothers (four times live). I am going to see Tedeschi Trucks Band for the first time in July (in the town of my old engineering school, Raleigh, NC!) and I am excited to hear this duo finally in person! Basically, I know how Trucks sounds when he plays live and I have listened to his studio work for hundreds of hours, maybe thousands (car trips add up fast). Without further ado, these are my thoughts on the performance of these components during this excellent live high res album.
We begin with the ES9038P + FUN01 going into a SMSL sAp-10 balanced headphone amplifier, although we are using RCA for fairness sake. I have considered comparing balanced (the hardware interface) out of the sAp-10 once I have the “Blue Dragon” cable and EL-8 connectors from Moon Audio to a 4-pin XLR from Neutrik. This is the balanced output from the sAp-10 that is offered alongside the ¼” jack.

Back to the music at hand, this is one of the most lively and upbeat live albums I have had the pleasure of listening to in a while. This will be my first opportunity to listen to this album, for the sake of the review! From the start of the first track we hear the crowd noise tumble into our sound field, the drum rolls left to right, everything seems just how you want it. Flat curve with complete neutrality throughout the frequency spectrum and even though they jam out hard at The Fox, it’s not fatiguing. I know that my EL-8s definitely help in that area, though, also having the Kenwood C-2 really is a life saver and worth every penny. The C-2 comes alive further when we take the time to mod it for modern discrete op-amps! Giving the tone control the V5i-Ds from Burson Audio was an easy call, these tone controls are a crucial part of my rig. Each album has its own EQ and I have an EQ that I want to create for my system, so a pre-amp caters to this need. At least if you get one with decent tone controls like we have on the C-2. All final impressions are done with the tone neutrality (tone controls disabled/off).
The guitar is placed right in the center of the sound stage, the crowd seems to encircle the guitar during the track “Keep on Growing”. If you listen, close your eyes and really listen, the crowd is all around you and the instruments come from dead center, if the stage was a 360 sphere in front of your face. We get to the bluesy, slower “Bird on a Wire” piano opening, which I love. Growing up with Aretha Franklin and Led Zeppelin, creates an eclectic ear. An ear that loved Zeppelin’s “Trampled Underfoot” because of the keyboard solo! This album hits so many genres without having to try, it transplants you. Then in comes Susan Tedeschi, who delivers all the vocal sweetness and texture like the great ones from the past. Ever since I heard her sing “Midnight in Harlem” at Eric Clapton’s 2010 Crossroads on Blu-Ray, I was sold. The fact she married one of the top touring guitarist in the world, was definitely a plus! “Bird on a Wire” is such a powerful track, Tedeschi gives a soulful and church hymn inspired tune a modern feel, with her own special touches at every chance she gets. The sound of Tedeschi coming in the EL-8s compared to the piano, drums and backup singers, almost seems to be coming from “above” you, like an angel singing down

It’s time to switch over to the Burson Play after I have a good sense of the ES9038P and its performance on coaxial. I can’t deny it, I listened to “Within You, Without You” twice, once with the ES9038P + FUN01 and once with the Play (both setups were using the SMSL sAp-10 headphone amp into the EL-8 open-backs). I put the Play on and closed my eyes, in order to imagine this sound field and pick up on the details I noticed a change with. The first thing was the jump in decibel (which I had to correct obviously), but it is worth noting that the Burson Play overall has so much more gain than my ES9038P, maybe 4x. The Play is loud enough to easily damage your hearing, especially when you are using things like a pre-amp with a power amplifier. Be safe with your gain levels and protect your hearing!
What I noticed first was the goose bumps on my arms when using the Play, honestly. The first time I played the first track, it was like I was actually there (when I closed my eyes and focused on the sound). I’m doing it now with the track “These Walls”. The guitar seems to originate from some ancient stone cave due to the sound of the instrument and the echo captured, but there is a large crowd of people around too. This strange instrument being played, not one I can name (sorry guys/gals), it seems to grab your attention and sort of tickles your brain with a melody almost hypnotic in its timing. Derek Trucks starts to play along with them, sounds like he is using a slide guitar on this track. The drum comes in, slowly at first, with a jazz type sound and all of a sudden we have Susan singing again. This is a song I absolutely love, titled “These Walls”. It’s so easy to pick out each instrument when you open your ears and just sit and focus on the track. The Play has so many strengths and I’m not just saying that for the purpose of this review, I plan to prove it actually. We will eventually put the Play and the ES9038P + FUN01 into RightMark and my oscilloscope to see what is going on!

This will probably be the longest listening test of this review because this band means a lot to me and I hope this review will help to expose this album as one of the few great modern releases by a real rock band. They always say, write about things that are meaningful to you, well here you go! Susan Tedeschi is able to build up the momentum of the track so well, but then we transition to a slower paced slide guitar and what sounds to be an acoustic slide of some sort. Then Derek Trucks is just playing normally, he just sounds like that on a normal guitar. The man is a genius when it comes to playing, you can quote me on that.
The Play comes away here really cementing the way I feel about how it stacks up. I only hope this continues once the ES9038P is running on I2S also! That will be something that should interest people who may not be interested in the overall review topic! Is I2S that important where a DAC/Amp combo can compete against using all discrete components? The placement and dynamics that the Play is able to achieve, really creates an impressive sound field to get lost into. The track returns to what it opened up with and then it closes out as smoothly as it came in. I’d probably have to give the Burson Play the win (while the album was playing through coax on the ES9038P setup).
A Short Note on Converting PCM to DSD with Foobar2000:
I tried playing the Tedeschi Trucks album with DSD64 using SDM Type D (best of the available Foobar2000 DSD converters) from its native 96 kHz PCM and I ended up hearing what sounded like clicking coming from random locations. I tried both DSD128/48 and DSD128, I didn’t experience this artifact using these settings and the overall sound signature seemed livelier. I am listening to more of the same Tedeschi Trucks album in DSD128 and it truly sounds remarkable. “Don’t Drift Away” in particular draws emotion out of you like Otis Redding can in songs such as “Cigarettes and Coffee” or even “Chain Gang”. Perhaps you are more into Aretha doing “The House that Jack Built”? Anyone who enjoys those tracks will enjoy this live Tedeschi Trucks album in my opinion, it’s definitely worth checking out. The jam out track “Ali” brings in a lot of brass instruments that really help to open this album up to a huge audience, between the excellent trumpet work and the always groovy playing of Trucks, you are in for a treat!
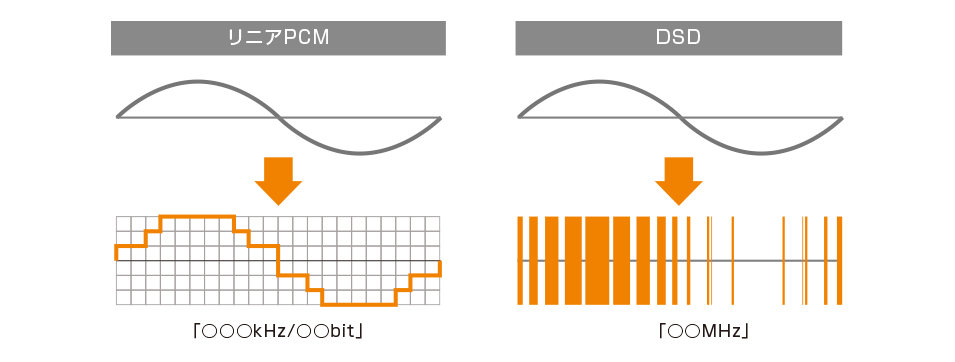
Just for the sake of pointing it out, I switched back to DSD64 on a track that was clear during DSD128 and sure enough, the clicking had returned. As soon as I switched over to DSD128, before even hitting apply, the clicking was gone! So there must be a limitation of DSD64 with this up conversion that still needs to be ironed out with foobar2000. For now if you are going to convert PCM into DSD on foobar2000, stick to DSD128 or DSD128/48.
Balanced vs. Unbalanced: Understanding the ES9038’s Performance
I think the huge difference in unbalanced vs. balanced sound quality needs to be pointed out. This is an advantage that stacks up in favor of the ES9038Pro for the no-holds bar patrons of HiFi HW (large budgets). Sadly it is true, in order to get an amplifier with XLR in will cost a pretty penny. There are a few exceptions to this rule, especially if you go with used equipment (I do this, see Pioneer VSX-919AH) or DIY.
When using my XLR/balanced setup the sound stage seems to expand by at least 2 fold, it’s immediately noticeable if sitting near the sAp-10 with both RCA and XLR hooked up from the ES9038P (switching between the 2 inputs because the ES9038P can output both). It’s not only sound stage size that changes, the texture of the highs and lows have more detail. The dynamic range seems to be better too, the XLR input from the ES9038P seems louder on the sAp-10 by a few decibels, nothing crazy. Just the change in the details you can pick up on, like someone hitting a mic stand or the pianist foot tapping against the ground while playing brings an old album alive again.
When we are comparing brass instruments you might as well lay down the cards on balanced audio, it’s not even close, especially on the high frequency side. The RCA output of the ES9038P is a tad darker, even when running through the C-2 with V6-OPA-D “Vivid” op-amps for the flat amp. Perhaps this is why I kept hearing a high frequency shift with the Burson Play for most of the review (because of the darker RCA signature).

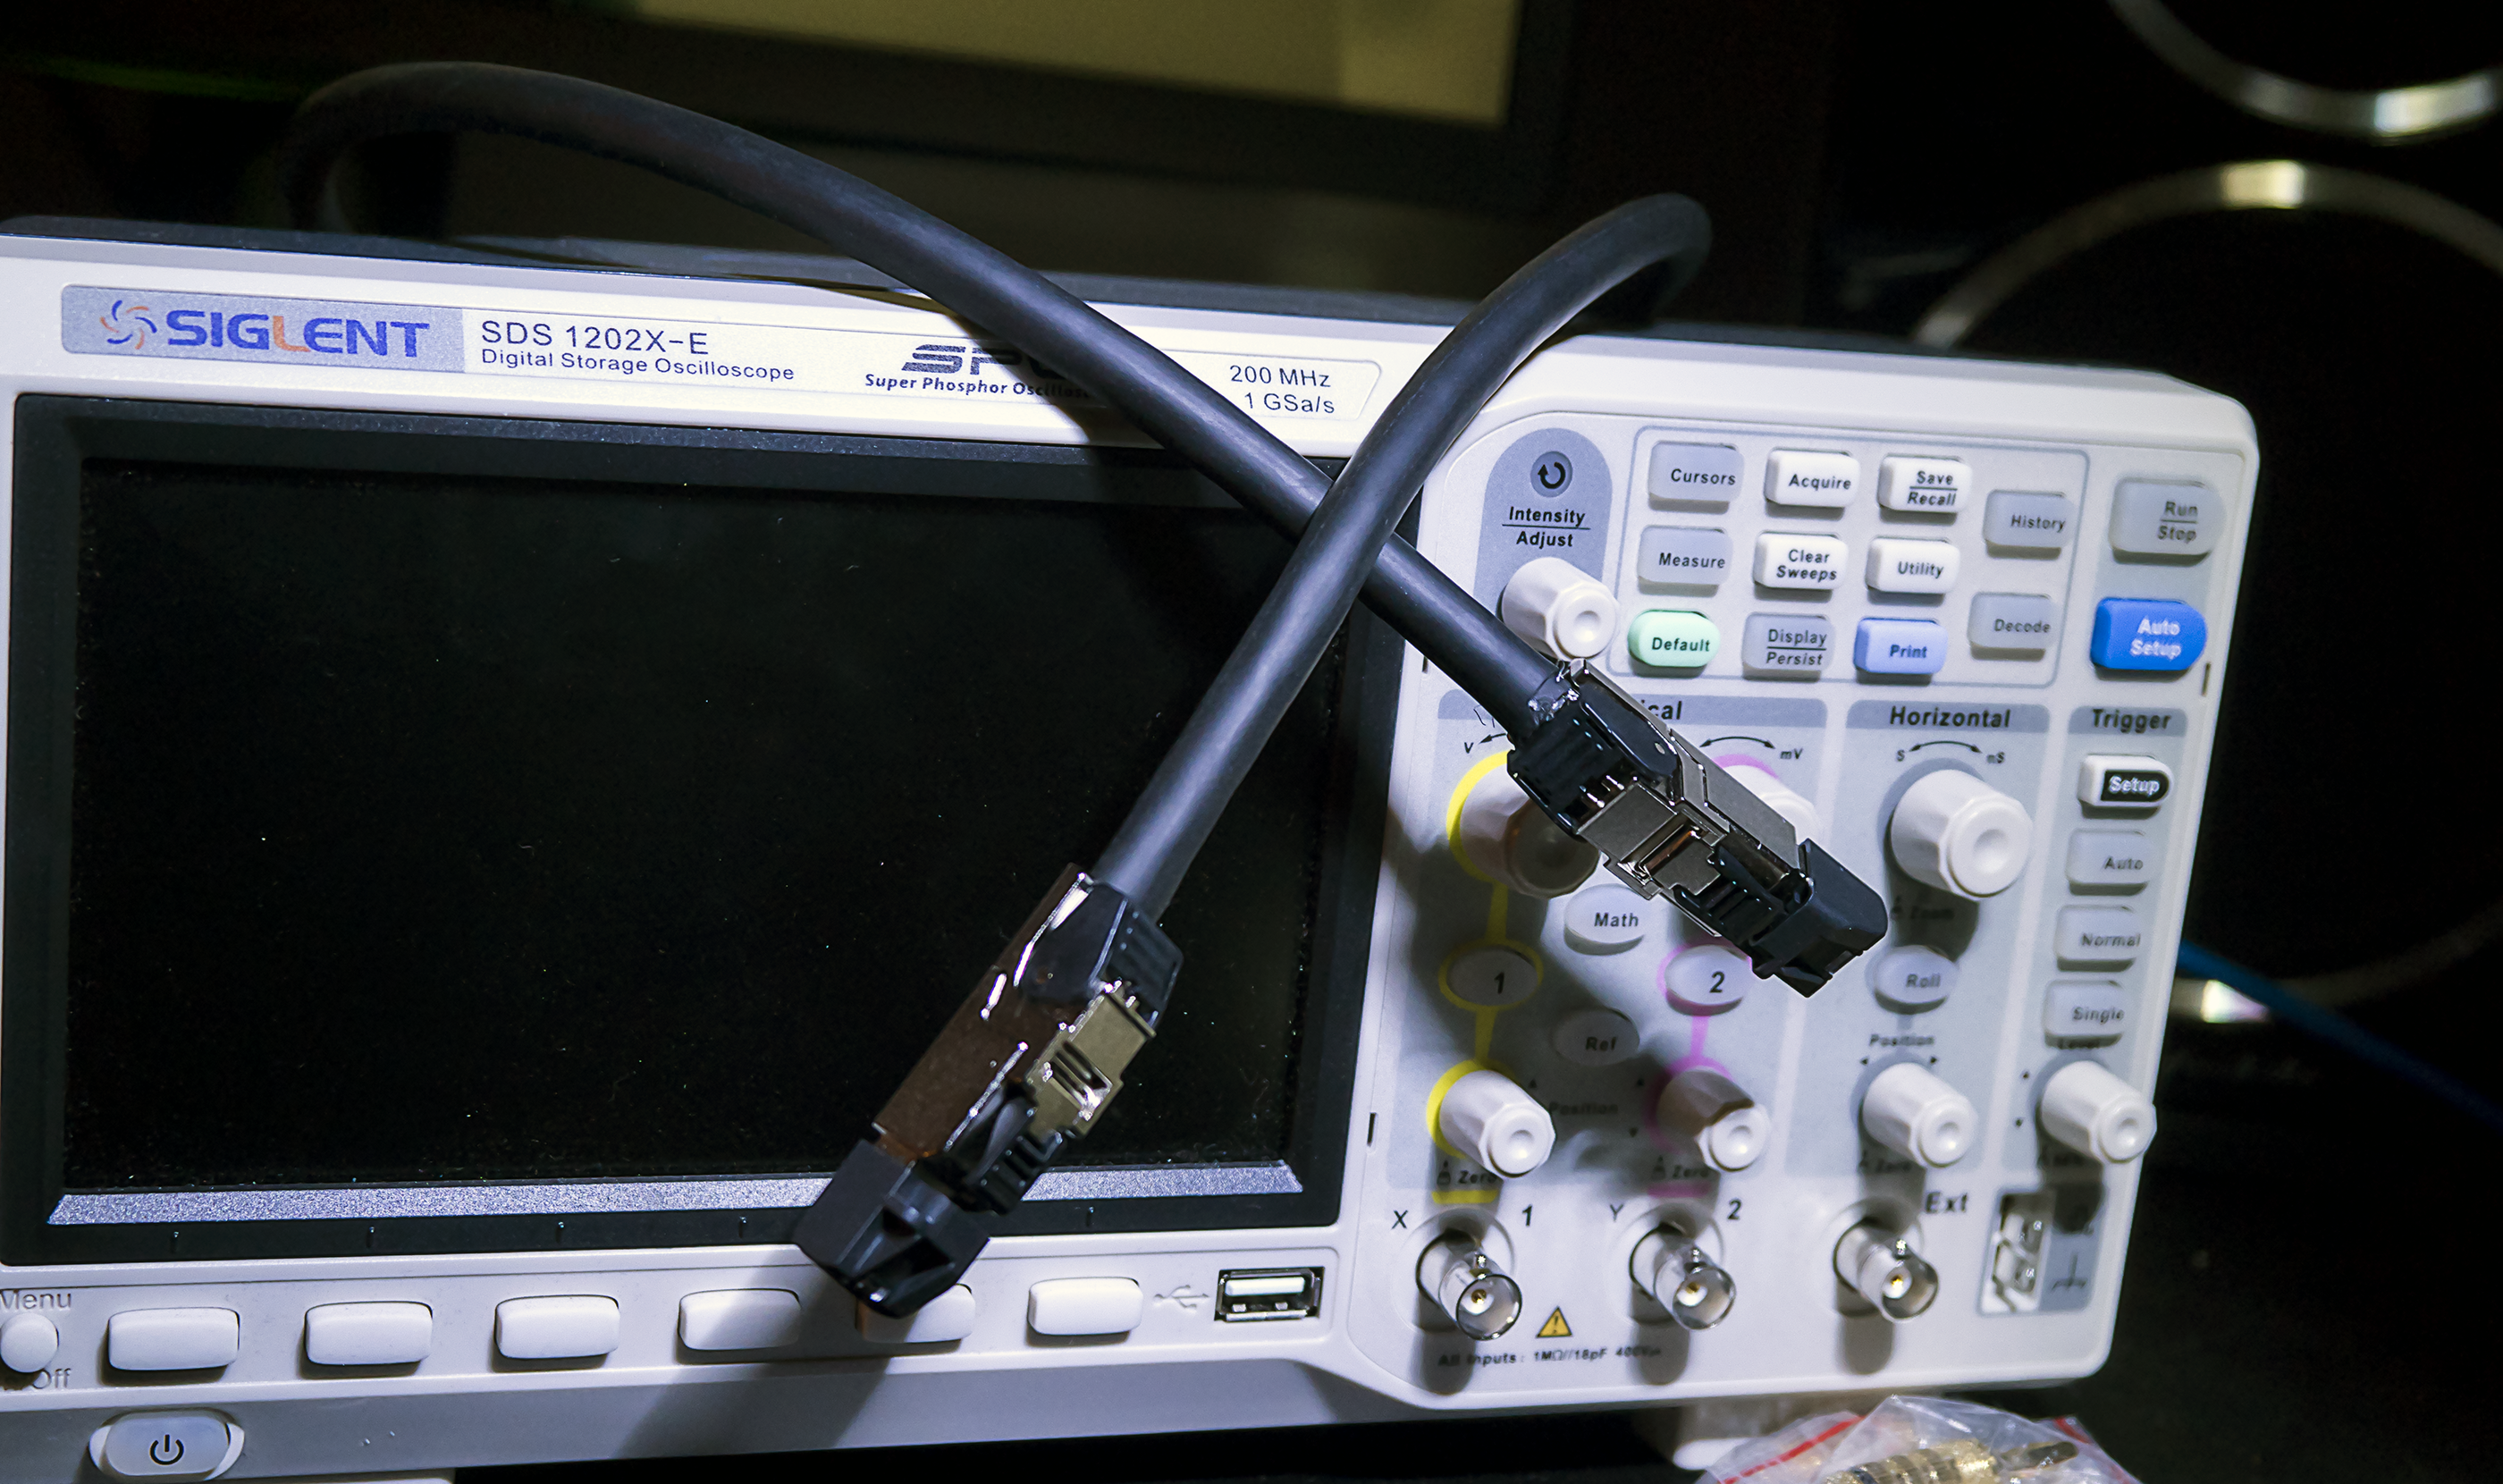
Perhaps the ES9038P has a darker signature on the RCA outputs than the XLR or, it could also be how the sAp-10 handles the two input types. Sadly I only have one amp that can take XLR in, so I can’t confirm this observation. I do have another XLR DAC on the work bench (see DSC1 article). Over the days following the release of this review I will be making measurements trying to get all of these audible claims to show up on an oscilloscope or in RightMark, so keep an eye out for the update.

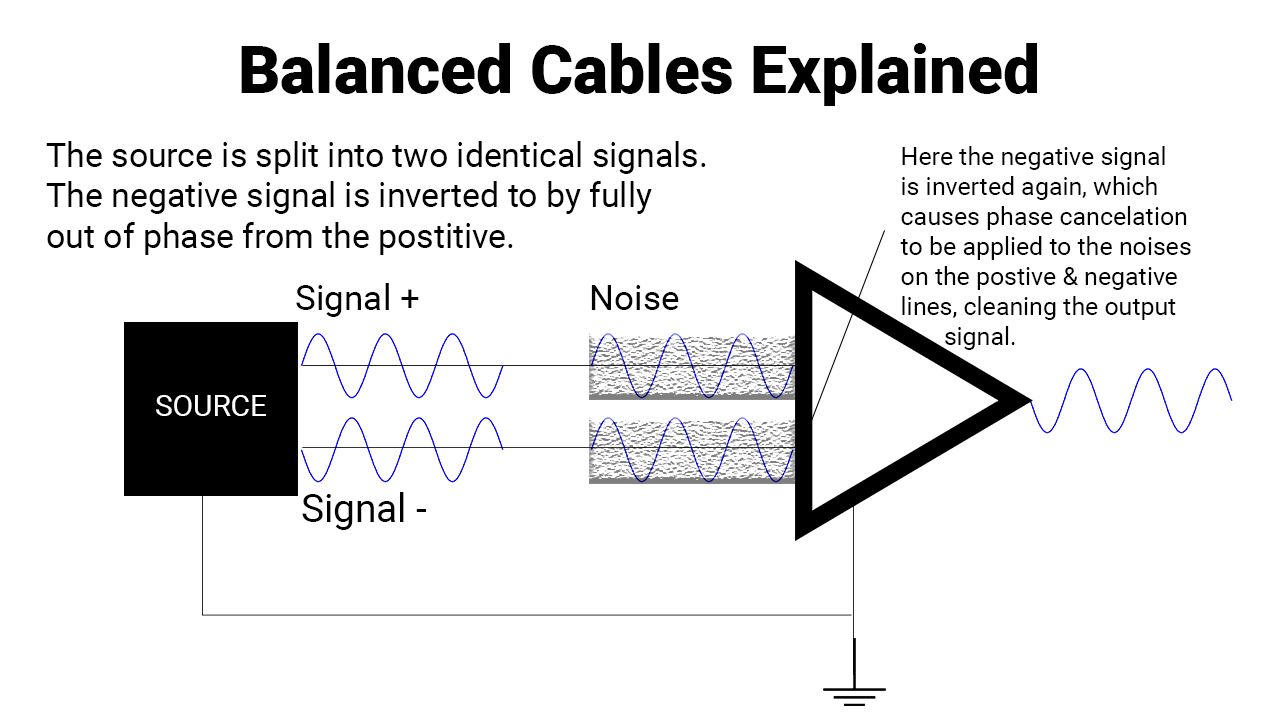
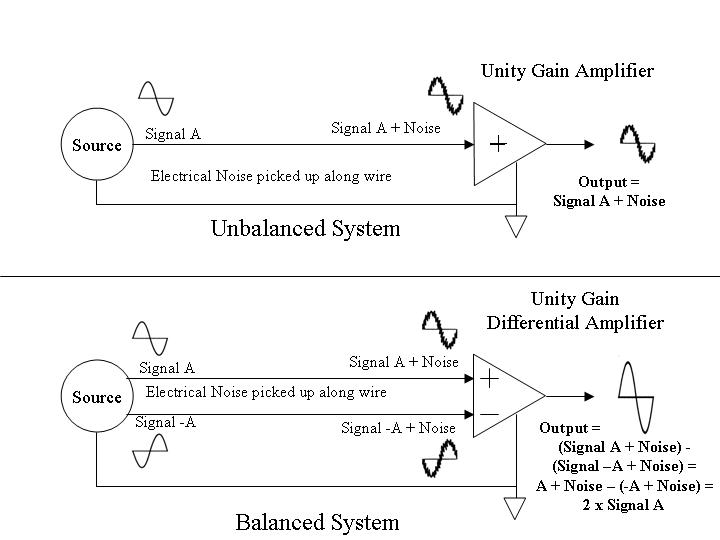
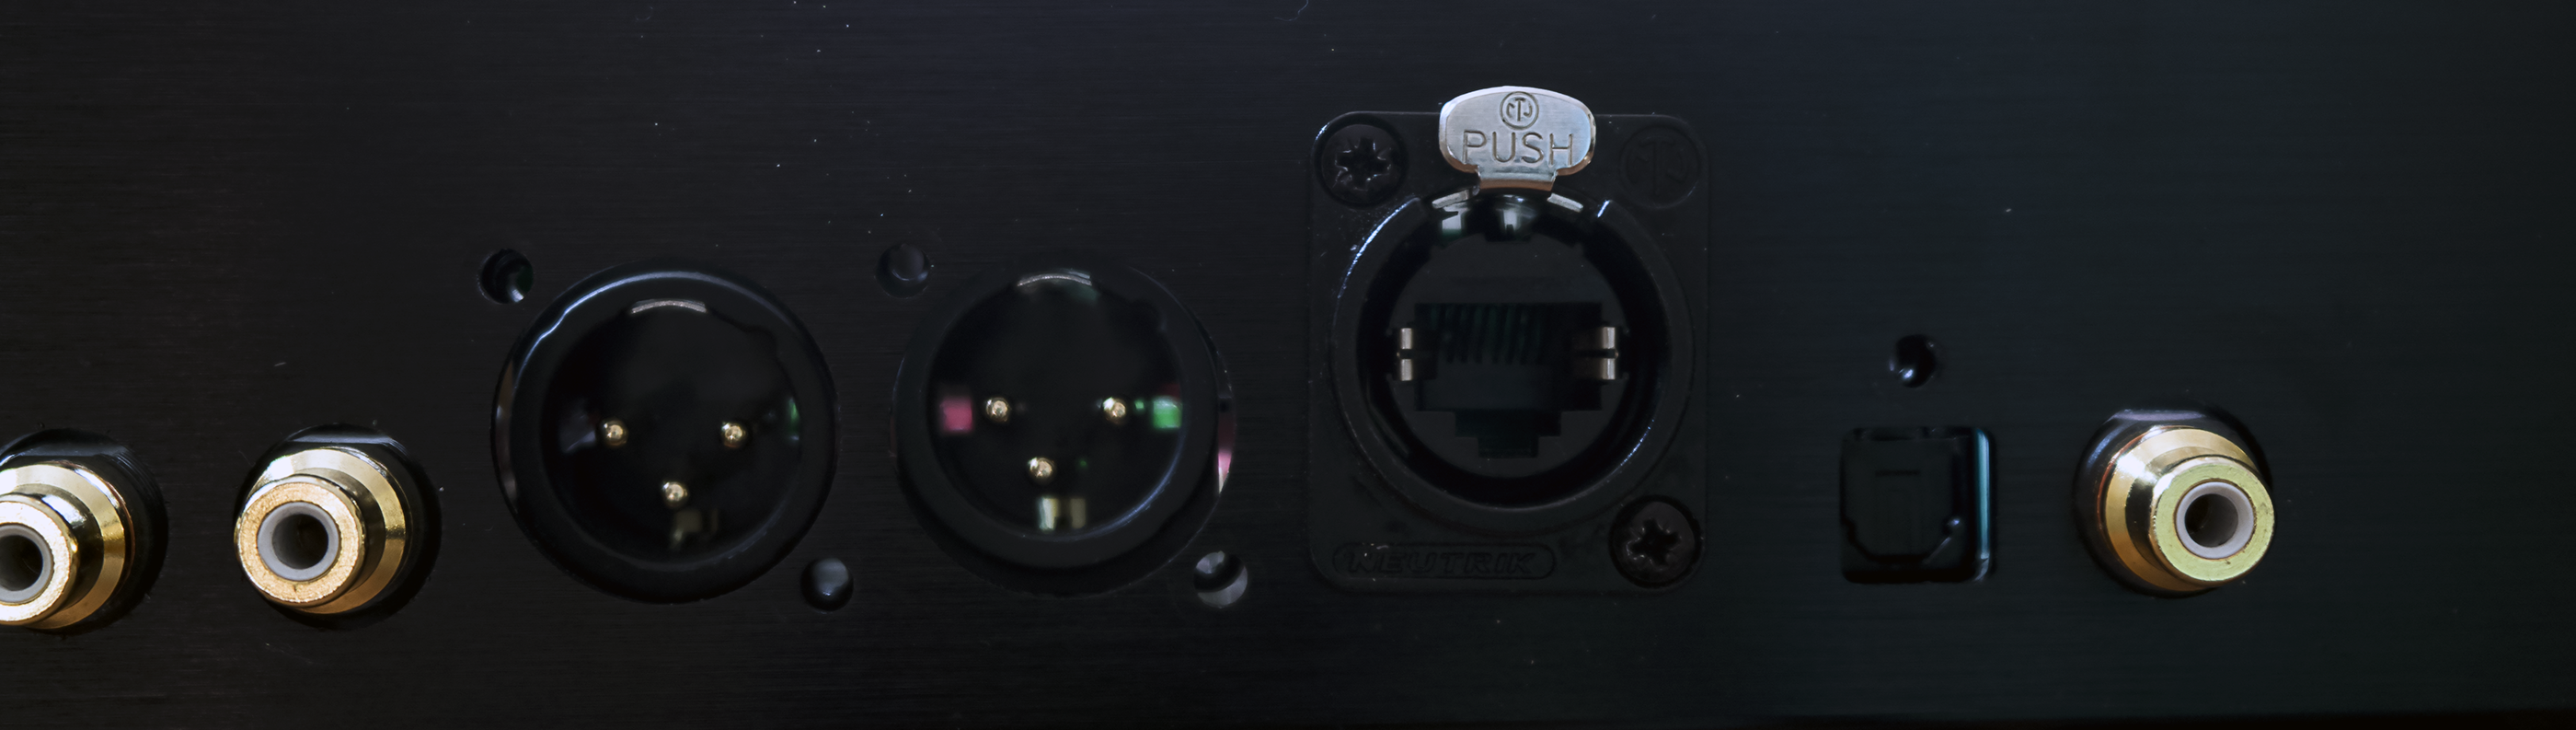
Adding I2S Input To ES9038 DAC:
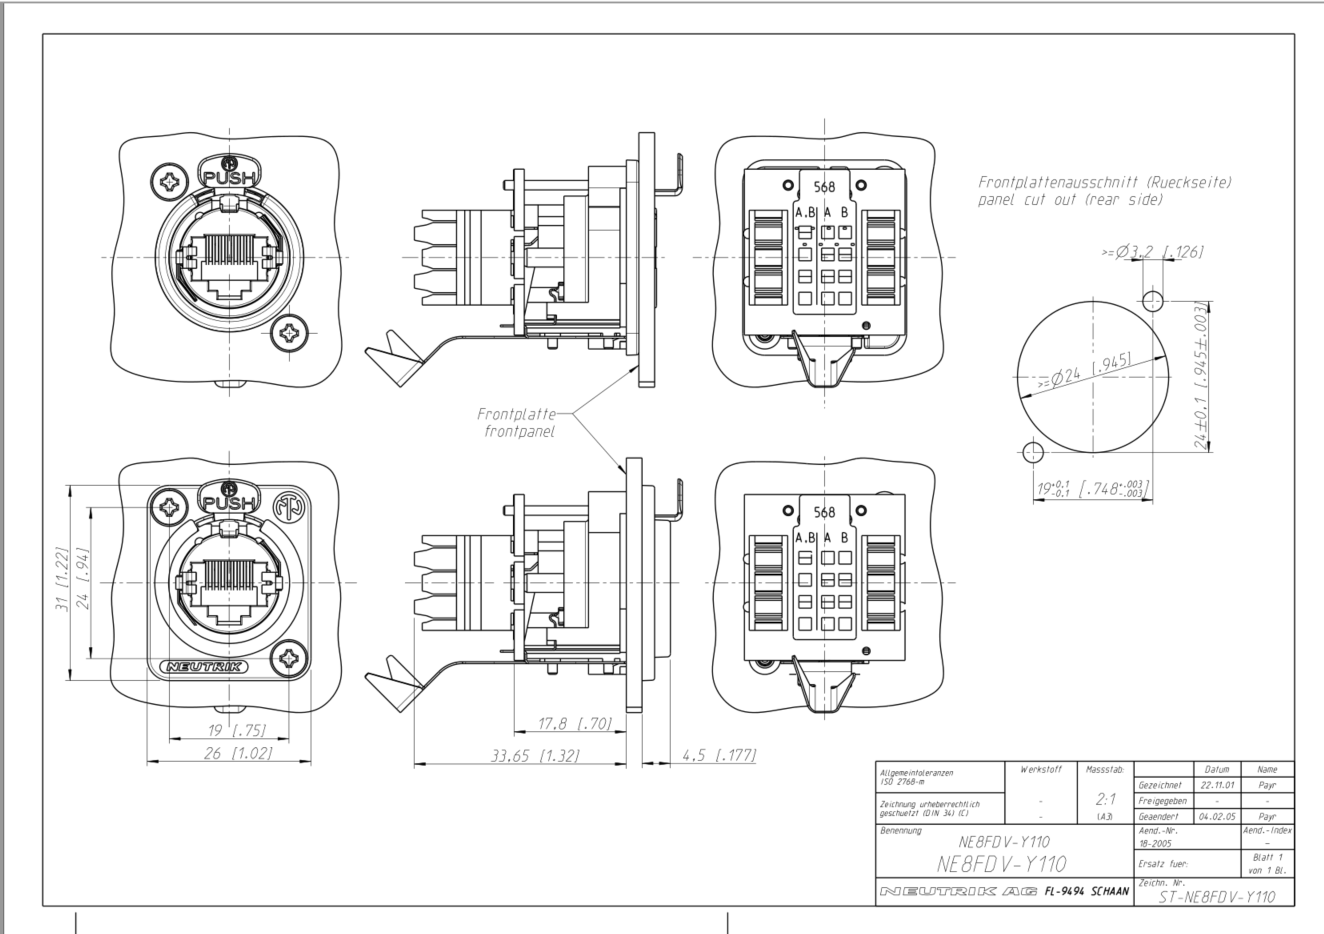
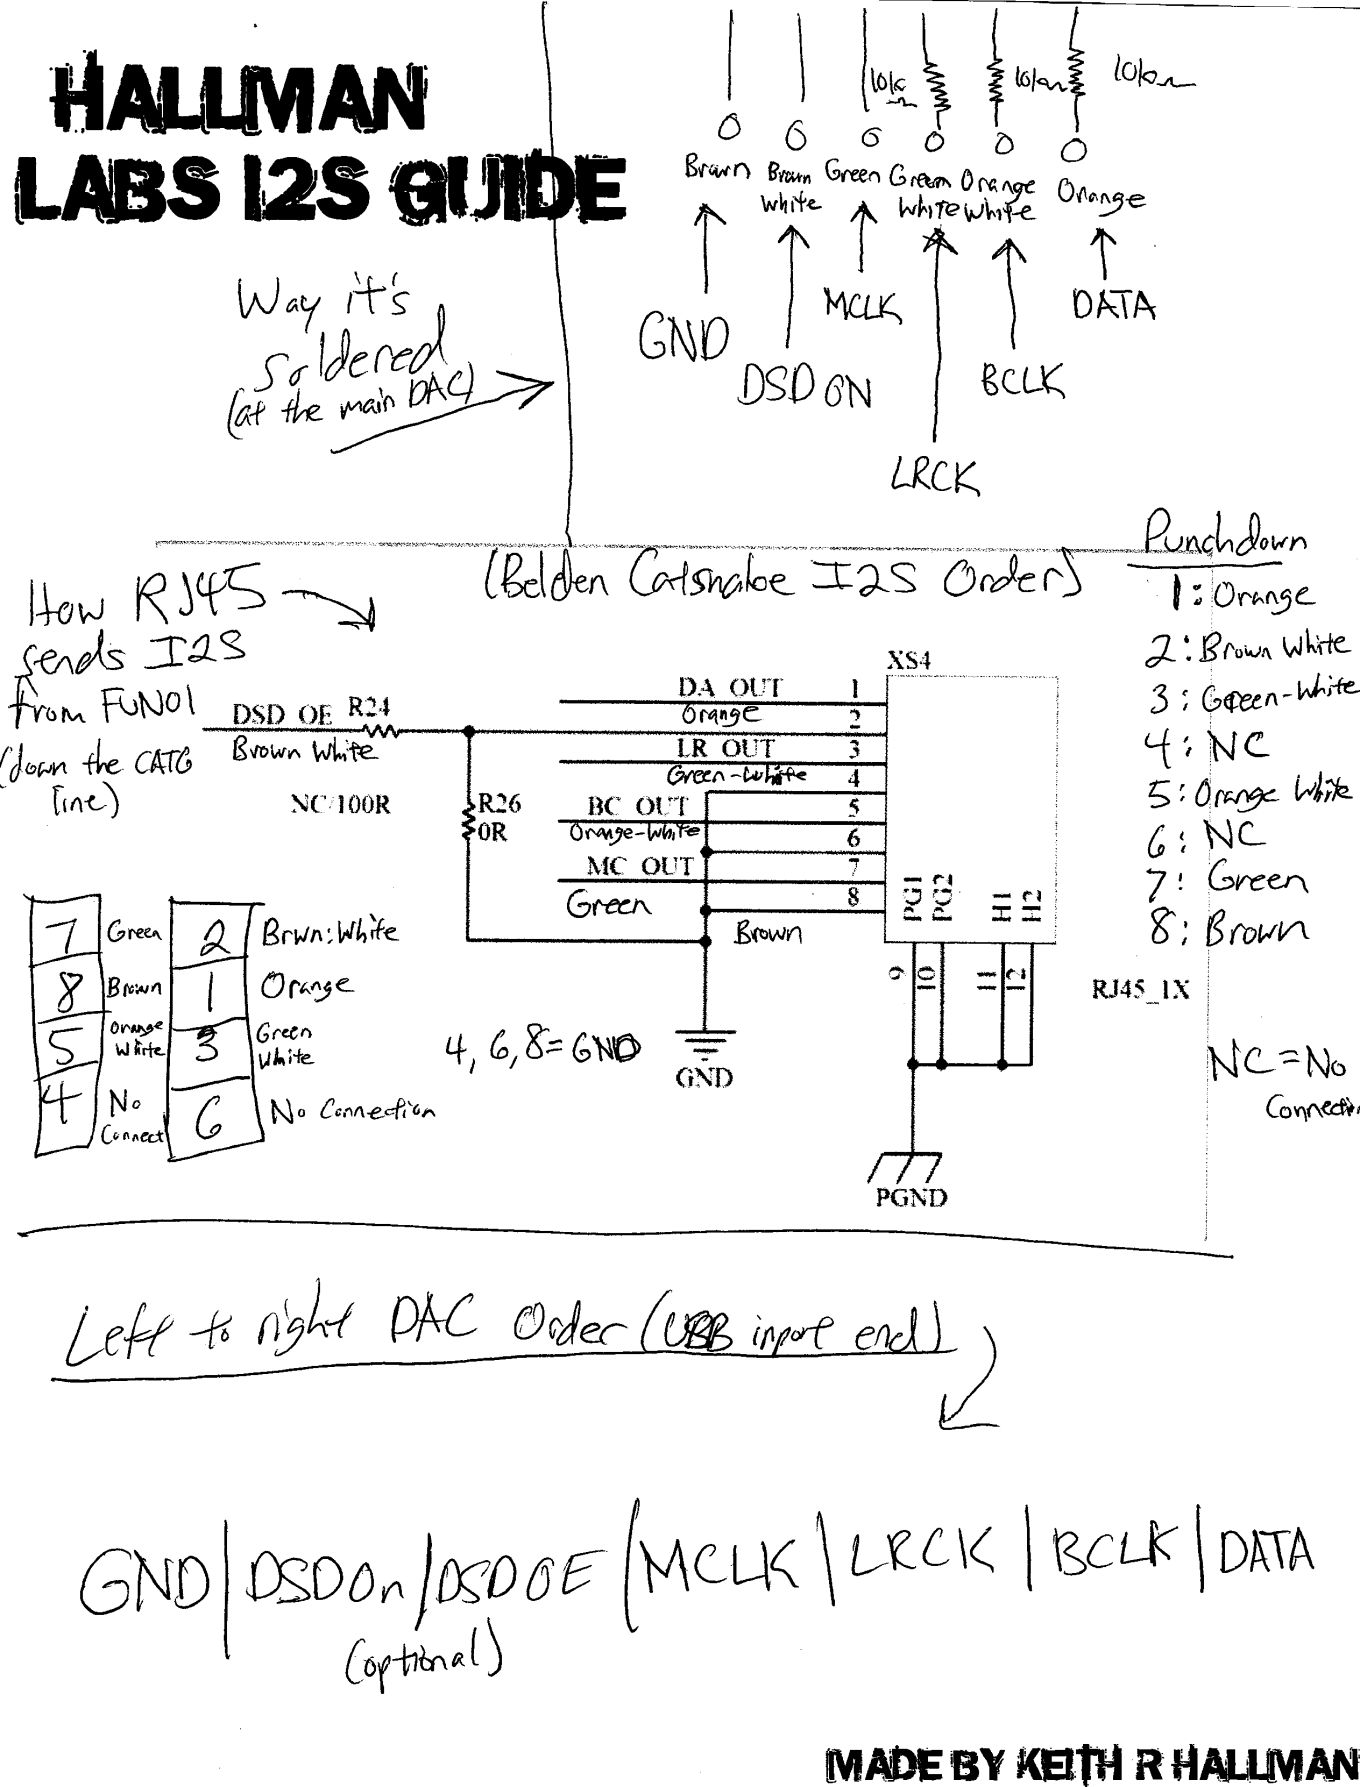
The job of putting I2S into the ES9038P DAC enclosure is no small feat. The mod takes someone who can use both soldering irons and power tools! Most decent CAT6 jacks will require a 6/7” to 1″ hole in the back of the DAC to fit the jack. Then you need to remove the stock pin header from the DAC PCB so you can hard-wire the I2S line (in my case, using Belden Catsnake™ CAT6A) between the I2S header location and the punch down/keystone jack found on the Neutrik plug. Using a keystone jack makes it easy to change the order of the wires, if ever needed in the future.
Not all XMOS/Amanero units have the same I2S output order, even just leaving a pin out can wreak havoc on your Hi-Fi experience (if you don’t adjust the order to match)! Once you punch down the CAT5/CAT6 you can hook up your CAT6 cable between your XMOS/Amanero module and the DAC’s CAT6 jack you just installed. Congrats, you now have a custom DAC (takes just one mod to qualify for the word “custom”)! If anyone has questions about why I did something or how to apply this information and the info found in the I2S Catsnake™ article, please email me at keith@hallmanlabs.com for more info.


I2S opened a huge door for the ES9038P across the board (RCA or XLR). The highs are better, more transparent signature, less fatigue on an already low fatiguing setup. Then of course the ability to now play DSD256 or 32-bit FLAC at 352.8 kHz+ adds to our High-Res options!
Before, running the ES9038 on coax was a little unfair, but not by a stupid amount. I apologize as the majority of this review was written with the ES9038 setup running on coax, but I will be including listening tests where the ES9038 is also on I2S (like the Play is by default). I hope this little “change in our program” will go to showing the strengths of XLR + I2S vs. RCA + Coax. This will give us a sub-review in the main review; as I will distinguish Coax tests from those made on I2S and see what differences or similarities exist.


DAC Audio Performance Measurements
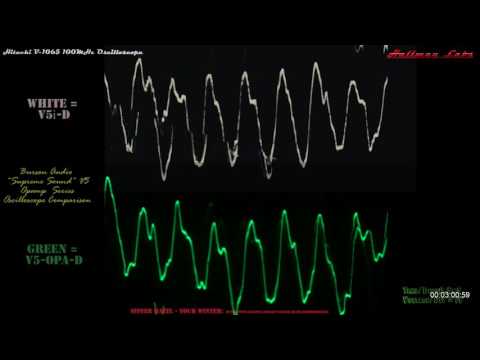
Frequency Response: White & Pink Noise Testing
There are a handful of different types of “colored” noise, white noise has equal dB across the entire frequency spectrum (limited in how high the range is in frequency by the track/album used). While “pink” noise has a perfectly flat line in the audible range with a -20dB drop (at varying slopes/shapes) after 20 kHz.
A perfectly flat line (on the FFT) is what we want to see on this first test (white noise is up first), and both DACs come very close using this method to “flat”. Pink noise is what you see below the first two photographs. Sadly I don’t have equal quality digital files (such as DSD256 as I do for each frequency vs. a sweep or colored noise that I only have in CD quality).
ES9038Pro DAC – White Noise Test:

Burson Play: White Noise Test:

Now let’s look at how a 96kHz 24-bit FLAC pink noise and how this shows us the high frequency roll off.
Now, with the ES9038Pro, you can change the behavior/shape of the high frequency roll-off using FIR filters found in the menus. Each of the 10 or so filters have a noticeable impact on the shape of the FFT. This is one of the examples that show the flexibility of the ES9038P. We can see just from the last two scope captures that the Burson Play does indeed have a higher dBV value at parts of the higher frequency end of the FFT than the ES9038P (this matches what I noticed listening).
Note: I am working on doing frequency response using discrete frequencies as I have them in DSD256. However, I have run into some difficulties getting a fair score on both DACs. I am also working on THD, SNR, Jitter, etc.
Thanks for being patient!
Closing Remarks: Burson Play Comes In First In Its Weight Class:
These two setups turned out to be much closer in fidelity than I would have ever guessed from the start of the review. We were able to gauge how much of a difference I2S has over Coax and then I compared balanced outputs to unbalanced outputs. Most reviewers would never change something so dramatic during a review, but I found it insightful to do so. Without switching to I2S or balanced outputs, I would have probably rated the Burson Play slightly too high. The Play is definitely an excellent choice for those who want your DAC/Amp together in a mobile package, but still want the option of rolling op-amps. The Play is a unique piece of equipment that shows us that size can be deceiving and is an excellent value for the money. The sAp-10 amplifier alone is larger than the entire Play, much less if we take into account the DAC and XMOS unit that make up the other combo.

Overall I have been thoroughly impressed by the performance and fidelity of the Burson Play, both from a DAC standpoint and as a separate amplifier. When you think about how the Play is laid out, the single-DIP op-amps each power one channel (L/R) of the headphones amp and the pre-amp out (that can be run at the same time as the headphone ¼” out). Throwing in a decent quality mic input powered by an ES9018K2M, gives the gamers everything they need in one enclosure. This is a solid rig all around and with just a little tweaking it can be a great rig! I can easily recommend this for anyone who admires simplicity and quality for a budget conscious price, wrapped up in a compact package. Burson Audio has really found something special here with the Play and 5x V6-OPA Classics!
Overall Rating: 90/100 = A-
(not an average of the above scores)
Hallman Labs Award Winner for Best DAC/Amp in 5.75″ form factor!
Pros:
Cons:
Thanks for reading the 3rd review at Hallman Labs! On deck is Part 2 of my Discrete Op-Amp Showdown and I will be adding technical aspects to this article as time goes on, such as performance measurements.
Copyright © 2018 Hallman Labs™, All rights reserved. No material written or photographed on this site may be replicated/copied/quoted/etc. without written permission from the site author/owner of Hallman Labs.
Announcing Burson v1.6 Play Giveaway by Hallman Labs. Winner drawn on September 1st, 2018! See more info here.
Originally posted here: https://hallmanlabs.com/review-3-burson-play-dac-amp-vs-es9038pro-dac-fun01-v1-1-xmos-su-1-clone/
At the request of Burson Audio I am sharing my latest review to date. This is between the stout Burson Play w/ 5x V6 Classics and the ESS ES903Pro w/ 4x Sparkos Labs SS3601/SS3602 and the FUN01, a clone of the Singxer SU-1 without the power supply part. I up the ante even more when I came back to add Black Gate™ "F" capacitors all around on the FUN01. This heightened the clarity of the FUN01 even further than before, after a few weeks of burning in. Nothing in this review was rushed and I tried to verify what I heard more than once before sharing it. I wasn't paid to do this review, but I was provided review hardware.
K. Hallman (Owner - Operator of Hallman Labs©)
My review today is focused on Burson Audio’s “Play”, a potent DAC/Amp combo available in a variety of prices. Dependent on the op-amps chosen from Burson Audio, the price varies from $299 (no remote) up to $549 (with 5x discrete V6-OPA “Classic” op-amps + remote, the setup shown in this review)! The Play uses an XMOS chipset for USB/digital audio in and it has a full pre-amp and headphone amp, offering both ¼” and RCA outputs. You can run the ¼” output and the RCA output together/at the same time. This is similiar to how the ES9038P can do XLR and RCA out at the same time from one pre-amp.
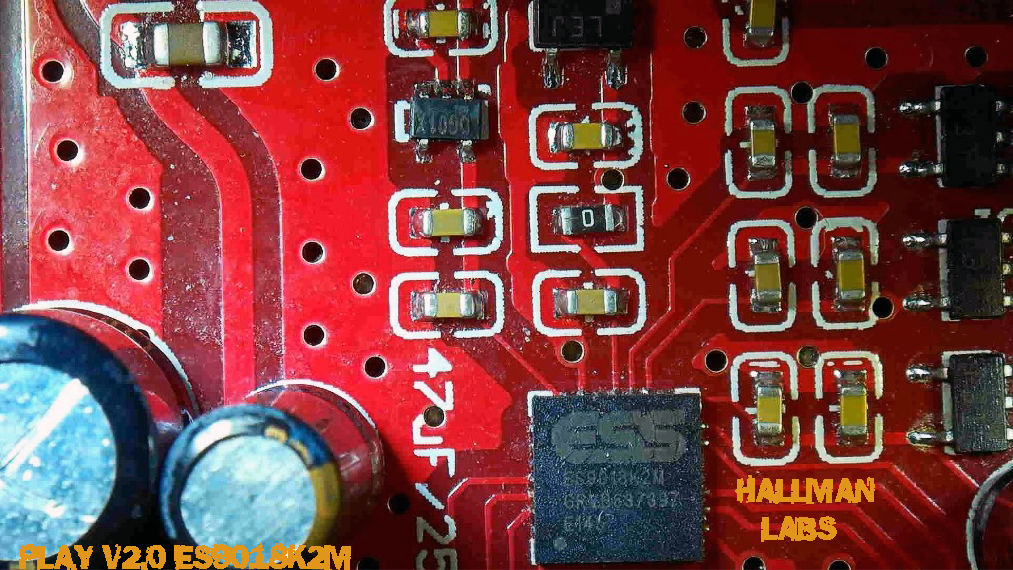
I confirmed with Alex at Burson that the XMOS unit talks to the main DAC using I2S! This is why you are able to play DSD128 with ease on foobar2000! The 64-pin ES9018K2M seen on the primary PCB (under the XMOS unit) is responsible for converting this I2S into analog wave-forms. We have a ton of different op-amp sockets to “Play” with (5 in total), yet it will still fit into a CD/DVD 5.75” drive bay in a PC case. I will be using the V6-OPA “Classic” line from Burson across the board inside the Play for this review. Burson Audio includes a standard 12V Molex power connection on the rear of the unit as well as a microphone input on the front. The 12V Molex connector allows for an easy power connection when the Play is inside your PC’s 5.75” drive bay. All of these features come together to give you the whole package in one very mobile footprint!
The microphone is powered by a small C-Media HS100B (thanks to Head-Fi.org for this correction). After connecting USB, most computers will see the ES9018 output and list it as a generic USB device. This ES9018 output is not meant to be used, so disable it. If you don’t choose the XMOS device (default) named “XMOS-XS1-U8 MFA (ST)”, you’ll never get any sound output. You can find the XMOS driver for the Play directly on Burson Audio’s website in the download section (found here https://drive.google.com/file/d/1RwVLfyNDo0u79erR3KaETreUnlemVhjn/view).
Competition Hardware Descriptions:
While looking at the hardware below keep in mind that the Play can do everything (except maybe DSD256) that the discrete rig below can do. By discrete, I mean we have dedicated components: DAC, USB Interface/XMOS, Power Amplifier, etc. This is one of the huge plus categories for the Play, cost effectiveness. For HiFi on a budget the $299 Play is hard to beat, especially knowing what you can get it to do with discrete op-amps!
Update: 6/25/18:
I have managed to run down 6 replacement capacitors for the Nichicon Muse stock caps below in the FUN01 XMOS module. Interested in finding out how this can/or if it will cause a change in the sound signature or quality. I found some Rubycon Black Gate™ “F” Series 100uF 25V (exact replacements to those installed below). I have never bought any Black Gates™ before because the cost of entry is usually so high, but I did once find some of the Non-Polar X (NX) versions for about $35 each, which is really good (same rating as these). Still looking for a good place to use those insanely good capacitors, but non-polar caps are pretty rare these days in digital audio circuits.
I really lucked out on this latest seller, because I found out that despite the fact they have been soldered in a PCB before, it was never used. They removed the capacitors from new circuit boards and as a result, besides testing, the capacitors are all new! These carry a price tag around $50-$100 on Ebay for NOS or New (Other) or New, expect about a 50% price drop for used. Or you can do like I do and sit and wait, always looking but only buying when you truly spot something worth your money. New Black Gate™ F Series capacitors for $20 a piece? Sure! Read a little more here.
I am providing some stout competition for the lonely “Play”. I will be utilizing my ES9038Pro DAC by ESS + “FUN01” v1.1 XMOS module (identical to Singxer’s SU-1). To keep this as even as possible, I will be making almost all head-to-head headphone comparisons using a single amplifier, when I’m using the internal Play amp I will notify the reader. The amp used on most parts is my S.M.S.L. “sAp-10” (a completely balanced headphone amplifier). Offering 2x 3-Pin XLR in + RCA in, with 1x 4-Pin XLR out and ¼” out. All loudspeaker comparisons will be made using my Pioneer “VSX-919AH” (4-Star WhatHiFi Winner) or my Yamaha “RX-V863” (I try both in the review), powering a pair of Wharfedale’s “Diamond 220” bookshelf speakers (5-Star WhatHiFi Winner). Throughout the review, Burson Audio’s impedance matching RCA-to-RCA Cable+™ will be connected between my modded Kenwood C-2 pre-amp (more on that here) and the power amplifier in use.
I will confirm observations I hear over the loudspeakers with my Audeze “EL-8” planar magnetic headphones; to make sure there is really a tonal shift, or distortion, etc. The EL-8 “space-age material” diaphragms (thinner than a human hair) lay above the Uniforce™ voice-coils, which give what Audeze calls, “near zero distortion”, making the EL-8s a perfect choice for reviewing high-end hardware where reference quality and flat frequency response is required!
The EL-8 also uses “patented Fluxor™ Magnet Arrays giving near double the power driving the diaphragm for even less distortion” along with Fazor™ elements as waveguides for a more “accurate waveform”. That is not to say the Wharfedale “Diamond 220” speakers are anything but exceptional, blowing away my Polk ”70s” in fidelity.
We want flat frequency response because anything other than that is in effect, an EQ on the incoming signal. In reality there is always some amount of EQ from the speakers or headphones, especially the speakers. As the Art of Digital Audio says, transducers, especially in loudspeakers, are what hold back audio the most from the next leap in innovation.
The “sAp-10” is a new device at Hallman Labs in a category of products I have been researching, balanced headphone amplifiers. This sAp-10 is an impressive piece of hardware, especially for only $199 (Amazon in May of 2018). The sAp-10 uses twin TI TPA6120A2 headphone amps, a TRIAD (FP24-500) US built transformer on board (and shielded), JRC NJW1195 four channel digital volume control with balanced phase, 2x Panasonic TQ2SA-3V Relays to prevent clicks/pops in output, 10x EPCOS (Siemens) film coupling capacitors, 3300uF Nichicon FW power supply capacitors and a lot more name brand parts.
This is a step up from my Schiit Audio “Magni2” ($99 at launch) and a good fit for this review since the amplifier in the Burson Play is so strong (with V6-OPA Classics). Running a dedicated amplifier ensures that we are only reviewing the DACs. As long as your DAC combo has analog outputs, such as RCA or XLR jacks, you can always bypass the internal amp. For the purposes of being fair/unbiased, I will be using RCA outs on both DACs since the Play doesn’t have XLR, also known as “balanced” outputs like the ES9038 DAC. This also keeps the exact same wiring for both DACs, including the Burson Cable+™ RCA-to-RCA cable.
The only difference between the two setups is the fact that the Play uses I2S (Inter-IC Sound, the latest and greatest) from the USB module and the ES9038 is still using coax from its XMOS. This was remedied before the review was finished, but not too long before. For the majority of the time all tracks in DSD were down-sampled to DSD64 (in foobar2000) because that is the maximum that the FUN01 can handle over Coax with the ES9038Pro using DoP (DSD over PCM). Note, this is how the review was run the majority of the time, even though it was corrected towards the end of the review.
Review Hardware Info: v2.0 vs. v1.6 Burson Audio Play
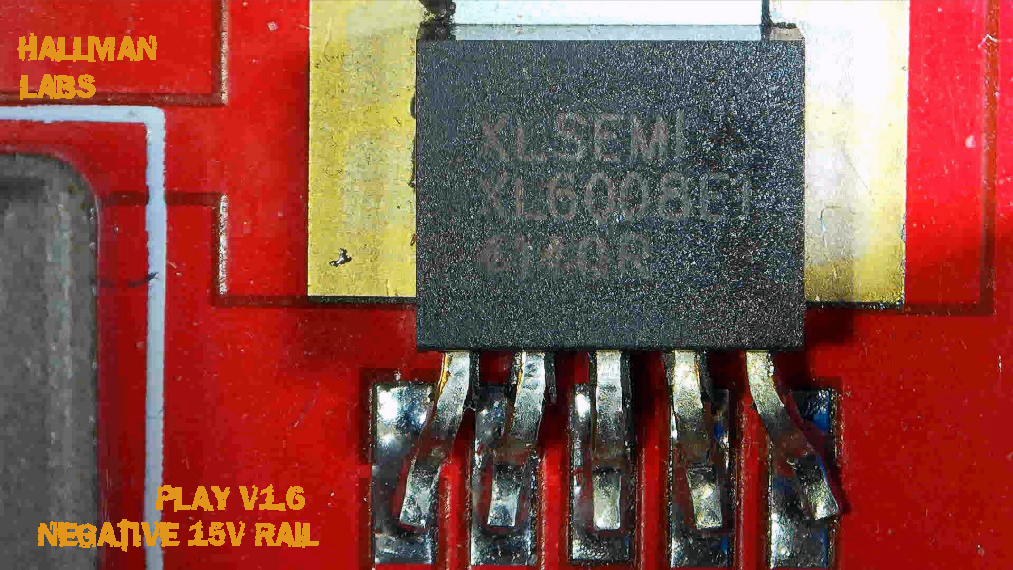
Burson Audio sent me a new revision of their Play’s primary PCB which is now v2.0 vs. v1.6. The primary upgrades were an increase in filtering by an increase in the number of ELNA SILMIC-II capacitors on-board. They replaced both Bourns trim pots with fixed Dale resistors (all other non-surface mounted resistors are Dales). For the -15V rail of the DAC/Amp, the v1.6 used an XL6008E1 while v2.0 uses an XL6019E1 IC. For the +15V rail of the DAC/Amp, the v1.6 used an XL4005E1 while the v2.0 model uses an XL4015E1 IC. The last two changes I noticed were the inclusion of an inline + removable 5A miniature-fuse with the 12V Molex connector and the 5W cement resistor was replaced with dual 2W carbon comp resistors in parallel. As you can guess from the names, most of these IC changes are newer revisions of the previous model (thus should be higher performing parts). From my conversations with Burson and what I have read, the main focus was lowering the noise floor without losing power. Increasing the quality of the power components will surely help out in this area.
I talked again with Alex from Burson Audio on the topic of what was changed from v1.6 to v2.0 (to confirm my observations) and as I thought from inspection, it mainly has to do with the ICs used for the power delivery of the positive and negative op-amp voltage rails. Burson also wanted to remove the trim-pots due to Dale resistors being less likely to cause noise in the signal path. This latest revision has excellent depth characteristics that shine during my PC gaming sessions. Surely a lower noise floor can help give the listener the purist audio possible (free of audible noise). I was also told that Burson is no longer making the v1.6 Play, so I stopped my detailed comparison between the two from a sound standpoint. If enough people want this comparison, I’ll bring it back.
Digital Noise/Mouse Distortion + Solution & Dedicated PC Power Supply: Fix that Hum Yourself!
I have not noticed any pops, cracks, echo distortion (distortion that follows right after original sound) or other general distortion. There was one issue with digital noise that increases in decibel with mouse movement. This is a very old issue with digital audio, especially for the PC users. Luckily the community at Head-Fi.org found a fix, rather quickly in fact! New user “Dżonel” first suggested this simple mod and a handful of other users confirmed the fix works, including myself (you can find more on that here). The DAC still has a ground, it’s either from the 12V Molex or the normal DC power input, whichever you are using gives the +5V in its return path to ground (there must be one by KVL, Kirchhoff’s Voltage Law). This mod simply negates a 2nd (and thus optional) ground from the system. If you cut open your USB cable and clip the black ground wire, this noise will cease, or at the very least, drop in decibel by 75%. Some XMOS modules require the GND from the USB cable, usually those without a grounded chassis, so pick the cable you cut up wisely! You can also kill the USB ground at the DAC, but this is a more permanent option.
The issue of mouse induced noise/artifacts is an issue that I have brought up to companies like Creative before the X-Fi series ever launched (over a decade). I am of the opinion that it has to do with high amperage draw GPUs and CPUs. There is the possibility that a noisy AC line/outlet could contribute as well. You can minimize this chance by minimizing the number of active components in your PC (and in your audio signal chain, start with a small, but high quality system). With regard to minimizing the number of components, I am speaking about the non – system critical hardware (as in don’t remove your CPU/RAM/Mobo/PSU). When we are dealing with high res audio, this noise usually isn’t an issue, but when dealing with a lower quality (like streaming) it sometimes is. I have also picked up on similar distortion when converting multi-channel audio to stereo with the Play. When noise on the digital line is an issue, the ES9038P is almost always the winner. According to “The Art of Digital Audio 3rd Rev.”, the ability of a DAC to reject noise/jitter/artifacts/aliasing/etc.. is the “greatest measurement of DAC performance”. But as we have already mentioned, it was simply a ground issue and was easily fixed, so not everything is so cut and dry.
I’ll do more tests using compressed audio tracks vs. high res audio to see if I can duplicate it. I found out that the ES9038P is able to do gain compensation dynamically and as a result, lower the THD (Total Harmonic Distortion). I am building a 2nd PC for Hallman Labs, nearly identical to the main PC except this one has an i5 3570K de-lidded (heat spreader removed and higher quality paste added) w/ Cooler Master V8 GTS + ASRock Z77 Extreme6 + G.Skill DDR3 2133MHz 16GB (4x4GB) + Corsair HX750 (750W/62A) + Corsair 650D rig, running the Linux tailored to Hi-Fi, Audiophile Linux (“AP-Linux” link here). This will allow us to see if this is an OS related issue, or truly just a hardware grounding problem (well, in theory it should allow us).
From the ESS datasheet “(The ES9038P has) Programmable THD compensation to minimize the THD caused by external components” and “Full-Scale manual/auto-gain calibration reduces device-to-device gain error.” This is exactly what Burson Audio said is causing the noise over a digital signal, gain offsets between devices. Alex said the next revision of the Play will be able to adjust this manually. Now we know after troubleshooting, the cause of our digital noise has to do with the ground in the USB cable.
I also had to use a standalone power supply from a computer with a 24 pin lab PSU module with an on/off switch to give the 12 V Molex on the Play its power. I used a Corsair HX750 (high end PC PSU) for this to ensure the cleanest possible power (nothing else is drawing power, even the fan only runs when necessary). To make a long story short, I had a bad power brick and I ended up preferring how the PC power supply sounded over the replacement I got. I estimate having over 400 hours of use on the new revision of the Play. Even when putting it up against stout competition, the Play’s V6-OPA “Classic” op-amps really shine, especially as the amplifier. In fact, doing a direct comparison with just the Play and its internal amplifier vs. the entire other setup, the Play isn’t that far behind (using its own amp vs. the ES9038P on RCA out to sAp-10)!
Opening Thoughts on Voicing of Burson Play vs. ES9038Pro + sAp-10:
Switching from the SMSL sAp-10 + ES9038P + XMOS FUN01 combo to the Burson Play DAC/Amp combo has a noticeable tonal shift. I first noticed a high frequency extension of what seems to be an upper-mid to high frequency focused lift found in the Burson Play’s voicing (w/ V6-OPA “Classics”), not heard as prominently as in the other combo. I checked this with both DACs, the ES9038P + sAp-10 has slightly better low frequency extension and a mid-range lift vs. the slightly higher and a tad more detailed lift on the Burson Play DAC/Amp. I matched the volumes as close as possible without having to hook up the oscilloscope or multi-meter, by using the modded Kenwood C-2 (which has 2x V6-OPA-D “Vivid” op-amps running in the EQ amp and Flat Amp + 4x replaced stock 18V diodes with 16V Zener diodes). I also tried running 2x V5-OPA-S in the flat-amp using an adapter and flexible DIP-8 extensions. I ended up preferring the tone of the dual V5-OPA-S over the single V6-OPA-D “Vivid”.
The Kenwood C-2 has been instrumental in this review, matching volumes with its 4-gang ALPS potentiometer and matching voicings through its above average tone controls (running on 2x V5i-D op-amps). When we flip the ES9038P from RCA to XLR in the later parts of the review, we find that the RCA outputs are darker, with less sparkle. I bring up small details like this to ensure I give an unbiased and clear opinion.
The Burson Play’s performance in a movie or TV show usually comes off as more engaging, the upper-mid to high frequency extension causes environmental effects to echo/reflect around the room easier when using loudspeakers. In headphones they help give sound that extra sparkle and high frequency detail. Others may find the higher frequency focus as a distraction from the ideal flat line response, but at a time when High Resolution audio is king, I can understand the voicing selection.
We are also talking about Burson Audio V6-OPA “Classic” (5 of them) in the Play vs. Sparkos Labs SS3601 and SS3602 (two pair) in the ES9038P. Every single op-amp selection/swap is going to change the overall tone of the sound when used in system critical positions, like these components do. As I learned after the initial review was written, the digital interface used and whether or not you are using balanced or unbalanced inputs/outputs, all have an impact on voicing and sound stage. I was surprised to learn that XLR (balanced) vs. RCA (unbalanced) had more of an impact on sound quality than Coax vs. I2S did.
Listening Tests Streaming (Pt 1):
(ES9038 on Coax & RCA)
One of the things I have learned from doing multiple reviews is not to weight music too heavily. The people who do want to know about the music performance want to hear it across a broad range of different genre. The majority of people will use their hardware to do a lot more than just listening to music and the Play is focused on this fact. The main reason I can see to include a microphone is for the gamers and pod-casters, it allows you to have everything you need included in a plain 5.75” drive bay!
While listening to some streaming off of Netflix through a Windows 10 PC, I noticed I preferred the Burson Play over the other combo (while using Coax and RCA on the ES9038P). This tells me that depending on what you are using your device/s for, either of my combos could be on top of the other, fidelity wise. Hell if you blindfolded me and started switching DACs, I would be hard-pressed to guess right much over 50%, because they are honestly that close in fidelity, especially through my Diamond 220 bookshelf speakers. There are minute details (yep, that is how you spell minute) that come out with the ES9038P that sometimes get lost in the gain of the Play. This isn’t always true and depending on the situation, I would pick the Play.
When I am checking the differences between my two DAC combos I always turn off the tone controls of the Kenwood C-2 pre-amp so I can hear their voicing through just the flat amp of C-2 (where one of the Burson V6-OPA-D “Vivid” discrete op-amps are). The “Play” has this crispness to the sound, without being edgy and thus not fatiguing on the ears. The bass is also prominent and free of distortion. Usually when dealing with lower quality DACs you have to sacrifice either bass or treble to boost the other. This is not true with the Burson Play DAC/Amp combo, it seems both ends of the spectrum are here equally, as well as the mid-range. The Burson Play just has this lively feel to it that is truly musical in its qualities. One of the things I always try to keep in my mind is how the hardware sounds compared to being in person at a concert.
When I switch back to the ES9038P combo, the first thing I hear is the mid-range clarity of the speech and when there is nothing being played, the noise floor is seemingly non-existent (Note: through the ES9038P’s XLR outputs, there is no noise floor, period). I have mentioned this fact before that the ES9038P + FUN01 seems to deal with digital noise better than the Play and its XMOS through the use of hardware demanding oversampling and noise filtering. The FUN01 has the ground plane split between the digital and analog sides of the board, something not usually seen on budget to mid-range priced USB digital interfaces. The FUN01 connects the analog and digital sides through digital isolators.
System Critical Note: The FUN01 (clone of Singxer’s SU-1) requires power on both the digital/USB side AND on the analog side (5V power supply with center pin positive). This means you can’t use things like SBooster’s “VBus2” that kills the ground and power pins of the USB cable. The best you can do with a design like this is with something like AudioQuest’s “Jitterbug”. The Jitterbug is said to improve clarity and dynamics, bringing an overall more solid and precise sound. I was testing with and without, I’ve never been able to find any negative changes to the fidelity, so I usually run it. We are also Unable to use the modified USB cable for the Play (with the ground removed) with the FUN01.
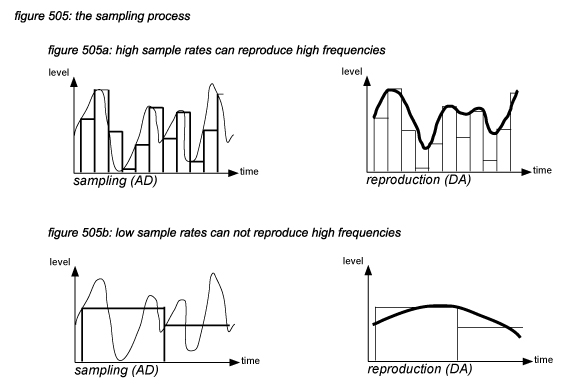
Oversampling is a crucial part of a modern DAC, especially the ES9038P which uses 4x oversampling in stereo or 8x in mono mode. The ES9038P has shown its ability to filter out noise that the Play allowed through. Now we know this digital noise has been brought on by having 2 paths to ground, one in the USB cable and one through the chassis ground (supplied by the power supply ground). Oversampling helps to push noise/distortion outside of the audio band, especially with modern filtering/shaping on top of oversampling. With specific shaped filtering you can filter out 50% more or so of the quantization noise than with a plain filter (Source: Art of Digital Audio)
In simple terms oversampling means to sample at a higher rate than is required by the Nyquist Rate (a little over two times the top input frequency). Quantization (signal processing) error happens when going from analog to digital (ADC). This involves taking a continuous signal and segmenting it into “boxes” or “bins”. “Such errors are an inevitable result of the classification of continuously varying analog voltages into discrete digital bins. This quantization necessarily adds this noise at the level of ½ LSB (Least Significant Bit).” Pg.694 Art of Electronics Lab Manual 3rd Edition Luckily for us, the entire process is digital, from the hard drive to the XMOS and then to the ES9038P (or ES9018K2M for the Play), where digital is then turned to analog (DAC).
Often after conversion from digital to analog (DAC), flat lines will have a roughness, also called “steppy edges”. This error can be smoothed out using a quality, low-pass filter. If you look on the back of the Play, this is what the “LP” means in the diagram. A common use of discrete op-amps, includes being used as high quality, low-pass filters with little effort.
Sampling Rate: In simple terms, sampling involves breaking the waveform/graph into smaller and smaller chunks. However, the sampling rate must be taken across the horizontal/time axis. Note: In audio, when signal frequencies begin close to zero, the highest frequency simply is the bandwidth. This tells us the sampling required for a given signal must be dependent on the highest frequency in the analog wave. If the wave is made up of more than one frequency (such as in audio), it is the highest frequency that we are concerned with (lower frequencies are much easier to sample). So, if you buy a high res PCM/FLAC album that is rated at 96 kHz, the highest frequency you should see on an oscilloscope of the DAC outputs should be right around 96 kHz.
Listening Test Music (Pt 1):
(ES9038 on I2S + RCA out & Play using internal amp)
Adele Live at the Royal Albert Hall Blu-Ray (DTS-HD MA 5.1 to LCPM 2.0)
I have to admit I am a fan of Adele, she is one of the most powerful and spine tingling voices still with us. This Blu-Ray is an excellent showcase of her talents, from the power of “Don’t You Remember” to the country melody of the cover “If it Hadn’t Been for Love”, Adele never leaves you disappointed with this live album. I start out on the Burson Play using the internal amp into my EL-8s and there isn’t even a hint of distortion, noise, pop, cracks, etc. The EL-8s are so transparent on this album with the Burson Play, yet they maintain the body and depth of a live album. From the realism of the Royal Albert Hall echoes (time for a note to decay) captured, to the texture of her voice, this album transports you to London. Accurate imaging and timbre of the instruments intertwined with the powerful vocals, make this one of my favorite “reference” albums.
On the track “Turning Tables” we are greeted with a very rich and textured voice, thanks to Adele. The piano on this track seems to surround the vocals of Adele on both sides and the violins come in from what seems to be higher (off the ground) than the vocals and piano, like birds swooping in from on high. Switching to one of the higher paced tracks, “Rumor Has It” brings the bass and body without losing the precision of this album. This is one of the best tracks to hear the dynamic range and the snap/speed of transient response of the album. (Transients as defined by Head-Fi “the leading edge of a percussive sound. Good transient response makes the sound as a whole more live and realistic.”) In contrast, a bad transient response would come off smeared or muddy.
I switch over to the ES9038P + FUN01 and finally the ES9038P is able to pull ahead in the upper-mid to high frequency territory. I think the ES9038P has a better balance on this album than the Play does (tone controls are off on C-2) and it has better low level detail. At the top of the SPL (Sound Pressure level) the sound has a warmth and texture to it that is slightly lacking on the Play. It’s like you dialed the presence knob up when going between the Play to the ES9038P. To those who don’t play guitar, presence means how “close” the sound seems to you. Neither setups are really lacking, but we are doing a comparison here, which is far from easy with how strong each of the setups are.
I flip to the cover, “I Can’t Make You Love Me” and from the first note you feel like you are standing there watching her. The sweetness of her voice shines through on this track while maintaining pitch across her unbelievable vocal range. Only a few artist before her could even compete with her capacity and vocal stamina, such as Aretha Franklin or Whitney Houston. The overall realism of this album is up there with some of the best, from the echo of her voice around the hall to the crowd singing on the track “One and Only”. The dynamic range could be glass shattering, yet I don’t feel my ears getting tired/fatigued (when played at a reasonable level). Now we go back to the Play and cue up the song “I’ll Be Waiting”, as if on cue the chills go down my spine. It’s very hard to describe these changes in sound quality. It’s almost the way it “feels” vs. how it sounds, people use the word “musicality” to describe this sensation. The Play seems to have slightly more body to the sound, the small details seem more focused or just come out with less effort.
I noticed when I was playing the album over DTS-MA 5.1 (into LPCM 2.0) I kept hearing what sounded like sibilant distortion, but when I flipped to Dolby 2.0 it stopped instantly. This tells me that this issue has to do with down-sampling 5.1 into stereo using PowerDVD 17 Ultra. For whatever reason, this issue doesn’t seem to bother the ES9038P combo as prominently. Once I had that issue figured out I was left with a hard decision to make, deciding which DAC wins this section. There is a small downside for the Play, it lacks the complete blackness of the ES9038P’s background, even in between notes you can hear this difference. However, this is not a detail that you’d notice right off the bat, maybe not even the first few times playing the album. Still, for this reason I have to give this section to the ES9038P. If not for this little difference I would have called it a tie.
Listening Test Music (Pt 2):
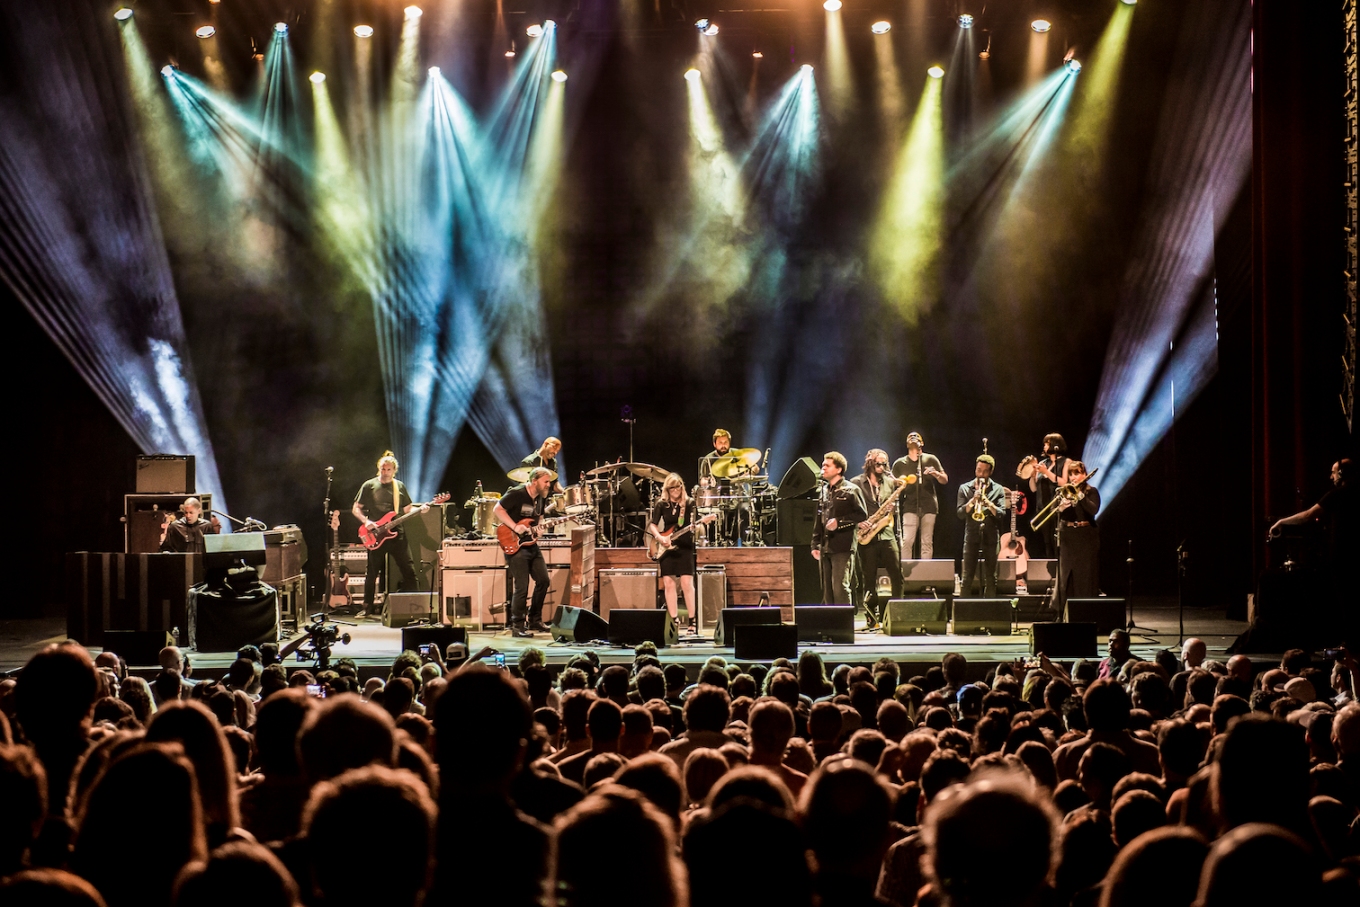
Tedeschi Trucks Band Live from the Fox, Oakland (96kHz/24-bit FLAC)
I have seen Derek Trucks in both of his former groups, The Derek Trucks Band (twice live) and The Allman Brothers (four times live). I am going to see Tedeschi Trucks Band for the first time in July (in the town of my old engineering school, Raleigh, NC!) and I am excited to hear this duo finally in person! Basically, I know how Trucks sounds when he plays live and I have listened to his studio work for hundreds of hours, maybe thousands (car trips add up fast). Without further ado, these are my thoughts on the performance of these components during this excellent live high res album.
We begin with the ES9038P + FUN01 going into a SMSL sAp-10 balanced headphone amplifier, although we are using RCA for fairness sake. I have considered comparing balanced (the hardware interface) out of the sAp-10 once I have the “Blue Dragon” cable and EL-8 connectors from Moon Audio to a 4-pin XLR from Neutrik. This is the balanced output from the sAp-10 that is offered alongside the ¼” jack.
Back to the music at hand, this is one of the most lively and upbeat live albums I have had the pleasure of listening to in a while. This will be my first opportunity to listen to this album, for the sake of the review! From the start of the first track we hear the crowd noise tumble into our sound field, the drum rolls left to right, everything seems just how you want it. Flat curve with complete neutrality throughout the frequency spectrum and even though they jam out hard at The Fox, it’s not fatiguing. I know that my EL-8s definitely help in that area, though, also having the Kenwood C-2 really is a life saver and worth every penny. The C-2 comes alive further when we take the time to mod it for modern discrete op-amps! Giving the tone control the V5i-Ds from Burson Audio was an easy call, these tone controls are a crucial part of my rig. Each album has its own EQ and I have an EQ that I want to create for my system, so a pre-amp caters to this need. At least if you get one with decent tone controls like we have on the C-2. All final impressions are done with the tone neutrality (tone controls disabled/off).
The guitar is placed right in the center of the sound stage, the crowd seems to encircle the guitar during the track “Keep on Growing”. If you listen, close your eyes and really listen, the crowd is all around you and the instruments come from dead center, if the stage was a 360 sphere in front of your face. We get to the bluesy, slower “Bird on a Wire” piano opening, which I love. Growing up with Aretha Franklin and Led Zeppelin, creates an eclectic ear. An ear that loved Zeppelin’s “Trampled Underfoot” because of the keyboard solo! This album hits so many genres without having to try, it transplants you. Then in comes Susan Tedeschi, who delivers all the vocal sweetness and texture like the great ones from the past. Ever since I heard her sing “Midnight in Harlem” at Eric Clapton’s 2010 Crossroads on Blu-Ray, I was sold. The fact she married one of the top touring guitarist in the world, was definitely a plus! “Bird on a Wire” is such a powerful track, Tedeschi gives a soulful and church hymn inspired tune a modern feel, with her own special touches at every chance she gets. The sound of Tedeschi coming in the EL-8s compared to the piano, drums and backup singers, almost seems to be coming from “above” you, like an angel singing down
It’s time to switch over to the Burson Play after I have a good sense of the ES9038P and its performance on coaxial. I can’t deny it, I listened to “Within You, Without You” twice, once with the ES9038P + FUN01 and once with the Play (both setups were using the SMSL sAp-10 headphone amp into the EL-8 open-backs). I put the Play on and closed my eyes, in order to imagine this sound field and pick up on the details I noticed a change with. The first thing was the jump in decibel (which I had to correct obviously), but it is worth noting that the Burson Play overall has so much more gain than my ES9038P, maybe 4x. The Play is loud enough to easily damage your hearing, especially when you are using things like a pre-amp with a power amplifier. Be safe with your gain levels and protect your hearing!
What I noticed first was the goose bumps on my arms when using the Play, honestly. The first time I played the first track, it was like I was actually there (when I closed my eyes and focused on the sound). I’m doing it now with the track “These Walls”. The guitar seems to originate from some ancient stone cave due to the sound of the instrument and the echo captured, but there is a large crowd of people around too. This strange instrument being played, not one I can name (sorry guys/gals), it seems to grab your attention and sort of tickles your brain with a melody almost hypnotic in its timing. Derek Trucks starts to play along with them, sounds like he is using a slide guitar on this track. The drum comes in, slowly at first, with a jazz type sound and all of a sudden we have Susan singing again. This is a song I absolutely love, titled “These Walls”. It’s so easy to pick out each instrument when you open your ears and just sit and focus on the track. The Play has so many strengths and I’m not just saying that for the purpose of this review, I plan to prove it actually. We will eventually put the Play and the ES9038P + FUN01 into RightMark and my oscilloscope to see what is going on!
The Play comes away here really cementing the way I feel about how it stacks up. I only hope this continues once the ES9038P is running on I2S also! That will be something that should interest people who may not be interested in the overall review topic! Is I2S that important where a DAC/Amp combo can compete against using all discrete components? The placement and dynamics that the Play is able to achieve, really creates an impressive sound field to get lost into. The track returns to what it opened up with and then it closes out as smoothly as it came in. I’d probably have to give the Burson Play the win (while the album was playing through coax on the ES9038P setup).
A Short Note on Converting PCM to DSD with Foobar2000:
I tried playing the Tedeschi Trucks album with DSD64 using SDM Type D (best of the available Foobar2000 DSD converters) from its native 96 kHz PCM and I ended up hearing what sounded like clicking coming from random locations. I tried both DSD128/48 and DSD128, I didn’t experience this artifact using these settings and the overall sound signature seemed livelier. I am listening to more of the same Tedeschi Trucks album in DSD128 and it truly sounds remarkable. “Don’t Drift Away” in particular draws emotion out of you like Otis Redding can in songs such as “Cigarettes and Coffee” or even “Chain Gang”. Perhaps you are more into Aretha doing “The House that Jack Built”? Anyone who enjoys those tracks will enjoy this live Tedeschi Trucks album in my opinion, it’s definitely worth checking out. The jam out track “Ali” brings in a lot of brass instruments that really help to open this album up to a huge audience, between the excellent trumpet work and the always groovy playing of Trucks, you are in for a treat!
Just for the sake of pointing it out, I switched back to DSD64 on a track that was clear during DSD128 and sure enough, the clicking had returned. As soon as I switched over to DSD128, before even hitting apply, the clicking was gone! So there must be a limitation of DSD64 with this up conversion that still needs to be ironed out with foobar2000. For now if you are going to convert PCM into DSD on foobar2000, stick to DSD128 or DSD128/48.
Balanced vs. Unbalanced: Understanding the ES9038’s Performance
I think the huge difference in unbalanced vs. balanced sound quality needs to be pointed out. This is an advantage that stacks up in favor of the ES9038Pro for the no-holds bar patrons of HiFi HW (large budgets). Sadly it is true, in order to get an amplifier with XLR in will cost a pretty penny. There are a few exceptions to this rule, especially if you go with used equipment (I do this, see Pioneer VSX-919AH) or DIY.
When using my XLR/balanced setup the sound stage seems to expand by at least 2 fold, it’s immediately noticeable if sitting near the sAp-10 with both RCA and XLR hooked up from the ES9038P (switching between the 2 inputs because the ES9038P can output both). It’s not only sound stage size that changes, the texture of the highs and lows have more detail. The dynamic range seems to be better too, the XLR input from the ES9038P seems louder on the sAp-10 by a few decibels, nothing crazy. Just the change in the details you can pick up on, like someone hitting a mic stand or the pianist foot tapping against the ground while playing brings an old album alive again.
When we are comparing brass instruments you might as well lay down the cards on balanced audio, it’s not even close, especially on the high frequency side. The RCA output of the ES9038P is a tad darker, even when running through the C-2 with V6-OPA-D “Vivid” op-amps for the flat amp. Perhaps this is why I kept hearing a high frequency shift with the Burson Play for most of the review (because of the darker RCA signature).
Perhaps the ES9038P has a darker signature on the RCA outputs than the XLR or, it could also be how the sAp-10 handles the two input types. Sadly I only have one amp that can take XLR in, so I can’t confirm this observation. I do have another XLR DAC on the work bench (see DSC1 article). Over the days following the release of this review I will be making measurements trying to get all of these audible claims to show up on an oscilloscope or in RightMark, so keep an eye out for the update.
Adding I2S Input To ES9038 DAC:
The job of putting I2S into the ES9038P DAC enclosure is no small feat. The mod takes someone who can use both soldering irons and power tools! Most decent CAT6 jacks will require a 6/7” to 1″ hole in the back of the DAC to fit the jack. Then you need to remove the stock pin header from the DAC PCB so you can hard-wire the I2S line (in my case, using Belden Catsnake™ CAT6A) between the I2S header location and the punch down/keystone jack found on the Neutrik plug. Using a keystone jack makes it easy to change the order of the wires, if ever needed in the future.
Not all XMOS/Amanero units have the same I2S output order, even just leaving a pin out can wreak havoc on your Hi-Fi experience (if you don’t adjust the order to match)! Once you punch down the CAT5/CAT6 you can hook up your CAT6 cable between your XMOS/Amanero module and the DAC’s CAT6 jack you just installed. Congrats, you now have a custom DAC (takes just one mod to qualify for the word “custom”)! If anyone has questions about why I did something or how to apply this information and the info found in the I2S Catsnake™ article, please email me at keith@hallmanlabs.com for more info.
I2S opened a huge door for the ES9038P across the board (RCA or XLR). The highs are better, more transparent signature, less fatigue on an already low fatiguing setup. Then of course the ability to now play DSD256 or 32-bit FLAC at 352.8 kHz+ adds to our High-Res options!
Before, running the ES9038 on coax was a little unfair, but not by a stupid amount. I apologize as the majority of this review was written with the ES9038 setup running on coax, but I will be including listening tests where the ES9038 is also on I2S (like the Play is by default). I hope this little “change in our program” will go to showing the strengths of XLR + I2S vs. RCA + Coax. This will give us a sub-review in the main review; as I will distinguish Coax tests from those made on I2S and see what differences or similarities exist.
DAC Audio Performance Measurements
Frequency Response: White & Pink Noise Testing
There are a handful of different types of “colored” noise, white noise has equal dB across the entire frequency spectrum (limited in how high the range is in frequency by the track/album used). While “pink” noise has a perfectly flat line in the audible range with a -20dB drop (at varying slopes/shapes) after 20 kHz.
A perfectly flat line (on the FFT) is what we want to see on this first test (white noise is up first), and both DACs come very close using this method to “flat”. Pink noise is what you see below the first two photographs. Sadly I don’t have equal quality digital files (such as DSD256 as I do for each frequency vs. a sweep or colored noise that I only have in CD quality).
ES9038Pro DAC – White Noise Test:
Burson Play: White Noise Test:
Now let’s look at how a 96kHz 24-bit FLAC pink noise and how this shows us the high frequency roll off.
Burson Audio’s Play:
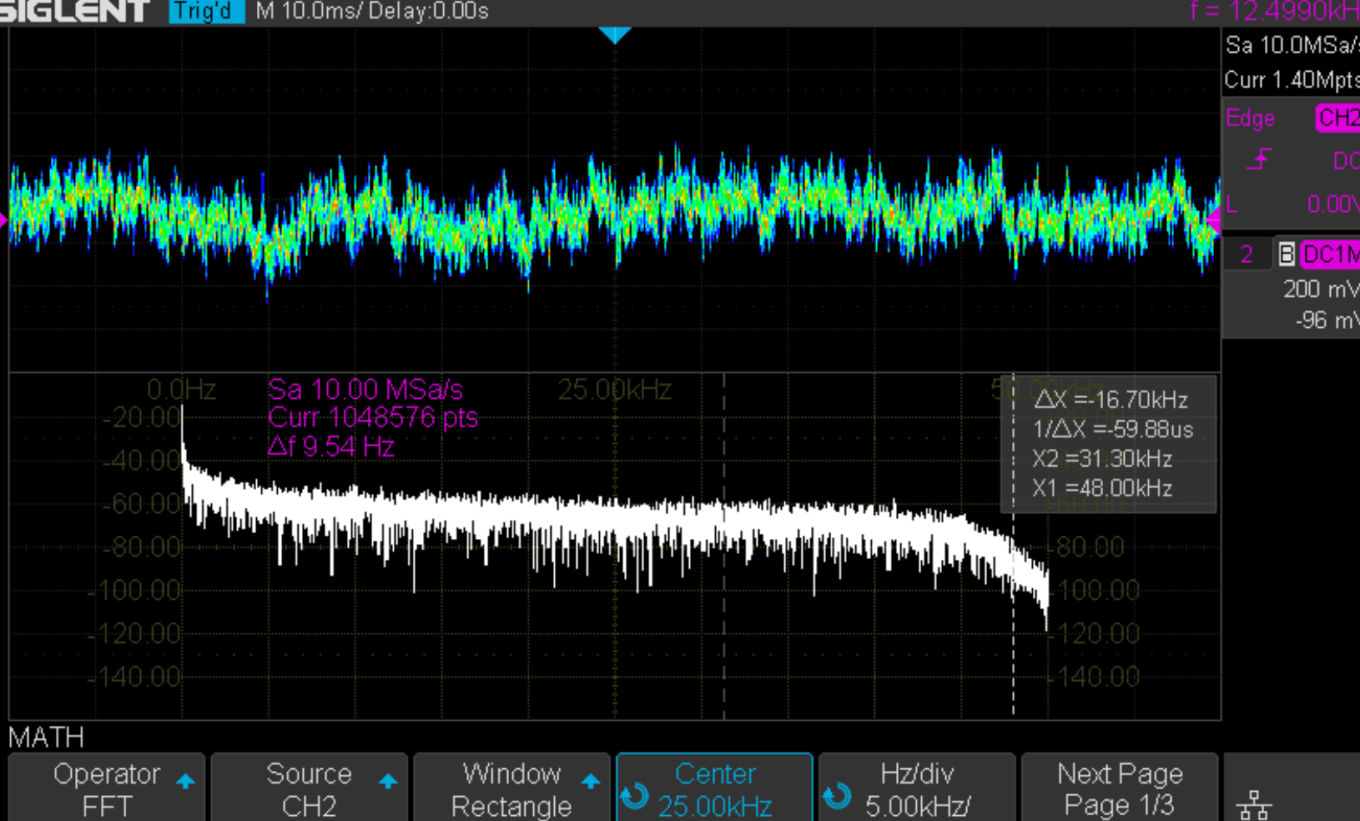
ES9038Pro:

ES9038Pro:
Now, with the ES9038Pro, you can change the behavior/shape of the high frequency roll-off using FIR filters found in the menus. Each of the 10 or so filters have a noticeable impact on the shape of the FFT. This is one of the examples that show the flexibility of the ES9038P. We can see just from the last two scope captures that the Burson Play does indeed have a higher dBV value at parts of the higher frequency end of the FFT than the ES9038P (this matches what I noticed listening).
Note: I am working on doing frequency response using discrete frequencies as I have them in DSD256. However, I have run into some difficulties getting a fair score on both DACs. I am also working on THD, SNR, Jitter, etc.
Thanks for being patient!
Closing Remarks: Burson Play Comes In First In Its Weight Class:
These two setups turned out to be much closer in fidelity than I would have ever guessed from the start of the review. We were able to gauge how much of a difference I2S has over Coax and then I compared balanced outputs to unbalanced outputs. Most reviewers would never change something so dramatic during a review, but I found it insightful to do so. Without switching to I2S or balanced outputs, I would have probably rated the Burson Play slightly too high. The Play is definitely an excellent choice for those who want your DAC/Amp together in a mobile package, but still want the option of rolling op-amps. The Play is a unique piece of equipment that shows us that size can be deceiving and is an excellent value for the money. The sAp-10 amplifier alone is larger than the entire Play, much less if we take into account the DAC and XMOS unit that make up the other combo.
Overall I have been thoroughly impressed by the performance and fidelity of the Burson Play, both from a DAC standpoint and as a separate amplifier. When you think about how the Play is laid out, the single-DIP op-amps each power one channel (L/R) of the headphones amp and the pre-amp out (that can be run at the same time as the headphone ¼” out). Throwing in a decent quality mic input powered by an ES9018K2M, gives the gamers everything they need in one enclosure. This is a solid rig all around and with just a little tweaking it can be a great rig! I can easily recommend this for anyone who admires simplicity and quality for a budget conscious price, wrapped up in a compact package. Burson Audio has really found something special here with the Play and 5x V6-OPA Classics!
- Overall Performance in Music: 9/10
- Overall Performance in TV/Movies: 9/10
- Overall Performance in Streaming: 8.5/10
- Internal Amp Performance: 9.5/10
- DAC Performance w/o Amp: 8.5/10
- Ability of DAC to Reject Noise: 7/10
- Ease of Use: 9/10
- Performance per dollar: 9/10
- Performance of Headphone Out: 9.5/10
- Performance of RCA/Pre-amp Out: 8.5/10
- Customer Service of Company: 10/10
Overall Rating: 90/100 = A-
(not an average of the above scores)
Hallman Labs Award Winner for Best DAC/Amp in 5.75″ form factor!
Pros:
- Ability to upgrade at a later time to a higher end rig.
- High mobility/portability due to a very compact design.
- Entire chassis acts as a heat sink and entire chassis is grounded.
- Excellent quality audio for the cost. The Play is able to compete with ES9038PRO DAC and even win a few of the tests.
- Plenty of power using the internal amp, powered by two single-DIP op-amps.
- Ability to slide the Play right into a PC 5.75″ drive bay.
- Ability to listen to RCA and headphones outputs simultaneously.
- Uses I2S to communicate with XMOS.
- Can be powered a variety of ways.
- Has a remote and a few other included accessories, sounds small, but an important detail.
Cons:
- Can get fairly warm, but these are the realities of a Class A amplifier and the components can handle it.
- Not as good at rejecting noise as the ES9038PRO DAC can. The FUN01 also plays a role in the cleaner signal. (Note: this opinion is after fixing the USB ground issue.)
- Unable to get a Play that uses the Amanero, although you can easily get one that fits if you want one, just not stock.
- The Play’s display could give us more info and the inclusion of a simple menu would be nice. Just give us a few filter selections and a few other basics menu options (as seen on the ES9038P’s screen).
- There can be a digital noise issue because of the fact there are two paths to ground in the Play if you leave the USB cable’s GND connected. I disconnected mine as advised on Head-Fi and the digital noise stopped. Still have to list this as a con though, the average consumer might not want to cut into a USB cable or de-solder something.
Thanks for reading the 3rd review at Hallman Labs! On deck is Part 2 of my Discrete Op-Amp Showdown and I will be adding technical aspects to this article as time goes on, such as performance measurements.
Copyright © 2018 Hallman Labs™, All rights reserved. No material written or photographed on this site may be replicated/copied/quoted/etc. without written permission from the site author/owner of Hallman Labs.
Announcing Burson v1.6 Play Giveaway by Hallman Labs. Winner drawn on September 1st, 2018! See more info here.