


tsdorsey
New Head-Fier
- Joined
- May 27, 2012
- Posts
- 10
- Likes
- 15
I found the threads on here about the HD280 "blue tak" mod helpful in taking apart my set to add a jack so I thought I reciprocate and post a thread showing how I added a jack to replace the built-in cord.
Update: Executor32 found a really nice headphone jack on Amazon, I've quoted his post here so you can all see it sooner.
I have had my 280's for a few weeks now and love 'em. They block out lots of noise and don't hurt they way the RS 120's did (because the don't sit ON my ears). However I didn't like the coiled cord that came with them. My full intention is to use the RS 120 guts to make the 280's wireless but that will be for another time. In the mean time I wanted to remove the coiled cord and make it possible to use any cord. I've seen mods where all but a few inches of the cord are removed and a male jack is added. This means you can use whatever extension cord you have but they are removable. I didn't like this because it's not very clean and because of my final goal of making them wireless. So without further ado here are the pic's of my conversion.
1. There are lots of thread about how to take these apart so I'll skip that step. Here is the left shell with the cover in place. This is the part that we'll need to modify.

2. The panel removed.

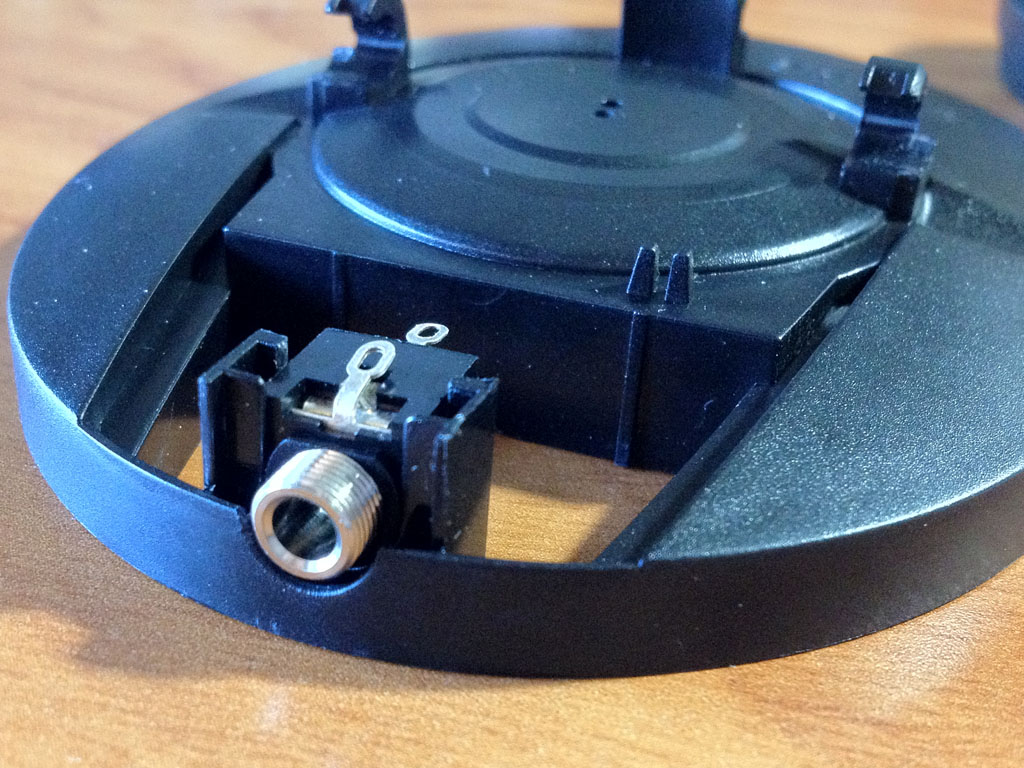
3. This is the jack we'll be transplanting into the headphones. It's a radio shack part, nothing special. After opening the set I discovered that it's almost like this was intended. With only a little plastic removal I was able to get a perfect fit. I only thought to take pictures after I made the cuts so I have no before pictures. The bit I removed looked just like the U shaped part you see here.

4. A test fit. This is too good to be true.

5. Here is another shot from the top of the test fit.

6. There is a little bit of plastic that needs to be removed from the underside of the cover as well but it's easy to do. I recommend scoring it with an x-acto knife and then using a pliers to break it off. It makes a very clean cut that way.

7. I used the x-acto knife to crosshatch the jack so the epoxy would have more to grab onto. Here you can see the epoxy.

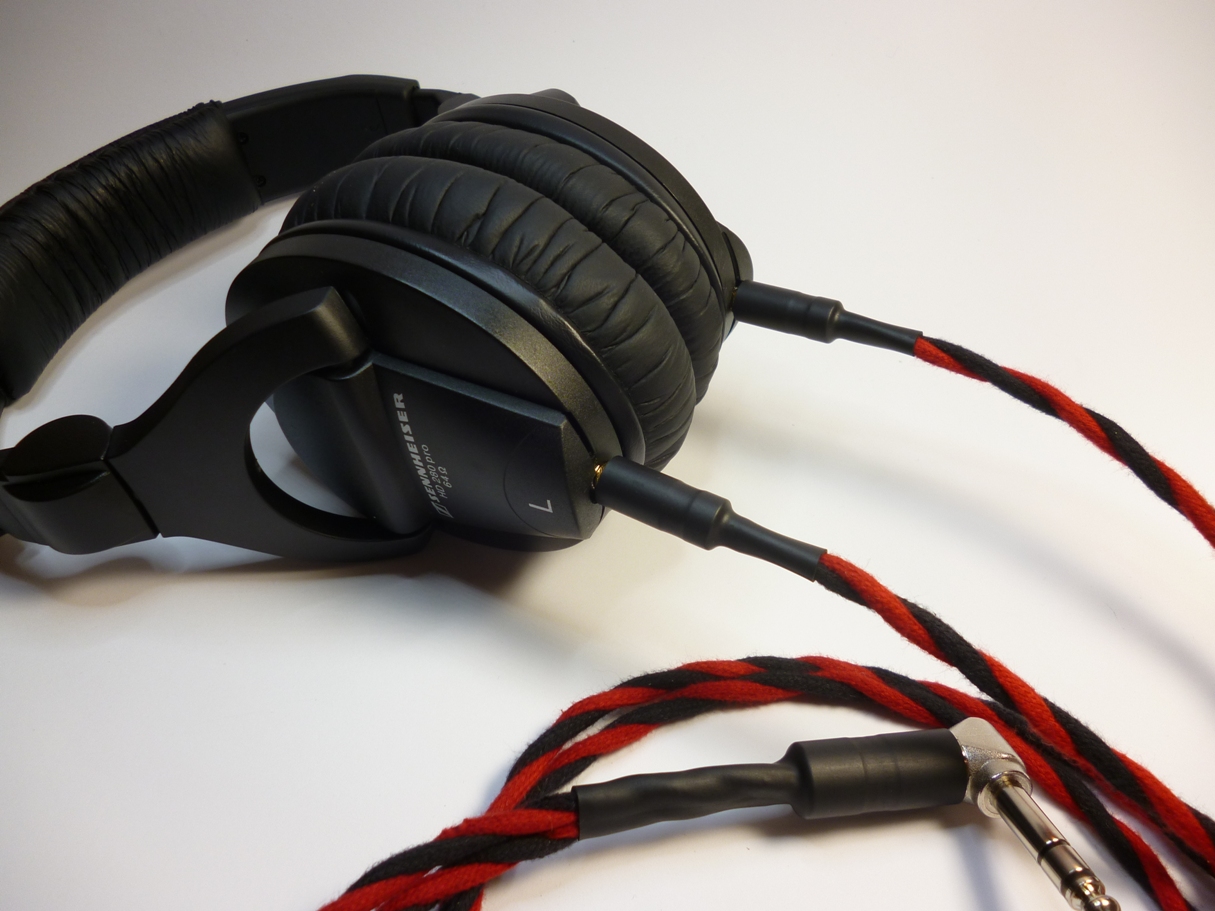
8. All back together. You'd never know that it wasn't stock.

Thanks for reading. Hope I've inspired you to do your own mod.
-Trevor
Update: Executor32 found a really nice headphone jack on Amazon, I've quoted his post here so you can all see it sooner.
...I did find this Philmore panel-mount jack that I ended up using.
I have had my 280's for a few weeks now and love 'em. They block out lots of noise and don't hurt they way the RS 120's did (because the don't sit ON my ears). However I didn't like the coiled cord that came with them. My full intention is to use the RS 120 guts to make the 280's wireless but that will be for another time. In the mean time I wanted to remove the coiled cord and make it possible to use any cord. I've seen mods where all but a few inches of the cord are removed and a male jack is added. This means you can use whatever extension cord you have but they are removable. I didn't like this because it's not very clean and because of my final goal of making them wireless. So without further ado here are the pic's of my conversion.
1. There are lots of thread about how to take these apart so I'll skip that step. Here is the left shell with the cover in place. This is the part that we'll need to modify.
2. The panel removed.
3. This is the jack we'll be transplanting into the headphones. It's a radio shack part, nothing special. After opening the set I discovered that it's almost like this was intended. With only a little plastic removal I was able to get a perfect fit. I only thought to take pictures after I made the cuts so I have no before pictures. The bit I removed looked just like the U shaped part you see here.
4. A test fit. This is too good to be true.
5. Here is another shot from the top of the test fit.
6. There is a little bit of plastic that needs to be removed from the underside of the cover as well but it's easy to do. I recommend scoring it with an x-acto knife and then using a pliers to break it off. It makes a very clean cut that way.
7. I used the x-acto knife to crosshatch the jack so the epoxy would have more to grab onto. Here you can see the epoxy.
8. All back together. You'd never know that it wasn't stock.
Thanks for reading. Hope I've inspired you to do your own mod.
-Trevor
Last edited:

")

