SR60-Mod
Mar 2, 2011 at 4:19 AM Post #1,816 of 5,004


Quote:
 

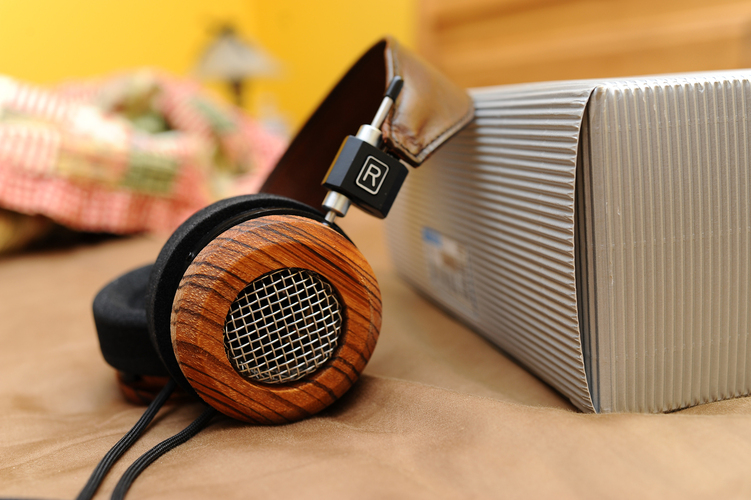
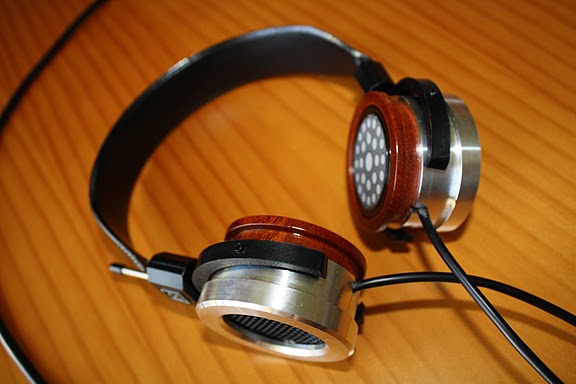
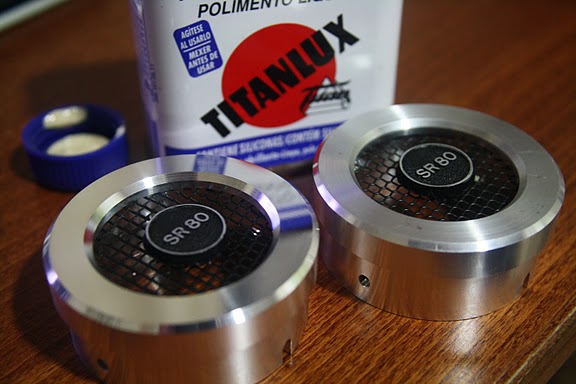
When I first started experimenting with shells, I made them big and bold.  I didn't worry about fitting them to the C clamps.  They were robust.  You could mame somebody with one of those early shells.  In time, I got feedback from friends who said they'd like to see them scaled down a bit, so as to use them in the gimbals.  As I did, I found the shells to become more fragile.  It's tough because you have to clear 2" to slide them over the plastic inners but you have to stay within 2.5" to get them into the C clamps.  Wood being more porous and spongey than either plastic or aluminum, I found the 1/8" shell walls unpleasantly thin.  I suspect that one reason Grado put a thicker ring at the end of the SR2 and SR1 was to brace the emaciated walls for some shock resistance.  The thicker 1/4" ring at the mouth of these headphones gives the impression that you're getting a thicker shell than you really are.  It's certainly more pleasant to look at.  It's really the seedling of the later hammerhead on the mushroom top of the GS1000.  With the drill press, I've found that using a 2 3/8" hole saw (which actually produces an outer wall of 2 1/4") to be the best fit but I've also cut slightly thicker shells, using the 2 1/2" hole saw.  These latter shells still fit within the  C clamps because they cut an outer diameter of 2 3/8".  One trick is to enlarge the holes for the lateral pins connecting the cups to the C clamps.  Doing so allows greater ease as the clamps are brought closer in.  This has allowed me, on some projects, to get away with larger shells, even if the clearance is, as you've noticed, a little more hairpin.  On the other hand, such shells are thicker and a little more able to handle some knocks and bumps.
 

My mistake.  Thank you for correcting that.  I wondered, while I said it, whether Grado did something to lessen their resemblance to the more expensive RS1s.  So far, I've made aluminum gimbals with 3" rings, but that was for the aluminum project, which is unapologetically big and brash.  After comparing other aluminum shell designs, including the PS1 and the HP1000, I've decided that on my next aluminum project, I'll let the inners rest at 2", with rear chambers at 2 1/4" and with three points (the front lip, the middle ring and the end "hammerhead lite") at 2 1/2".  This "middle ring" of which I speak is the gimbal that will replace the old plastic gimbal.  Having already moved in that direction, I have ordered the materials to make  2 1/2" aluminum rings.  Knock on wood.  Such rings will be useful for both types of shells - aluminum and wood.  I had previously envisioned using wood on wood Grado mods, but - as my son points out - aluminum has a structural strength that wood of that diameter simply doesn't have.

Ah I see, so the removal of the pin now isn't necessary? Thanks for your elaborate response. Fascinating to hear the perfection of such a great project


Mar 2, 2011 at 4:20 AM Post #1,817 of 5,004

 
Quote:
Time to add a couple of pics of my woodies :)


Those aren't aluminium gimbals - they were sprayed back then to match the brush metal shells of my SR325is. They seem to be doing ok with the cocobolos too so I decided to keep them this way.


Hanging on a cup holder :) The side of the wood got a bit damaged when I was replacing the screens. These are from my SR325is and they are tough as hell.


Maybe it's just me, but I actually kinda like the silver against the cocobolos. Hopefully one day I will be able to get some real aluminium ones to replace these.


Beautiful! What screws did you use to keep the bars in place? Also I have a question for everyone here: DO you prefer the bowls or quarter modded comfies?
 
Mar 2, 2011 at 4:26 AM Post #1,818 of 5,004
LATEST PROJECTS
 
Life has tugged at me, pulling me away from my favorite hobby.  In the meantime, I feel a little less energy, the result of not getting quite as much sleep as I should, so my forays - in the last few days - have been more limited.


I cut some mini-shells - about the depth of the original SR60s - using various woods.  These have only had about two coats of lacquer so far, but it was fun to experiment with different woods.


If memory serves, this is bubinga, a very fetching wood.


This is zebrawood.


I think this is pine.


This is cherry.


My favorite is African paduak.  


I just love the rich color of this wood.


In the meantime, I've gone back to the Brazilian rosewood and added more Dynamat.


The idea was to damp other areas of the spider that are affected by the heavy pounding of bass.  If the magnet plate might become a source of buzzing, I wondered if the rest of the spider might also find itself flapping around, with these vibrations becoming part of the presentation.  I set about to damp the areas between the vents.
 
This headphone set has un-liberated drivers but the shell reaches deep, covering up most of the plastic ring behind the driver.  With the Dynamat soaking up oscillations of the plastic spider, the bass is now merciless.  It isn't just prominent.  It's super tight.  Anybody who speaks of the SR60 as "maybe" coming within the greater orbit of the SR225 - or even the SR225 and the RS1 - are being too modest.  Having owned the SR225 and SR325 (as well as the RS1, the GS1000, the HF2 and the PS1000), I can't remember a headphone with this much punch.  These are just infectiously dynamic.  While it doesn't hurt to come packing the undisputed king of tonewoods, I put a lot of stock in the other tweaks: damping the driver, venting the driver, removing the loin cloth and making full use of the double grip (which provides double the contact surface while also covering up the plastic).  
 
To anyone considering the full uses of damping material like Dynamat, I highly recommend damping the plastic spider, where doing so avoid covering up the vents.  Like the magnet plate, which is routinely damped to avoid buzzing, the plastic spider gets a lot of shaking.  Even if it doesn't produce an audible buzz, this is an area that's expected to remain stiff and as unmoved by the vibrations as any area of the speaker.  Taking its distortion out of the mix produces a noticeable difference in clarity of the HF and definition in the bass.  I think it must aid in decay rate because, while the bass is plenty prominent, I'm hearing more sonic blackness between the notes.  It's something that defies the intuition that quantity of bass robs quality of the same.  The midbass seems less crowded and the resulting soundstage is at least a little more pronounced.
 
Now, if I could just figure out a way to sneak in some aluminum . . . 
 
Mar 2, 2011 at 4:34 AM Post #1,819 of 5,004
 
Time to add a couple of pics of my woodies :)


Those aren't aluminium gimbals - they were sprayed back then to match the brush metal shells of my SR325is. They seem to be doing ok with the cocobolos too so I decided to keep them this way.


Hanging on a cup holder :) The side of the wood got a bit damaged when I was replacing the screens. These are from my SR325is and they are tough as hell.


Maybe it's just me, but I actually kinda like the silver against the cocobolos. Hopefully one day I will be able to get some real aluminium ones to replace these.


1. I love the way you topped those gimbal rods.
 
2. You fooled me.  I saw your work with the plastic gimbals and thought they were aluminum.  Well done!
 
3. I have aluminum rings that will fit your headphones.  Sometime this week, I'll send them out to you.  Getting the plastic gimbals off of the gimbal rods is merely a matter of wrist action and patience.  The aluminum rings will have holes punched into them for insertion of the gimbal rods, but you'll need something like Super Glue to ensure that they stay in.  I had a little disaster with a pair of these, facilitated by the weight of the aluminum shells.  Super Glue will fix that.
 
Mar 2, 2011 at 4:42 AM Post #1,820 of 5,004
Whats the difference in the sound of using the rings?
 
Also, what exactly is the "spider" you speak of damping?
 
Thanks
 
Mar 2, 2011 at 5:00 AM Post #1,821 of 5,004
 
Whats the difference in the sound of using the rings?
 
Also, what exactly is the "spider" you speak of damping?
 
Thanks


The rings?  Are you talking about the gimbals?  They don't have much to do with the sound.  In an interview, Grado suggested that their minimal contact helped, but as others have pointed out, they're basically there to provide four-direction movement (up, down, left and right).  The choice between wood and aluminum is either purely cosmetic or structural to the extent that aluminum can provide a sturdier frame.  The real benefit is in being able to make them larger, where necessary, to provide better access with larger shells.
 
I misspoke when I made reference to the spider.  On a loudspeaker, the spider typically houses the voice coil (which looks loosely like a spider's web).  That's not what I meant (I'm up too late again).  The analogy I wanted to draw was between the back of the driver and the "basket" on a conventional loudspeaker.  The basket holds the spider and cone in place.  It's best if this rigid frame remains rigid.  When it starts vibrating, it adds its own lack of balance to the mix, producing its own distortions.  While the magnet plate is a more obvious source of problems, this basket sneaks in a few of its own.  When I added damping material where I could do so without covering up the vents, the presentation seemed sharper and more in focus.  The bass has a solidity to it, which is wonderful, but there's also more room for mids and treble.  I'm getting the best of both worlds: better bass and better treble.  Given the price of the trace amount of Dynamat it takes to dot the driver back with damping material, I'd say it's one of the cost-effective tweaks I could have stumbled over (without breaking my neck).
 
 
Mar 2, 2011 at 5:55 AM Post #1,822 of 5,004

billavideo any suggestions? :frowning2: 
 
Quote:
so after i vented the driver i noticed a buzzing/rattle in one of the cups. i tried sticking bluestix (blue tack or sticky tack) to the magnet and nothing happened. do i really need dynamat for this?

oh and there definitely is something loose in the cup when i shake it. should i proceed to dissect and liberate the plastic housing to pluck it out?


i also tried shaking and blowing into the vents... but nada. 


Mar 2, 2011 at 8:31 AM Post #1,823 of 5,004


Quote:
 

1. I love the way you topped those gimbal rods.
 
2. You fooled me.  I saw your work with the plastic gimbals and thought they were aluminum.  Well done!
 
3. I have aluminum rings that will fit your headphones.  Sometime this week, I'll send them out to you.  Getting the plastic gimbals off of the gimbal rods is merely a matter of wrist action and patience.  The aluminum rings will have holes punched into them for insertion of the gimbal rods, but you'll need something like Super Glue to ensure that they stay in.  I had a little disaster with a pair of these, facilitated by the weight of the aluminum shells.  Super Glue will fix that.

 
I thought the metal tips made a great replacement for the stock rubber ones. They aesthetically matched the 325 shells that I had before the cocobolos. Three things I like about those tips. One, they have split ends so I can bend them in a bit and they'll grip the rod real good. Two, they are not filled on the inside, meaning with a little bit of push / pull power, I can still move the rods up and down. Three, they're real cheap. Like 50 cents for a set of two. I'd like to say four, they look really good too :)
 
Marvelous Bill! If you have spares for the aluminium gimbals, I'd simply love to have them! Thanks so much for offering dude! This really made my day! :) I'll send you a PM to discuss this more. 


Mar 2, 2011 at 9:08 AM Post #1,825 of 5,004
Bill, I am very jealous. I wish I had access to your wood supplies. Or at least the money to buy 8 foot lengths of wood, although I would be happy enough to find somewhere that will sell me only 1 foot lengths of wood, the blessing and curse of cutting such small objects is that very minimal material is necessary. I love the way the Padauk and Zebrawood look, those are the woods I have most been on the lookout for. Hopefully I can procure some in the future.
 
I have another question for you, where did you find a 2-3/8" hole saw deep enough to cut through all the material? I have had less than good luck in my searches so far.
 
I also like the looks of the aluminum gimbals. That might be one of my next tasks, finding the material to make that happen. I keep thinking I am done modding these guys but the supplies keep coming. I finally ordered all my recable supplies last night. Hopefully some of the stuff shows before the weekend.
 
Mar 2, 2011 at 10:04 AM Post #1,826 of 5,004


Quote:
can those round mesh grilles be made up from a cheap microphone windscreen?
 
man! i hate ideas... they run around your head for quite a while and makes me concentrate less on my day job.


I find myself going into Dollarama stores and staring at the strainers in the cookware section, imaging a screen mod for some Grados or Senns.
 
This is an amazing thread! It reminded me of when (about 12 years ago) I built RS-1 cups from scratch. I used SR225 drivers in those cups but in the long run, I ended up not really liking the sound. There an awful lot more to the RS-1 that wood.
 
Those hand made wood cups are beautiful!


Mar 2, 2011 at 10:16 AM Post #1,827 of 5,004
Tough thread to keep up with!
 
Nice work on the various versions that people are coming up with.
 
I have a rough up of mine, and have attached pics below.  They are a work in progress, but I wanted to share the design, and my experiences to date.
 
Slip on style cups, they slide right over the stock front plastic cups.  Blu tack on the back of the driver, and holding the cups together.  Tenzip mesh.  East Indian Rosewood, 1 inch thick or slightly deeper.  2.5 inch hole saw for the OD.  Circle cutter for the ID.  Roughly sanded, but not finish sanded, and no proper finish on there as yet.  Cut the hole for the cables with my dremel, after splitting several trial cups with my drill press, trying to drill that close to the edge.  I did experiment with clamping the 2 cups together and drilling between them, and that can work just fine too.
 
Front white cloth removed.  6 holes per driver so far.  Bowl pads in use.  Recabling this weekend with a Vampire 1/4, and some cryo'd Mogami 2534 starquad.
 
I have bagel pads in the mail to me, and will try them out when I get them, and am willing to punch all 10 holes if I need to - I actually like the stock cush-s pads the best for comfort, but the cush-m are OK if I stretch the band to fit better.  I am interested to see if the spaciousness driven by the cush-m vs cush-s is further driven by the cush-L.
 
Fun stuff, even if I have spent more than I should have so far!
 
Those Jaben alumods appear the be the affordable straight line to MS1000i heaven, so my MS1i's are cowering in their case!
 
In terms of sound, the stock MS1i were better than the stock SR60i's for sure.  Now, the modded 60i's are better for sure.
 
I will be at the Toronto Head-Fi meet this weekend, and will be interested to see what folks think.  I expect there will be some higher end Grado's there, as well as some other good phones to compare to.
 
My source is a Bolder Cables modified Logitech SB3, and my amp is the FallenAngel built Millett Max Hybrid in my sig.
 
Thanks for the fun thread Bill, your effects are felt far and wide!


Mar 2, 2011 at 11:12 AM Post #1,828 of 5,004
MCGSXR, those look great so far, can't wait to see them finished! Which wood is that?
 
I think more people should try getting some Sennheiser pads and modifying them. They are cheap and easy to mod and I am really liking the sound. I was more than willing to give up some soundstage to gain comfort, clarify, and bass over the bowls I was using. They are slightly under the quarter modded comfies in terms of comfort (but not by much) and seem to sound a lot better than them (bass is similar, but they are clearer), likely a factor of being closer to your ears and there being a different density of foam seperating them.
 
Mar 2, 2011 at 11:25 AM Post #1,829 of 5,004
What you said about the driver distance is the biggest thing on my mind atm. My Jaben cups are due to arrive tomorrow so I will look closer then but atm I see no reason why I couldn't chop the threaded part off along the line shown below and hotglue the driver in place as with a normal cup. it would also take some weight away and they wouldn't be as ridiculously wide either. I'm going to de-anodize them anyway so not worried about messing the colour with a hacksaw.


Quote:
 

I checked it out at the Jaben website.  It's a very pretty design and for $99, you're getting it at a reasonable price.  That said, you should not shrink from making your own aluminum mod.  Everybody has their own idea of the perfect shell - even the perfect aluminum shell.  How thin do you want your aluminum?  Do you want the driver that far from your ear?  This Jaben design is quite professionally done but it represents one of any number of possible visions of what an aluminum shell should look like.  If you want to make the mod, do it.  Bring your own vision to life.


Users who are viewing this thread

Back
Top