
BassThor
100+ Head-Fier
- Joined
- Oct 13, 2009
- Posts
- 358
- Likes
- 12
Since the reason for me signing up for this forum being my DT 770's cable being ripped off I thought I should post how I got this fixed.

Caution! Being a student with very little money, true audiophiles might be offended by tools and parts used, this is do it yourself, AT HOME STYLE. Caution!

First off, here is a list of what I bought to get my DT's back in buisness:
Monster Stereolink 3.5mm Jack to RCA 2m
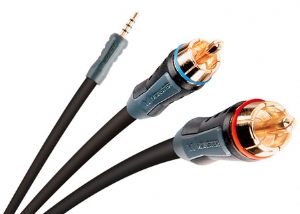
Why? Well I have used monster cable with my Xbox before and the quality was good, plus I got it for 18$ incl ship from ebay. I also like the DT's to have a thick, durable cable. The quality of this cable was also surprisingly good, each channel is isolated with something that resembles aluminium paper, about 10 stings of thread, and some very thin paper. Thumbs up!

5x 1m heatshrink in different sizes from DealExtreme. (2$)
1x Soldering Iron (30w) from DealExtreme. (4.5$)
Some super glue from the nearest shop. (1$) Also some soldering tin from the same shop. (1$)

So that puts my entire budget on 26.5$..!
So here we go!
First off, cut off the Y-split on the new cable, and strip off the outer rubber down to where you want the new Y-split to be and you should have something like this:

Then cut off the rubber coating of the tip of the cables that will transfer our beloved music.

Here is a little trick to how you can minimize the accident of cutting the copper/silver threads inside, cut the rubber just a little bit on one side, then bend it out, and cut inside the bend. Do this carefully and you will have a nice result.

Finally cover the cables with heatshrink. You should have one fat (large diameter 0.7 to 1cm) one on at the Y point so you can form a split before you heat it, and one for each of the cables going into the headset.
DO NOT HEAT THE HEATSHRINK JUST YET! We'd hate to cut it open to find any errors before we are done won't we?

(Optional? Depending on cable used) Wrap the two grounds together. Not all cable have separated ground cables. (Like the stock ones for example..)

OK! So now our new cable is ready for action, lets move on to the DT's.
First off take off the cushions , these come off quite easily, but don't use force, they can tear, and cost 40$ for a new pair...

Now, I prefer to take the cans off the headthingy as well, this will make it a lot easier to work on at the later stages of our operation.
Just unscrew the 2 screws and take out the cans, and don't drop the screws or parts anywhere...

With a small screwdriver (or something similar, I would not recommend a sharp knife since right under this lies the speaker mounts..!) flip up and out the ring securing the speaker mount.


The actual speaker mount is not screwed/glued to anything and should fall out of the can when you hold it upside down. Have one hand ready under to catch it.
Since we are going for a dual entry (one cable into each can/side) we not going to use the cable that transfers the signal to the right speaker from the left can, so just cut and pull it out. You now have your sweet babies in front of you.

Next, somehow open a hole in the bottom of the right can, most people use a drill (doh!) but my tools are all back in Norway I had to use a scalpel...

Everything going smooth so far? Ok, then its time to shrink that heatshrink, shrink the two thinner cables that will go into the cans first, then pull the thicker one up over the Y-split and over the two thinner ones, using a pair of clams pinch the thick one between the two thin cords so that it will actually make a Y before you heat and shrink it. I used a lighter, just keep the flame moving up and down the heatshrink and it won't catch fire. If you have a heatgun, I envy you...

Here is a little tip; since I didn't prepare any stress reliever for the two new cables going into the cans, and the cable is way to stiff to make a knot inside the cans that will absorb any sudden pulling etc, I used the clips that were inside the cans on the stock left-to-right cable. To do this measure where the aproximate exit point is on the cable by comparing the soldering points on driver mount with the new cable when it is mounted in the can. Then make sure you clam em good so they don't fail.
You should also do some means to make sure the stress from the cable does not lie on the soldering points.

Before you start soldering take this precaution:
Make sure the cable is not abnormally twisted according to how the final result will be, hint: take the cable from the Y split, follow it up through the can and to the driver soldering points. Find the way where the cable has the least twist, and the ground is on the left and signal on the right inside the can when looking down inside the can.
Now, drivers lying face down, take off the white cotton and the black plastic ring the cotton surrounds. You have 3 pins in front of you. The one on the right is ground, the one on the left is signal so solder the cables accordingly. These three pins are GLUED to the driver mount, so try to be accurate and quick when soldering off the old and the new cables on.
If its your first time (like me) take your time and try to keep the attachment points as cool as possible.
CAUTION!!! While soldering, should one or more pins fall out, do not pull, or try to separate them from the mount!! On the underside of where we are soldering our new cable on is a super thin copper cable that goes into the driver, if this tears off (mine actually did!
 stupid, stupid, stupid!) you have to sold this 0.00001mm thin cord back on. It took me an hour, one of the most hellish hours I've had this year.. So if one of these 3 pins fall out, just carefully put it back in its place and apply some superglue, wait until it hardens and continue soldering.

Now: TEST DRIVE!! Plug it in to something and turn the music on. If you have sound on both, try to carefully jiggle the cable a little just to hear if the solding is good enough, if sounds starts to become "unstable" (on, off, on, off, on, off) you should redo the soldering job on that side. Also try to carefully place the speaker mount into the can with the music on. If there are any errors that needs adjustment, now is the time.
If there is no sound you have to check that the signal and ground cables are separate! Especially where we pulled the rubber off. I actually had to take one of the cables off and put more heatshrink on one side to keep signal and ground separate. (You can see this on one of the pictures..)
And there we go! Finish! Job well done! Just carefully place the speaker mounts back into the can, put the black cover on before you start screwing the cans to the headthingy again.
Put on the cushions back on and enjoy your renewed DT!

Hope you guys find this useful, I searched this forum for a detailed guide but the ones that are have only a few pictures..
Things that needs (should have been) done:
Close the holes where the left-to-right cable went.
Get a better stress reliever for the two cables going into the cans.
Nylonhosing? Although the microphonics are zero, nylon would look cool and protect the cable.
SO! Opinions, tips, etc will be much appreciated! If anyone feels like they have gotten a wish-come-true, please consider making one of my wishes come true!

AudioLove from Japan!
Edit: Typos and the link to the pictures... Album links from imageshack were no-go..
Edit: Regarding sound quality (the monster cable is of remarkably better quality compared to stock) I feel the DT's are more forgiving when used on my laptop's crap integrated soundcard. I don't know if they need burn in or not (anyone know?) but on my Cowon D2 I can't notice any huge difference (as of 10 hours of use). I'm after all a junior audiophile (the best I have tried is UE superfi 5 pro) with the DT 770 being my "best" headset.
Caution! Being a student with very little money, true audiophiles might be offended by tools and parts used, this is do it yourself, AT HOME STYLE. Caution!
First off, here is a list of what I bought to get my DT's back in buisness:
Monster Stereolink 3.5mm Jack to RCA 2m
Why? Well I have used monster cable with my Xbox before and the quality was good, plus I got it for 18$ incl ship from ebay. I also like the DT's to have a thick, durable cable. The quality of this cable was also surprisingly good, each channel is isolated with something that resembles aluminium paper, about 10 stings of thread, and some very thin paper. Thumbs up!
5x 1m heatshrink in different sizes from DealExtreme. (2$)
1x Soldering Iron (30w) from DealExtreme. (4.5$)
Some super glue from the nearest shop. (1$) Also some soldering tin from the same shop. (1$)
So that puts my entire budget on 26.5$..!
So here we go!
First off, cut off the Y-split on the new cable, and strip off the outer rubber down to where you want the new Y-split to be and you should have something like this:
Then cut off the rubber coating of the tip of the cables that will transfer our beloved music.
Here is a little trick to how you can minimize the accident of cutting the copper/silver threads inside, cut the rubber just a little bit on one side, then bend it out, and cut inside the bend. Do this carefully and you will have a nice result.
Finally cover the cables with heatshrink. You should have one fat (large diameter 0.7 to 1cm) one on at the Y point so you can form a split before you heat it, and one for each of the cables going into the headset.
DO NOT HEAT THE HEATSHRINK JUST YET! We'd hate to cut it open to find any errors before we are done won't we?
(Optional? Depending on cable used) Wrap the two grounds together. Not all cable have separated ground cables. (Like the stock ones for example..)
OK! So now our new cable is ready for action, lets move on to the DT's.
First off take off the cushions , these come off quite easily, but don't use force, they can tear, and cost 40$ for a new pair...
Now, I prefer to take the cans off the headthingy as well, this will make it a lot easier to work on at the later stages of our operation.
Just unscrew the 2 screws and take out the cans, and don't drop the screws or parts anywhere...
With a small screwdriver (or something similar, I would not recommend a sharp knife since right under this lies the speaker mounts..!) flip up and out the ring securing the speaker mount.
The actual speaker mount is not screwed/glued to anything and should fall out of the can when you hold it upside down. Have one hand ready under to catch it.
Since we are going for a dual entry (one cable into each can/side) we not going to use the cable that transfers the signal to the right speaker from the left can, so just cut and pull it out. You now have your sweet babies in front of you.
Next, somehow open a hole in the bottom of the right can, most people use a drill (doh!) but my tools are all back in Norway I had to use a scalpel...
Everything going smooth so far? Ok, then its time to shrink that heatshrink, shrink the two thinner cables that will go into the cans first, then pull the thicker one up over the Y-split and over the two thinner ones, using a pair of clams pinch the thick one between the two thin cords so that it will actually make a Y before you heat and shrink it. I used a lighter, just keep the flame moving up and down the heatshrink and it won't catch fire. If you have a heatgun, I envy you...
Here is a little tip; since I didn't prepare any stress reliever for the two new cables going into the cans, and the cable is way to stiff to make a knot inside the cans that will absorb any sudden pulling etc, I used the clips that were inside the cans on the stock left-to-right cable. To do this measure where the aproximate exit point is on the cable by comparing the soldering points on driver mount with the new cable when it is mounted in the can. Then make sure you clam em good so they don't fail.
You should also do some means to make sure the stress from the cable does not lie on the soldering points.
Before you start soldering take this precaution:
Make sure the cable is not abnormally twisted according to how the final result will be, hint: take the cable from the Y split, follow it up through the can and to the driver soldering points. Find the way where the cable has the least twist, and the ground is on the left and signal on the right inside the can when looking down inside the can.
Now, drivers lying face down, take off the white cotton and the black plastic ring the cotton surrounds. You have 3 pins in front of you. The one on the right is ground, the one on the left is signal so solder the cables accordingly. These three pins are GLUED to the driver mount, so try to be accurate and quick when soldering off the old and the new cables on.
If its your first time (like me) take your time and try to keep the attachment points as cool as possible.
CAUTION!!! While soldering, should one or more pins fall out, do not pull, or try to separate them from the mount!! On the underside of where we are soldering our new cable on is a super thin copper cable that goes into the driver, if this tears off (mine actually did!
Now: TEST DRIVE!! Plug it in to something and turn the music on. If you have sound on both, try to carefully jiggle the cable a little just to hear if the solding is good enough, if sounds starts to become "unstable" (on, off, on, off, on, off) you should redo the soldering job on that side. Also try to carefully place the speaker mount into the can with the music on. If there are any errors that needs adjustment, now is the time.
If there is no sound you have to check that the signal and ground cables are separate! Especially where we pulled the rubber off. I actually had to take one of the cables off and put more heatshrink on one side to keep signal and ground separate. (You can see this on one of the pictures..)
And there we go! Finish! Job well done! Just carefully place the speaker mounts back into the can, put the black cover on before you start screwing the cans to the headthingy again.
Put on the cushions back on and enjoy your renewed DT!
Hope you guys find this useful, I searched this forum for a detailed guide but the ones that are have only a few pictures..
Things that needs (should have been) done:
Close the holes where the left-to-right cable went.
Get a better stress reliever for the two cables going into the cans.
Nylonhosing? Although the microphonics are zero, nylon would look cool and protect the cable.
SO! Opinions, tips, etc will be much appreciated! If anyone feels like they have gotten a wish-come-true, please consider making one of my wishes come true!
AudioLove from Japan!
Edit: Typos and the link to the pictures... Album links from imageshack were no-go..
Edit: Regarding sound quality (the monster cable is of remarkably better quality compared to stock) I feel the DT's are more forgiving when used on my laptop's crap integrated soundcard. I don't know if they need burn in or not (anyone know?) but on my Cowon D2 I can't notice any huge difference (as of 10 hours of use). I'm after all a junior audiophile (the best I have tried is UE superfi 5 pro) with the DT 770 being my "best" headset.


