


CAT5e
New Head-Fier
- Joined
- Jun 17, 2011
- Posts
- 8
- Likes
- 0
I have a Micro Seiki MB-15 turntable that I got at a yard sale for $3, and I was unsatisfied with the stock RCA cables. Although I couldn't find much information online about replacing hard-wired stock interconnects, I went ahead and tried to replace them myself. The result: success! I now have interconnects that are about twice as long, much thicker, and shielded. I also added a longer ground wire to match the longer interconnects. I can't say if it sounds better than the stocks since I never got to really listen to them since I just got my new cartridge today (Shure M97xE). The interconnects I used are 6' Acoustic Research. In my opinion, these are excellent value cables. I don't feel the need to spend an outrageous amount on cables.
The black wires are the stock interconnects. The blue cables are my Acoustic Research cables with one side of the ends cut off with about an inch of the insulation and shielding removed. In this picture I have not stripped part of the red or white insulation off yet, but used a lighter to burn about a centimeter off and cleaned them before soldering.

Here is a comparison of the stock RCA cables to the Acoustic Research cables.

After properly stripping the Acoustic Research, I determined where to solder the center pin wire of each channel. I peeled away the rubber coating from the ends I cut off to determine which color was the center pin and which was the outer. In this case, red was the inner and white was the outer. As you can see, I also removed the stock ground wire and soldered a new wire in its place. I used some red shrink tube to insulate it and a wire tie to keep the trio of wires together near the base. The wires coming from the base of the tone arm are very fragile and must be handled with care. I kept my soldering pencil tip clean using steel wool and applied a bit of flux to the tips of each wire before soldering.

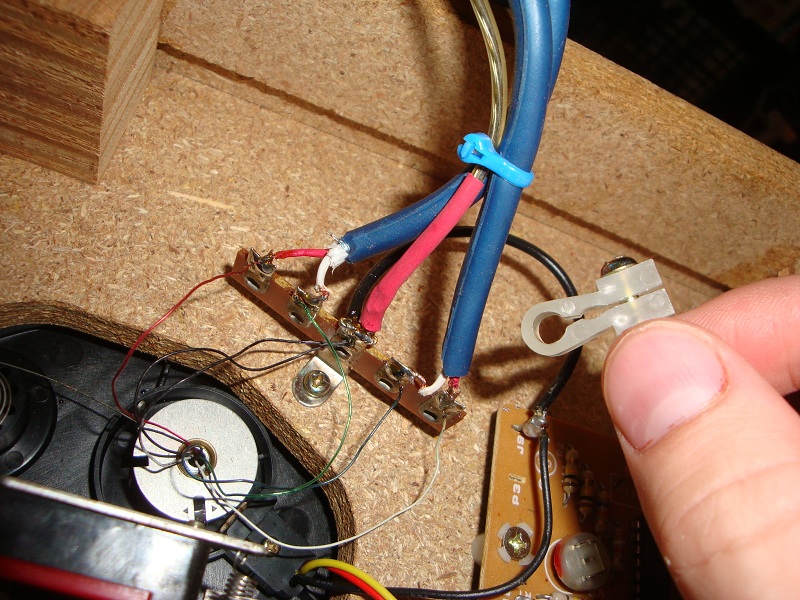
This shows the size of the new cables compared to the stock cables. That clear thing that I am holding was the original bracket that held the stock interconnects in place. The new cables are much too thick for it, so I had to come up with a new solution to secure them.

I attached a thicker wire tie where I wanted the wires to not leave the cabinet, and I marked a spot in the press board where I would need to make a hole. The new cables were too thick to fit through the original hole in the bottom plate.

I used this round hand file to make a clean hole for the cables to go through.

The result of the filing: Looks like press board is good for something other than just being a cheap material; it files away easily.

I put the bottom plate back on and added one more of the thicker wires ties to secure the cable. This keeps it from sliding in and out and destroying my solder work.

The end result:

If you wanted, you could use this procedure to add RCA output jacks to the back of your turntable instead of hard-wiring cables to it, but I did not do this because I didn't have any high-quality RCA jacks laying around. You would just have to come up with a solution for securing them in place.
The end result of this modification was excellent. Clean sound comes from the turntable when the ground is connected. The 6' cable length allows me to have the turntable at a distance from the amplifier that I prefer.
The black wires are the stock interconnects. The blue cables are my Acoustic Research cables with one side of the ends cut off with about an inch of the insulation and shielding removed. In this picture I have not stripped part of the red or white insulation off yet, but used a lighter to burn about a centimeter off and cleaned them before soldering.
Here is a comparison of the stock RCA cables to the Acoustic Research cables.
After properly stripping the Acoustic Research, I determined where to solder the center pin wire of each channel. I peeled away the rubber coating from the ends I cut off to determine which color was the center pin and which was the outer. In this case, red was the inner and white was the outer. As you can see, I also removed the stock ground wire and soldered a new wire in its place. I used some red shrink tube to insulate it and a wire tie to keep the trio of wires together near the base. The wires coming from the base of the tone arm are very fragile and must be handled with care. I kept my soldering pencil tip clean using steel wool and applied a bit of flux to the tips of each wire before soldering.
This shows the size of the new cables compared to the stock cables. That clear thing that I am holding was the original bracket that held the stock interconnects in place. The new cables are much too thick for it, so I had to come up with a new solution to secure them.
I attached a thicker wire tie where I wanted the wires to not leave the cabinet, and I marked a spot in the press board where I would need to make a hole. The new cables were too thick to fit through the original hole in the bottom plate.
I used this round hand file to make a clean hole for the cables to go through.
The result of the filing: Looks like press board is good for something other than just being a cheap material; it files away easily.
I put the bottom plate back on and added one more of the thicker wires ties to secure the cable. This keeps it from sliding in and out and destroying my solder work.
The end result:
If you wanted, you could use this procedure to add RCA output jacks to the back of your turntable instead of hard-wiring cables to it, but I did not do this because I didn't have any high-quality RCA jacks laying around. You would just have to come up with a solution for securing them in place.
The end result of this modification was excellent. Clean sound comes from the turntable when the ground is connected. The 6' cable length allows me to have the turntable at a distance from the amplifier that I prefer.
