rectifier bridge basics
Mar 15, 2003 at 2:56 AM Post #16 of 34
the amp's on this page at SDS
http://www.quadesl.com/schematics.shtml

i'd already checked for updated info.

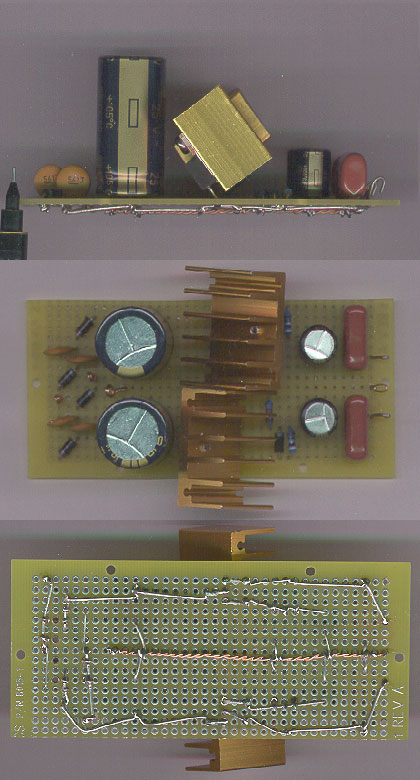
y'know, i've got plenty of 1N4007 diodes, and it would be a tidier layout than the bridge. i guess i'm just being scottish since i already have the bridge too. anyone have last minute audiophile voodoo reasons that the bridge'd be better?

likely it won't matter a bean in this psu. possibly sheldon just spec'd it because he was familiar with it from another project.

but i'm curious for opinions. y'all got a couple of hours before i get to the bench.
smily_headphones1.gif
 
Mar 15, 2003 at 11:56 AM Post #17 of 34
I think that the diode quality is certainly less of an issue if you bypass them with the caps. Schottkys are quieter and faster on their own than a 1nxxxx, but with caps, it's probably a negligible benefit. Using nicer diodes and bypass caps is over the top, for sure.

Those things presumed equal, I like discrete diodes better for layout purposes. Are you planning on making the PCB? It looks in the zoomed area as though some things have been moved around near the bridge. Again, Sheldon may have some reason for doing it that way, but I still don't know why he does not have the schematic match the PCB.

Perhaps Chu re-drew the schematic to ensure it would match the others in the librabry, and between him and Sheldon there was some minor discrepancy not noted... until now.
 
Mar 15, 2003 at 8:35 PM Post #18 of 34
sheldon got back to me last night to say there is a mistake and that he'll post to the thread for a broader benefit. he needed to register and wait for the system to acknowledge. probably he got sidetracked by other things while waiting.

hopefully he'll comment on why he went with the RS401LR-ND bridge and caps combination. i'm curious for his thinking behind that.

i went with diodes on proto board. erix's son o' **** layout is just too elegant to miss trying.

it's, uh, half done.
smily_headphones1.gif
turning out to be more challenge than i thought, being a first project. i'm doing my share of beginner mistakes.
 
Mar 16, 2003 at 12:57 AM Post #19 of 34
It's an ambitious first project... and it sounds like it's going pretty well overall. Just noting the mistake on the foil was great.

Glad Sheldon was available, too.
 
Mar 16, 2003 at 3:14 AM Post #21 of 34
come to think of it, i have a switch question.

i presume the switch and a fuse would go on the hot side between the iec and the tranny. how big a fuse? i picked up 0.5amp based on a parts list for a similar headamp. [this psu is for a plain meta42.] that sound about right?

EDIT: they're 250v fuses. so i guess we're talking a full amp here.
 
Mar 16, 2003 at 3:43 AM Post #22 of 34
Ahhh... I thought you were going to build the entire amp
redface.gif
.

Nice job on the power supply, ofb. Snazzy heatsinks in particular!

What will you be powering with this?
 
Mar 16, 2003 at 4:55 AM Post #23 of 34
the psu is for a plain meta42.

snazzy heatsinks are from the scrap pile.
smily_headphones1.gif
i ran out of room on the proto board with those, hence the angled installation fudge. seems okay, though definitely not a good practice. for caution i've got the regulator leads folded full length beneath. this way the dabs of solder directly below can provide support separate from the electrical connection. should save me having a problem due to vibration over time.

it seems plenty stiff and unstressed. the center of gravity is pretty much directly above the pin holes.
 
Mar 16, 2003 at 6:19 AM Post #24 of 34
I didn't see the [2]nd page at the bottom when I posted "What will you be powering with this?" oops.

So, you must have hungry buffers and OPAs in your meta!

Nice work! As for a fuse, I'd try a 1/4 amp. It's still rated higher than the amp will draw, but much closer than the 1A.
 
Mar 16, 2003 at 7:00 AM Post #25 of 34
thanks for that. i'll p/u a 1/4a fuse.

meta will be AD8620 and EL2002CNs. ...and i have no clue if that's a hungry meta. i'm just looking over the shoulders of the rest of you and it seemed to me this psu would take care of an ac version. this is all quite new to me, so i'm stumbling along.
 
Mar 16, 2003 at 10:05 PM Post #27 of 34
nice.

can one test one of these without a load? and if i need a temporary load, how do i do that?

naturally i'm curious if i put it together right.
smily_headphones1.gif
the boards for the meta won't show up for a while yet.
 
Mar 16, 2003 at 10:25 PM Post #28 of 34
Sure thing, OFB. Test away, and don't be alarmen if the neg rail is a tad higher than the positive. I thought it was initially due to poor resistor matching on my part, but when I swapped the two adjust resistors, the output remained the same. So, excellent parts matching
biggrin.gif
. You could fiddle with different 'values' of the same batch. I like to use a trimpot to get exact output matching, but I do not know how critical this even is.

Jamont, very nice looking! I reconize those caps. Nice connectors, too.
 
Mar 17, 2003 at 7:28 AM Post #29 of 34
hully gee, it works.

+15.67 and -15.78 on my cheapo meter. does that sound okay? i really don't have much to compare it to.

while i'm here, there's a couple of related questions.

do i do anything with the ground line of the iec socket? ignore it for this setup, or hook it into the case with everything else?

for that matter, this one may be cased in acrylic. if i need to install an ef shield [probably reuse the tin from an old apple] does that become part of the ground too?

i did match resistors in the psu. while i was playing with the meter i found some variation in the 1N4007 diodes, but i don't recall anyone ever mentioning matching diodes. that doesn't matter? i matched the last pair, but had already installed the bridge.
 

Users who are viewing this thread

Back
Top