roger_s
100+ Head-Fier
- Joined
- Mar 17, 2008
- Posts
- 131
- Likes
- 2
About 10 days ago I dropped a note here asking if anyone had seen this HA:
Single End Tube Head Phone Amp Kit - Plug and Play
I didn't get any responses but then I'd never seen mention of it so I wasn't surprised. The vendor's got good feedback, charges very reasonable shipping from HK (19 bucks!) so I figured what the heck and bought one.
It arrived yesterday. The bottom line, it's a decent amp if you're willing to invest some sweat equity.
I took it out of its shipping box (the top had not been taped shut, it was held together by a tab/slot bit that somehow managed to stay together from HK to ABQ. Amazing), plugged in the 6DJ8 tube--the markings are rubbed off, don't know it's lineage--and fired it up. With my DIYmod iPod Mini or my iMod 4G I got hum and not-so-hot sound from my HD-650's. There was noticeable distortion, unfocused bass, and only OK imaging. My ears said "the input's over driven".
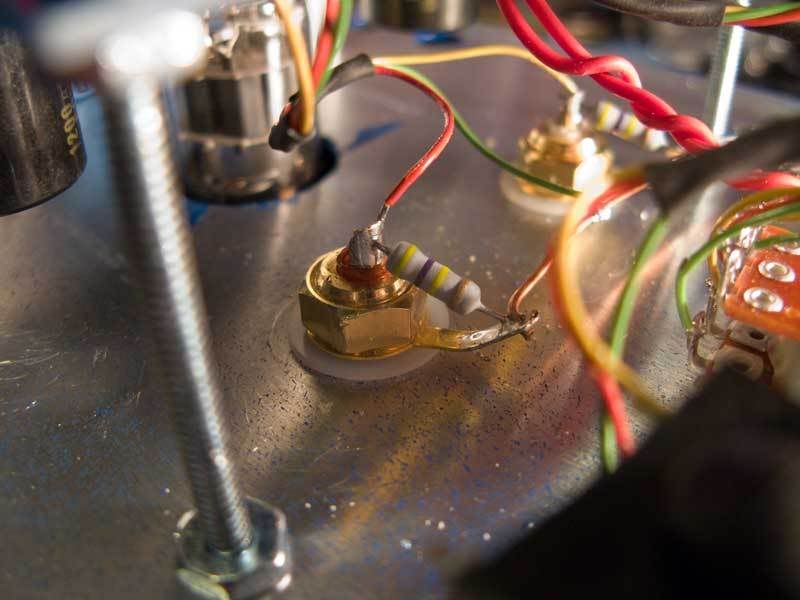
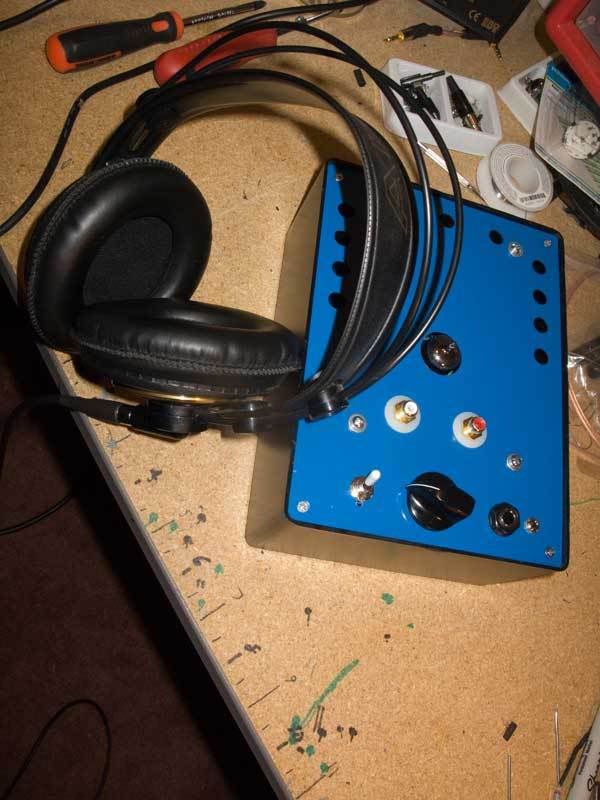
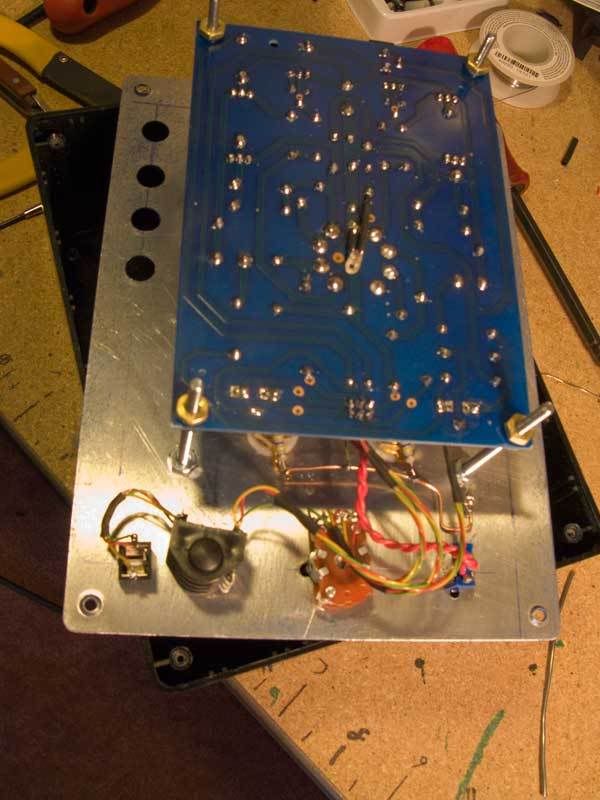
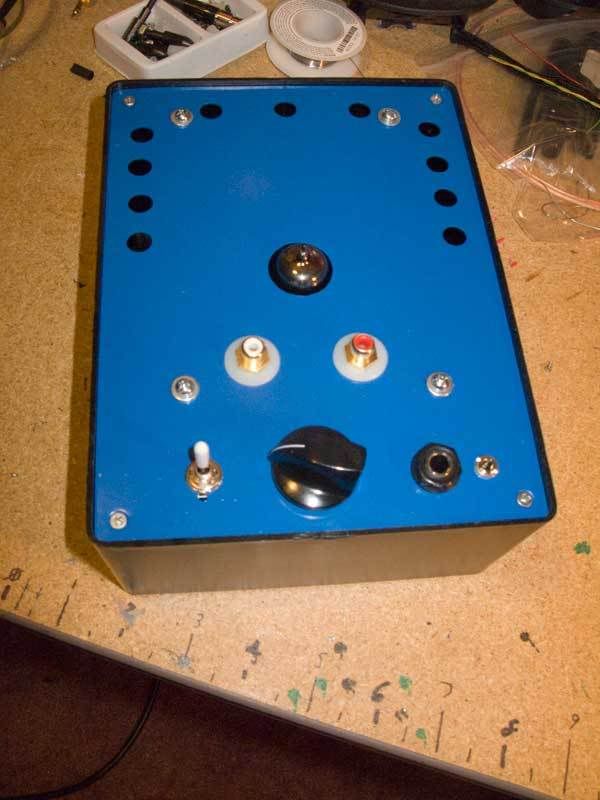
I also wasn't too happy plugging everything into 1/8" jacks. I knew about them going in and already planned on replacing them. So I set about mounting it in a Radio Shack project box. I removed the 1/8" jacks and the Alps volume control/power switch and soldered in some Navships teflon insulated wire. On went RCA jacks, a proper 100K pot, a power switch and a 1/4" phone jack paired with a 1/8" jack that's disconnects when a 1/4" plug is in use. I floated the RCA jacks from the aluminum top plate with shoulder washers and didn't ground the PCB to the plate.
Another plug and play and still hum and still not so hot sound. Back under the soldering iron I tied the PCB ground to the plate. The hum was much improved. There's still some with the iMod or the DIYmod but I pretty much expected that since they're not grounded to anything and the XR010 likely isn't getting much grounding from its power supply.
Time to tackle that lousy sound. I scrounged up a couple of 470k ohm resistors and tied the inputs to ground through them. Wow, was I right about it being over driven. What a difference. The bass is much improved, tighter, more slam. The opening of k.d. lang's "Luck In My Eyes" really shines. It took everything Jimmy Smith's Hammond B3 could toss at it. It's not perfect, it's not as articulate as my Bottlehead S.E.X and certainly not as transparent or detailed but at 1/4 the price I'm very impressed. Next up is to replace the coupling caps. I suspect even a pair of Solens will take this little amp up a notch or two.
It plays well with my HD-650s, K-240Ss, V-Moda Vibes but not so much with my Shure E3c's. They sounded rather tinny compared to the others.
If you opt to get one, be prepared to fire up your soldering station and your solder sucker. A few hours of elbow grease make for a pretty decent amp. Right now mine's serving duty as the audio for a Hackintosh that I use as to convert reel-to-reel and cassette tapes to CD. No hum to speak of now that it's tied into a properly grounded source.
EDIT: You really don't won't your phones on when powering on. There is a very pronounced power-on pop.
Roger
Single End Tube Head Phone Amp Kit - Plug and Play
I didn't get any responses but then I'd never seen mention of it so I wasn't surprised. The vendor's got good feedback, charges very reasonable shipping from HK (19 bucks!) so I figured what the heck and bought one.
It arrived yesterday. The bottom line, it's a decent amp if you're willing to invest some sweat equity.
I took it out of its shipping box (the top had not been taped shut, it was held together by a tab/slot bit that somehow managed to stay together from HK to ABQ. Amazing), plugged in the 6DJ8 tube--the markings are rubbed off, don't know it's lineage--and fired it up. With my DIYmod iPod Mini or my iMod 4G I got hum and not-so-hot sound from my HD-650's. There was noticeable distortion, unfocused bass, and only OK imaging. My ears said "the input's over driven".
I also wasn't too happy plugging everything into 1/8" jacks. I knew about them going in and already planned on replacing them. So I set about mounting it in a Radio Shack project box. I removed the 1/8" jacks and the Alps volume control/power switch and soldered in some Navships teflon insulated wire. On went RCA jacks, a proper 100K pot, a power switch and a 1/4" phone jack paired with a 1/8" jack that's disconnects when a 1/4" plug is in use. I floated the RCA jacks from the aluminum top plate with shoulder washers and didn't ground the PCB to the plate.
Another plug and play and still hum and still not so hot sound. Back under the soldering iron I tied the PCB ground to the plate. The hum was much improved. There's still some with the iMod or the DIYmod but I pretty much expected that since they're not grounded to anything and the XR010 likely isn't getting much grounding from its power supply.
Time to tackle that lousy sound. I scrounged up a couple of 470k ohm resistors and tied the inputs to ground through them. Wow, was I right about it being over driven. What a difference. The bass is much improved, tighter, more slam. The opening of k.d. lang's "Luck In My Eyes" really shines. It took everything Jimmy Smith's Hammond B3 could toss at it. It's not perfect, it's not as articulate as my Bottlehead S.E.X and certainly not as transparent or detailed but at 1/4 the price I'm very impressed. Next up is to replace the coupling caps. I suspect even a pair of Solens will take this little amp up a notch or two.
It plays well with my HD-650s, K-240Ss, V-Moda Vibes but not so much with my Shure E3c's. They sounded rather tinny compared to the others.
If you opt to get one, be prepared to fire up your soldering station and your solder sucker. A few hours of elbow grease make for a pretty decent amp. Right now mine's serving duty as the audio for a Hackintosh that I use as to convert reel-to-reel and cassette tapes to CD. No hum to speak of now that it's tied into a properly grounded source.
EDIT: You really don't won't your phones on when powering on. There is a very pronounced power-on pop.
Roger