


- Joined
- Oct 14, 2013
- Posts
- 28,339
- Likes
- 32,167
I create this topic for the sole purposes of modifying, and sharing impressions, experiences, and potential upgrades. You are all welcome to modify and post your wm1A/Z here, and to put up further works perform on the Walkman.
To replace WM1Z internal wires to Balanced side
*disclaimer* before proceeding, do understand that you are doing this at your own risk, and if you damaged your players, it is your fault. Please ask people who have experienced working in smartphone, and soldering, electrical devices to help you out. I am not held reliable for any accidents you may found and put yourself into. Only proceed when you are confident.
*With all due respects* who is out to make profit, please do not use my guide to "rip-off" the customers. This guide was put up from my sole-finding of modifying and tinkering with my expensive Wm1z, in order to help the people to improve their Wm1z further. I am a huge fan of "audio quality over anything else", and I would be happy to see other people be enjoying it as well. Hence the reason why I put it up. I disagree with people using my guide to rip-off potential customers who only want to improve their player for better quality and performances. If I found any reports about "rip-off" using my guide. All the future findings from my experiences will not be published again. Pm, if you have any questions. It should only be a couple hours work, if cables wires and materials are provided, and hence labor rate and charge shall be according to the time and labor performed.
First of all: make sure you have no rings on your fingers as it will scratch your precious 1z body. Turn it off!!
Next up: turn your 1z on it back, and use a hard plastic card such as credit card or those that come with smartphone fix kit. Use heat gun on low setting and be patient Start peeling from the up top corner from either sides. Green or red.
Orange is NFC antenna amplification. Be careful using heat gun at low temperature and do to slowly, not to damage the NFC antenna underneath, the white part. I do not use my NFC, so I took it off to make sure no noise gets transmitted into the digital block.
Peel the leather off completely to expose the Wm1z inside.

Then you can see the plastic casing outside which is screwed onto the main chassis. I will upgrade picture later. Unscrew all 4 corners, and pull it off off
Then you will see the circuitry section exposed inside

Next you will need to proceed from step to step.
1/ pull off the Bluetooth antenna, use a tweezer to pull it up vertically and parallel to the surface it attached to...otherwise you risk pulling off the copper adhesive and destroy the antenna itself. Then tape the antenna to a side so it won't get in your way
2/ peel back the key LED and wire detector plug and tape it to the side so it is clearing the way. The tapes and glues that hold the plugs is a bit tough. Just be careful not to damage the wires.
3/ pull the black spacer from the back (bottom) toward the top of the 1z and pull it up.
4/ unscrew the screw in the clear plastic wires holder. Take it out.

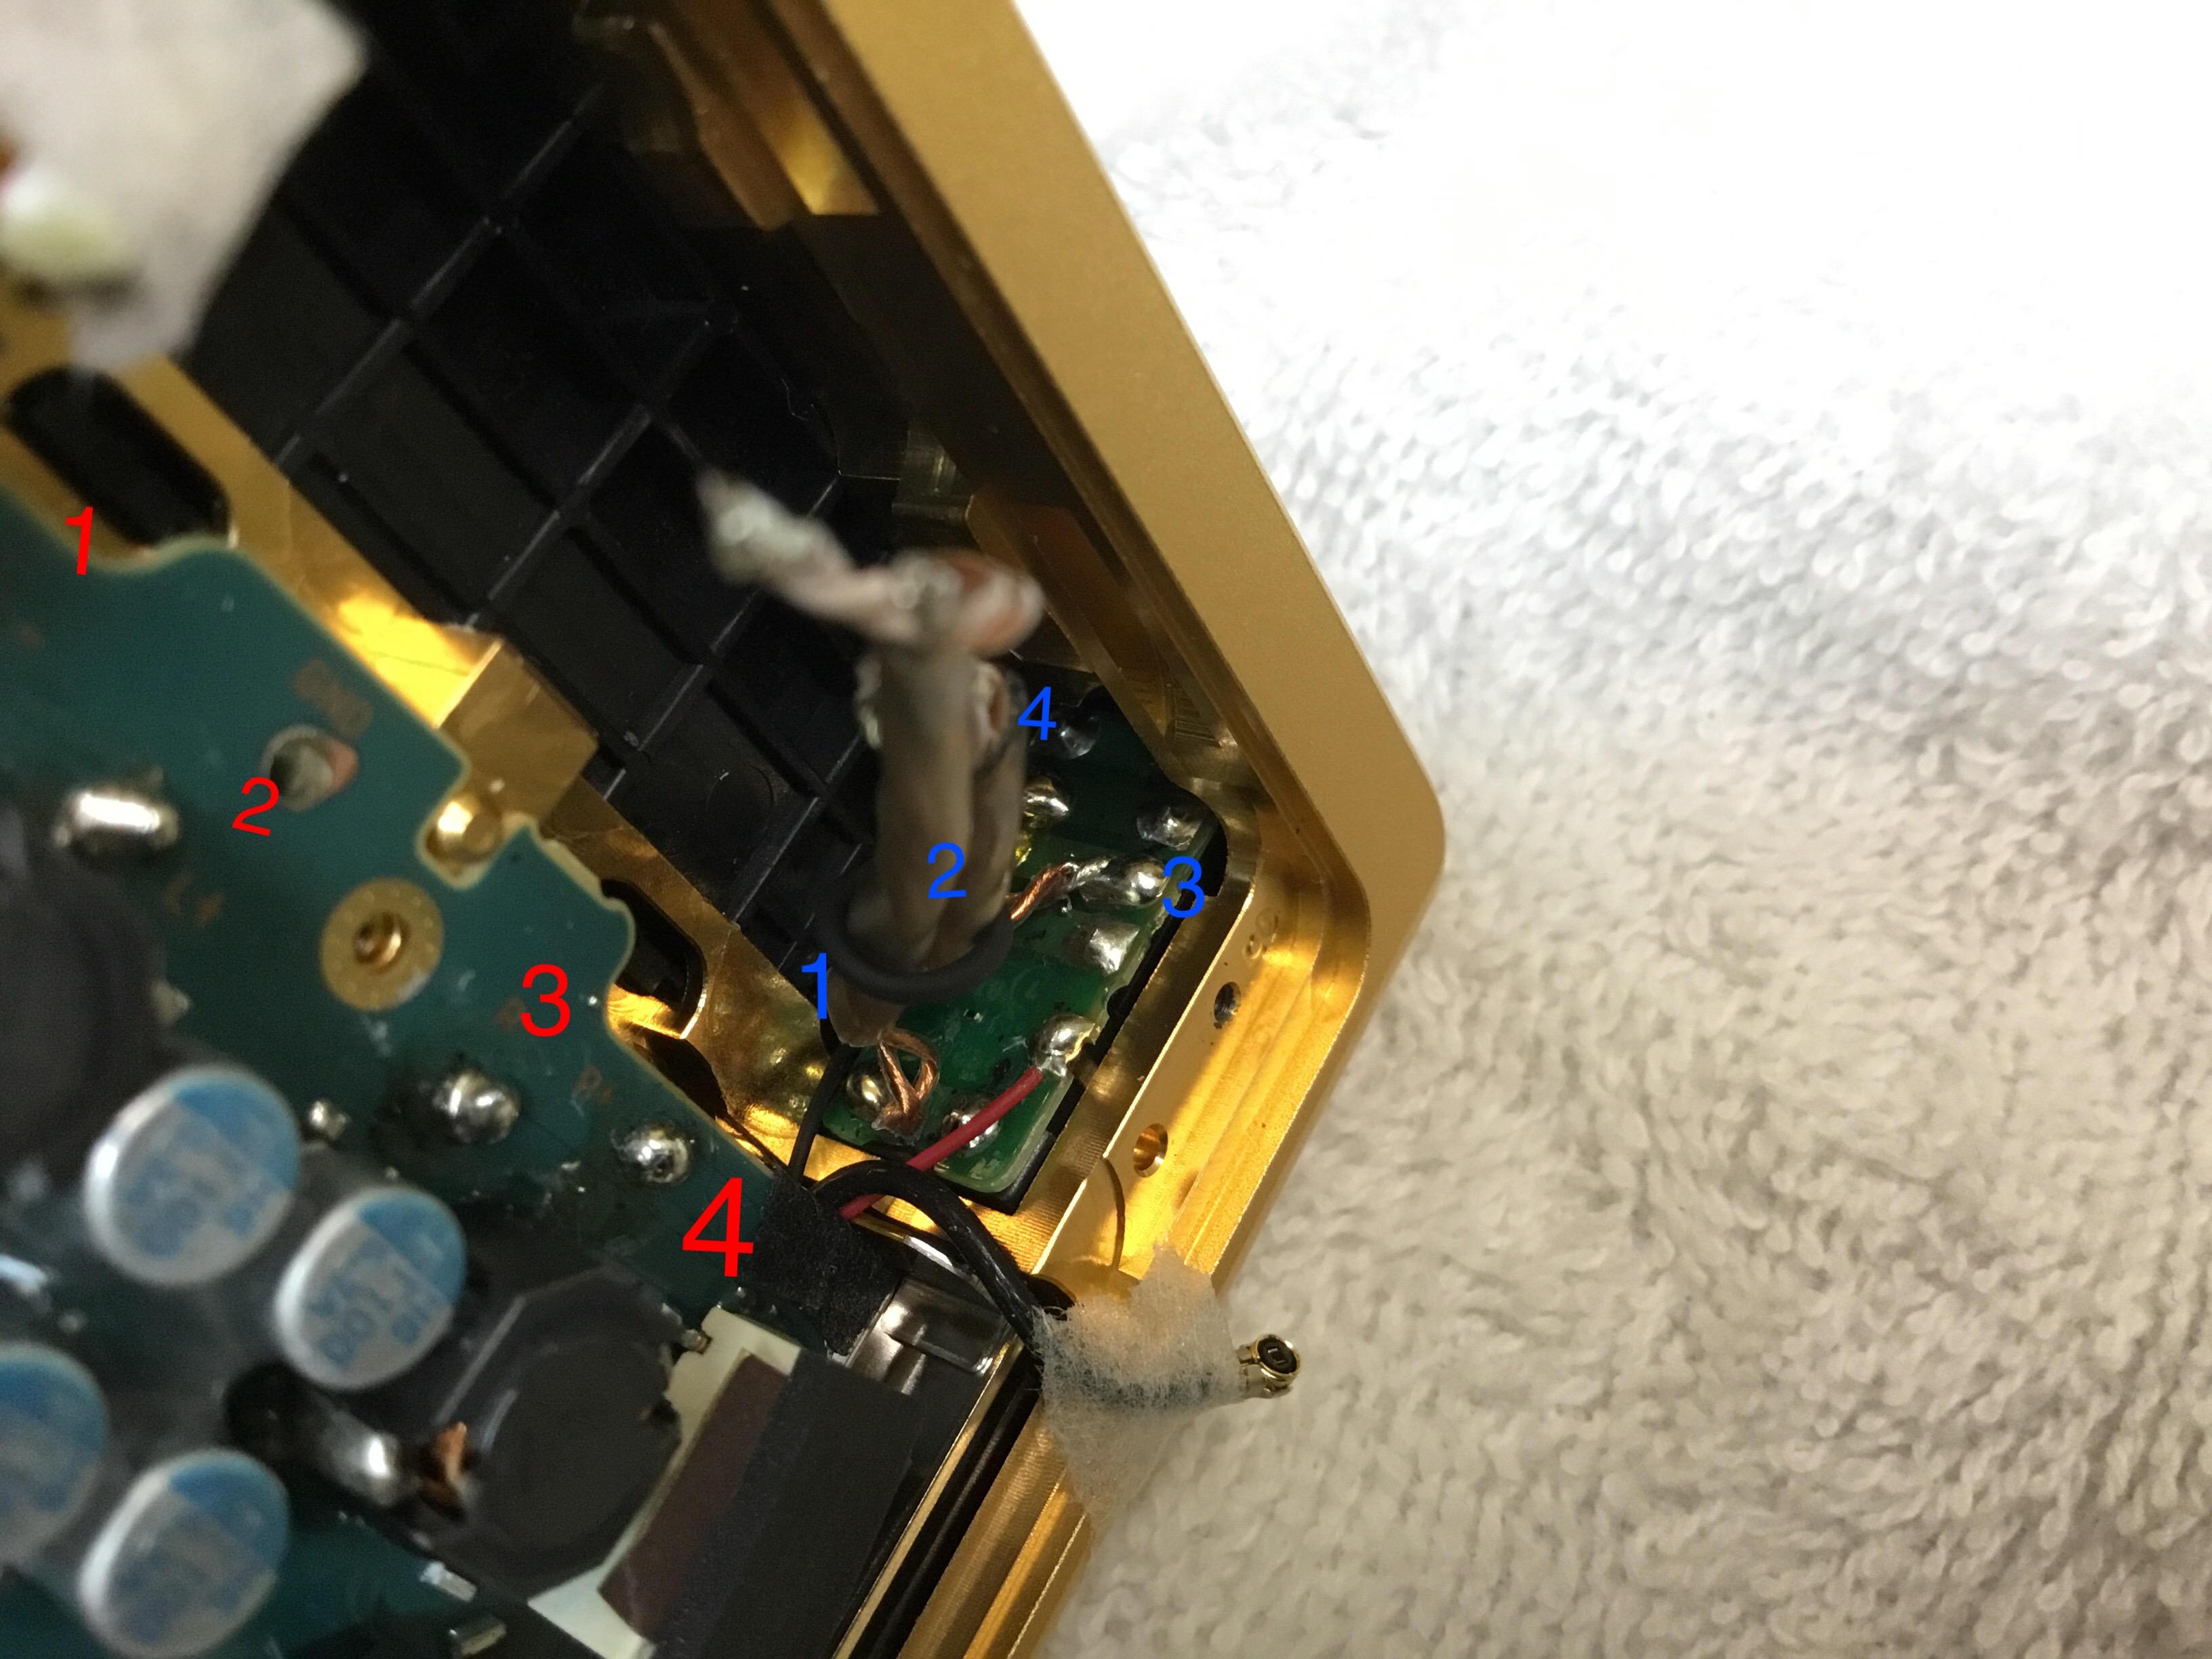
Next, you will see the wires soldered onto the 1z board which is clearly marked L- L+ R- R+ (left to right looking from top down to bottom). Do this from step to step in sequential. Desoldering the L- then L+ then R- then R+. Then pull the wires out.
Now, the stock socket is configured in this configuration. From the bottom to the top of the Walkman , toward the Socket opening.

1/ L+
Empty/ Wires detector, there is the red wire attached. Avoid touching it with your iron
2/ L-
3/ R+
4/ R-
Now, when you desoldering this part. Start out with L-, L+, R-, R+ (1,2,3,4 red)
If you are finished until this step, congratulation ! You are ready to upgrade the wires.
You can chose to suck out the Sony Solder and use your own!
Have the wires of your choices, and start wiring it in from the socket with L+ then L-. Now move along into the board and solder up R+ then R-
**make sure** you did not mess up the polarity, short them out, confused them up...etc...etc.
**make sure** to use good judgement on the length of the wires.
Next step is to solder in R- (4-blue) ***First*** (notice this is the one out at the top end of the socket), and then R+ (3-blue). Doesn't matter, if you do it in reverse, it is just harder for you to snug your solder iron tip inside to reach it. You can solder it to the top terminal, doesn't matter. The only thing is that getting it too close to touching the chassis is not a good idea here.
Then, proceed into the board with R+ then R-
Have you done everything ? Great. Use your MultiMeter to trace the wires again to make sure you did not screwup any insulator along the wires and short them out, check all 4 wires, and the chassis ground. All clear ? Great ! You have done the upgrading for your WM1Z inner wire upgrade. Congratulation ! Now you will truly have something special and unique to your taste.
I chose to use Silver-gold Wires in braided configurations. Here is the finished upgrade of mine

Now, you can start putting them back together.
Clear plastic wire holder, screw it in
Black Bluetooth antenna, put the top in first and push it down, you will hear it click. Do not force anything, if there are any resistance, more than likely your wires are taking up more spaces, carefully move them so they can fit nicely
Put the Bluetooth antenna snapped in carefully
Pull down the LeD and wire detector, replace the 2 sides glues if you need to, attach it firmly.
Black plastic casing in, screw it in
Slap the back leather in, firmly press it, and use your nails to snug it in under the chassis grooves.
Done!!!
How to Change your Player into Japan Region and Uncap volume at the same time
https://www.head-fi.org/threads/modifying-wm1z-a.856213/post-15488705
Firmware upgrades
https://www.head-fi.org/threads/modifying-wm1z-a.856213/post-15495488
To replace WM1Z internal wires to Balanced side
*disclaimer* before proceeding, do understand that you are doing this at your own risk, and if you damaged your players, it is your fault. Please ask people who have experienced working in smartphone, and soldering, electrical devices to help you out. I am not held reliable for any accidents you may found and put yourself into. Only proceed when you are confident.
*With all due respects* who is out to make profit, please do not use my guide to "rip-off" the customers. This guide was put up from my sole-finding of modifying and tinkering with my expensive Wm1z, in order to help the people to improve their Wm1z further. I am a huge fan of "audio quality over anything else", and I would be happy to see other people be enjoying it as well. Hence the reason why I put it up. I disagree with people using my guide to rip-off potential customers who only want to improve their player for better quality and performances. If I found any reports about "rip-off" using my guide. All the future findings from my experiences will not be published again. Pm, if you have any questions. It should only be a couple hours work, if cables wires and materials are provided, and hence labor rate and charge shall be according to the time and labor performed.
First of all: make sure you have no rings on your fingers as it will scratch your precious 1z body. Turn it off!!
Next up: turn your 1z on it back, and use a hard plastic card such as credit card or those that come with smartphone fix kit. Use heat gun on low setting and be patient Start peeling from the up top corner from either sides. Green or red.
Orange is NFC antenna amplification. Be careful using heat gun at low temperature and do to slowly, not to damage the NFC antenna underneath, the white part. I do not use my NFC, so I took it off to make sure no noise gets transmitted into the digital block.
Peel the leather off completely to expose the Wm1z inside.
Then you can see the plastic casing outside which is screwed onto the main chassis. I will upgrade picture later. Unscrew all 4 corners, and pull it off off
Then you will see the circuitry section exposed inside
Next you will need to proceed from step to step.
1/ pull off the Bluetooth antenna, use a tweezer to pull it up vertically and parallel to the surface it attached to...otherwise you risk pulling off the copper adhesive and destroy the antenna itself. Then tape the antenna to a side so it won't get in your way
2/ peel back the key LED and wire detector plug and tape it to the side so it is clearing the way. The tapes and glues that hold the plugs is a bit tough. Just be careful not to damage the wires.
3/ pull the black spacer from the back (bottom) toward the top of the 1z and pull it up.
4/ unscrew the screw in the clear plastic wires holder. Take it out.
Next, you will see the wires soldered onto the 1z board which is clearly marked L- L+ R- R+ (left to right looking from top down to bottom). Do this from step to step in sequential. Desoldering the L- then L+ then R- then R+. Then pull the wires out.
Now, the stock socket is configured in this configuration. From the bottom to the top of the Walkman , toward the Socket opening.

1/ L+
Empty/ Wires detector, there is the red wire attached. Avoid touching it with your iron
2/ L-
3/ R+
4/ R-
Now, when you desoldering this part. Start out with L-, L+, R-, R+ (1,2,3,4 red)
If you are finished until this step, congratulation ! You are ready to upgrade the wires.
You can chose to suck out the Sony Solder and use your own!
Have the wires of your choices, and start wiring it in from the socket with L+ then L-. Now move along into the board and solder up R+ then R-
**make sure** you did not mess up the polarity, short them out, confused them up...etc...etc.
**make sure** to use good judgement on the length of the wires.
Next step is to solder in R- (4-blue) ***First*** (notice this is the one out at the top end of the socket), and then R+ (3-blue). Doesn't matter, if you do it in reverse, it is just harder for you to snug your solder iron tip inside to reach it. You can solder it to the top terminal, doesn't matter. The only thing is that getting it too close to touching the chassis is not a good idea here.
Then, proceed into the board with R+ then R-
Have you done everything ? Great. Use your MultiMeter to trace the wires again to make sure you did not screwup any insulator along the wires and short them out, check all 4 wires, and the chassis ground. All clear ? Great ! You have done the upgrading for your WM1Z inner wire upgrade. Congratulation ! Now you will truly have something special and unique to your taste.
I chose to use Silver-gold Wires in braided configurations. Here is the finished upgrade of mine
Now, you can start putting them back together.
Clear plastic wire holder, screw it in
Black Bluetooth antenna, put the top in first and push it down, you will hear it click. Do not force anything, if there are any resistance, more than likely your wires are taking up more spaces, carefully move them so they can fit nicely
Put the Bluetooth antenna snapped in carefully
Pull down the LeD and wire detector, replace the 2 sides glues if you need to, attach it firmly.
Black plastic casing in, screw it in
Slap the back leather in, firmly press it, and use your nails to snug it in under the chassis grooves.
Done!!!
How to Change your Player into Japan Region and Uncap volume at the same time
https://www.head-fi.org/threads/modifying-wm1z-a.856213/post-15488705
Firmware upgrades
https://www.head-fi.org/threads/modifying-wm1z-a.856213/post-15495488
Attachments
Last edited:


 . I did try Silver as wiring materials, it didn't fit my taste well enough
") , the mod does bring new life into 1z
, the mod does bring new life into 1z