L0rdGwyn's DIY Audio
Sep 22, 2021 at 9:27 AM Post #3,136 of 6,785
Listening to the PCM56 DAC last night and today while working on the layout. Using my 6A5G amp and some ZMFs.

Gotta enjoy that tube glow now, soon it will be hidden!

PXL_20210922_120304604-2.jpg

I'm really happy with the sound. Nice detail, soundstage, and clarity, non-fatiguing and smooth. Will be fun to see how it stacks up to some other fancy tube output DACs.

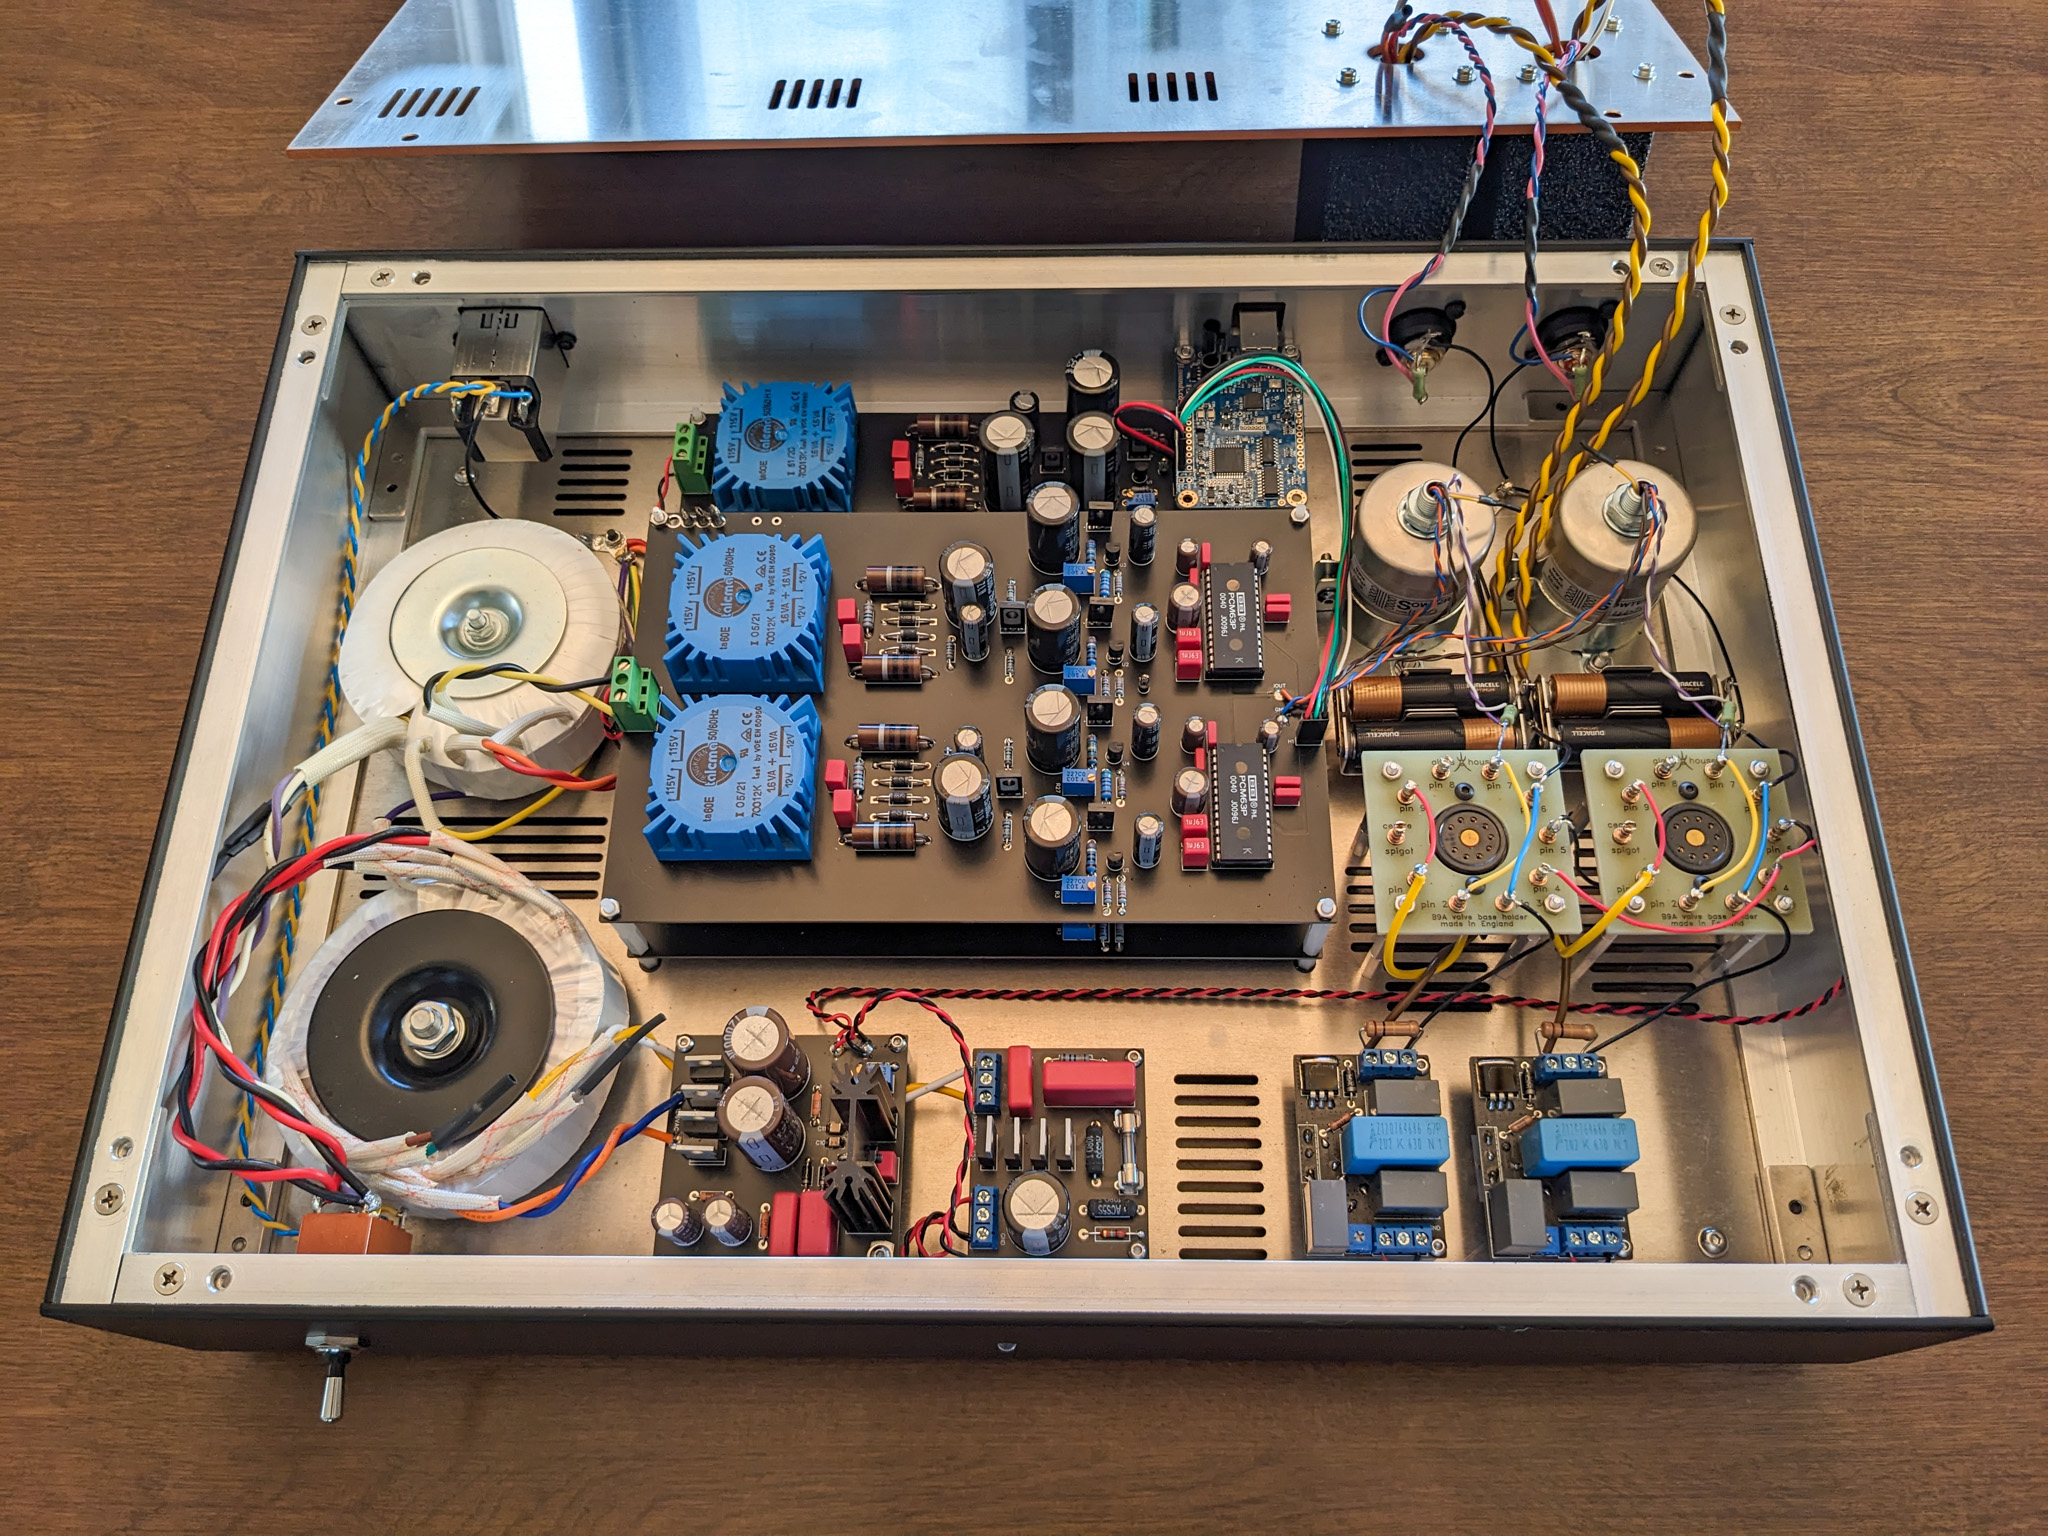
I finished the interior layout, seen below. Green are component outlines for the sake of arranging parts.

PCM56 DAC Layout.png

I am going to use Clarity Cap CMR for the output caps, 3.3uF 400VDC. That will give a f-3dB point of 1Hz with a 50K load.

I am making another change - given the CCS loads are not dissipating a significant amount of power (due to the 2Vrms voltage swing of the output tubes), I am going to use my smaller form factor CCS PCBs. The bottom FET on these boards is TO-92-3 package - I will switch to the DN2540 for the bottom device. It has a higher transconductance than the IXTP08N50D2 at the bias current of the output tubes, as such the output impedance should drop to around 200ohms.

There are actually a few different DAC chips that can be used in this circuit without any changes, all of the following are compatible: PCM56, PCM61, AD1851, AD1860, AD1861. I'm in no hurry, but at some point I'll probably try some out. The AD1861 is the most intriguing. I also have spare PCM56 - seven I think - so it would behoove me to take measurements to find the best stereo pair.

I was going to wait to measure one part in person, but I think it will be fine. Goal for the day is checking my work, then placing the chassis order.
 
Sep 22, 2021 at 2:58 PM Post #3,137 of 6,785
Took quite a few hours to go through everything all over again, but the DAC chassis order is in.

As I said, it will be in plain / silver brushed anodized aluminum.

Below is the final, didn't bother showing the side panels as they are completely plain. The vast majority of the machining is on the bottom panel, but it won't be visible obviously. Included ventilation on the bottom panel to promote airflow around the "hot" components, although nothing in this build gets very hot - the tubes are the hottest thing inside but only dissipating 2.75W, can place a finger on top of them comfortably while the DAC is on and warmed up.

PCM56 DAC.png


Need to organize a final parts order for a few things, but this was the rate-determining step, so wanted to get the order in. I have a week off in early October, would be great if I had the chassis by then and could finish the build. I don't expect it will take long given most everything is already constructed (although I say that every time...). One thing that is nice about everything being on the bottom plate is I don't have to put the whole chassis together to do a majority of the build - will do 90% with just the bottom plate, which will make getting to hard-to-reach places much easier, then plop the rest on top.
 
Last edited:
Sep 22, 2021 at 3:00 PM Post #3,138 of 6,785
Took quite a few hours to go through everything all over again, but the DAC chassis order is in.

As I said, it will be in plain / silver brushed anodized aluminum.

Below is the final, didn't bother showing the side panels as they are completely plain. The vast majority of the machining is on the bottom panel, but it won't be visible obviously. Included ventilation on the bottom panel to promote airflow around the "hot" components, although nothing in this build gets very hot - the tubes are the hottest thing inside but only dissipating 2.75W, can place a finger on top of them comfortably while the DAC is on and warmed up.

PCM56 DAC.png

Need to organize a final parts order for a few things, but this was the rate-determining step, so wanted to get the order in. I have a week off in early October, would be great if I had the chassis by then and could finish the build. I don't expect it will take long given most everything is already constructed (although I say that every time...). One thing that is nice about everything being on the bottom plate is I don't have to put the whole chassis together to do a majority of the build - will do 90% with just the bottom plate, which will make getting to hard-to-reach places much easier, then plop the rest on top.
Done in a day if your heads right :stuck_out_tongue_winking_eye:
 
Sep 22, 2021 at 3:09 PM Post #3,139 of 6,785
Done in a day if your heads right :stuck_out_tongue_winking_eye:

Oh yeah, first day I have off with everything ready it will be done LOL a marathon as usual!
 
Sep 22, 2021 at 3:22 PM Post #3,140 of 6,785
Stupid Question of The Day:

Would it be possible to incorporate a "trap door" into the chassis for when the tube needs to be replaced for those of us who are too lazy/ blind to take apart the whole top of the DAC? Or would that be too much work or compromise the sound?
 
Sep 22, 2021 at 3:40 PM Post #3,141 of 6,785
Stupid Question of The Day:

Would it be possible to incorporate a "trap door" into the chassis for when the tube needs to be replaced for those of us who are too lazy/ blind to take apart the whole top of the DAC? Or would that be too much work or compromise the sound?

Well if I were to build a copy of this for someone and they wanted the tube to be accessible, probably the easiest way would be to just have the top plate made with holes for the tubes, then just use taller standoffs on the tag boards so the tubes poke out of the top, if that makes sense.

Oh and these tubes are rated for 10,000 hours!
 
Sep 22, 2021 at 4:38 PM Post #3,142 of 6,785
Sep 23, 2021 at 1:38 PM Post #3,144 of 6,785
Well if I were to build a copy of this for someone and they wanted the tube to be accessible, probably the easiest way would be to just have the top plate made with holes for the tubes, then just use taller standoffs on the tag boards so the tubes poke out of the top, if that makes sense.

Oh and these tubes are rated for 10,000 hours!
I like the standoff idea or a chasis could be designed so it just slides off (a wrap around) with a fasterner/clip in the back or just one thumb screw, like the old desktop PCs.

Is the top of the DAC going to have vent holes in the top for heat and light to show through?
Is that this portion?
1632418902111.png
 
Last edited:
Sep 23, 2021 at 3:07 PM Post #3,145 of 6,785
I like the standoff idea or a chasis could be designed so it just slides off (a wrap around) with a fasterner/clip in the back or just one thumb screw, like the old desktop PCs.

Is the top of the DAC going to have vent holes in the top for heat and light to show through?
Is that this portion?
1632418902111.png

That's actually intake ventilation on the bottom plate, top plate will look like so.

PCM56_DAC_Top.png

Could spot the tubes through the vents, but I wasn't really prioritizing making the tubes visible since they are on the interior. The interior layout is optimized for low noise. I originally had the vents running the full front-to-back length of the top plate, I'm considering going back to that before it goes into production.

There is intake ventilation directly below the tube tag boards on the bottom plate.

PCM56_DAC_Bottom.png

If the tubes were to be raised up to poke out of the top, would make some changes to the top ventilation pattern.
 
Sep 23, 2021 at 4:33 PM Post #3,146 of 6,785
After @Galapac 's question and looking it over again, I went back to full front-to-back ventilation on the top panel. Widened the slots from 1/8" to 1/6". Did the same on the bottom panel and increased ventilation there as well.

Now it's perfect! Well, until I look at it again. Night shift starting tonight, so no DIY for a few days.

PCM56_DAC.png
 
Sep 23, 2021 at 5:57 PM Post #3,147 of 6,785
@L0rdGwyn are designs you are using all self-biasing? I was recently thinking of using a VU-meter for visualising transistor bias in a guitar pedal. It kind of works on a breadboard with a resistor in series, but I have concerns about precision and the idea in general. I also have a headphone amp with adjustable bias where you set a jumper and turn a trimpot until a LED (per channel) turns off.
 
Sep 23, 2021 at 10:47 PM Post #3,148 of 6,785
@L0rdGwyn are designs you are using all self-biasing? I was recently thinking of using a VU-meter for visualising transistor bias in a guitar pedal. It kind of works on a breadboard with a resistor in series, but I have concerns about precision and the idea in general. I also have a headphone amp with adjustable bias where you set a jumper and turn a trimpot until a LED (per channel) turns off.

Hey @tubebuyer2020 - these days I like to stick to fixed bias when I can. The tubes in the DAC are fixed bias via battery. I am a big fan of battery bias, the tricky aspect is a DC blocking component is needed on the input - it works really well in the output stage of this DAC given there is a step up transformer between the DAC output and tube grid.

If using autobias in a gain stage, like in a two-stage amplifier, and I can afford to have a slightly higher output impedance from that stage, I prefer to use an active load (CCS or gyrator) and leave the cathode resistor unbypassed. Usually the goal here is to keep a bypass capacitor out of the signal path if possible. The quality of the unbypassed resistor becomes important here as it does have an audible effect on the sound. I prefer carbon film.

And very cool, I didn't know you dabbled in DIY. What is your amp with the adjustable bias?
 
Sep 24, 2021 at 6:20 AM Post #3,149 of 6,785
Last edited:
Sep 27, 2021 at 12:41 PM Post #3,150 of 6,785

Users who are viewing this thread

Back
Top