


Part 1: The design and prototyping process.
8 years ago, I joined JDS Labs. John Seaber and I were frustrated with the quality of our contract manufacturers’ work. Shortly after I joined, we bought our first small CNC machine and began moving the production in-house. Today, we operate two vertical mills and a lathe in the machine shop, as well as a bead blaster for finishing our machined parts. Over the years, I’ve learned that for small companies like ours, doing the work yourself with your own equipment and team, is the best way to achieve the quality we expect in the products we build.
I’m Nick Amizich, and in the coming weeks, myself and other team members are going to give some behind the scenes looks into how Vokyl operates.
While some JDS Labs members make up the Vokyl team and we are lucky enough to be able to use a corner of the JDS office and their equipment, Vokyl is a venture completely independent of JDS Labs. Making a headphone is something I have had interest in doing for years, but it has not been of particular interest to John. He has always been there for Vokyl in terms of having a great set of ears and performing the small amount of electrical engineering work we’ve needed, but Vokyl is solely funded by myself and our potential Indiegogo backers. We’ll take a deeper dive into Vokyl’s origins and structure in the next couple posts.

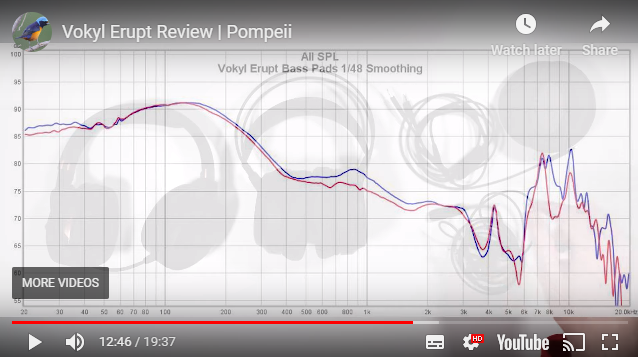
Really isolating the right channel in this test.
From early on, we knew we wanted to build Erupt ourselves. We like to get our hands dirty, make things ourselves, and we have trust issues. There is some work that we just can’t do (like sew earpads!) but for the things we are able to handle, we feel we should. We operate under the notion that no one will care about our product more than us and we feel the need to communicate that care through to the end user.
The Erupt was designed using the myriad of tools at our disposal and we thought it might be fun to give you a brief walkthrough of our design process, focusing on both the industrial design and later the machining work that brings that design to life. No one will dispute that sound quality is king in any headphone. For us though, focusing only on sound quality is like playing tennis without a racket; you can still play, but someone is going to get hurt. We believe the design is just as important to the customer’s experience.

We start ROUGH.
Ideation.
Our first step when designing a product at Vokyl is to take a long hard look at what else is out there. We start by seeing what we really like about current products and things that we think we can improve upon. We take all of those pros and cons, break them out, and make a features list: things that we think we need to put into our product and things that we definitely want to stay away from.

.png")
Examples of how we really hone things in during the ideation process, Concept 4 was our was our final choice and led to the Erupt you see today.
For the Erupt, we had 3 major things that really drove us nuts about headsets on the market.
1. The build quality. It seemed like every mainstream gaming headset we picked up felt cheap. We know that the average, everyday gamer isn’t raising a fuss about their plastic headset, but that doesn’t mean that’s what they deserve! We wanted to make a gaming headset that would last, so naturally, given our background, the answer was machined aluminum.
2. The sound quality. Being lucky enough to have exposure to the best audio gear in the world through CanJams and Head-Fi meets, we really just couldn’t use the off the shelf parts out there. When we went out and tried the “Gaming” headsets, there just was no comparison. We didn’t (and still don’t) understand why you can’t bring the kind of quality sound, clarity, and accuracy that we’re used to into the gaming space. A vast, vast majority of our budget is in the quality components that make up the Erupt. We believe the most critical part in making a headphone is the driver, and shouldn’t that be the largest part of your bill of materials?
3. The mic quality. Like the drivers, our microphone capsules make a dent in our BOM, with the mic itself being the biggest hurdle to manufacture. For us, the microphone is the reason the Indiegogo campaign is needed, 2/3rds of our startup cost is budgeted for tooling and manufacturing of the microphone and cable. The mic itself has multiple injection molded parts, with the cable requiring even more. Also, when ordering cables, you must hit the minimum order quantities for materials… which measure in kilometers. Any cable manufacturer will tell you that this MOQ is their nightmare.
Once our list of “must have’s” and “cannot be this way’s” is compiled, we work with our industrial designer to create concepts for us. This is a highly creative process that can go in a lot of different directions over the course of several months. Using our 3D printer, we print out physical samples of the best concepts, refining and iterating until we have what we think will embody everything we want in a headset.
Rough Prototyping.
Broadly speaking, an industrial designer’s chief goal is to establish the aesthetic direction for the product, considering form, usability, and practicality. There are often differences between what an industrial engineer ideates and the realities of manufacturing, which are limited by capability, expense, and time. That’s where a mechanical engineer like me comes in. The industrial designer shows me how it should look and I feel. I have to figure out how to build it, a process I like to call “a very rewarding thing that can also be an all-consuming nightmare”.
For every component, I consider materials, the production process, and fitment. If a part needs to be injection molded, how complex will the part be, how expensive will the mold be, will the thickness of the part allow for a good material flow? Are the ratios all correct so there are no sink marks? Will the angles on the part allow for a clean release from the mold? The list of consideration goes on and on, but all these questions need to be answered if you want to build a truly quality product.

For parts we are machining, we have an equally long list of concerns. The good news for those is we can tackle every part of this process in-house. We will go into machining with much more detail in a later post, as it's really what makes our businesses tick and we’ll be gosh-darned if we gloss over it .
Back to the process. Using the initial designs, we’ll redraw the designer’s model into individual components, figuring out how all the pieces will fit together and the best materials to use for each component. During the mechanical design phase, our Formlabs Form 2 3D printer runs nearly 24/7. This little beauty allows us to relatively quickly (days instead of weeks!), see how each part will fit together. With some resurfacing and painting, we can also see how each part will look and feel. The 3D printer is great for small, plastic, or complex parts. The yokes on Erupt were an absolute beast to machine, so we wanted to make sure that we had everything exactly right before we gave them a go on the big CNC.

And sometimes, the 3D printer decides it doesn’t care about our timeline and prints this garbage.
Once we have physical samples of all the parts, we put them together! The first physical prototype is always a glorious mess of raw metal, brightly colored printed parts, hot glue, and hopes and dreams. We then have to make a call: “This is perfect!” or “Dispose of this properly behind the woodshed before anyone sees it.” Based on the reaction, we either proceed with the mechanical design/manufacturing process or hit the books and make some changes.
We’ll be continuing our look inside Vokyl Audio with upcoming sections on machining, in-house manufacturing processes, and our gritty origin story! Thanks for reading!
8 years ago, I joined JDS Labs. John Seaber and I were frustrated with the quality of our contract manufacturers’ work. Shortly after I joined, we bought our first small CNC machine and began moving the production in-house. Today, we operate two vertical mills and a lathe in the machine shop, as well as a bead blaster for finishing our machined parts. Over the years, I’ve learned that for small companies like ours, doing the work yourself with your own equipment and team, is the best way to achieve the quality we expect in the products we build.
I’m Nick Amizich, and in the coming weeks, myself and other team members are going to give some behind the scenes looks into how Vokyl operates.
While some JDS Labs members make up the Vokyl team and we are lucky enough to be able to use a corner of the JDS office and their equipment, Vokyl is a venture completely independent of JDS Labs. Making a headphone is something I have had interest in doing for years, but it has not been of particular interest to John. He has always been there for Vokyl in terms of having a great set of ears and performing the small amount of electrical engineering work we’ve needed, but Vokyl is solely funded by myself and our potential Indiegogo backers. We’ll take a deeper dive into Vokyl’s origins and structure in the next couple posts.

Really isolating the right channel in this test.
From early on, we knew we wanted to build Erupt ourselves. We like to get our hands dirty, make things ourselves, and we have trust issues. There is some work that we just can’t do (like sew earpads!) but for the things we are able to handle, we feel we should. We operate under the notion that no one will care about our product more than us and we feel the need to communicate that care through to the end user.
The Erupt was designed using the myriad of tools at our disposal and we thought it might be fun to give you a brief walkthrough of our design process, focusing on both the industrial design and later the machining work that brings that design to life. No one will dispute that sound quality is king in any headphone. For us though, focusing only on sound quality is like playing tennis without a racket; you can still play, but someone is going to get hurt. We believe the design is just as important to the customer’s experience.

We start ROUGH.
Ideation.
Our first step when designing a product at Vokyl is to take a long hard look at what else is out there. We start by seeing what we really like about current products and things that we think we can improve upon. We take all of those pros and cons, break them out, and make a features list: things that we think we need to put into our product and things that we definitely want to stay away from.

.png")
Examples of how we really hone things in during the ideation process, Concept 4 was our was our final choice and led to the Erupt you see today.
For the Erupt, we had 3 major things that really drove us nuts about headsets on the market.
1. The build quality. It seemed like every mainstream gaming headset we picked up felt cheap. We know that the average, everyday gamer isn’t raising a fuss about their plastic headset, but that doesn’t mean that’s what they deserve! We wanted to make a gaming headset that would last, so naturally, given our background, the answer was machined aluminum.
2. The sound quality. Being lucky enough to have exposure to the best audio gear in the world through CanJams and Head-Fi meets, we really just couldn’t use the off the shelf parts out there. When we went out and tried the “Gaming” headsets, there just was no comparison. We didn’t (and still don’t) understand why you can’t bring the kind of quality sound, clarity, and accuracy that we’re used to into the gaming space. A vast, vast majority of our budget is in the quality components that make up the Erupt. We believe the most critical part in making a headphone is the driver, and shouldn’t that be the largest part of your bill of materials?
3. The mic quality. Like the drivers, our microphone capsules make a dent in our BOM, with the mic itself being the biggest hurdle to manufacture. For us, the microphone is the reason the Indiegogo campaign is needed, 2/3rds of our startup cost is budgeted for tooling and manufacturing of the microphone and cable. The mic itself has multiple injection molded parts, with the cable requiring even more. Also, when ordering cables, you must hit the minimum order quantities for materials… which measure in kilometers. Any cable manufacturer will tell you that this MOQ is their nightmare.
Once our list of “must have’s” and “cannot be this way’s” is compiled, we work with our industrial designer to create concepts for us. This is a highly creative process that can go in a lot of different directions over the course of several months. Using our 3D printer, we print out physical samples of the best concepts, refining and iterating until we have what we think will embody everything we want in a headset.
Rough Prototyping.
Broadly speaking, an industrial designer’s chief goal is to establish the aesthetic direction for the product, considering form, usability, and practicality. There are often differences between what an industrial engineer ideates and the realities of manufacturing, which are limited by capability, expense, and time. That’s where a mechanical engineer like me comes in. The industrial designer shows me how it should look and I feel. I have to figure out how to build it, a process I like to call “a very rewarding thing that can also be an all-consuming nightmare”.
For every component, I consider materials, the production process, and fitment. If a part needs to be injection molded, how complex will the part be, how expensive will the mold be, will the thickness of the part allow for a good material flow? Are the ratios all correct so there are no sink marks? Will the angles on the part allow for a clean release from the mold? The list of consideration goes on and on, but all these questions need to be answered if you want to build a truly quality product.

With great hair, comes great responsibility.
For parts we are machining, we have an equally long list of concerns. The good news for those is we can tackle every part of this process in-house. We will go into machining with much more detail in a later post, as it's really what makes our businesses tick and we’ll be gosh-darned if we gloss over it .
Back to the process. Using the initial designs, we’ll redraw the designer’s model into individual components, figuring out how all the pieces will fit together and the best materials to use for each component. During the mechanical design phase, our Formlabs Form 2 3D printer runs nearly 24/7. This little beauty allows us to relatively quickly (days instead of weeks!), see how each part will fit together. With some resurfacing and painting, we can also see how each part will look and feel. The 3D printer is great for small, plastic, or complex parts. The yokes on Erupt were an absolute beast to machine, so we wanted to make sure that we had everything exactly right before we gave them a go on the big CNC.

And sometimes, the 3D printer decides it doesn’t care about our timeline and prints this garbage.
Once we have physical samples of all the parts, we put them together! The first physical prototype is always a glorious mess of raw metal, brightly colored printed parts, hot glue, and hopes and dreams. We then have to make a call: “This is perfect!” or “Dispose of this properly behind the woodshed before anyone sees it.” Based on the reaction, we either proceed with the mechanical design/manufacturing process or hit the books and make some changes.
We’ll be continuing our look inside Vokyl Audio with upcoming sections on machining, in-house manufacturing processes, and our gritty origin story! Thanks for reading!

 This will allow even the SWEATIEST of sweaty gamers to game non-stop!


