Home-Made IEMs
Sep 19, 2021 at 7:54 PM Post #13,366 of 15,966
thanks your advise. I will make change and print the shell again. Do I need to change the printer setup also. please take a look for me,

Layer Height = 0.03 mm
Exposure time = 8 seconds
bottom layer count = 5
bottom exposure time = 30 seconds
anti-aliasing = 5
Lift total height=4
Lift speed= 120
retract speed =120
stop time=3

thanks.
Hey man, layer height of 0.05 is sufficient for great detail. You'll save some time :wink:

thanks your advise. I will make change and print the shell again. Do I need to change the printer setup also. please take a look for me,

Layer Height = 0.03 mm
Exposure time = 8 seconds
bottom layer count = 5
bottom exposure time = 30 seconds
anti-aliasing = 5
Lift total height=4
Lift speed= 120
retract speed =120
stop time=3

thanks.
Oh and double lift height to 8, as well as lift speed to 80. These are the things that actually improve print quality
 
Sep 20, 2021 at 7:00 AM Post #13,368 of 15,966
How do I determine good cutoff frequencies for my crossover network? My current understanding is that I tune it to match my target FR, but Will the sound change at where different drivers intersect? Also, when should I use a zobel network for the woofer?
 
Last edited:
Sep 20, 2021 at 10:47 AM Post #13,369 of 15,966
It also depends on the resin used, look at the resin maker and see what they advise as setting in relation to your printer?
Slower lift and further lift generally improve results for all resins in my experience
 
Sep 20, 2021 at 12:44 PM Post #13,370 of 15,966
Slower lift and further lift generally improve results for all resins in my experience
Yes it depends on the resins, there are resins where the standard settings are enough and other or sometimes it is necessary to slow down the lifting for a good detachment of the layer on the FEP, as I said, each one makes these experiments and in the end each will have his own settings. people can be advised more precisely if they use exactly the same material. I think I have a hundred test shells printed to make my adjustments, the most difficult resins are the clear, I didn’t use more than one
 
Last edited:
Sep 20, 2021 at 8:22 PM Post #13,371 of 15,966
First hybrid, nothing special but I like the curve, almost too bright with that 5.5k spike but this is with no dampers or filter (I might put a screen filter on it later.) I was trying to get the most highs out of the 29689, think I did ok.

8mm dual DD and a 29689 in parallel. Out of polarity(phase.) They were fine before the crossover, but I had some cancelation after the crossover so it was better reversed.

High pass 29689 4.7uf and 3 ohm resistor to better match the DD. Crossover just built on the terminal.

Pics and curve:
8mm dual DD BS29689n.jpg20210919_190955.jpg20210919_184434.jpg20210919_151830.jpg
 
Sep 21, 2021 at 2:26 AM Post #13,372 of 15,966
Thanks all you guy helping. Thanks a million, you all are great and expert !!!

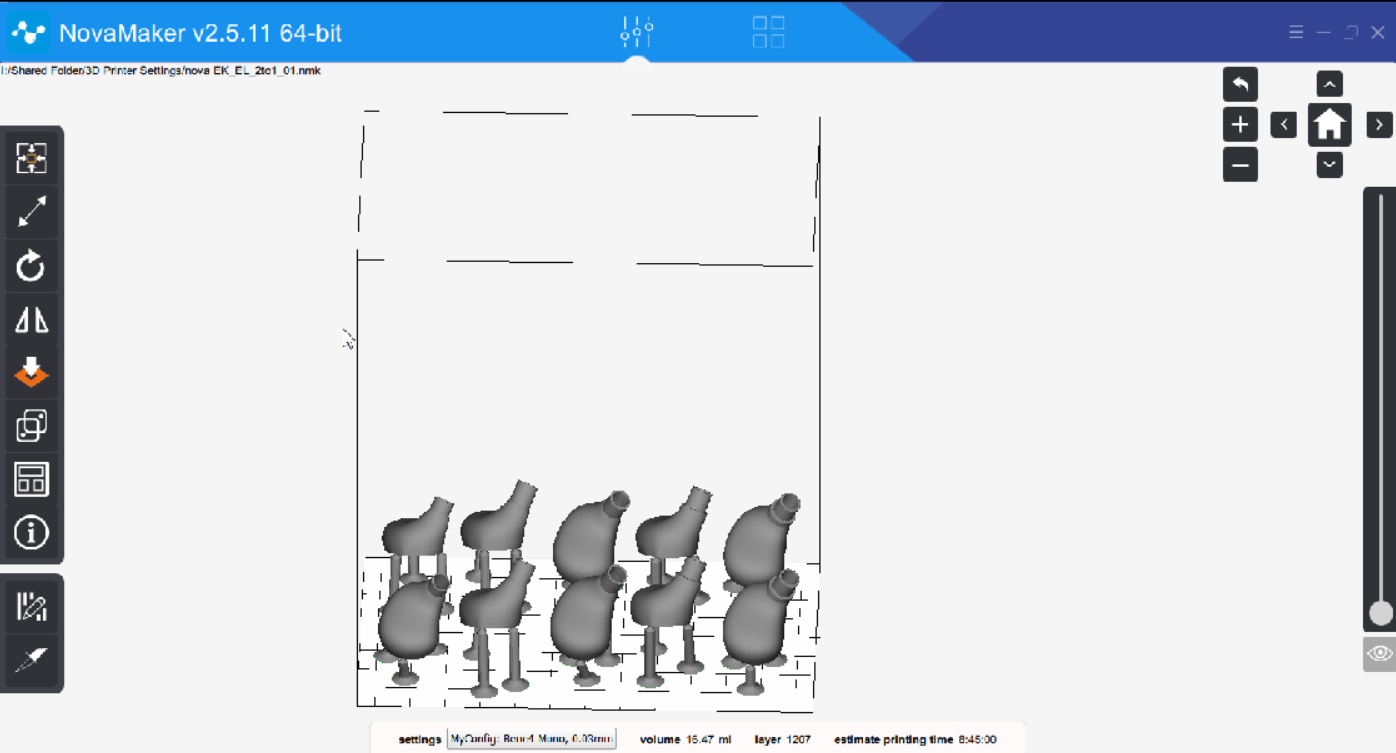
I used the clear high transparency UV Resin. They just told me to use 0.03mm for layer height and exposure time of 8 seconds, other than that they haven't mentioned. I changed the shell to 45 degree hanging on the build-plate and did not make a hole this trial, lift height to 8 and lift speed to 80 but the layer height remain 0.03mm. Woo, it needs 8hrs 45mins to complete the printing. I start it before I go to office and leave it there and to see what's the results when I back home.

Nova clear high transparency UV resin.png
 
Sep 21, 2021 at 2:35 AM Post #13,373 of 15,966
Thanks all you guy helping. Thanks a million, you all are great and expert !!!

I used the clear high transparency UV Resin. They just told me to use 0.03mm for layer height and exposure time of 8 seconds, other than that they haven't mentioned. I changed the shell to 45 degree hanging on the build-plate and did not make a hole this trial, lift height to 8 and lift speed to 80 but the layer height remain 0.03mm. Woo, it needs 8hrs 45mins to complete the printing. I start it before I go to office and leave it there and to see what's the results when I back home.

Nova clear high transparency UV resin.png
8h seems excessive, you have to review the settings in my opinion because I have to put a little more than 3H with any resin.
 
Sep 21, 2021 at 2:44 AM Post #13,374 of 15,966
Thanks all you guy helping. Thanks a million, you all are great and expert !!!

I used the clear high transparency UV Resin. They just told me to use 0.03mm for layer height and exposure time of 8 seconds, other than that they haven't mentioned. I changed the shell to 45 degree hanging on the build-plate and did not make a hole this trial, lift height to 8 and lift speed to 80 but the layer height remain 0.03mm. Woo, it needs 8hrs 45mins to complete the printing. I start it before I go to office and leave it there and to see what's the results when I back home.

Nova clear high transparency UV resin.png
you have to check your settings bro. I think 8 hrs is a bit much. 5 hrs max for me. That would depend on how I orient my shells and how high they are.
 
Sep 21, 2021 at 3:40 AM Post #13,375 of 15,966
I set the supports 10mm hanging the shell on the build-plate. Is that too high ?

I used the software that come with the 3D printer, Nova 3D maker. I did compare it with Chitubox v1.9. Chitubox is faster by 50%. but one thing is Chitubox has a lot of option it needs to config. Do I need to config it or just use the default setting is ok ?
 
Sep 21, 2021 at 4:29 AM Post #13,376 of 15,966
I set the supports 10mm hanging the shell on the build-plate. Is that too high ?

I used the software that come with the 3D printer, Nova 3D maker. I did compare it with Chitubox v1.9. Chitubox is faster by 50%. but one thing is Chitubox has a lot of option it needs to config. Do I need to config it or just use the default setting is ok ?
You mean you lift your shell 10mm from base? that's way too high in my opinion. I lift mine at 3mm. I think most of those parameters are well built to be configured and it helps with the print.

Can you show us how you layout your shells in your software?
 
Sep 21, 2021 at 11:08 AM Post #13,378 of 15,966
Hello everyone.
I learned a lot from this forum and made an IEM.
I am grateful to everyone who shared a lot of knowledge.

I'm not good at English, so I use google translate. I'm sorry if there is strange English.

I did a lot of experiments, tests, measurements and auditions to make an IEM.
The model version of the IEM is 12, and I'm finally proud of the IEM I like.

I made it as follows.

1) Create impressions.
2) 3D scan with iphone (Trnio).
3) Mold the 3D model with meshmixer.
4) Create a part to attach the face plate with FUSION 360 and convert it to STL.
5) Synthesize the impressions model and the face plate model with meshmixer.
6) Design the sound path part with FUSION 360 and subtract it from the external model.
7) Design the face plate with FUSION 360.
8) Print the model with a 3D printer (ELEGOO MARS 2 Pro).
9) Lacquer the printed material.
10) Adjust the network and damper while incorporating the unit and performing measurement (REW).
11) Make a face plate, cover the IEM and it's done!

model: IEM-012 is 10BA. All units are from langzhisheng (AliExpress).

EJ-30029 x 1 (≒ CI-22955 x 2) + Red Dumper (2200 ohm)
4.7uF + FWEK-31785 x 1 (≒ DWFK-31785 x 2) + Brown dumper (1000ohm) x 2
0.68uF + FWEK-31718 x 1 (≒ SWFK-31736 x 2)

I am using Rubycon PMLCAP for the capacitor. SMD type small film capacitor.
The sound is very clear. I have the illusion that my ears have improved. The treble (6kHz and above) is weak in the frequency response measurement, but it doesn't hurt because of that. I like the KZ ZAX and ZAS sounds, but the IEM-012 sounds better than them.
Since the impedance is low (10 ohm), a high-performance amplifier is required. A small amount of electrical noise becomes a sound. Also, the output impedance of the amplifier must be low enough. I am using the voltage follower circuit of THS4631.

The face plate can be replaced. I made different designs of faceplates using various techniques. I can exchange it depending on the mood of the day.

I have done a lot of experiments so I have gained experience and knowledge. I would like to share that experience with you.

s_IMG_8279.jpg
Sunburst!
s_IMG_8470.jpg
The Metal
s_IMG_8581.jpg
Aurora
s_IMG_8583.jpg
Racing
s_IEM-012.jpg
IEM-012 Frequency characteristic
s_IEM-012_imp.jpg
IEM-012 Impedance characteristics
s_iem_012BA v9.jpg
IEM-012 Sound path design
s_IMG_8573.jpg
Inside IEM-012. I use a kneaded eraser.
s_IMG_8587.jpg
Various IEMs(1DD+2BA,1DD+7BA,8BA,6BA etc...)
s_IMG_8585.jpg
Replaceable face plate
s_IMG_8588.jpg
Jigs and microphones for testing.
Send me impedance data and Frequency data and i will gib u a magic circuit

Project looks dope anyways
 
Sep 21, 2021 at 11:09 AM Post #13,379 of 15,966
Is using a Sonion 38DJ007Mi/9a for a woofer, Knowles ED-29689 for the mids, and a SWFK-31736 for the tweeter a good idea?
Any advice/feedback will be greatly appreciated.
12mm tube
Add 10ohms to ED
And put a white damper in center

And tune other driver according to that ED(around that ED)
 

Users who are viewing this thread

Back
Top