


just ordered this https://www.hificollective.co.uk/components/jb-jfx-series-polypropylene-capacitors.html, I will send updates soon about my CAP mod for ZXR
You are using an out of date browser. It may not display this or other websites correctly.
You should upgrade or use an alternative browser.
You should upgrade or use an alternative browser.
Germanium's Sound blaster ZXR mod thread
- Thread starter germanium
- Start date
Also good to note with caps like I used (ERSE PluseX), be careful with the leads because they can/will break off and you'll either have to solder the lead to the cap (like I did) or buy another one.
I wanted to share my new review of the Burson Audio V5-OPA and V5i Series op-amps since this thread played a role in me being selected by Burson Audio.
Wanted to give some credit to Germanium for opening the door for what is about to come. Soon you'll see a "ZoSo's SMD Op-Amp ZXR Tear Out" thread!
For now here the review (still about 1/4 of it missing until I get replacement parts from Burson Audio):
https://zosoncsu.com/reviews/
http://www.head-fi.org/products/burson-audio-supreme-sound-opamp-v5/reviews/17827
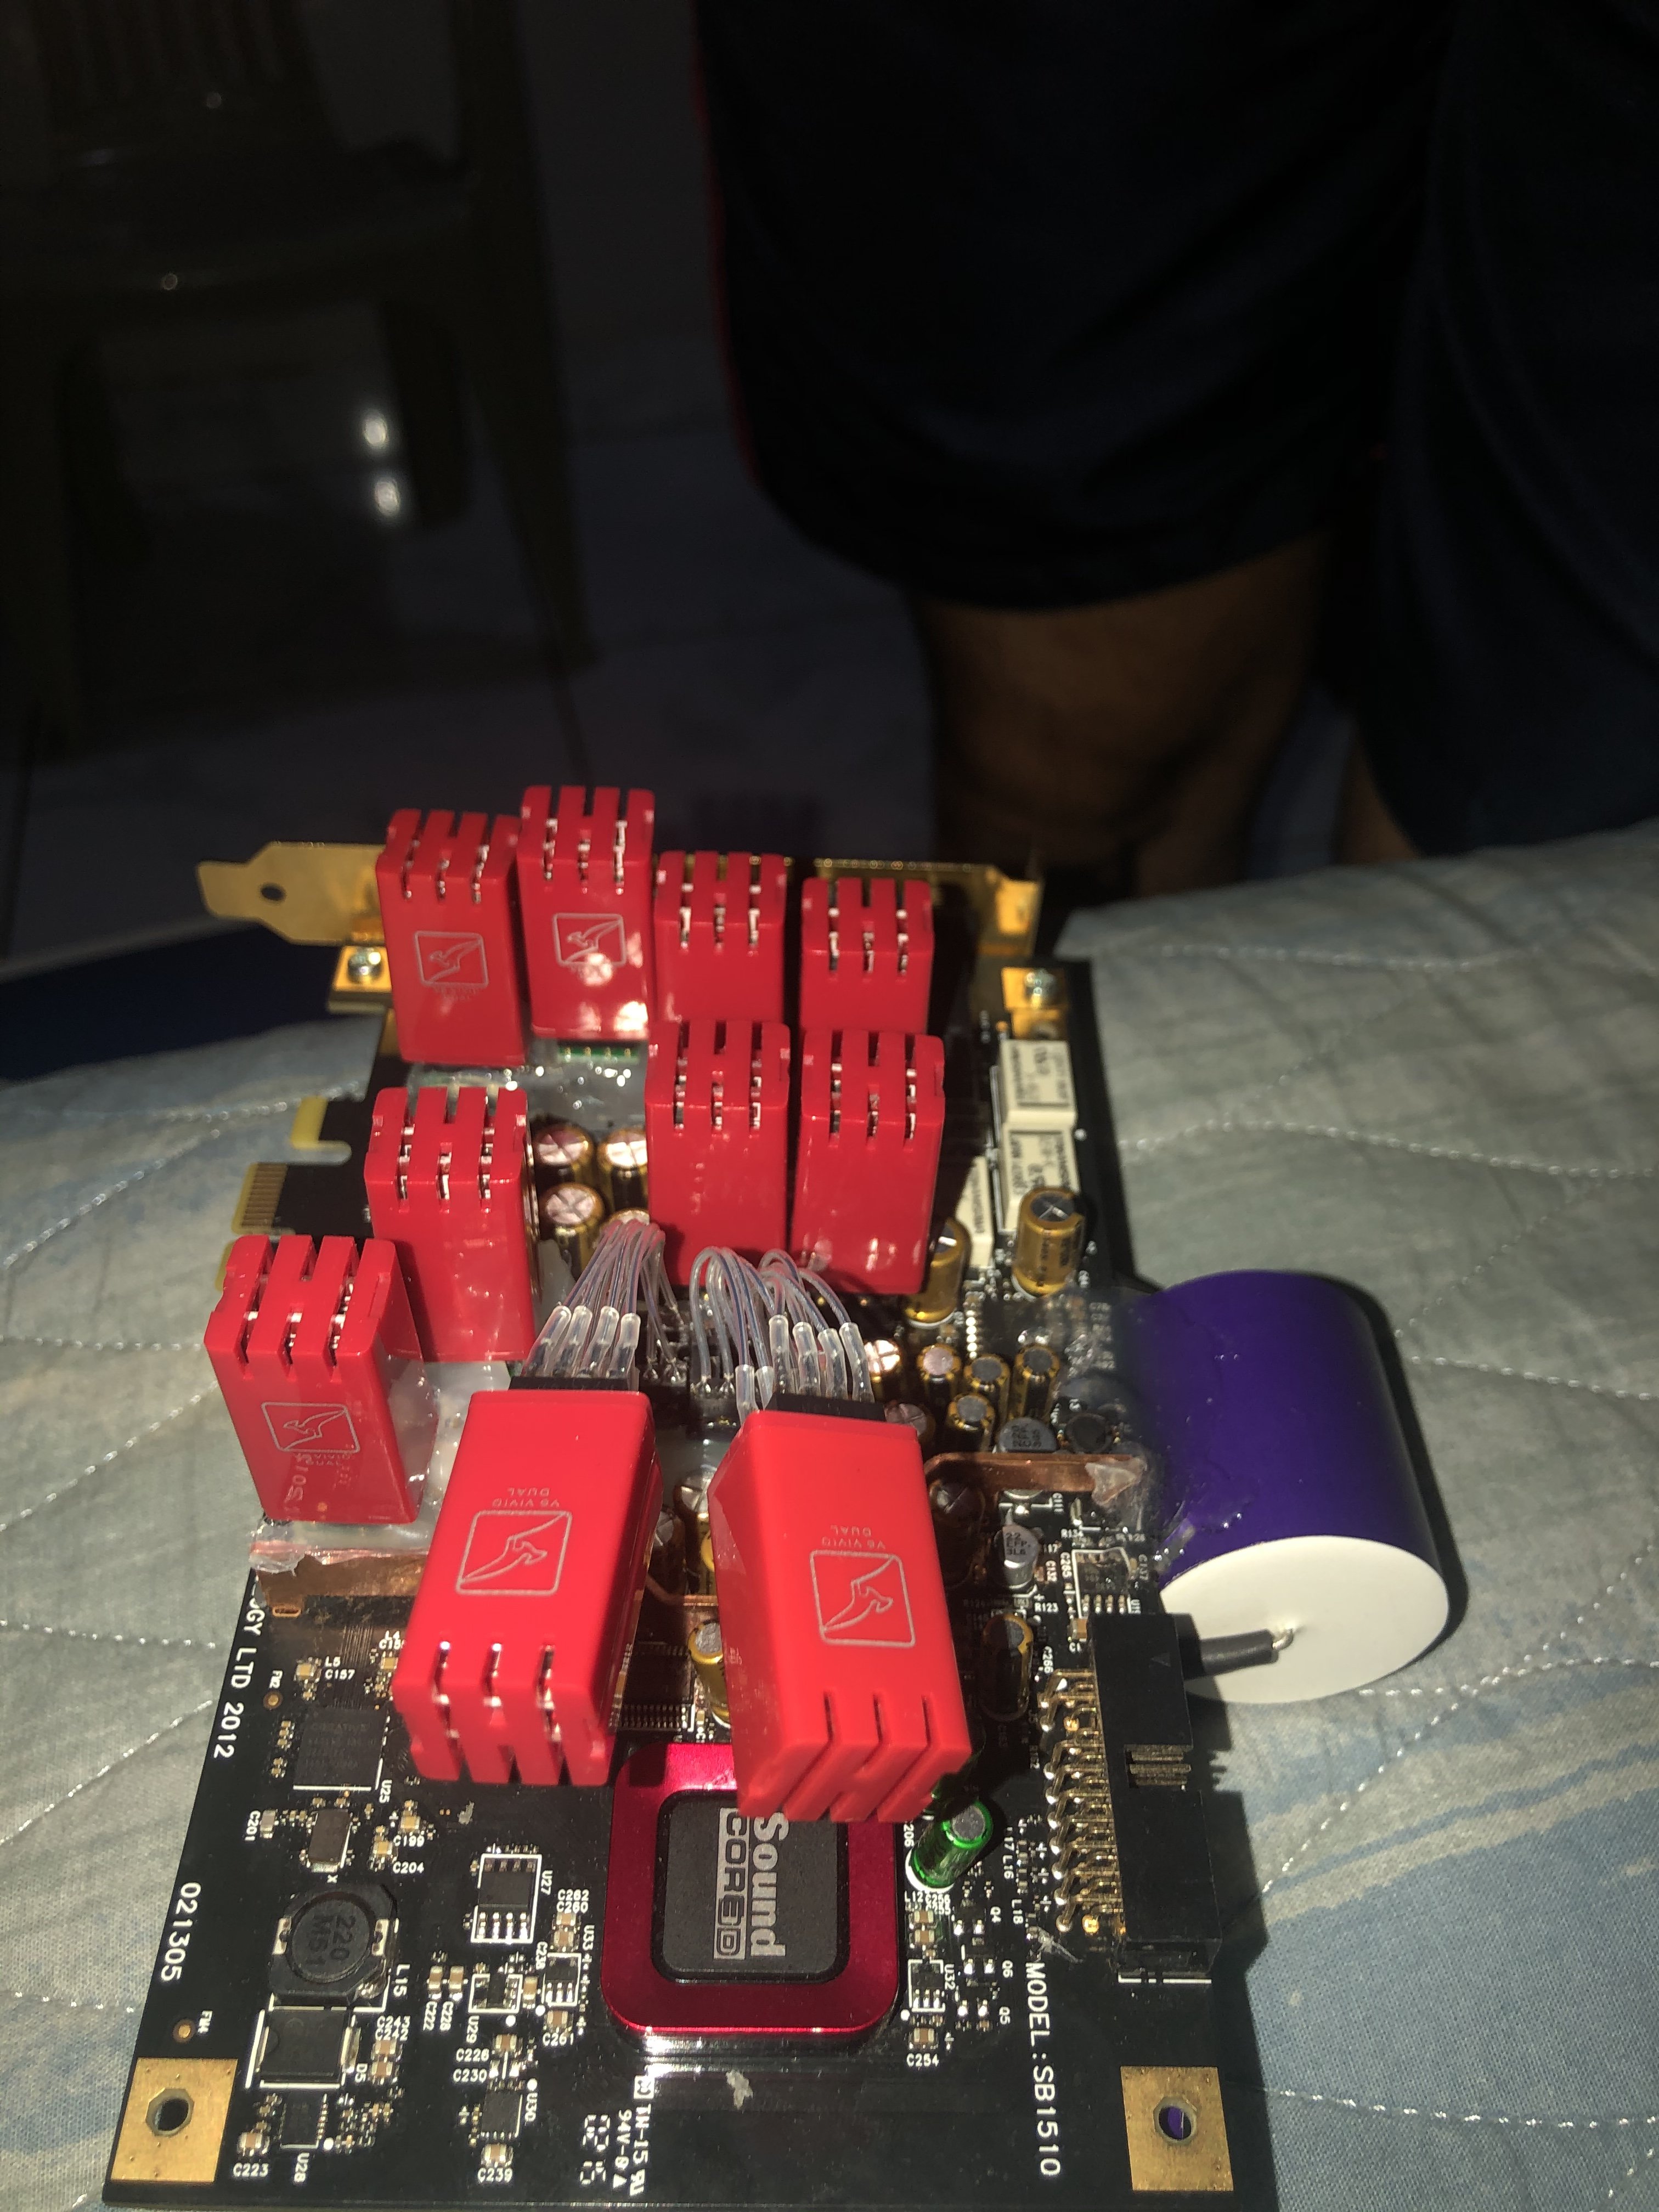
The op-amps you see that are surface mount (circled in red and green), I will be changing those with BB OPA604AU's all around.
(Every image/video you see used in my reviews/posts/website/forums are all taken by me and edited by me.)
This is the video I am trying to expand on to create a video review. I would welcome any ideas on ways to use the written review + this type of analysis to make a full-length video review of an op-amp series.
hi Mate is there any good Audio Analysing tool you know that I can use for ZXR??
Ok so here is my guide on how to do this with pictures:
1) Things Needed (for my way)
Soldering Iron and Solder
Extra Resistors/Capacitors/LED (for cutting leads to size for shorts)
7 Metal Film Capacitors (Here are the ones I used, 12uF 250V, I would have gotten lower voltage but it wasn't available)
Solid Copper Core Wire
Shrink Wrap
Hot Glue Gun and Glue
2) First Step
The first step is to cut a lead off one of your spare resistors or whatever you have (you can buy a 5 pack at Radio Shack for like $3) to the size of the distance between the capacitor you are shorting and then you basically do this 11 more times (12 total). I used NoOneLt's diagram:
You can see here how my shorts match the diagram exactly (if you don't know what a short is then you shouldn't be doing this mod).
Basically you just put one of those lead pieces you cut in the position to solder and get one side soldered and then solder the other, although it can be tricky with pieces of metal that small. If you put too much heat the solder will melt on both ends.
3) Now comes the tricky part that can be modified based on your PC and the capacitors you bought. This is the arrangement I went with. You can see the use of shrink wrap and hot glue. I had to use the solid core copper wire to bridge the distance between back of the capacitor and solder point. I'm sure I will make this more detailed as questions come in.
Each capacitor is hot glued on the connection end where they are joined (on the doubles) and also underneath to secure them to the board
You can see in the next picture the type of spacing I have using the Thermaltake Water2.0 Pro and if you have some of the big air coolers, you should have close to the same since my tubes coming out are at the same spot a heat sink would be normally.
(please excuse dust in next picture)
Any questions, feel free to ask.
Hi did you use Flux to do the soldering??
.
The caps in the red box need to be shorted underneath the board. This is for the analog stereo output section of the card
The caps in the green box need to be bypassed underneath with two 12uf metalized film caps each.
The caps in the purple need to be bypassed with one 12uf metalized film cap each.
The caps in the blue box are for the surround sound analog output section. These only need to be shorted if you are using 5.1 speakers with analog input.
This mod requires a total of 7-12uf capacitors
That is the extent of my mods to this card at this point.
The sound coming from this card is to die for it is so much better than when fresh out of the box.
Everything has much higher resolution. Bass though just as present is more detailed & takes it's proper place behind the midrange & still adding tremendous foundation to the music. Treble is massively more detailed yet easier on the ears as well. This is not to say the treble lacks dynamics as even the dynamics are improved as well. Instrument such as bell & triangles have a piercing but sweet quality. By piercing I mean that it projects it's sound above other instruments, not that it sounds harsh as it doesn't.
Saving the best for last, The midrange is what tube lovers love about tubes. Well you tube lovers can put away your tube amps now as this card has that type of midrange in spades with out all the fuss rebiasing your tubes every time you listen to your music, not that all tube amp need constant rebiasing but many higher end tube amps do. Just joking about putting away your tube amp really though. It's just this card takes on the midrange in such an excellent fashion yet retains all the best attributes of transistor amps. I.E. tight extended bass & extended treble but improving on the treble by giving it the sweetness & detail of the finest tube amps & yes I have heard some of the finest in the world tubes amps as one of the was built by a friend of mine that now deseased but in his heyday was lead audio engineer for A&M records as well as Disney studios. These were true studio grade amps. Before he died he sold the design which some parts were cheapened & turned into a consumer grade amp & they are charging 40,000 dollars for. Only 5 of the original amp were built before he became too sick to continue. He was only charging $7,000 for a 50 watt version & $3500 for the 25watt version amp that had even better parts & had an output transformer that was truly a design that was never seen outside of the studio. Instead of having the standard 4, 8, & 16 ohm taps found on most output transformers the winding of the transformer were sent out to a jones socket where the windings were reconfigured for each impedance tap inside the jones plug. This allowed him to double up the windings so they ran in parallel for the 4 ohm tap or run them in series for the 16ohm tap. Note he was not making a killing on these amps as the parts cost for the 25 watt version came to $2500.
These picture I'm posting now are posted with permission of NCSUZoSo.

He did a nice job on his mod. Better looking than mine.
Source for affordable caps:
ERSE PEx 12uF 250V: http://www.erseaudio.com/Products/PEx250v/12uF-250-volt-Metallized-Polyester-Mylar-Film-Capacitor ($2.97/unit = $20.79 (For 5.1))
ERSE PulseX 12uF 250V: http://www.erseaudio.com/Products/PulseX250v/MPX25-03-12-00 ($4.57/unit = $31.99 (For 5.1))
The other good thing about ERSE Audio is the shipping rates in the US are very low, my cost was two dollars and some change to have67 capacitors sent to my house for the 5.1 mod.
EDIT: It should be 7 caps, not 6. This was an error that Germanium caught after I had done my mod. All other posts were corrected to reflect this, but I forgot about this one. Sorry to anyone who purchased 6 and is one short. I actually have 3 spare PulseX Caps if someone did buy 6 instead of 7 please contact me through a PM.
Hi mate if I use spdif cable for 5.1 speakers then is this mod still valid?
NCSUZoSo
500+ Head-Fier
Probably not, this is mainly due to the I/V chain from the 1st and 2nd stage buffer and how that signal is routed. We would need to know when the SPIDF is pulled from the main signal. Is it before or after the op-amps. I would guess the main DSP chip takes care of this and the SPIDF never goes through the same hardware. This is just a "highly" educated guess.
See this picture from my first ever published review (lol)? The capacitors are exactly what we are bypassing. The SPIDF signal shouldn't need all this. Usually a SPIF connection only needs a few resistors and usually a large WIMA style capacitor.
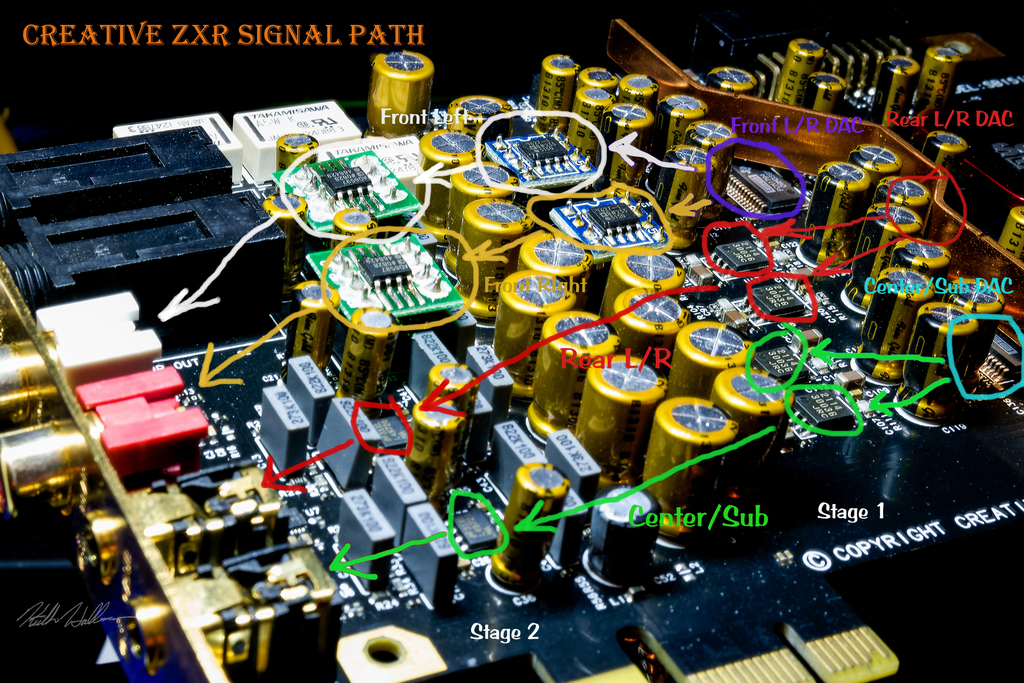
Full Size: https://zosoncsu.files.wordpress.com/2017/01/zxr-signal-path-diagram.jpg?w=2720
https://hallmanlabs.com/reviews/bursonv5review/
See this picture from my first ever published review (lol)? The capacitors are exactly what we are bypassing. The SPIDF signal shouldn't need all this. Usually a SPIF connection only needs a few resistors and usually a large WIMA style capacitor.
Full Size: https://zosoncsu.files.wordpress.com/2017/01/zxr-signal-path-diagram.jpg?w=2720
https://hallmanlabs.com/reviews/bursonv5review/
Last edited:

.jpg")
My WD Case was really useful for this CAP MOD ,, now it fits perfectly and looks cool inside my damn case!

Thanks again for this mod the sound is now crystal clear and real.

NCSUZoSo
500+ Head-Fier
Hot glue really is one of the best ways to hold capacitors for long periods. They will never get hot enough to turn the glue soft so it is basically permanent unless you remove it yourself with a knife.
Good job and I am glad it worked out well for you! I am working on making a how to video on replacing the SMD op-amps both the 1st and 2nd stages for the Center/Sub and Rear L/Rear R op-amp locations.
You can check my site for news on this, but it is on the backburner for now until I finish this massive discrete op-amp reviews using an ES9038Pro DAC w/ Modded Amanero for up to DSD512 native decoding, although it doesn't exist yet! Link is in my signature.
Let us know if you have any questions!
germanium
Headphoneus Supremus
Been a while since I posted back here. I have since replaced this card with the Asus Strix Raid DLX using the same mods only I went & removed the electrolyitics as well & just used my metalized films that I had on the ZXR. Tried it both ways & like it without the electrolytics better. It even tests slightly better. It sound better than my friends Mytek Brooklyn DAC which is a 2,000 dollar DAC rated class A by Stereophile magazine. Better rendition of background reverb & better sense of depth in recording without resorting to tricks such as crosstalk cancellation or gundry dips in the 2-4KHz range. Still have not replaced any OPAMPS.
Glad to see your keeping this alive
. Thank you.
Glad to see your keeping this alive
. Thank you.
I received Bursons Cable + Pro from Bursons, but it doesn't seems to be working with my Sound Card and with Z906.
When I connect it I get Harsh noise from my Speakers mostly from the Left Speaker.
Anyone knows whats wrong with my setup??
and I get the following Voltage reading from RCA line out while its connected to ZXR.
![20180317_143924[6054].jpg](https://cdn.head-fi.org/a/10085164_thumb.jpg "20180317_143924[6054].jpg")
When I connect it I get Harsh noise from my Speakers mostly from the Left Speaker.
Anyone knows whats wrong with my setup??
and I get the following Voltage reading from RCA line out while its connected to ZXR.
![20180317_143924[6054].jpg](https://cdn.head-fi.org/a/10085164.jpg "20180317_143924[6054].jpg")
germanium
Headphoneus Supremus
I received Bursons Cable + Pro from Bursons, but it doesn't seems to be working with my Sound Card and with Z906.
When I connect it I get Harsh noise from my Speakers mostly from the Left Speaker.
Anyone knows whats wrong with my setup??
and I get the following Voltage reading from RCA line out while its connected to ZXR.

Is that D.C. voltage? If it is then one of the capacitors may be shorted between the I/V converters & the buffer amp. If you did my mod then you have one cap with a bad short. In my mod if one cap is not shorted you will get the same results. They must be all shorted or all not shorted or you will run into this problem. Since the I/V converters out put + voltage to both the plus & - inputs of the buffer amp the 2 voltages cancel in the buffer amp but if one is not correctly shorted then no D.C. voltage cancelation occurs. Fix this problem quickly or you will damage other equipment.
Last edited:
Is that D.C. voltage? If it is then one of the capacitors may be shorted between the I/V converters & the buffer amp. If you did my mod then you have one cap with a bad short. In my mod if one cap is not shorted you will get the same results. They must be all shorted or all not shorted or you will run into this problem. Since the I/V converters out put both + &- voltage the 2 voltages cancel in the buffer amp but if one is not correctly shorted then no D.C. voltage cancelation occurs. Fix this problem quickly or you will damage other equipment.
I just desoldered again All the Caps and now my ZXR is working in default mode(no more mods), but still the same result with Bursons Cable+ pro RCA to RCA cable but it works fine with the standard RCA to RCA cable.
I assume its a compatible issue with Z906 internal AMP, but with my SB X7 it just works fine, hell knows whats wrong with ZXR with Z906.
Last edited:
germanium
Headphoneus Supremus
Problem is with the Z906 then not the ZXR.I just desoldered again All the Caps and now my ZXR is working in default mode(no more mods), but still the same result with Bursons Cable+ pro RCA to RCA cable but it works fine with the standard RCA to RCA cable.
I assume its a compatible issue with Z906 internal AMP, but with my SB X7 it just works fine, hell knows whats wrong with ZXR with Z906.
I just desoldered again All the Caps and now my ZXR is working in default mode(no more mods), but still the same result with Bursons Cable+ pro RCA to RCA cable but it works fine with the standard RCA to RCA cable.
I assume its a compatible issue with Z906 internal AMP, but with my SB X7 it just works fine, hell knows whats wrong with ZXR with Z906.
Weird.
Problem is with the Z906 then not the ZXR.
Weird.
I think the issue is only with Z906 not really with ZXR, I hear some unusual noise from z906 even there is no input to to cable+ pro. so its definitely internal amp causing the issue. I wish I had other speakers to test cable+ pro right now.

Whats the best way to test Cable + pro RCA to RCA do you know?
Last edited:
germanium
Headphoneus Supremus
I think the issue is only with Z906 not really with ZXR, I hear some unusual noise from z906 even there is no input to to cable+ pro. so its definitely internal amp causing the issue. I wish I had other speakers to test cable+ pro right now.
Whats the best way to test Cable + pro RCA to RCA do you know?
Unless it is an active cable which means it has an amplifier built in & a power connection it can't be the cable doing this. this is a very highly unlikely situation. What is highly likely is you have a failed coupling capacitor in the Z906. Failed as in shorted internally allowing D.C. to escape from it's input jack.
Just looked at the Burson's cable + It is an active cable that takes D.C. from a USB connection in the cable itself.So the cable could in fact be at fault.
If you have a multimeter you can plug the cable into it's USB cable & measure the D.C. coming out of the cable without the cable being connected to anything else. It there is more than a few millivolts coming out of the cable the cable is junk. Throw it away. I take that back send it back to burson's & try to get your money back. You shouldn't need an active cable to drive relatively short runs of cable. Active cables are really only useful for really long runs of cable & even then is questionable with most computer based systems as computers already have a faily low output impedance which can drive long cables with ease.
Last edited:
I tested the RCA outputs of Cable + pro again without being connected to anything, and this is what I get reading on my MM:
Right RCA OUTPUT Voltage:

Left RCA OUTPUT Voltage:

guess you are right this cable came faulty. Even if I don't connect it to anything it's still gives me harsh noise on my speakers, and then when I connect it to SB X7 I hear constant white noise on the Left speaker, It's from the very first day I plugged in this cable to my SB X7 to Z906.
I didnt buy it was a review sample from SS AUDIO.
I mailed Charles still waiting for his response.
Last edited:
Users who are viewing this thread
Total: 2 (members: 0, guests: 2)
