Equalizer APO Questions & Discussion
Jan 27, 2021 at 2:37 AM Thread Starter Post #1 of 36

ADUHF

Headphoneus Supremus
Joined
Mar 8, 2016
Posts
7,750
Likes
2,045
Location
USA
Last edited:
Jan 27, 2021 at 3:02 AM Post #2 of 36
I've decided not to use the Peace add-on for now. And just use the Equalizer APO Configuration Editor, which appears to be quite powerful. Though perhaps a bit difficult to use in some ways.

Right now, I'm having some difficulty figuring out how to scale down the decibel range on the Graphic EQ window to something a bit more workable than +/-100 dBs. Like this example image shows...

https://a.fsdn.com/con/app/proj/equalizerapo/screenshots/Screenshot3_2.png/max/max/1
 
Last edited:
Feb 1, 2021 at 8:07 PM Post #3 of 36
Still haven't figured out a way to stretch the Graphic EQ graphs in a single direction, to make it easier to see the adjustments in the vertical axis. But I did figure out how to zoom in closer, which helps alot! That's apparently how the above screen shot was made.

And I've figured out a number of other features just by playing around with the Graphic EQ interface, which I'll try to outline below.

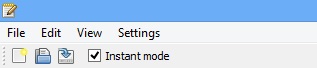
AN IMPORTANT WORD OF CAUTION RE "INSTANT MODE" BEFORE BEGINNING

If you have the Instant Mode enabled on the toolbar at the top left of the Configuration Editor, then any changes you make or points you add to the Graphic EQ will be instantly saved to the Equalizer APO's config file, and effect the sound output of your PC. So BE EXTREMELY CAREFUL when making any changes, especially large or inadvertent ones, to your correction curves, with this mode enabled!!

INSTANTMODE.jpg


This is the easiest way to use the program for making on-the-fly frequency response adjustments. But it can sometimes result in unintended surprises that could potentially have damaging consequences to your hearing, or headphones. Especially if you're listening at louder volumes.

So I would strongly advise leaving the Instant Mode turned OFF until you become better acquainted with the interface and how all its features work. And even then, mistakes can still happen, due to an inadvertent slip of the hand, or hitting a return key too quickly. So ALWAYS be on your guard when using this mode, especially when making volume/decibel-related adjustments on the graph, or via the numeric inputs!

YOU HAVE BEEN WARNED! :)

Zoom In or Out
This is done with the mouse wheel, normally used for scrolling pages. Haven't found any keyboard equivalents to this yet.

Resizing the Graph & Points List Windows
This is done by left- or right-clicking on the lower right corner of the graph window, where the two scroll bars meet. And then dragging that corner up or down, left or right. By moving that corner around, you will simultaneously change the shapes of both the graph, and the list of points on the right side of the graph.

RESIZE.jpg


Moving or Scrolling the Graph
There are several ways of doing this after you zoom in. You can use the aforementioned scroll bars on the bottom and right hand side of the graph window. Or click the arrows at either end of the scroll bars. Or you can simply right-click on the graph itself, somewhere away from the curve you're creating, and then drag the mouse.

Selecting Points
There a couple different ways to do this. You can simply left-click on the points. This will allow you to select only one point at a time. If you hold down the CTRL key while clicking on the points, then you can select more than one. The easiest way to select one or more points though in a particular area of your curve is with a drag-box. Left-click somewhere near the first point and then drag the mouse to create a box around the points you want to select...

DRAGOBOX.jpg


The drag-box is my preferred method of selection, because there is no chance of the points being inadvertently moved. If you click directly on a point, there is always a chance it'll be moved slightly out of its original position at the same time

Adding Points
Double-click with the left or right mouse button anywhere on the graph to add a new point at that location.

Removing Points
Select one or more points, and then hit the DELETE key on your keyboard.

NOTE: Adding and removing points will only work when you're in the "Variable" Graphic EQ mode. And not in the regular 15- or 31-Band modes, because the quantity of points have to remain fixed in those (though you can still adjust their frequencies, if you want).

VARIABLE.jpg


An easy way to quickly add some points on the graph is to start with the 15-Band mode. And then switch over from that to the Variable mode, where you can add, delete, and move the points more freely.

You can switch between any of the three different Graphic EQ modes at any time btw. And the software will automatically recalculate the appropriate positions of the new points for you.

However, if you switch to either the 15- or 31-Band modes from the Variable mode, then you will not be able to go back to the same variable configuration of bands that you had before... unless you save the Variable mode graph or points list to a different filename first.

Moving Points
There are several different ways to do this.

You can use the arrow keys on the keyboard. Unfortunately, this only appears to work in integers. So the movements in the vertical axis are in 1 dB steps. And movements in the horizontal axis are in 1 Hz steps (which can take more time at the higher frequencies).

If you have multiple points selected, they will all move as a group, which can be quite handy. This is great for making coarse adjustments on different areas of your curve, to quickly try a little more or less bass or treble, for example.

The movement is continuous if you hold the arrow keys down. However, it is better and safer to work in steps when making any volume changes in dBs in the vertical axis with the Instant Mode enabled, to avoid getting hit with excessive volumes at a particular frequency.

You can also left-click and drag any point. If you're using either the 15 or 31-Band EQ modes, the point will remain locked at its frequency in the horizontal axis, and will only move up or down on that frequency. (It can still be moved horizontally with the arrow keys though.) In Variable EQ mode, the point can move in any direction.

The last method of moving points is with the numeric inputs in the Points List on the right hand side of the graph window. Make sure though that your decibel levels are reasonable before you hit return to accept them. Frequencies are on the left and dBs are on the right...

POINTSLIST.jpg


There are also a couple different tools you can use to quickly make some changes to all the points on the graph at once, which are located at the bottom of the Points List...

TOOLS.jpg


The first two icons on the left will import or export your list of points to a CSV file (whatever that is). And the other three icons will perform the following actions...

1) Invert your curve in the vertical axis. (I don't recommend using this feature in Instant Mode.)

2) Transpose (aka normalize) your curve so the points are all below 0 dB. This can potentially eliminate the need for a Preamp adjustment, to prevent audio from being clipped at certain frequencies. If you're using other filters than just the Graphic EQ though, then a negative Gain in the Preamp may still be advisable to prevent clipping.

3) Flatten all points on the curve to 0 dBs. (Note: if you have any points already selected on the graph, then only those points will be flattened/moved to 0 dBs with this tool.)

Text Mode
Every filter in the Configuration Editor, including the Graphic EQ, also has a "text mode" which can be edited directly, if you know the correct syntax and what have you to do that.

TEXTMODE.jpg


So you can quickly flip between the graphical and textual modes at will, and make adjustments to either one, if you like. The text mode shows the line of information that is added to the Equalizer APO's config file for that particular filter.

Syntax info for the Graphic EQ filter can be found here...

https://sourceforge.net/p/equalizerapo/wiki/Configuration reference/#graphiceq-since-version-10

Hit the RETURN key after making any changes in the text field to go back to graphical mode.
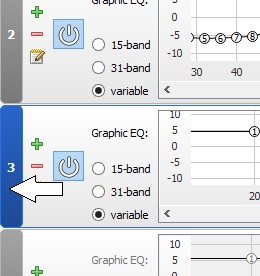
Power On/Off Button
The Power button turns the Graphic EQ filter on or off, so you can easily compare the difference in sound quality with, or without your new correction curve applied. Black is Off, and white is On.

POWERBUTTON.jpg


The graph also becomes ghosted in light gray when the Power is turned Off.

Some stuff I still haven't figured out...

As already stated, I wish there was a way to stretch the graph in just one axis, so I could see the changes in volume in the vertical axis a bit more easily. Simply zooming in the graph definitely helps though.

I also wish there was a way to move points vertically in somewhat smaller steps than 1 dB with the arrow keys. Like maybe 0.5 or 0.25 dBs, for example.

And I also wish there was a way to lock the horizontal movement of points in the Variable EQ mode, when simply dragging them with the mouse. I've tried various key combinations to do this, but so far none have worked.
 
Last edited:
Feb 2, 2021 at 2:14 AM Post #4 of 36
A Graphic EQ does not have to be that complicated btw. It can be as simple or as complex as you like. If you want to see what a pair of headphones would sound like with a brighter or darker overall tilt, for example, you could create a Graphic EQ with just two points of control at 20 and 20000 Hz. And adjust the tilt of the headphone by simply raising or lowering one of those points.

TWOPOINTGRAPHICEQ.jpg


Graphic EQs can also be combined, just like other filters, to correct different problems in a headphone's FR. There is no reason it has to all be done on one single graph. Though it may be easier to transport to other applications that way.

Making coarse adjustments is also generally easier with fewer points of control. Especially if they are well-placed to address a headphone's particular needs/deficiencies.
 
Last edited:
Feb 15, 2021 at 5:51 PM Post #5 of 36
Post from a related topic with some more tips on the Configuration Editor's Preamp Setting and Analysis Panel. Both of which are very useful tools...

I've decided to try an EQ program and downloaded the one mentioned here in your signature, and I'm quite happy with it so far. Among the rest, one of the things I'm yet too ignorant about, is the (audible) distortion the EQ sometimes causes. I'd really like to know what causes that, and how and when I could prevent it from happening. I guess it depends on the capabilities of the headphone itself. I'm doubfull however as to whether it also depends on the manipulated frequency - i.e., is it more likely occur on a certain area of the spectrum (in all/most headphones), or does it all go down to the headphone potential. I've purchased a pair of HD800 from someone here, and I'm planning to try boosting their bass response (which I remember is tight but also too light), as well as the known 5.5khz peak.

This is still somethin I'm trying to better understand myself. First thing you should probably do is make sure that your overall gain/preamp levels are set low enough so that no clipping occurs at any frequency. If you are using Equalizer APO's built-in Configuration Editor, you can see the combined output levels of all your filters in the Analysis Panel...


The Peak Gain shown above in red should be close to 0 dB. But not exceed 0 dB. Otherwise clipping and distortion can potentially occur in the louder musical passages. The overall gain can be controlled by a Preamp Filter (which is also part of the default config that comes up, when you first load the program).


In the above example, the Preamp needs to be lowered at least -6.1 dB to prevent clipping.


After making that adjustment, the Analysis panel should no longer be showing a Peak Gain above 0 dB. So no more red stuff...


If you're using only one Graphic EQ filter in your Equalizer APO config, then the peak gain level (and preamp adjustment needed to compensate for it) should be determined by the highest frequency setting on your Graphic EQ curve. And one other way to deal with that is to simply adjust all the points in your curve so they're all below 0 dB on the graph.

You can do that by simply selecting all the points on the graph, and moving them lower with the arrow keys on your keyboard. Or by using the "Normalize" shortcut in the tools underneath the Points List on the right side of the Graphic EQ window...

The last method of moving points is with the numeric inputs in the Points List on the right hand side of the graph window. Make sure though that your decibel levels are reasonable before you hit return to accept them. Frequencies are on the left and dBs are on the right...


There are also a couple different tools you can use to quickly make some changes to all the points on the graph at once, which are located at the bottom of the Points List...


The first two icons on the left will import or export your list of points to a CSV file (whatever that is). And the other three icons will perform the following actions...

1) Invert your curve in the vertical axis. (I don't recommend using this feature in Instant Mode.)

2) Transpose (aka normalize) your curve so the points are all below 0 dB. This can potentially eliminate the need for a Preamp adjustment, to prevent audio from being clipped at certain frequencies. If you're using other filters than just the Graphic EQ though, then a negative Gain in the Preamp may still be advisable to prevent clipping.

3) Flatten all points on the curve to 0 dBs.

As indicated in my excerpt above though, the gain adjustments will add together when using multiple filters. So if you're using more than one, then the Peak Gain of all of them together could be either higher, or lower than the highest level on your Graphic EQ graph... Hence the need for a preview, such as the Analysis Panel, which shows the combined filter output levels on one graph.

These features in Equalizer APO do not require either the Room EQ Wizard or the Peace interface add-ons btw. Neither of which are installed on my PC.

I'll probably have some more thoughts on the Analysis Panel another time. Because it can be quite a useful tool. The Analysis Panel is generally only active, btw, when the Configuration Editor is in Instant Mode.

INSTANTMODEON.jpg


If you turn the Instant Mode off, then the graph in the Analysis Panel will remain at your last saved config.txt settings. And will only update again after you either re-enable the Instant Mode. Or if you update your config.txt file with the Save command.
 
Last edited:
Feb 15, 2021 at 6:13 PM Post #6 of 36
More general tips from the above discussion...

Quote:
(Dynamic) open back headphones are also limited in terms their gain potential and EQ-ability in the lower frequencies, due to certain physical limitations in their design. Since they are open, they can't maintain as much pressure inside the earcups to produce sub-bass frequencies as well as closed-back headphones can. So if you try to raise the levels too much in the sub-bass, the sound in the lower frequencies and midrange on open headphones will just begin to distort.

You also cannot simply flip/invert the compensated frequency response curve of a headphone, and automatically use that as your EQ curve. Because it can potentially introduce large spikes at very narrow bandwidths into the response, which is never a good thing. When you flip an FR curve, any notches or depressions in its response suddenly transform into peaks. Sometimes quite large ones, which can potentially be damaging to your hearing.

Large changes in volume over small bandwidths should always be avoided. As a general rule, smoother curves are almost always more desirable, and will usually deliver the best results.

Sometimes the dips or depressions in a headphone's frequency response will also coincide with a bad spike in their distortion. And raising the volume in those areas with an EQ will also make the distortion more audible as well.
 
Last edited:
Feb 15, 2021 at 7:07 PM Post #7 of 36
EXAMPLETXT.jpg


Example.txt

So what is it? And why is it there when you first run the program?... I pondered this as well when I first began using the Configuration Editor. Even after reading the somewhat scant instructions for the interface which actually explain it... :)

https://sourceforge.net/p/equalizerapo/wiki/Documentation/

...5. When the system has rebooted, the APO should be active. This will only be noticable by a small reduction in volume and a mild low frequency boost, because this is what the example configuration file specifies. To change the APO's behaviour to something more useful, you can now read the Configuration chapter.

Configuration tutorial
1. Open Windows Explorer and navigate to C:\Program Files\EqualizerAPO\config . You should find the files config.txt and example.txt. The file config.txt is the main configuration file that will automatically be loaded by Equalizer APO.

2. Open the file config.txt in a text editor and you will see that it first defines a preamplification value and then includes example.txt. To check if the APO is really working you can start some audio or video application and adjust the preamp value while music is running...

Filters of this type invoke other configurations of filters from a separate text file of your choice. And are added to the Configuration Editor with the Control/Include option...

INVOKE.jpg


Once added, this particular example.txt file adds a bass boost, which is visible in the lower frequencies in the Analysis Panel...

EXAMPLETXT.jpg


This is what the example.txt file actually contains...

Filter Settings file

Room EQ V5,01
Dated: 29.02.2012 20:04:50

Notes:Simple bass boost

Equaliser: Generic
No measurement
Filter 1: ON PK Fc 20,0 Hz Gain 4,0 dB Q 1,00
Filter 2: ON PK Fc 45,0 Hz Gain 2,0 dB Q 1,00
Filter 3: OFF None
Filter 4: OFF None
Filter 5: OFF None
Filter 6: OFF None
Filter 7: OFF None
Filter 8: OFF None
Filter 9: OFF None
Filter 10: OFF None
Filter 11: OFF None
Filter 12: OFF None
Filter 13: OFF None
Filter 14: OFF None
Filter 15: OFF None
Filter 16: OFF None
Filter 17: OFF None
Filter 18: OFF None
Filter 19: OFF None
Filter 20: OFF None

Unless you happen to need a bass boost with these particular settings, I recommend simply deleting the filter from the Configuration Editor.
 
Last edited:
Feb 15, 2021 at 8:18 PM Post #8 of 36
Some general housekeeping tips...

Some stuff I still haven't figured out...

As already stated, I wish there was a way to stretch the graph in just one axis, so I could see the changes in volume in the vertical axis a bit more easily. Simply zooming in the graph definitely helps though.

Fwiw, when stacking multiple filters and Graphic EQs in the Configuration Editor, I've actually come to appreciate having the Graphic EQ graphs a bit more tightly condensed in the vertical axis. Because it allows more graphs to be viewed all at once in the Configuration Editor window...

GRAPHS.jpg


An ability to expand the graphs more in the vertical axis would still probably be a nice option. And probably make some adjustments on the points a little easier. But I'm missing that capability less due to the added convenience of being able to view more graphs at once. So there are both some upsides, and downsides to having the graphs more condensed in the vertical axis.

The Analysis Panel can also be temporarily closed. Or de-parked from the Configuration Editor window by double-clicking on its title bar. So it can be moved to another video monitor (if you're using more than one) to make more space for your graphs.

To re-park it back in the Configuration Editor window, just double-click its title bar again.

Important Note: If you de-park the Analysis Panel, make sure that you re-park it again before your close down the Configuration Editor. Because if it's not re-parked, it may cause the interface to crash the next time you try to use it.

If you close the Analysis Panel, then you can re-enable it in the Configuration Editor's View Settings.

ANALYSISPANELCOMMAND.jpg


It is also possible to rearrange the order of the filters in your stack by simply clicking on the left-hand side of one of the filter bars, and then dragging it up or down to a new position between two other filters in the stack.

DRAGFILTER.jpg
 
Last edited:
Mar 23, 2021 at 12:27 PM Post #9 of 36
ADUHF, do you know a way to quickly switch between different filter presets ? I'm definitely not familiar with the program enough at this strage, but anyway, it seems like it would only use the settings found in the config.txt file, ignoring any other presets that I create later. I need this for using a few output devices in parallel - one or two headphone sets, and a pair of monitors.

Also, for this purpose, and just for anyone's interest, I've 'found' that there's a great option which would let you enable a particular set of filters (preset) for a specific audio output of your computer. I know this might make things a bit more complicated, but maybe it would turn out to be useful finally. Using this special setting, along with different presets simultaneously, would be a great plus. Just wondering if it's possible.

Roy
 
Mar 23, 2021 at 6:33 PM Post #10 of 36
ADUHF, do you know a way to quickly switch between different filter presets ? I'm definitely not familiar with the program enough at this strage, but anyway, it seems like it would only use the settings found in the config.txt file, ignoring any other presets that I create later. I need this for using a few output devices in parallel - one or two headphone sets, and a pair of monitors.

I'm not sure I entirely understand what you're trying to do. But you can save your EQ projects in different files under different names. Or in different folders/directories, if you think that's easier. As you have surmised, the only config.txt file that will be recognized and used by your computer's audio device is the one contained in the Equalizer APO/config folder. However, you can save any project that you have open in the Configuration Editor to that file, at basically any time, to hear what it sounds like. And you can also have multiple projects open at the same time in the Configuration Editor. To make flipping between them a bit easier and faster.

When I'm creating a new EQ project, I will usually have several different projects open at once in the Configuration Editor, for doing different tasks. One of those projects will usually contain just a Preamp filter for controlling the volume, and nothing else. By saving this project to the config.txt in the EqualizerAPO/config folder, I can quickly go back to the regular unequalized sound of my headphones, with just a slight volume reduction to better match the level of my latest EQ project.

When switching between different EQ projects in this way, I normally keep the "Instant Mode" turned OFF, so there are no sudden surprises. (It is possible to do it with the Instant Mode turned on as well, but the results can sometimes be more unpredictable and unreliable I have found.)

There may be other better ways of doing the above as well. But so far this has been my approach. Just make sure that the overall gain levels are reasonable and comparable on your projects before switching between them. Or lower the general volume control on your PC a bit, when switching between the projects in this way.

Sidenote: The only project that you can see in the Analysis Panel, btw, is the one last saved to the Equalizer APO/config/config.txt file... Even if you are working on a different EQ project. That Analysis Panel only shows what's in the default config.txt file.

Hopefully some of the above makes some sense, and will help. :) If you have any tips to share as well, you're more than welcome to do that here. And maybe I'll give them a try too. That's what this topic is for.

Also, if I can think of some better ways of doing the above, I'll get back to you on that. I am not a programmer though. So I generally try to stay within the easily understandable confines of a piece of software like this. My EQ projects can often get quite complicated though, with multiple layers of Graphic EQs, and Parametric filters, for example, all within the same project window.
 
Last edited:
Mar 23, 2021 at 10:42 PM Post #11 of 36
Switching Audio Devices

If you enabled multiple audio devices for the Equalizer APO to use when installing the software, then I believe you can switch between those different devices using the "Device" pulldown menu on the Configuration Editor's menu bar.

DEVICE.jpg


I only use one device though.
 
Mar 23, 2021 at 10:56 PM Post #12 of 36
Text Mode

I also keep backups of all of my important Graphic EQ curves in separate text files. I do that by simply switching the graph into text mode (as described in one of my other posts above). And then copying the text from that into Windows Notepad. And saving it as a new file to a special folder.

I rarely edit my graphs in the text mode. But will frequently use the text versions of the graphs to copy the graphs from one project to another, for example. Or when starting a new EQ project.

Notepad is a little flaky in the version of Windows I'm using btw. So I usually have to turn off the Format/Word Wrap feature, when copying my text files from there into a new graph in the Configuration Editor. To ensure that no returns, spaces, or line-breaks are accidentally inserted into the copied and pasted text.
 
Last edited:
Mar 24, 2021 at 6:18 AM Post #13 of 36
Thank you for your response.

There's just one point that still remains uncovered on my end: I can't figure out how to actually flip between devices inside the program, without having to save the preset file onto config.txt (from what I understand from your post, this is what I have to do in order to make a new preset be active). I initially thought I'd just have to switch between the tabs, but that doesn't do anything (which is a good thing, as we don't want sudden changes in sound as you explained). But along with that, I can't find a place or menu where you are able to switch between them, intentionally.


Roy
 
Mar 24, 2021 at 10:48 AM Post #14 of 36
Since I'm only using one device, I have not used this feature. But I believe there is a filter you can add to your EQ projects/presets that will switch the audio device for you, when you save your project to the config.txt file. This may save you the extra step of selecting the new device from the Device pulldown menu that I described above.

This filter is under the Control options...

CHANGEDEVICE1.jpg


After the filter is added, you can choose the device for that project/preset, using the options that come up with the Change button....

CHANGEDEVICE2.jpg


After this filter has been added to your EQ project/preset, it should switch to the selected device whenever you save this EQ project to the EqualizerAPO/config/config.txt file.... I think. :)

I am just sort of guessin on this though, since I've never actually tried this feature.

If you use this feature, then you may want to make it the first filter in your EQ project stack.
 
Last edited:
Mar 24, 2021 at 11:18 AM Post #15 of 36
If you have the "Instant Mode" enabled, then the above filter may also switch automatically to the selected device when selecting that project/preset tab on the menu bar. In theory this should work. But it may not be 100% reliable. Because the program may get a bit "confused" when more that one open project is saved to the same EqualizerAPO/config/config.txt file, with the Instant Mode enabled. This is why I suggest leaving the Instant Mode off, and manually Saving the projects to the config.txt file to perform the switch.

You'll have to experiment a little though, to see what works best for you.

There may be some other ways of configuring the Equalizer APO to automatically used different EQ profiles for different audio devices. But I don't know how that can be done. You could try searching or inquiring on the official Equalizer APO forum though for some more info on how to accomplish something like that.

Perhaps that is something that could also be accomplished more easily with the Peace add-on (which I have so far not installed or used on my PC).
 
Last edited:

Users who are viewing this thread

Back
Top