EHHA Rev A - Interest Thread
Sep 5, 2011 at 1:43 PM Post #1,381 of 1,752
V- and V+ appear to be correct, here is a close up of the problem board(the one closest to the AC inlet in the big picture):
 
Also, I'll work on changing that ground wiring around, thanks for the tip!
 
Sep 5, 2011 at 2:30 PM Post #1,383 of 1,752
I can't seem to get a decent picture of the underside...but heres my attempt:

The flash would either reflect too much off of the pcb, or it would end up too dark with no flash, so my apologies in advance about the picture quality.
 
The MOSFETs are correct, as well as the resistors(atleast they appear to be). I did a quick cross check between both PCBs(learned my lesson after my first DIY to put the resistor values up).
 
Sep 5, 2011 at 2:41 PM Post #1,384 of 1,752
So,the best way to take a picture like that is to use no flash and indirect lighting. A bright room or even outside can help, but, dump light on the board and avoid the flash.
 
In any case, we need to verify you are getting voltage from the PS to the amp board.
 
We can use the BJT pads (opposite the MOSFETs) to measure the voltage going into each MOSFET drain. On each side, by the test points (TP1 and TP2) there is a set of pads. Measure between the middle pad and ground on each side of the board (each MOSFET).


Sep 8, 2011 at 11:14 PM Post #1,385 of 1,752
Sorry for the delay, school arose as a delay again.
 
Q11B(Ground was placed on pad 2)
pad 2 to pad 3 = 18.0 V
pad 2 to pad 1 = 20.6 V
 
Q10B(Ground was placed on pad 2)
pad 2 to pad 3 = -16.5 V
pad 2 to pad 1 = -19.7 V
 
Those measurements are from the problem board, I can measure the good board if needed.
 
Sep 9, 2011 at 11:01 AM Post #1,386 of 1,752
Sort of a strange update, I actually reflowed a bunch of joints on the problem board before I left to go back to school. After I measured those voltages last night, I figured I might as well check the DC offset. Well, to my surprise it had actually dropped to 0 mV, as same as the good board was reading. So then next I measured between OUT and TP1, and was able to bias both boards. So after checking voltages no less than 3 times each, everything appeared normal. So I plugged a cheapo gaming headset I got ages ago, and I got sound from both channels, but from the right channel(problem board) there was a pretty decent hum, left board was dead silent until I opened the volume up all the way(with nothing plugged in of course). The LED under the problem board for the tube still doesnt light though.


Sep 9, 2011 at 11:07 AM Post #1,387 of 1,752
Might have the LED on backwards.
 
What sort of a noise are you getting fromt he bad chanel? is it a hiss or a humm (like a ground humm)
 
Do you have a star ground in place?


Sep 9, 2011 at 3:04 PM Post #1,388 of 1,752
I'd say more of a hum for sure. I have the star ground setup with all the wires connected to a terminal block. I tried both wiring options from the cavalli website, and still got hum.
 
Sep 9, 2011 at 11:37 PM Post #1,389 of 1,752
Well, that was not exactly what I was asking you to measure, but, I guess that is OBE. I was looking for a measure from ground to pad2. Not between pads.

Anyway, I would first check to make sure you have all the wires seated correctly in the terminal blocks. Sometimes they can be tricky. Especially is a piece of insulation or such prevents a good contact.

Some quick and easy things to try first are to swap the tubes across both boards. I would do the same for the signal input wires. Swap the signal input between the boards and see if the hum follows with the swap or remains with the suspect board. Unless you have already tested it, there could be an issue with your glassware attenuator solution.

Swapping outputs is also something to try and see if the problem follows with the swap or remains with the suspect board.

After that, then you may still have some suspect soldier joints.

 
Sep 10, 2011 at 3:47 PM Post #1,390 of 1,752
I messed with the wiring some with some interesting results. Before I messed with the wiring, I hooked the amps output up to a mixer I have just for fun. The hum was lighting up the -24 dB light on the mixer on the right channel, also when I turned the amp on and off, the left channel would remain silent, but the right channel would shoot up to the +6 dB, and start to light up the clip light before it went down. Switching the tubes didn't change anything. I took the input wiring and tightend up the connections and fired the amp back up. The hum had dropped off the the dB meter LEDs. So I switched the amp on and off a couple times, and got a -12 dB spike max, instead of a clip. I decided to try plugging in some headphones next, and the hum was still there. It had dropped off greatly on the right channel(problem board), but had increased slightly on the good board(left channel). Another curious thing, is if 1 RCA is plugged in(doesn't matter which channel, or what the RCA is coming from, as long as it is plugged in) the hum is there, but if I take both RCAs out, the hum drops to almost inaudible levels.
 
Tl;dr: Hum seems to be a ground problem.
 
I think my terminal block may not be the best solution for the star ground, is the best way to do a start ground a single post and some crimp connectors?
 
edit: If it makes a difference, all of my signal wires are shielded.
 
Sep 10, 2011 at 4:54 PM Post #1,391 of 1,752
Sounds like a classic ground loop. Are your RCA jacks isolated from the chassis? If not, they should be.

The terminal blocks should work just fine. That is what I am using and my amp is dead quiet. How are you using the shield on your shielded wires? From the last picture I saw, it appears the shields are floating. I may be wrong. Shieds are most likely not the issue in this case. You have a ground loop that needs to be cured,

How have you wired up your attenuator? How is ground being passed through it? Is the attenuator board isolated from the chassis? Is it tied into a ground at some point? I suspect the issue lies somewhere on your ground passing through the attenuator. Diagram up how you wired in the attenuator. I think it will be most telling.


BTW, did you tin your wires that go into the terminal blocks? If so, did you clean the flux off them prior to inserting them? Also be careful with too much torque on the terminal blocks. You can literally sever the wire such that you no longer have contact. I would reseat all of the wires going into your input terminal block connections. Pull out the wires out, check for damage, clean them if required and reset them into the block and torque down to the point of being snug, but not brutally tight.
 
Sep 10, 2011 at 8:37 PM Post #1,392 of 1,752
I didn't tin any of the leads, except the signal output wires. I did remember to clean them though(It was only 2 wires).
 
The jacks should be insulted, they are the neutrik D series jacks: http://www.parts-express.com/pe/showdetl.cfm?Partnumber=092-232
 
The shields are just floating, I just stripped the shield and jacket off where I needed, and just used the black wire for ground, and white for signal. (It was a twisted pair wire, 24 awg, SPC).
 
When I get a chance tomorrow, I'll re-seat all the wiring and hopefully that should cure the ground loop.
 
Sep 10, 2011 at 9:12 PM Post #1,393 of 1,752
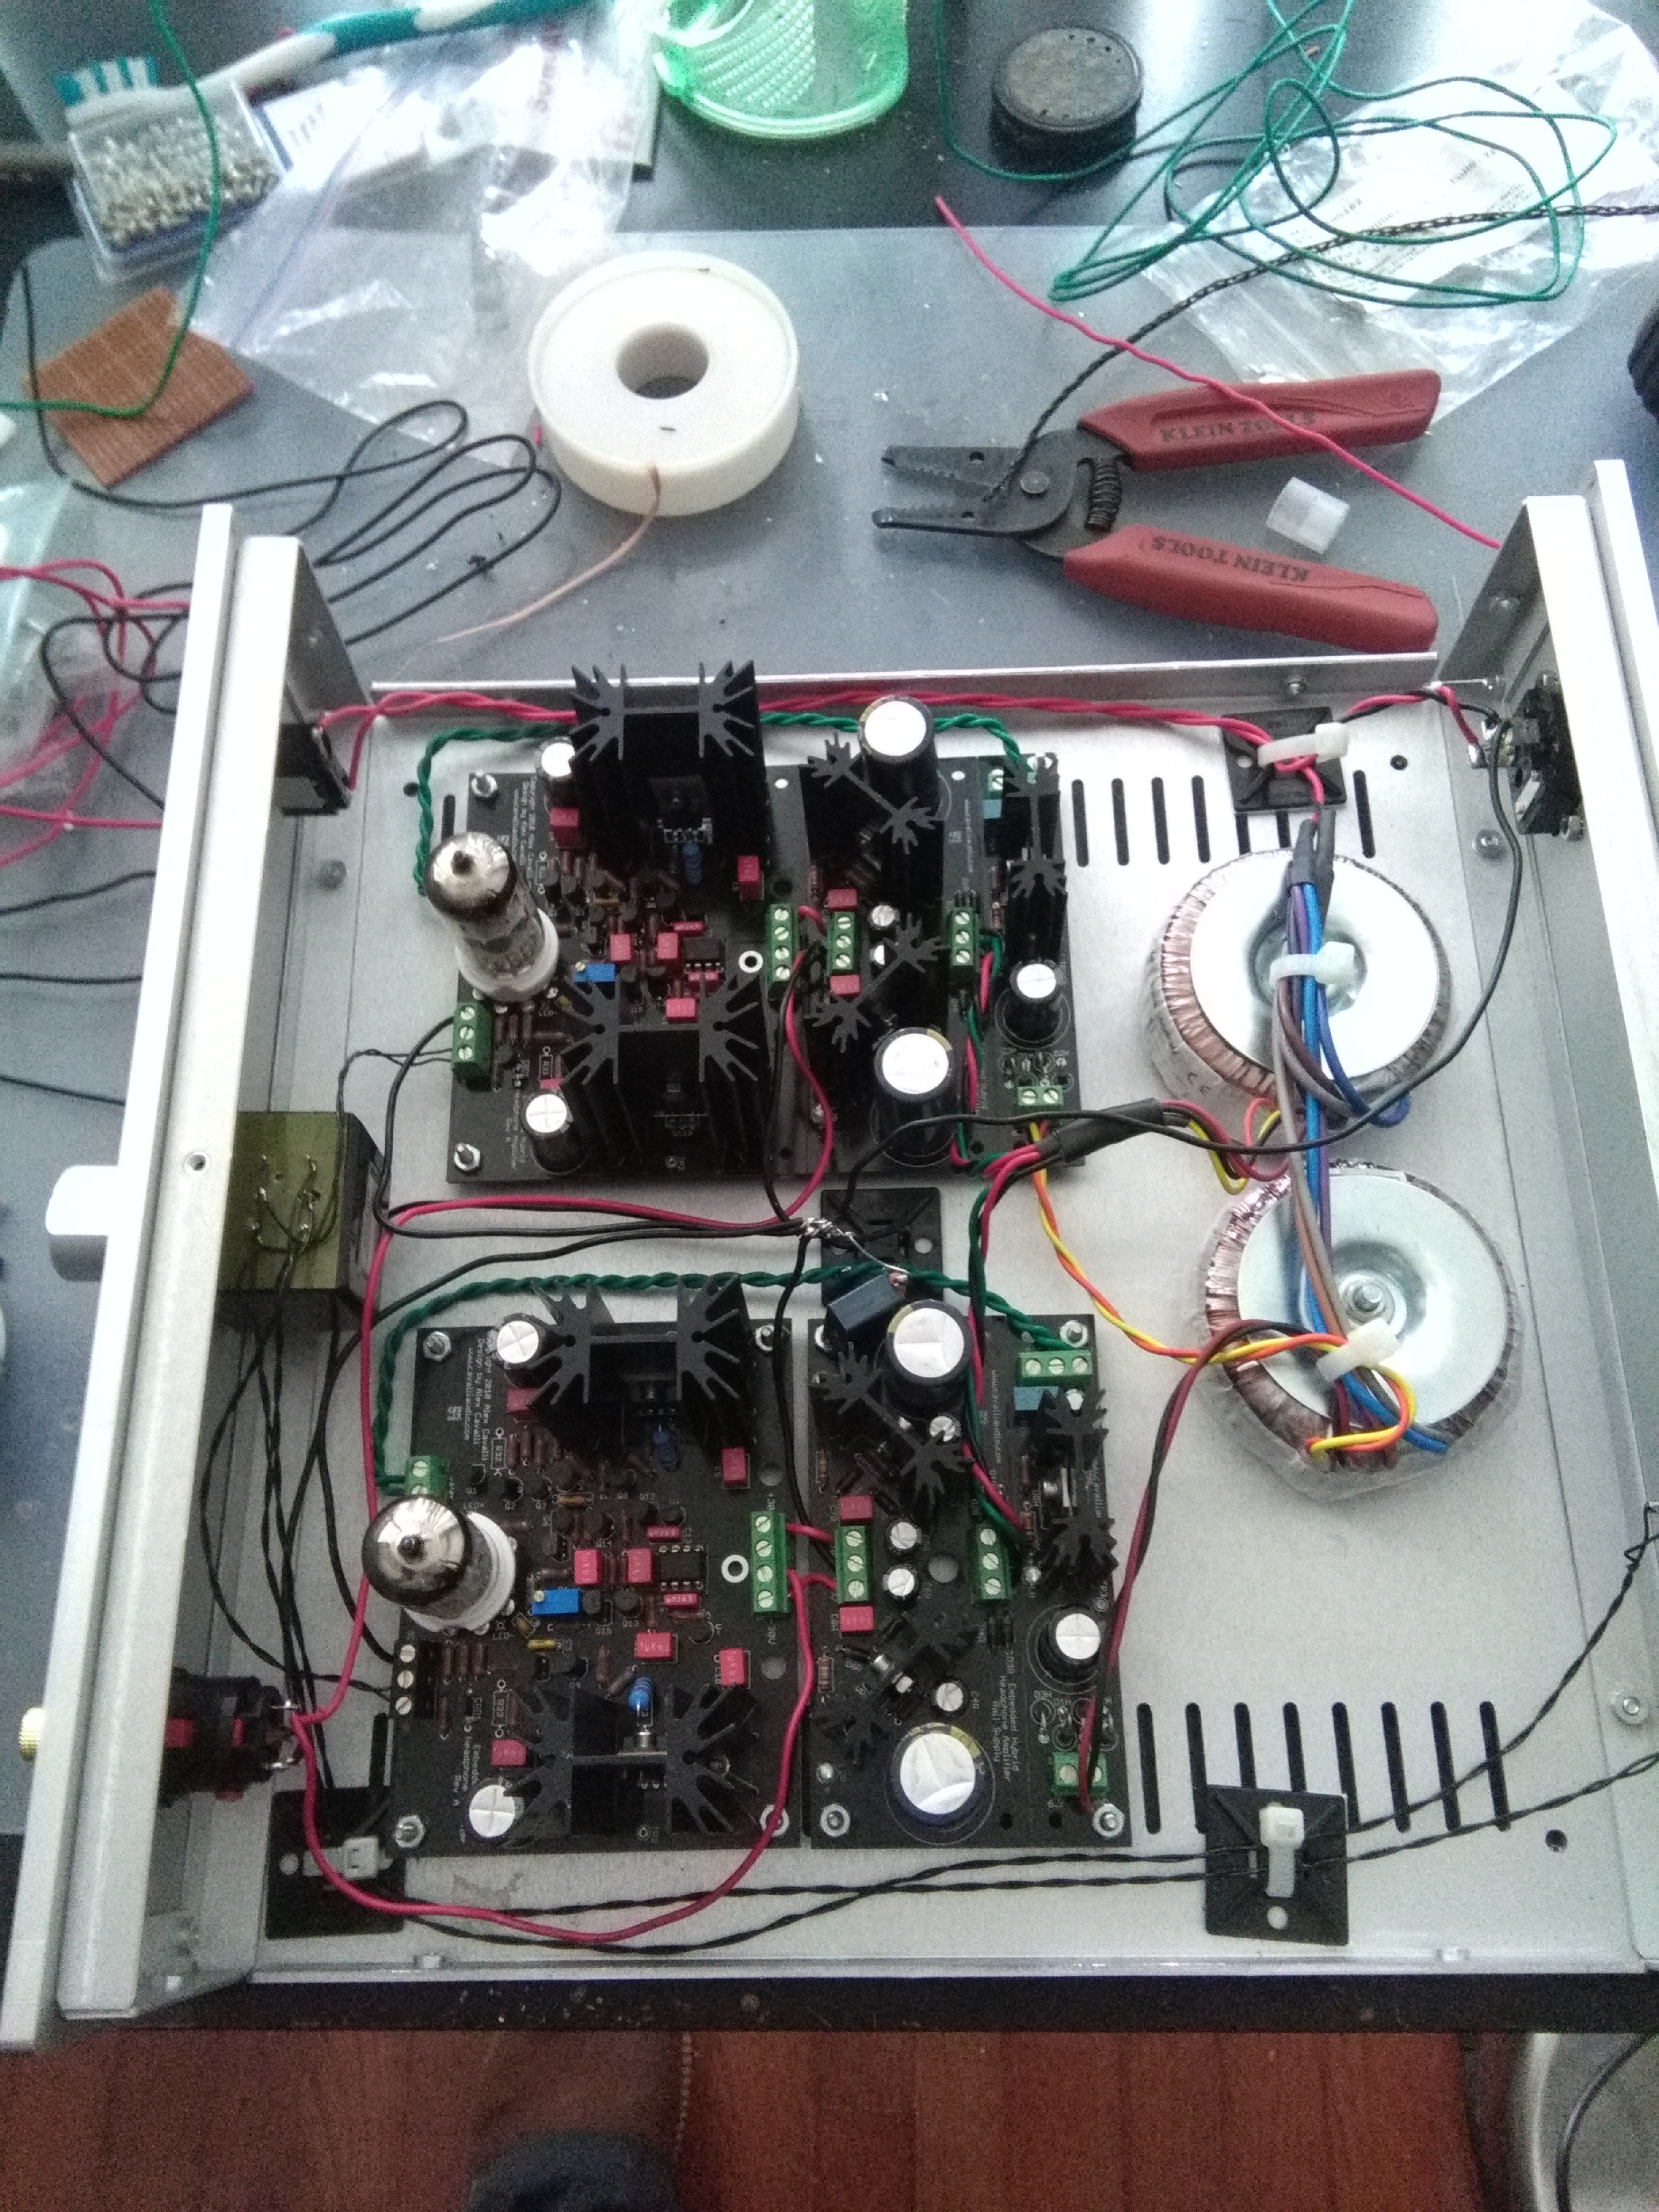
Perhaps, but still a worthy endeavor even if it is unlikely to cure the problem. If you are using stranded hook up wire, you should really consider lightly tinning the wires, especially those that go into the terminal blocks. Those screws can be very hard on untinned stranded wire of that small a gauge. A lot of times, a number of the strands will spread and break right off by the screw action alone. The tinning makes them act a bit more like a solid wire at the connection point and is far, far more mechanically robust.

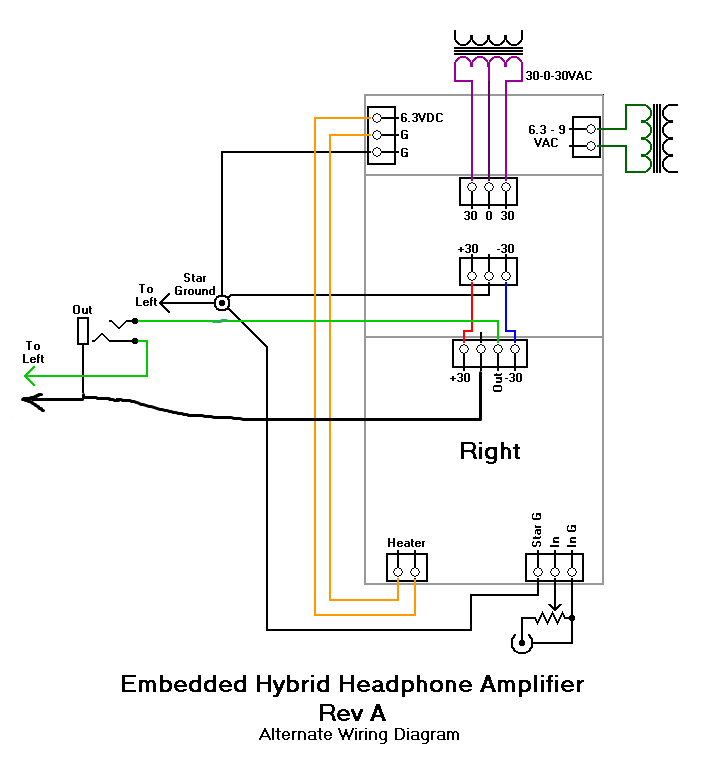
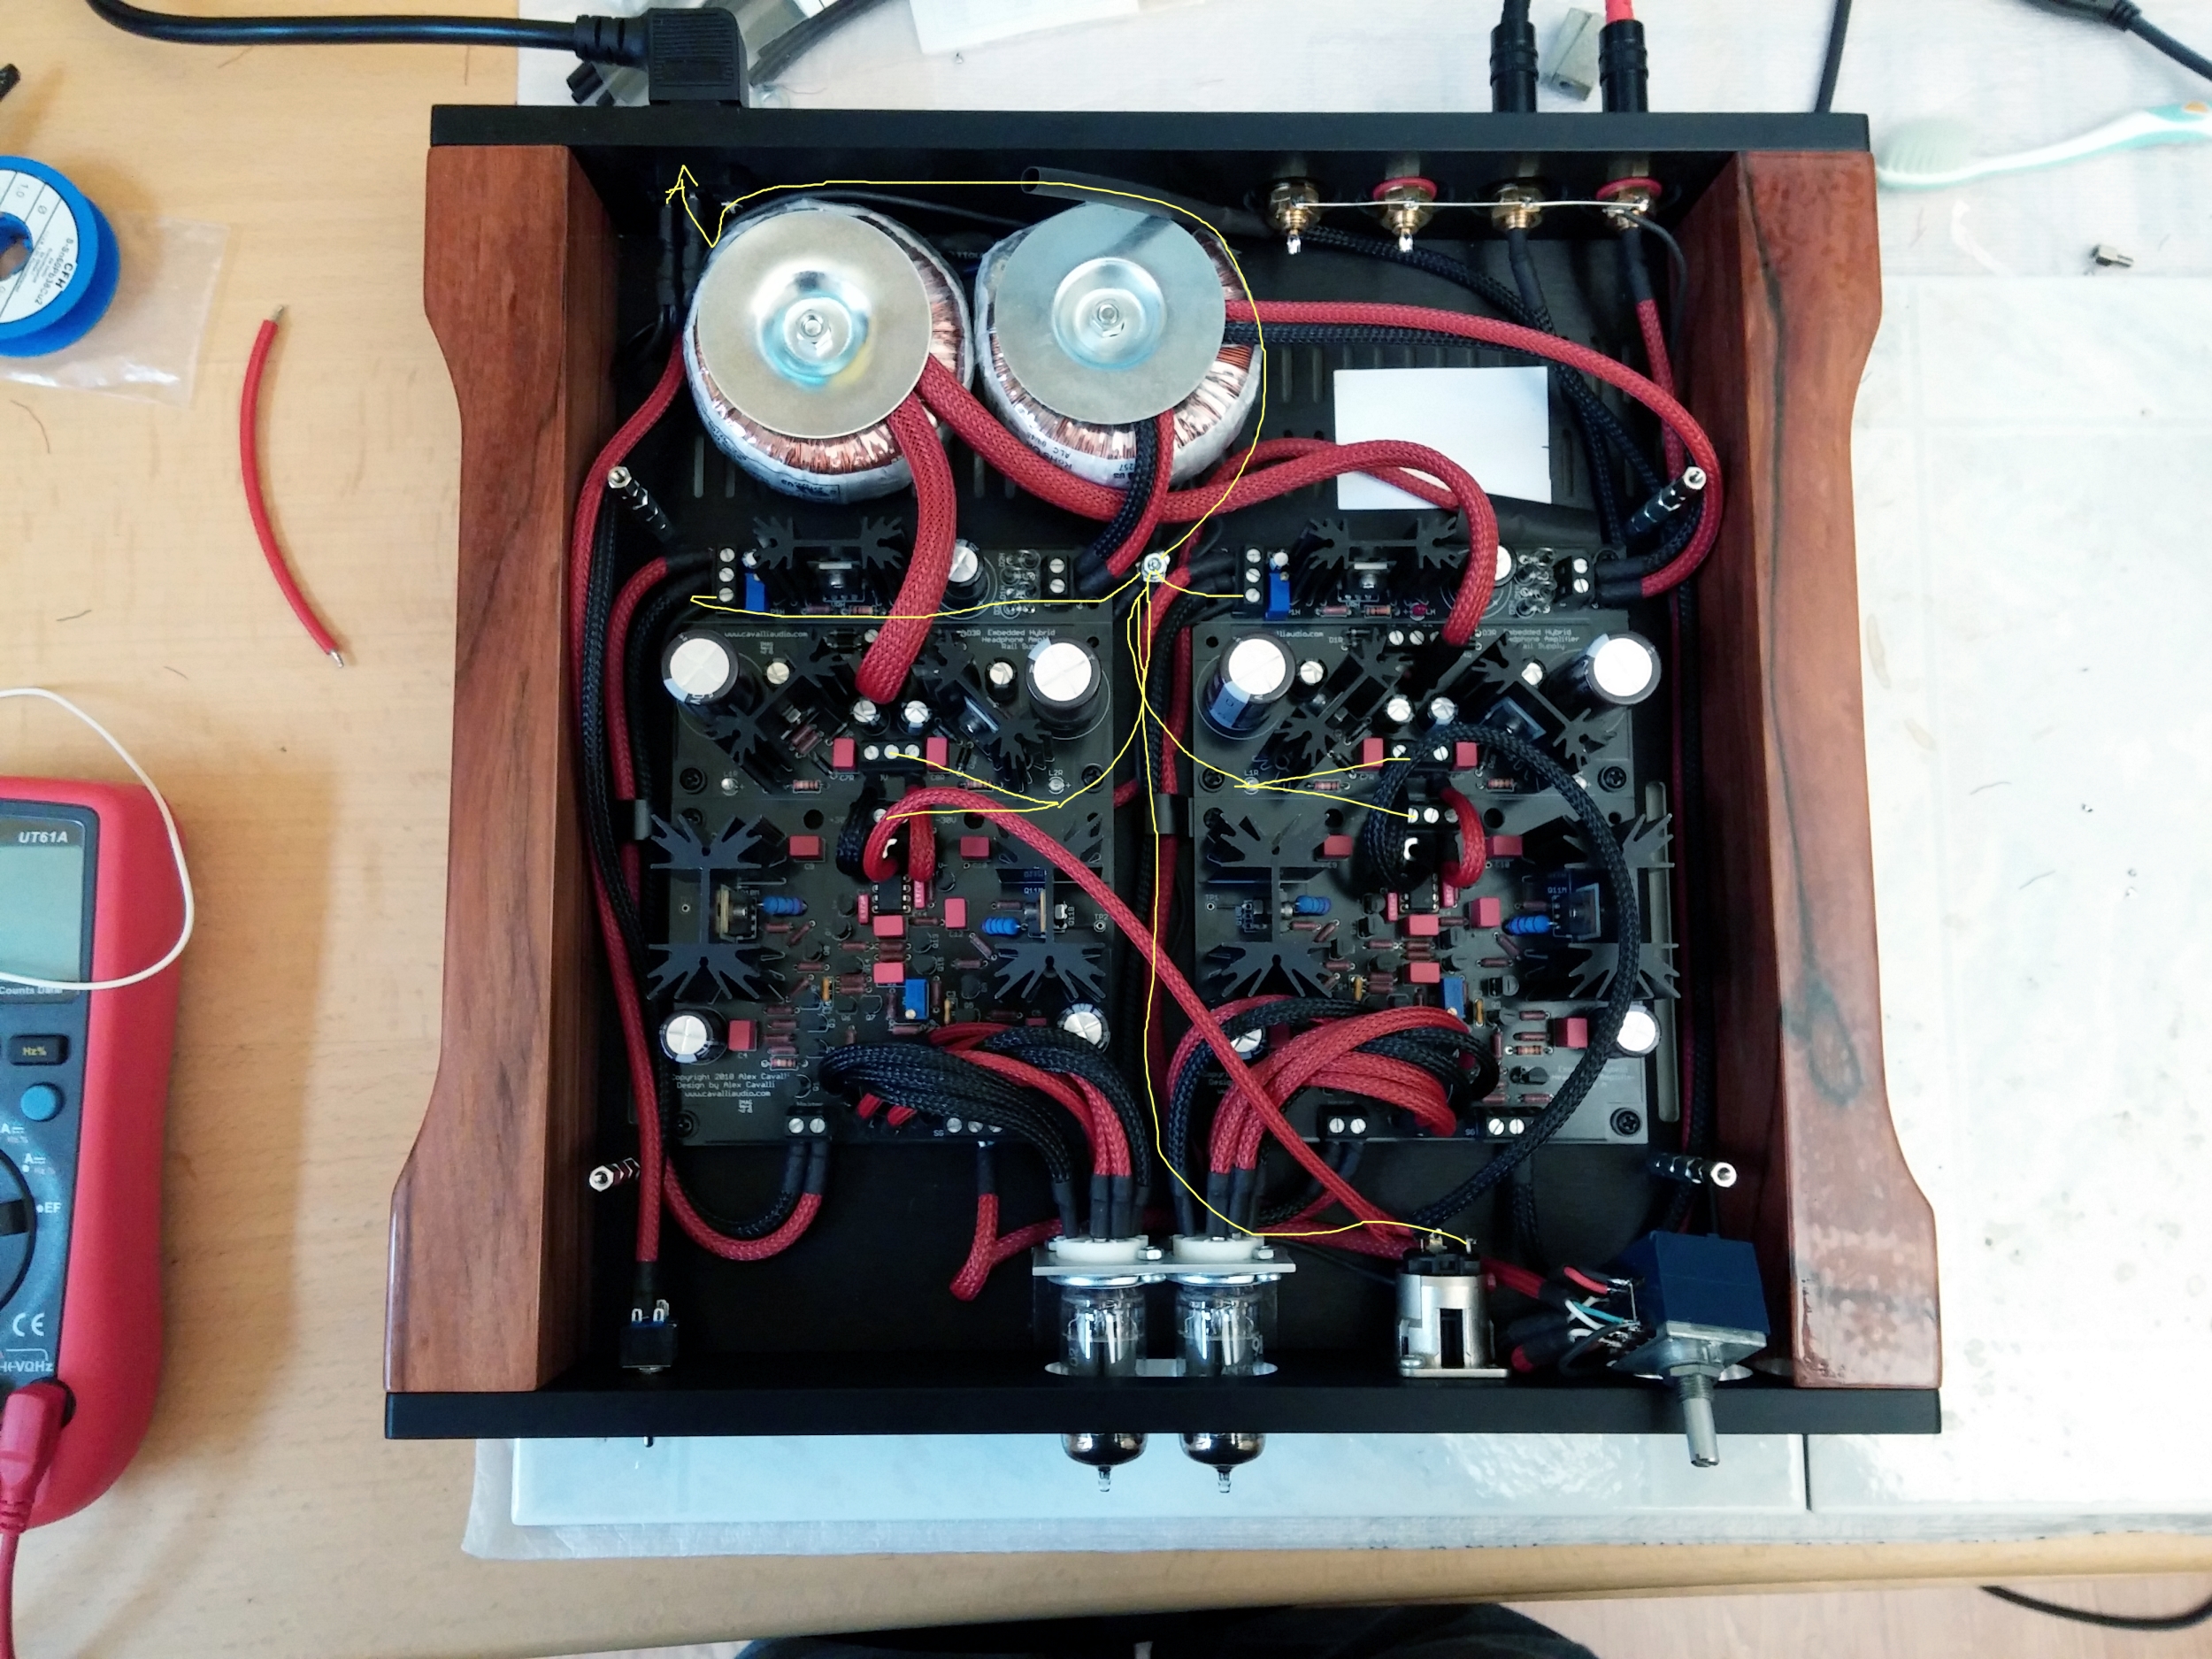
Did you ever fix your ground loop isolation scheme? As it stands now, I am not sure if you have a separate signal ground vice chassis ground. Hence the ground loop. While you are in there, with the power off, use you multimeter and measure the resistance from the star ground to a clear part of the chassis. By clear, I mean an area without anodizing. The anodizing acts as an insulator, so, you need a clear shot to the bare aluminum. Since it does not appear you have drilled into the case yet, sometimes the pem nuts on the bottom plate act as a decent place to measure. Otherwise, if you have attached your safety ground to the case as described previously, that will work perfectly. You want to see if the connection between signal ground and chassis ground is open, shorted or at some resistance in between. Ideally, if the ground loop breaker is installed, the resistance should measure the value of the resistor used for the isolator.

Also, details on how you wired through the attenuator would still be very helpful.


BTW, floating shields do not really act as shields without being tied to a ground source.
 
Sep 12, 2011 at 2:56 PM Post #1,394 of 1,752
I haven't had time to change around any wiring yet(being an engineering student kinda sucks sometimes...), but I did have time to sketch up how the volume control is wired in.
Circles are RCA jacks.

 
Sep 12, 2011 at 9:29 PM Post #1,395 of 1,752
Okay. With a diagram like that, you really must be busy.  
wink_face.gif


So, are you using the glassware A3?
 
The goal of the exercise is to ensure the ground is correctly routed through the attenuator circuit. You should be able to buzz out the continuity from the jacks into the inputs of the amp boards for both the signal as well as the ground wires. Be sure nothing is plugged into the rca jacks when you make this measurement.
 
Are the switches isolated from the chassis front panel? In this case, you do not want them to be isolated. They should be directly attached to the chassis front panel (attached to chassis ground).
 
Additionally, measure to be sure the front panel and bottom panel are electrically connected (you should be able to measure a direct short between the front panel and bottom panel). Sometimes, due to paint or anodizing, the front panel can float from the rest of the chassis. This happened with my panel (too much paint) and I had to wire my pot body directly to a chassis ground point on the bottom plate.
 

Users who are viewing this thread

Back
Top