DX200/220 Amp8, MAX and other EX modifications
Jan 30, 2019 at 7:57 AM Thread Starter Post #1 of 473

Whitigir

Member of the Trade: Portable Modder
Joined
Oct 14, 2013
Posts
28,339
Likes
32,164
How to disassemble 2Max
Simpler MAXW1-MAXW2 modifications is up

New MAXEX recipe is up <== Click on Me
MAXEX sound impressions and evaluation can be found here

DX228EX Sound quality can be found here by @edwardsean :


Disclaimer
: by modifications and tinkering with your device, your warranty will be voided, and there are devastating risks of permanently damaging your device. Only proceed if you are seeking for the performances with no boundaries, and that you can swallow the cost of it like a man wearing his pants. You have been warned***

**Please, with due respects to any technician within the US or from other countries. If you follow this guide and perform labor, do not charge unreasonable pricing as the developments and tuning of this modifications belong to us, the enthusiasts here on the forum, and mainly the people mentioned in this article**

Amp8-EX can be used on dx150 or also the upcoming dx220
**Also, for Titanium DX200, there is no need to upgrading the regulator**


EX name was realized after observing the sound and the works that was done into it: it stands for

EX-treme Fidelity and EX-treme Modifications

There are 3 parts to this modification

The parts needed for this

Part 1: hardware


https://www.mouser.com/ProductDetail/595-LP5907MFX-3.3NPB
2x of these, buy 4x for spare

Special thanks to @bden59 for looking up for an upgraded regulator with better power dissipation, higher rejections and lower Noises (regular dx200)

https://www.mouser.com/ProductDetail/80-T543B107K010TE150
12x of these, you buy 14X if spares are needed.
https://www.mouser.com/ProductDetail/80-T527I476M10ATE200
7x of these , buy 10x or so for spares
https://www.mouser.com/ProductDetail/80-T527I226M10ATE200
10x of these, buy 12x for spares
https://www.mouser.com/ProductDetail/80-T543B227K6AHW35
3x of these, buy 4x for spares

https://www.mouser.com/ProductDetail/647-RNE1C471MDN1PX
1x of this, 2 for spares

Part 2: Noises suppression

https://www.mouser.com/ProductDetail/810-IFM10M25BB300200


The noises suppression is applied to eliminate the digital noises that plagues us, the digital music world. It can be widely used on other systems as well. However, thanks to DX200 as a platform and a fellow member @chaiyuta , I found this a Vital modification not only for DX200, but for many other players out there.

The processing:

Please bare with me and my horrible hand drawing here. Just have these pictures printed out or in front of you and follow it

On the Amp8 module, and the Main body, the ** takes a little more heat
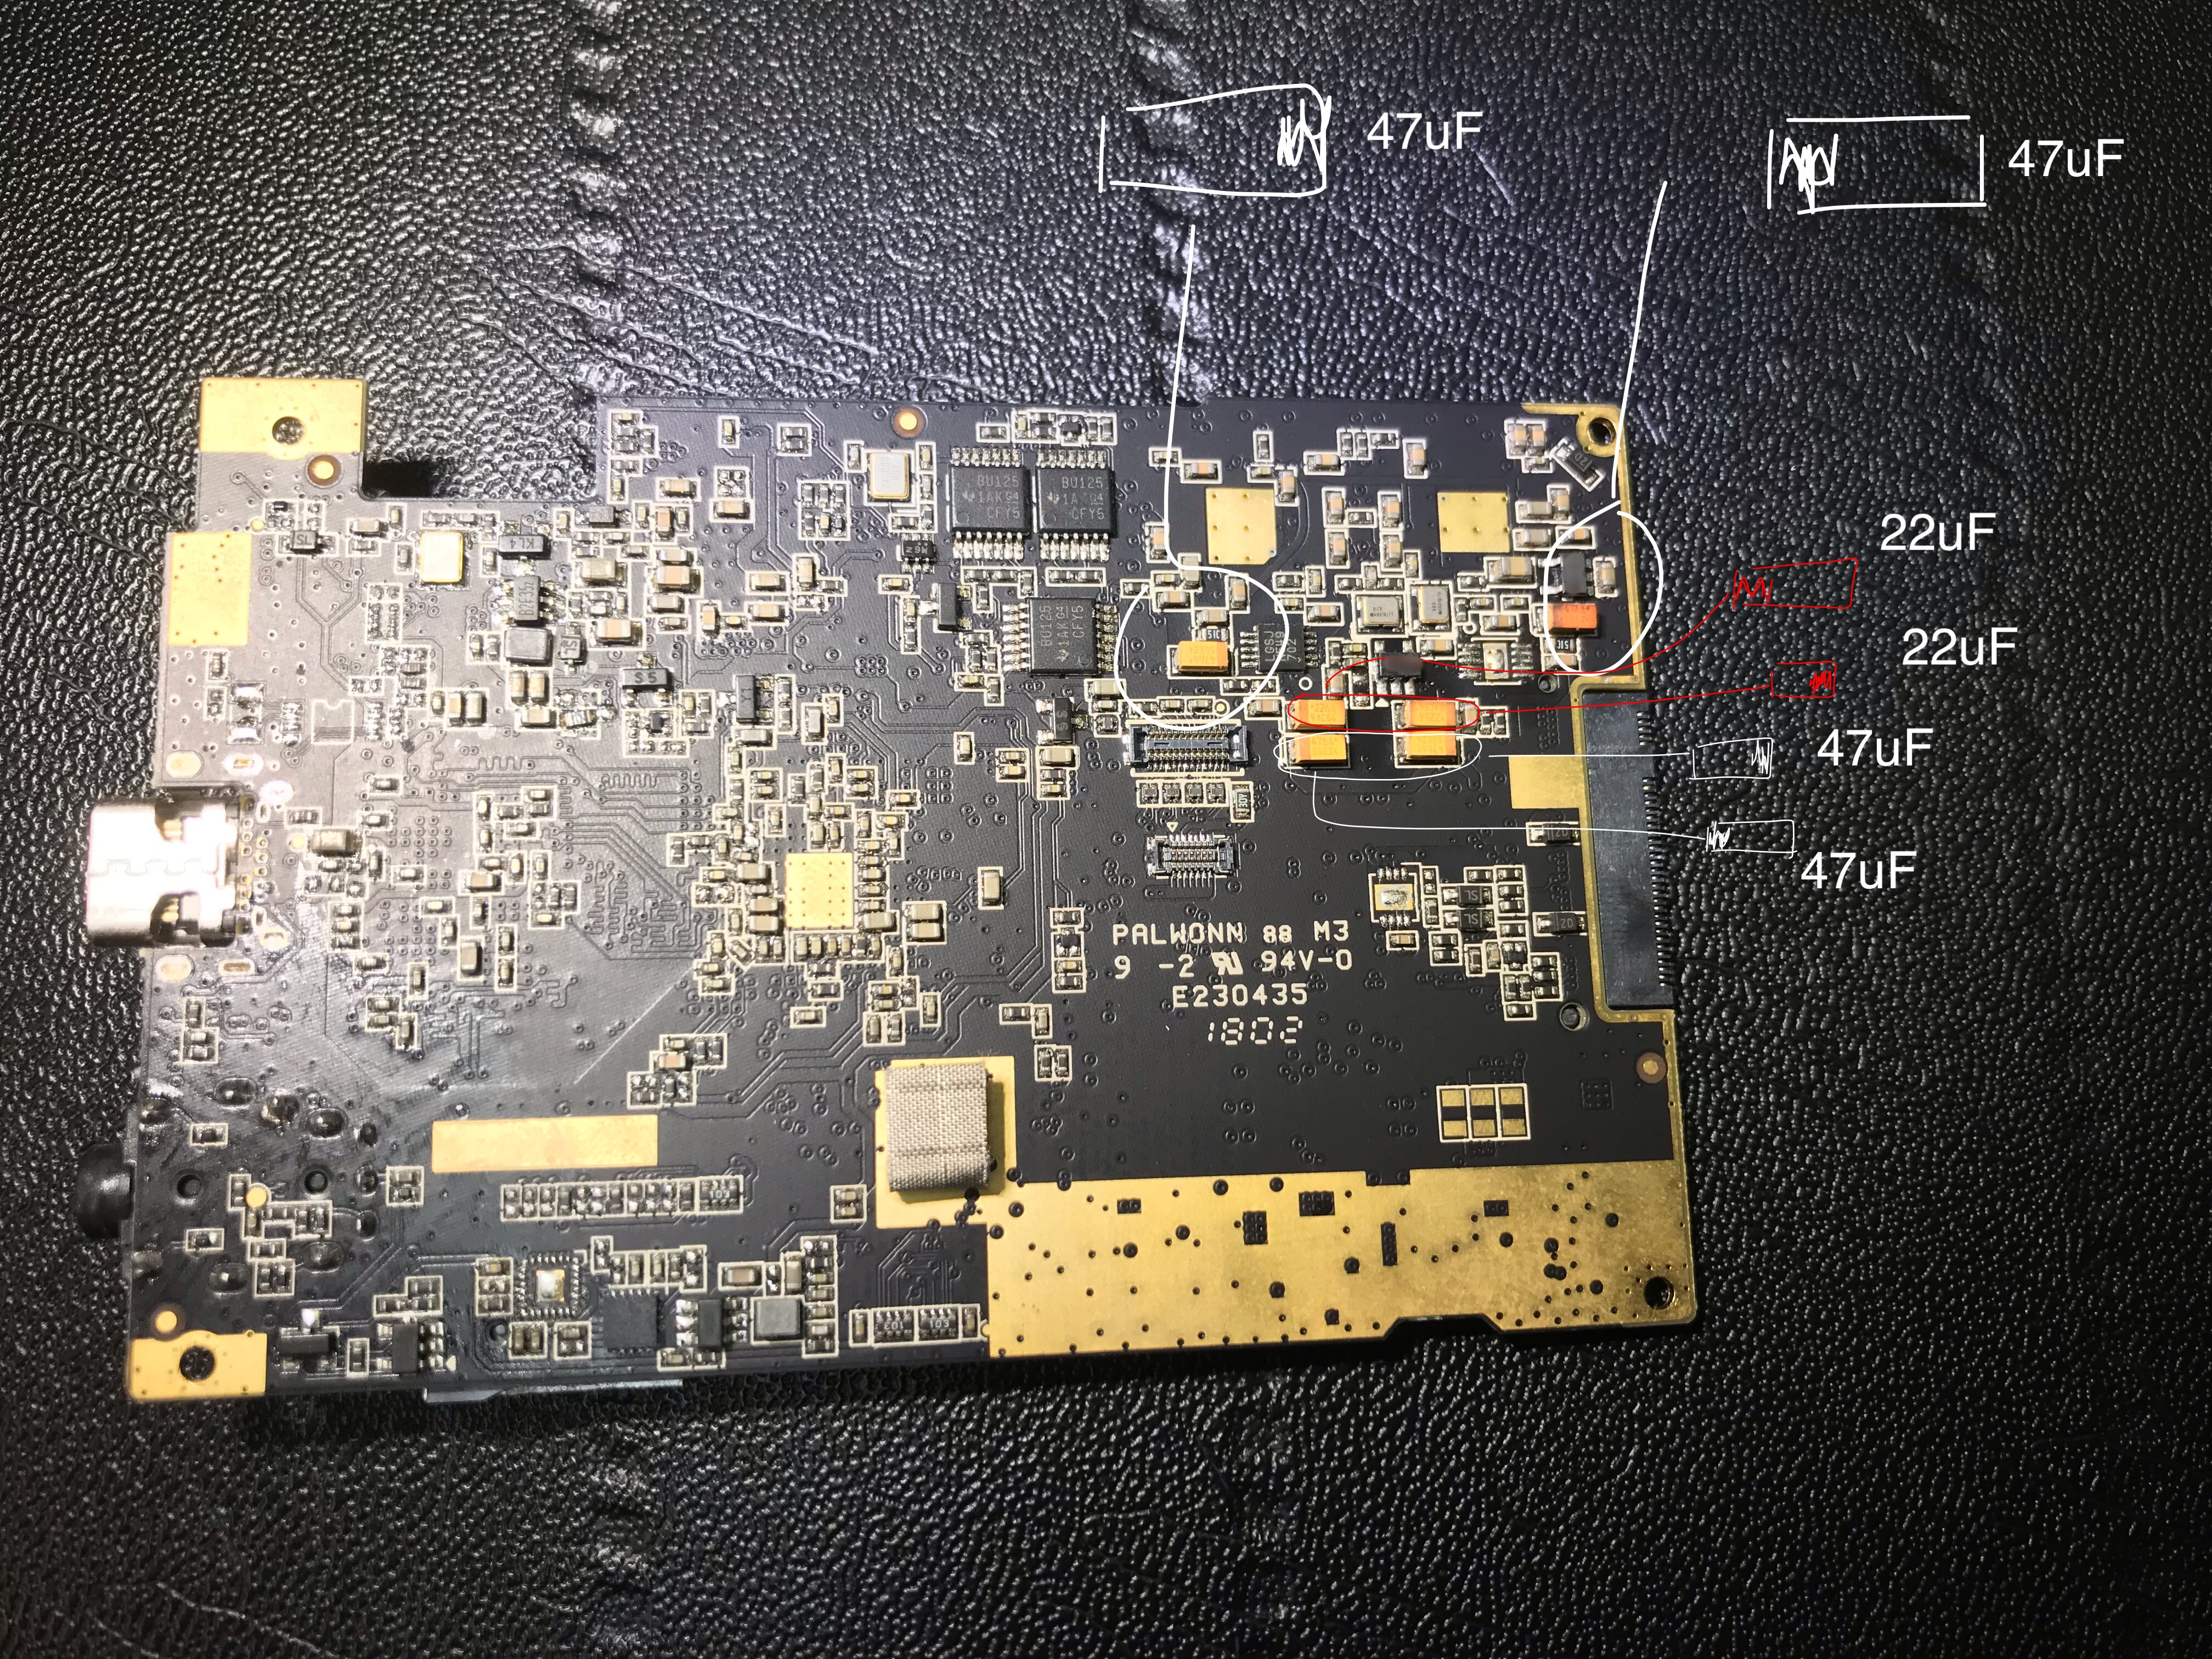
Main body Hardware

To open up the shield on DAC-IC, please be very careful to lift up with tweezers and do not bend anything

Follow Alex guide to disassemble your Dx200, ribbon Cables connectors has a flip lock that need to be flipped up before you can pull out or insert it back in (then lock)

https://twister6.com/2017/07/05/inside-the-dx200-literally/

*updated first picture with regulator to update as in Blue indicators*

D528EF53-0C7D-4FA4-A81F-808CDD0AAED8.jpeg

8953C68D-3C0C-4947-AC44-82B41A8FEE18.jpeg

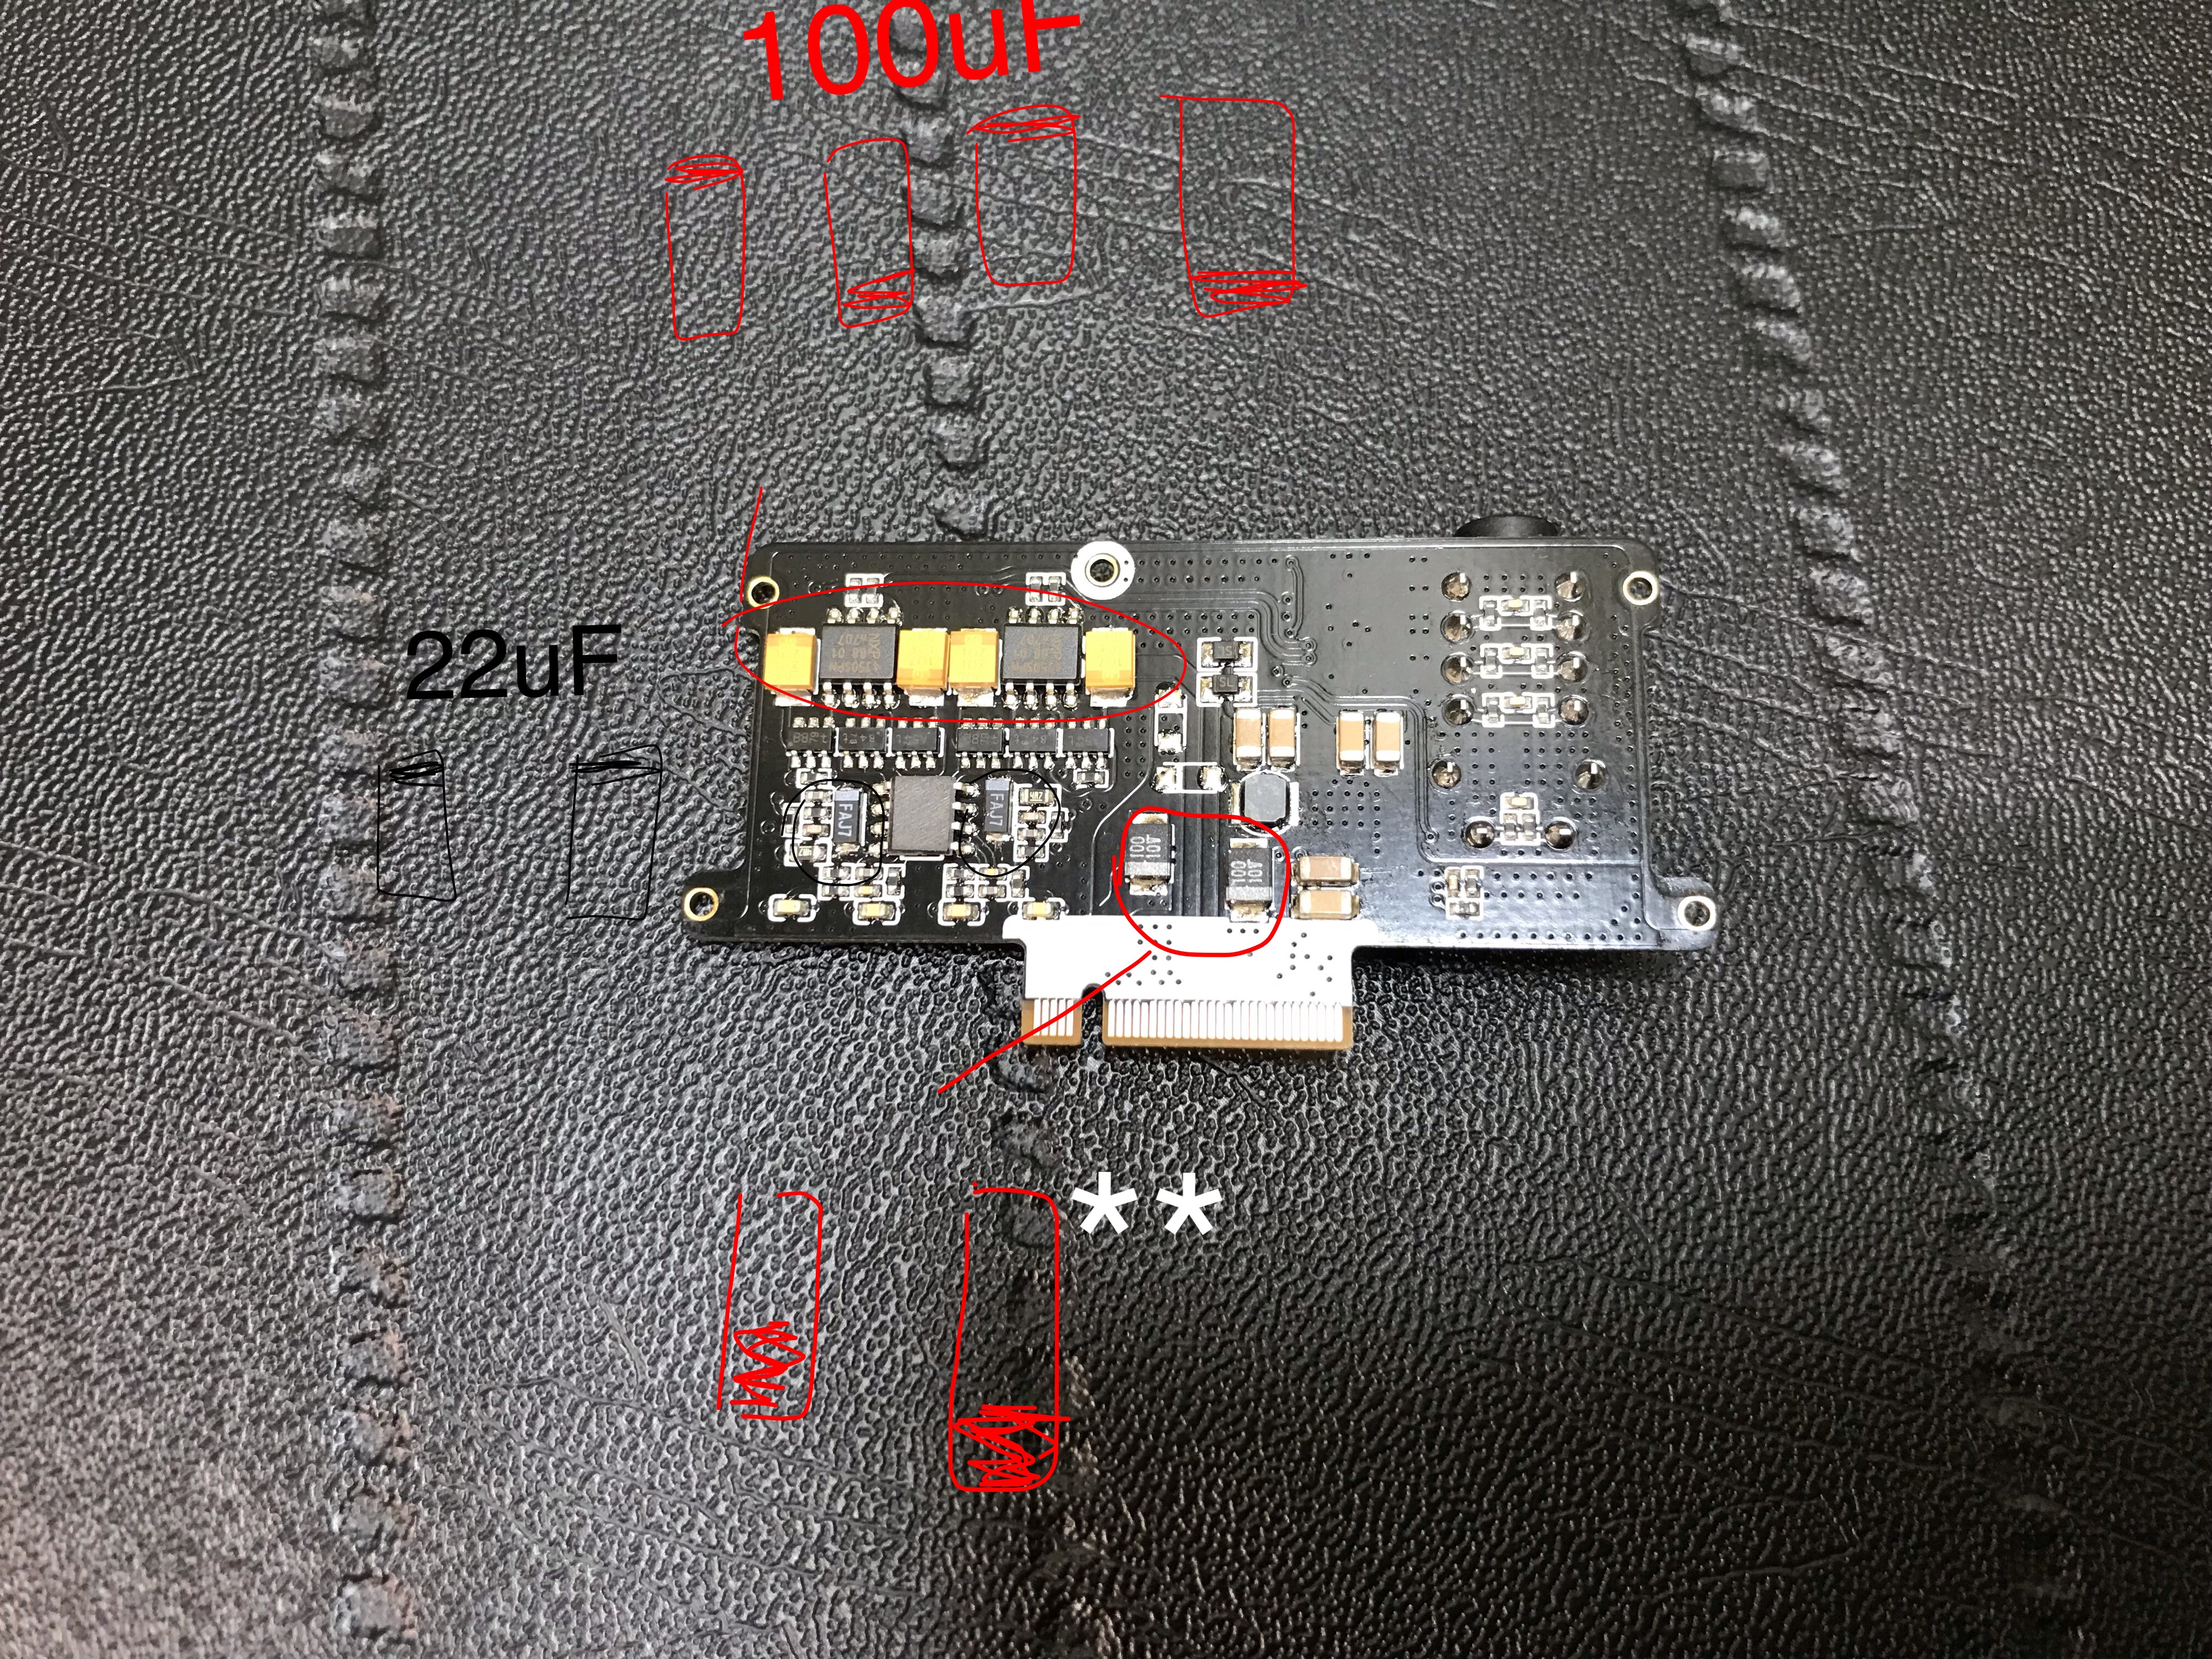
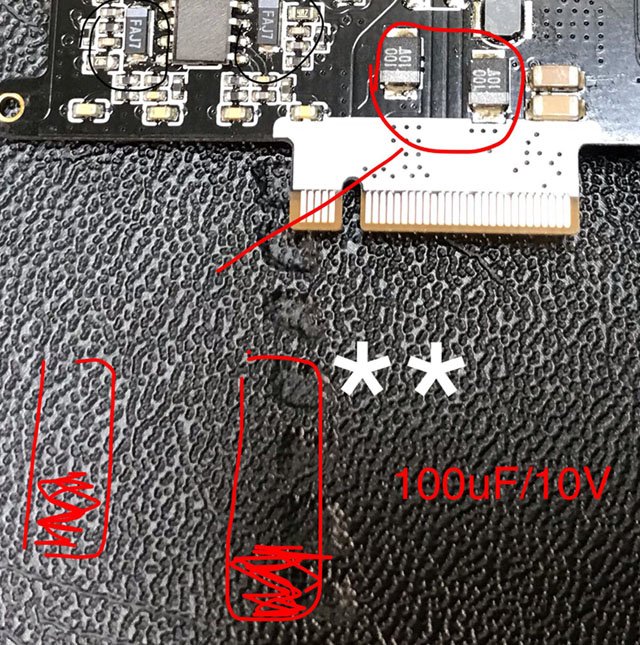
Amp8 Hardware: *unlike Amp8W*, the EX, No MLCC will be used, and No Bi-Cap
BF70B478-C1F0-43D2-9F94-F895A83841FC.jpeg


34548865-61A6-40AB-BF16-E3E89996D75A.jpeg

Main body Part 2: noises suppression cover main IC, DAC Chips is personal preferences (optional), I use it, and the WiFi antenna back

Do take notice that all trimming of the sheets have to be clean off and away from the pcb on both of the main body and the Amp. If it is laying in between any thing, it could cause short circuit
893E8873-BDFE-4B42-B32B-A890A9B2DBDE.jpeg
40BA8032-6D1F-43D9-A4D6-94274E8D89B4.jpeg


Amp8 noise suppression

Apply the sheets at the square regulator before putting in 470uF Nichicon

The rest can be applied after the modification is done. Coil inductors can be covered too, but optional, I left it out

1AA85C25-300C-4C9C-9779-B668C24C07D0.jpeg

20F5EB69-E59C-45B0-BC2D-41D33B98DE80.jpeg
 

Attachments

  • B888AE73-B4E4-4614-B675-B647821898A8.jpeg
    B888AE73-B4E4-4614-B675-B647821898A8.jpeg
    4 MB · Views: 0
  • 238F77FD-AAE8-4534-95BC-419179A3B56A.jpeg
    238F77FD-AAE8-4534-95BC-419179A3B56A.jpeg
    4.2 MB · Views: 0
Last edited:
Jan 30, 2019 at 7:26 PM Post #3 of 473
Edited
Newest Edit with MAXEX Links <== click

Updated with better pictures, and those pictures are meant for processing. I did not take pictures of completed DAP, because there is nothing to look at lol....

*Tip* for the Amp8, the Bicap or Grey Panasonic HD and original AVX Tantalum can be removed with hot-air altogether, by taking out the Tantalum while grabbing onto it and not the main grey caps. (Do not use force, these pads are easily lifted and if it does, your module is trash) Once the Tantalum came off, the big cap can be grabbed out. If you slip, it could blew away resistors and caps above it. But due to how sensitive this part of the board are, I recommend Hot-air and a very steady robot pair of arms

20D55B5B-FF26-4872-80AA-58A13EA10313.jpeg
 
Last edited:
Feb 6, 2019 at 8:17 AM Post #4 of 473
Part 3: Ground path Return Mod

Due to the investigation of the Amp module chassis, I found out that the Ground path return could be more efficient by sanding down the Anodized layer of the chassis at the grounding screws. Theoretically speaking these are steel screws, and steels isn’t the best of conductivity. Therefore, in order to make it more efficient, we need to expose the bare Aluminum Chassis to make contacts with the Gold-plated ground plane on the PCB

Only sanding down on the chassis and not the PCB (*pictures are to shown the contacts point), Do not sand down the PCB contact points.

The sanding can be done with finest grit sand paper available, take off enough of the layering to show the surfaces

A0A3CD2C-6526-4E38-AB54-04CD118F0CB4.jpeg C5FE1B11-EDE0-40C4-9DC4-842BD8ABDC82.jpeg

The improvements are that the clarity and vivid resolutions are improved a little bit under the EX modifications package. However, @edwardsean still mentioned that his Dx208-EX still revealing some grains which is more observable after this step (But is not observable by me and Titanium version), which leads me to think of DX200 regular would also have Anodized chassis. Sure enough that it was, according to Alex picture below, and what is worse ? The main PCB screws are Black-Anodized also, which further decrease the Ground-plane-conductivity-efficiency

Therefore, thanks to @edwardsean and his great observations, the EX modifications receive (Part 3) for regular DX200.

The EX modifications were originally done for Titanium version, which chassis is not coated or Anodized, therefore the conductivity is exposed everywhere which made the Titanium has a very efficient GPR (Ground path return)

Picture courtesy of Alex, and red circle is to show the contact points that needs to be sanded down and expose the ground contact surfaces

This is very important: after the sanding, please brush and air blown the chassis clean off the metallic dust....we do not want them flying everywhere to cause potential shorts*

B612C3A7-10B3-4206-834D-6ABE57B52F0F.jpeg
 
Feb 7, 2019 at 8:09 PM Post #5 of 473
These four notes were the most essential parts of my experience getting to the EX. If you want to know more about how it sounded afterwards I’ve posted on the SQ in the main DX200 thread. I sincerely wish you all best with your modding.

The Build | notes

If you’re reading this you’ve probably already heard that the path to this upgrade is littered with the bodies of dead amp8 modules. Not one, but two of those modules are mine (RIP sweet departed 8s). My personal feeling on this is that modding is going "off-road." You don't start unless you're willing to accept the risks. There's no warranty, guarantee, or clear maps. If you're lucky you get someone who has hacked out a path in front of you. In our case, that’s Whitigir. Failure shouldn’t make you afraid but wiser. Unexpected problems are to be expected even as they take you by surprise. You keep trudging along and the last surprise is that you actually get to where you're going. Of course, whether that kind of investment is worth it for you is a personal decision. You should know from the outset though that this is–not–a paint by numbers, plug and play upgrade. The gains are great but the risks are real. You can maximize your chance for success by keeping a few things in mind.

1) Don’t do the mod yourself. If you don’t have experience working on delicate surface mount boards find a professional to do the component replacement. I’ve already shared on this a couple of times before so I won’t go into detail here. Unfortunately, it may not be easy to find someone that really knows what they’re doing and the labor is expensive. I’ve talked with a few techs now and I think somewhere around 125USD per board is fair (1 amp, 1 main), or 250 for the whole job. I found one tech near me in the Chicago area that I think is extremely skilled and I talked with him about taking on this job for anyone interested at that price. If you want to send him your whole unit or amp, PM me and I can help set things up.

2) Do the mod yourself. This is the opposite of note number 1. If you can’t find an experienced tech, and you have soldering skills, and the time, you can do, at least, amp8 yourself. I didn’t think so before, but now I’m getting pretty comfortable working with the components on these boards and it’s actually become quite enjoyable. The mod on the main board is a bit trickier because some of the work is in densely packed locations and you have to be confident with switching out the two regulator ICs. Hot air is probably the best option here and if you aren’t skilled with SMD reflow do not do what I did. I bought a hot air station, watched a bunch of YouTube videos, and tackled it like man. Believe me you will end up crying like a little girl.

However, I am convinced at this point that Jamoto is right, and that an iron is a completely viable option for amp8EX. I actually think the safest route for amp8 is with an iron and low temp solder (quikchip or fastchip). (Also, cut off the bicapped Panasonics before removing the tantalums.) If you work carefully and slowly, never forcing anything, you will not lift any pads. You can keep the temperature nice and low on those super sensitive output cap pads. I was down around 180C and didn’t have any problems. You can ramp up the temperature to 230-250 and get in and out of the larger caps near the opamps and the couple in the middle. This is advisable because those two middle caps are in a crowded location. If you were to work with lower heat the time necessary can cause the small resistors nearby to desolder before the caps. You may want to do these small caps under a magnifying glass or endoscopic cam. A key to ensuring a good outcome is to find an old SMD board that you can practice on. Don’t make the amp8 your practice board. I offer this specific note because, after seeing the work of gannjunior’s tech, I realized that a bunch of techs out there aren’t going to take as much care with your amp as you yourself.

So, that’s the tricky part. Step three and four can be done by anyone regardless of skill. Step three is really more of a craft project so if you can’t find a qualified tech ask your mom to do it. I’m sure she won’t charge you too much (grin).

3) TDK and GRP. Whit posted instructions for Chaiyuta’s TDK sheeting mod a while back, but just recently put up the Ground Return Path (GRP) mod. I would recommend doing these together because they both affect the final sound. When you do the GRP mod you will get improved performance and you will notice it right away in the increased treble energy. Unlike the transient intermodulation distortion you’re getting from noisy components, this is clean treble. So if you restricted the amount of TDK sheeting to retain a bright tonality the GRP mod will cause you to adjust this and use more of the sheeting. Basically, you can suppress more noisy energy with the TDK sheets as you reveal more clean energy with the GRP mod.

As for the disassembly, when you follow Twister’s excellent guide make sure to eject your SD card or the main board won’t come out. Also, for me, the one tricky part was the ribbon cable that connects the volume/power controls. I thought I had to get the white line on the ribbon to reach all the way to the edge of the housing. I pushed it in with a tweezer and ripped the ribbon at the right angle. You actually don’t need to force it in further, it will just slide into place. You shouldn’t have any problems, but the tight bend does it make possible to damage this thin ribbon. In this unlikely event you can contact Paul and get a replacement for cheap. IBasso is the best.

4) Digital EX (DSD). This last note is not part of the EX mod, but for me the software enhancements are a substantial part of the upgraded sound. In order of descending importance to SQ they are: DSD upconversion, Fidelizer’s Advanced Rom with Lurker’s FW, UAPP, and the latest Oreo 8.1 release. The EX mod is all about fidelity and improving the SNR. These software modifications also accomplish this aim and the analog and digital sides synergize together. I would say, if you’re going to go through all the trouble of the hardware mods these far simpler and cheaper steps only make sense.
 
Feb 8, 2019 at 3:24 AM Post #6 of 473
Thanks @edwardsean for sharing the tips above , and yeah I agree about the software part. Hardware is the body and software is the spirit. Even in building or modifying a vehicle, without a good software tuner, the car would destroy itself and not running correctly. In our hobby, without a good tuner and the software development, the sound would have been ruined and won’t be to it most performances. This is exactly another reason why I love DX200 as a platform so much.

Also, thanks again for going out and look for a good tech who can tackles the Job of performing EX modifications for us all within the US !

I love both Lurker firmware and advanced Fidelizer ROM.
 
Last edited:
Feb 9, 2019 at 2:30 AM Post #7 of 473
Please tell me.
Since the parts ordered for EX have been shipped, we began removing capacitors.
(I tried to make it EX with AMP 7, but I made it to AMP 8 because it is denser than AMP 8)
Dy8ggeSVsAIjZh7.jpg


And now I noticed the designation of 100uF x2 on the back of AMP8.
Is this capacitor also subject to replacement for KEMET COTS capacitor?
(Is the image before exchanging)
Dy8hFKEV4AIomcm.jpg

I am impatient as to whether the DX 200 main unit is running out. :ghost:
 
Last edited:
Feb 9, 2019 at 5:19 AM Post #8 of 473
Please tell me.
Since the parts ordered for EX have been shipped, we began removing capacitors.
(I tried to make it EX with AMP 7, but I made it to AMP 8 because it is denser than AMP 8)
Dy8ggeSVsAIjZh7.jpg


And now I noticed the designation of 100uF x2 on the back of AMP8.
Is this capacitor also subject to replacement for KEMET COTS capacitor?
(Is the image before exchanging)
Dy8hFKEV4AIomcm.jpg

I am impatient as to whether the DX 200 main unit is running out. :ghost:

Yes, you are correct.
These 2 need to be replaced with COTS KEMET
Yes, image was before the upgrades

Also, the blue MLcC will need to be taken out too (removed) for the EX application
 
Last edited:
Feb 9, 2019 at 7:49 AM Post #9 of 473
Yes, you are correct.
These 2 need to be replaced with COTS KEMET
Yes, image was before the upgrades

Also, the blue MLcC will need to be taken out too (removed) for the EX application

Thank you very much.
I missed it.
EX understand that exchanging all the analog part with the power supply line is correct.

Uh huh. Because ordering is strict with two CAPs, I think whether AMP 7 will also go with momentum:grin:
 
Feb 9, 2019 at 8:51 AM Post #10 of 473
Thank you very much.
I missed it.
EX understand that exchanging all the analog part with the power supply line is correct.

Uh huh. Because ordering is strict with two CAPs, I think whether AMP 7 will also go with momentum:grin:

I would order some extras and perform some extra Amp8-EX and offer to our fellow members (with some fees) who need helps within Japan or else where ? :D, so that you can buy and have the parts shipping worth your while helping others too.

Amp8-EX will also work in dx220 :wink:! Or dx150
 
Last edited:
Feb 9, 2019 at 9:52 AM Post #11 of 473
I would order some extras and perform some extra Amp8-EX and offer to our fellow members (with some fees) who need helps within Japan or else where ? :D, so that you can buy and have the parts shipping worth your while helping others too.

Amp8-EX will also work in dx220 :wink:! Or dx150

That is a good idea. :thumbsup: But ...:thinking:
That is ... It is possible because of my DX200, but it is difficult for other people because I can not take responsibility.
I use solder iron with silver and copper mixed solder without reflow.
When such a small girl (also called a cat) rampage at that time I will purchase several DX200:scream:
 
Feb 13, 2019 at 7:19 PM Post #14 of 473
Woaaa! Cleanly done! Congratulation on Amp8-EX !!

I am in love with your ironing skills ! Can you modify me another EX :wink: ?

hank you very much!

Now I am struggling to remove 22uF of IV conversion part of DAC.
I will order a flat-head type iron to protect PPS Cap:sweat_smile:
It seems that it will take an endless time to make the DX200 EX, but I enjoy it.

I'm sorry. Endless time for your request ... very very very:zzz:
 

Users who are viewing this thread

Back
Top