


- Joined
- Jan 30, 2011
- Posts
- 13,315
- Likes
- 24,354
So you’ve started reviewing your own gear, and you’re enjoying the process, and you want to take it to the next level. What do you use, how do you use it, and why would you need to consider specialised equipment?
Welcome to chapter two – where I’ll outline the equipment I use, and give a brief overview of how I use it, some of the advantages and pitfalls, and most importantly why I think measuring equipment is essential in a well-balanced review. And for my fellow reviewers – please contribute your own thoughts, tips, and advice on what you use and why. Also feel free to disagree with anything I suggest. We’ll treat this as a learning curve together.
NOTE – please excuse the photos this time – I can’t reproduce this in a proper setting (light-box), so what you’re getting is pretty amateurish compared to my usual output!
So let’s skip back a bit a few years, to when I first started reviewing my own gear. The first portable amp/dac I owned after joining Head-Fi was the original E7. I’ve since amended the original review, but I can still remember waxing lyrical about the increase in clarity, sound-stage, bass definition, and all other manner of magic. It was a great improvement over my iPod Touch by itself – fantastic!
Fast forward a few years, and I am now a bit older and a lot wiser. I’d actually love to repeat the testing with the knowledge gained in the last few years, and the very first thing I would do is volume match the two items I was comparing. And not volume matching by ear, or by iPhone app – I’d use a proper SPL meter. The one thing I cringe at a lot of times is the mantra “trust your own ears”. Every time I see this spoken on the forums, my immediate thoughts are:
“No problem with trusting my ears mate – it’s the brain that is a little trickier”.
You see – one of the biggest issues I’ve found as I’ve gained more experience is that our wonderful brains have a habit of adapting to the environment it is in, and we (humans) also seem to have some common physiological responses to external stimuli, and no matter how hard we try to override them, they still influence what we think we’re hearing.
So – the first real tool for my reviewing was a proper calibrated SPL meter. They aren’t expensive – but they are essential if you want to make a proper comparison. Want to test my “theory” out? You’ll need someone to help you, two similar sounding amps (or headphones or any piece of equipment really). You’ll also need an SPL meter. Firstly – match by ear and do a sighted evaluation of which sounds better. I almost guarantee that one will be subjectively more vivid, more detailed, have better bass definition, more sound stage – all the things that we read often in a review – especially comparing a straight source with the same source adding a portable amplifier. I’d further guess that unknowingly one of the two is louder than the other – probably by as little as 1 dB, but maybe more. You see, we perceive something slightly louder as being (among other things) - more vivid, more detailed, having better bass definition, more sound stage etc. It’s not our fault – it’s how we’re wired. It is what makes us human. To test it, all you need to do is volume match properly with the SPL meter (to within 0.1-0.2 dB), and then get your friend to conduct a blind test where you don’t know the source. See if you can tell which source is which volume matched, and then get your partner to randomly increase the volume of one marginally, and see if your impressions change.
So what have we learnt? If we’re not accurately volume matching before making a comparison of any equipment, there is a high likelihood that our impressions of the advantages of a product will be heavily weighted towards the product which has more volume.
Why do we always read that an amplifier always makes our headphones sound better – even when the specifications of the headphone suggest that amplification won’t help? Because usually we’ll listen to the amplified version louder – we just won’t know it.
So we’ve covered the why – let’s look at what I use and how.
My tool of choice is equivalent to this Amazon product. To use it, I mostly use an IEM and a coupler (just a simple tube which snuggly fits the meter and the IEM). I then play a calibrated test tone (usually 1 kHz – you can create and down load these here http://onlinetonegenerator.com/). Then it’s just a simple matter of adjusting the volume on both sources until they match exactly.
And this introduces the next (very cheap piece of equipment) I use for comparing IEMs. It’s just a simple two way splitter, and a Shure volume attenuator. When comparing IEMs, simply attach the splitter to the output of your source, and the louder of the two IEMs (usually the one with lower impedance and/or higher sensitivity) gets the attenuator in-line. Set the volume so the two match, secure the volume control with a bit of blue tack, recheck again, and then you can fast switch between two IEMs very quickly.
Why do we need to do this? Well we already know why they must be volume matched, and the fast switching is simply because our echoic memory is actually pretty poor. Anything over about 10 seconds and we’re not really able to remember the differences we’re trying to compare. So the quicker we can compare the better. Eventually I’d like to find a nice splitter box with integrated volume controls on each channel – that would make the whole switching exercise a lot better.
One final thing – when testing IEMs that might have very different signatures – what frequency do you use? Most of the time I use the standard 1 kHz test tone. Occasionally I’ll use a 2 kHz tone (depending on the frequency shape of the earphone). We know that our hearing is generally most sensitive at the 1-3 kHz range, its where we perceive sound as being the loudest, and I guess this is because it is where a lot of enunciation of human speech lives. So it makes sense for comparison to make this the central point for setting the volume. Then we can comparatively describe differences in the rest of the signature because we have a fixed common point for both IEMs / sources.
But one thing I usually do now before volume matching is first measure the frequency response (if I’m comparing IEMs) because sometimes you’ll have one IEM with a dip at 1 kHz and another with a peak or boost. So in this case if I set the volume at 1 kHz – it would skew the results at other ends of the frequency spectrum. In cases like that – choose a frequency response point where both IEMs are consistent, without having the entire frequency domain completely out of whack.
This leads us to frequency measurement (and a host of other measurable information).
Probably the centre of my testing lab now revolves around my measurement equipment for IEMs and also for other equipment. Unfortunately it’s not uber precise gear, but for the hobbyist it is perfect – low cost, reasonably accurate, and as long as we look at the data comparatively, enough to give us a read on differences.
So what you need here is a soundcard (input and output channels), a coupler to mimic an ear canal, and some software to measure the results and provide meaningful visual output (graphs). As a soundcard, I use a very cheap USB micro unit from Startech which actually works a lot better than my on-board, and was recommended by the makers of the coupler. The coupler is the very affordable Vibro Veritas – which is essentially a microphone mounted at the bottom of a coupling mechanism.
The software is the truly excellent ARTA software suite which allows me to play selected sine waves / pink noise / white noise in set patterns though the sound card, to the earphones being tested, and then they sit in the coupler which is attached to mic input and recorded. The ARTA software then analyses the result, and produces an absolute plethora of information about what you’re measuring. Your job is the to interpret the output, and put the results into meaningful commentary in the review.
OK Brooko – so what do you measure and why?
Let’s start with the easy part – IEMs. The obvious thing we can measure is the frequency response, but we can also output CSD plots which allow us to see decay in certain frequencies over time, and identify any particular problem areas which could indicate things like driver ringing or unwanted resonances. There are also screens for impulse response, burst decay, and other reports – but I don’t know enough about those tools yet to be able to utilise them.
I have also set up an extremely basic contraption to measure full sized headphones – but it is very rudimentary, nowhere near accurate, and has nothing to allow for interaction with the outer ear. What it has allowed me to do is measure comparative bass and mid-range though, which has been handy when working out what a little EQ in the lower end of the spectrum does. The funny thing about this rudimentary set-up was that I was talking to Jude a couple of weeks ago on the phone about setting up the blog, and we were talking about measuring systems. It led to discussion about what he was planning and what I was doing (with measuring gear), and at one stage he mentioned that some people were simply using a mic with headphones stretched across a box, and how wrong that was. We didn’t have time to cover what I was doing – but I’m sure he’ll be amused when he sees my rig. I basically use Veritas nestled in a pad of foam with a soft outer surface (bubble wrap carefully covered with shrink-wrap. I then have the headphones sitting across a box, but it is measured to be the exact width as my head (with the pad included), and it delivers surprising consistent results. What I’d love to do is get a working model of an outer ear – that would be neat to incorporate!
Still using the same sound card and ARTA I can also perform loopback tests with DACs, DAPs and amps, and this can give me really good data on frequency response (is it flat from 20-20?), and things like gain, and bass boost or tone controls. For example, I used this on the E17K test, and it gave me some really good results - allowing me to map the tone controls, and the volume of the gain. The beauty of this, is I can also measure filtering roll-offs, and even EQ effects on headphones.
I have also been able to measure THD and IMD – but I stopped measuring that recently because I realised the limiting factor was the equipment – most competently designed audio gear is either at or below the threshold of the little Startech unit I’m using. What I really need is a better external sound card – but that is going to have to wait until much later in my reviewing “career” I think.
So – I have the gear, and the reports – what are the pitfalls, or some of the issues I’ve had?
By far the biggest issue is the accuracy of the coupler – it gives me raw data, but it isn’t compensated to any standard. When I compare IEMs I have to the same ones Tyll has measured though (on properly calibrated gear), my raw data isn’t a million miles away from his (see example). I was all set to try and introduce a calibration profile, and discussed this with Jude. He gave me some really good advice – and suggested not to change anything. His reasoning is that every measurement rig is different in some form or other. As long as when I’m measuring IEM’s I explain the limitations of the system, and mainly use it for comparative data (i.e. comparing different IEMs), then there is no need to change what I’m doing for now.
Other issues include consistency – basically to get the coupler to have consistent fit all the time I need to use foam tips – and sometimes I have to switch the settings around to get a decent reading. I’ve also often measured and measured for hours sometimes to make sure the read get is consistent. For me it is not usable unless I can get practically the same result again the very next day.
Then there is also the sound card’s relatively high impedance (I think it’s about 6-7 ohms), but I’ve overcome that with introducing the E11K into the mix.
This is starting to get overly long now so I’ll try and shorten it a bit, and save some for another blog entry.
The final pieces of equipment I use are a home-made light box (please don’t laugh, I built it myself, and it works surprisingly well) coupled with a relatively cheap Canon EOS series DSLR camera. The light box is getting too small, so mark two is well overdue to be built.
I also use MS word to write the reviews, Paint Shop Pro to manipulate the images, and the formatting I actually do inside Head-Fi’s editor software.
The final piece of the puzzle is my own ears. They are the equipment I use most, but the ones I trust the least. I always listen first (now), and then use the measurement information to either confirm, clarify, or understand what I’m hearing.
So let’s call it quits this week on that note.
If you have questions about the gear, fire away. I’ll answer where I can, and others can chime in and help me. If there are others who review – what equipment do you use and why?
For next week (or the next chapter anyway), I want to take a closer look at the basics I apply to my own reviews, what I include and why.
Welcome to chapter two – where I’ll outline the equipment I use, and give a brief overview of how I use it, some of the advantages and pitfalls, and most importantly why I think measuring equipment is essential in a well-balanced review. And for my fellow reviewers – please contribute your own thoughts, tips, and advice on what you use and why. Also feel free to disagree with anything I suggest. We’ll treat this as a learning curve together.
NOTE – please excuse the photos this time – I can’t reproduce this in a proper setting (light-box), so what you’re getting is pretty amateurish compared to my usual output!
So let’s skip back a bit a few years, to when I first started reviewing my own gear. The first portable amp/dac I owned after joining Head-Fi was the original E7. I’ve since amended the original review, but I can still remember waxing lyrical about the increase in clarity, sound-stage, bass definition, and all other manner of magic. It was a great improvement over my iPod Touch by itself – fantastic!
Fast forward a few years, and I am now a bit older and a lot wiser. I’d actually love to repeat the testing with the knowledge gained in the last few years, and the very first thing I would do is volume match the two items I was comparing. And not volume matching by ear, or by iPhone app – I’d use a proper SPL meter. The one thing I cringe at a lot of times is the mantra “trust your own ears”. Every time I see this spoken on the forums, my immediate thoughts are:
“No problem with trusting my ears mate – it’s the brain that is a little trickier”.
You see – one of the biggest issues I’ve found as I’ve gained more experience is that our wonderful brains have a habit of adapting to the environment it is in, and we (humans) also seem to have some common physiological responses to external stimuli, and no matter how hard we try to override them, they still influence what we think we’re hearing.
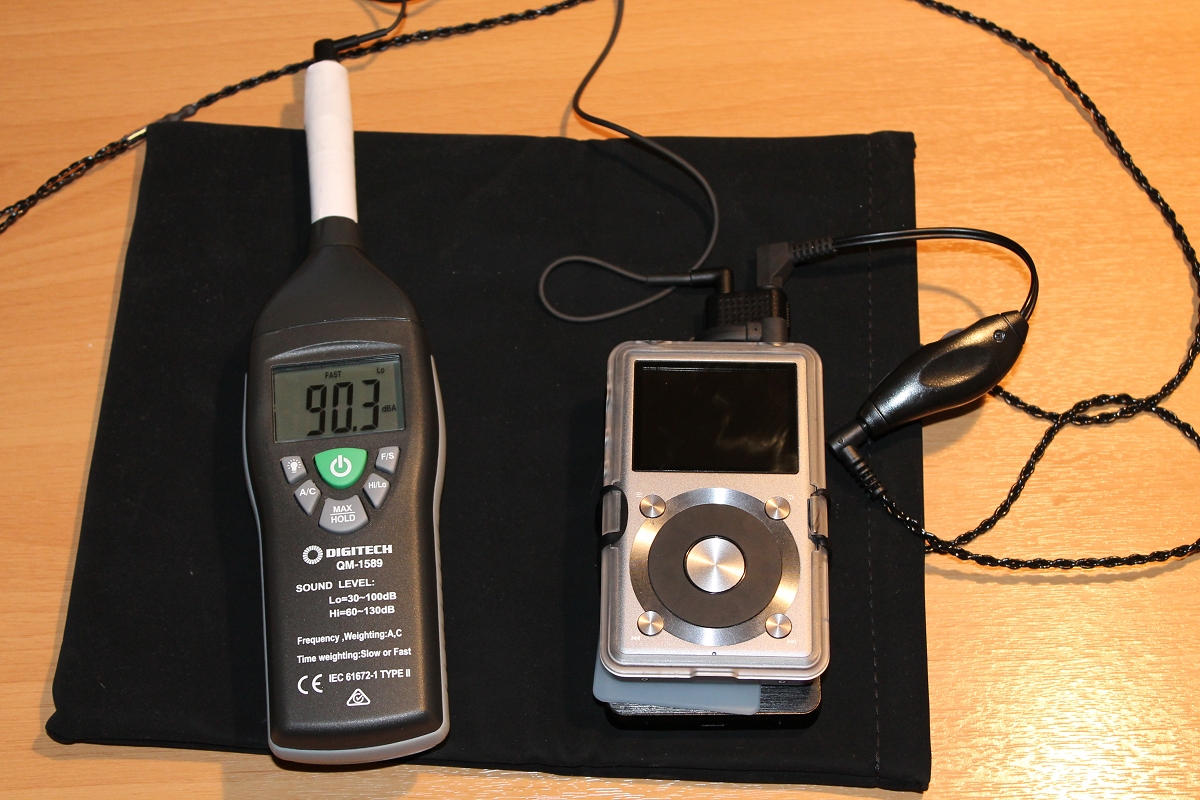
Measuring the q-Jays - X3ii + E17K + splitter + attenuator | Volume matching the Adel U6 - X3ii + E17K + splitter + attenuator |
So – the first real tool for my reviewing was a proper calibrated SPL meter. They aren’t expensive – but they are essential if you want to make a proper comparison. Want to test my “theory” out? You’ll need someone to help you, two similar sounding amps (or headphones or any piece of equipment really). You’ll also need an SPL meter. Firstly – match by ear and do a sighted evaluation of which sounds better. I almost guarantee that one will be subjectively more vivid, more detailed, have better bass definition, more sound stage – all the things that we read often in a review – especially comparing a straight source with the same source adding a portable amplifier. I’d further guess that unknowingly one of the two is louder than the other – probably by as little as 1 dB, but maybe more. You see, we perceive something slightly louder as being (among other things) - more vivid, more detailed, having better bass definition, more sound stage etc. It’s not our fault – it’s how we’re wired. It is what makes us human. To test it, all you need to do is volume match properly with the SPL meter (to within 0.1-0.2 dB), and then get your friend to conduct a blind test where you don’t know the source. See if you can tell which source is which volume matched, and then get your partner to randomly increase the volume of one marginally, and see if your impressions change.
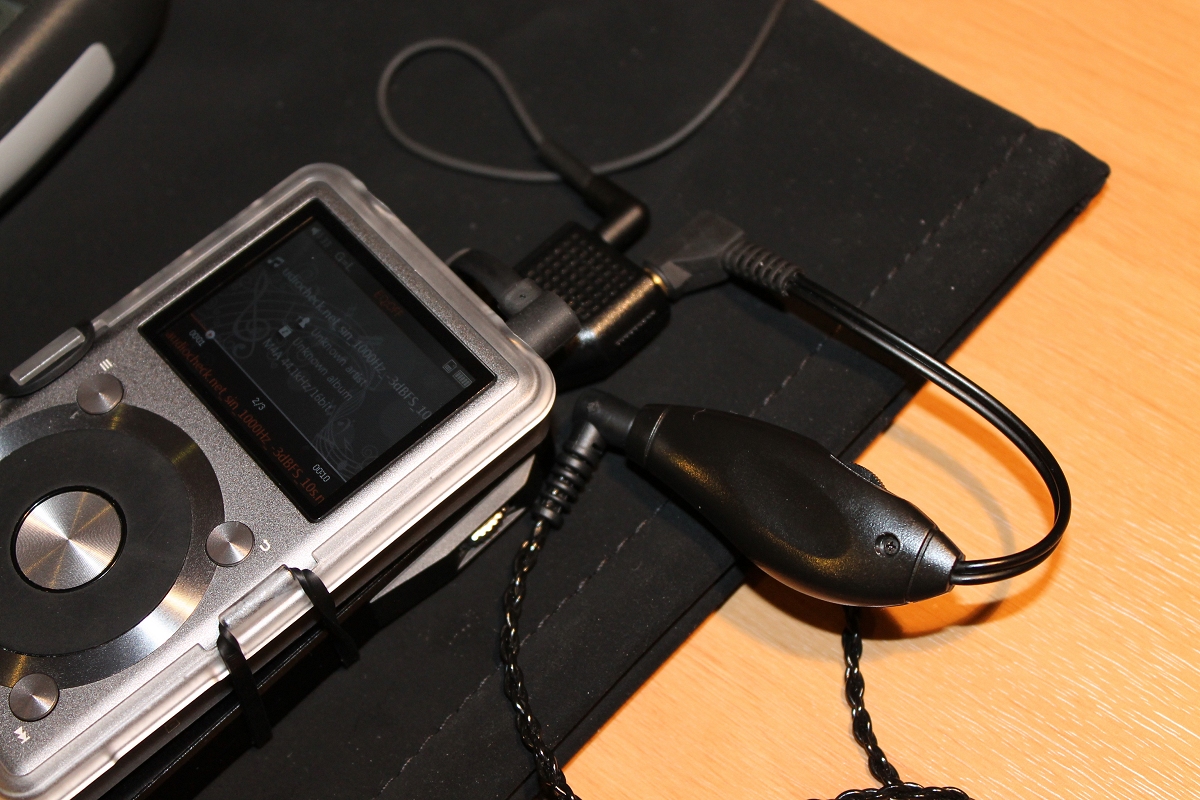
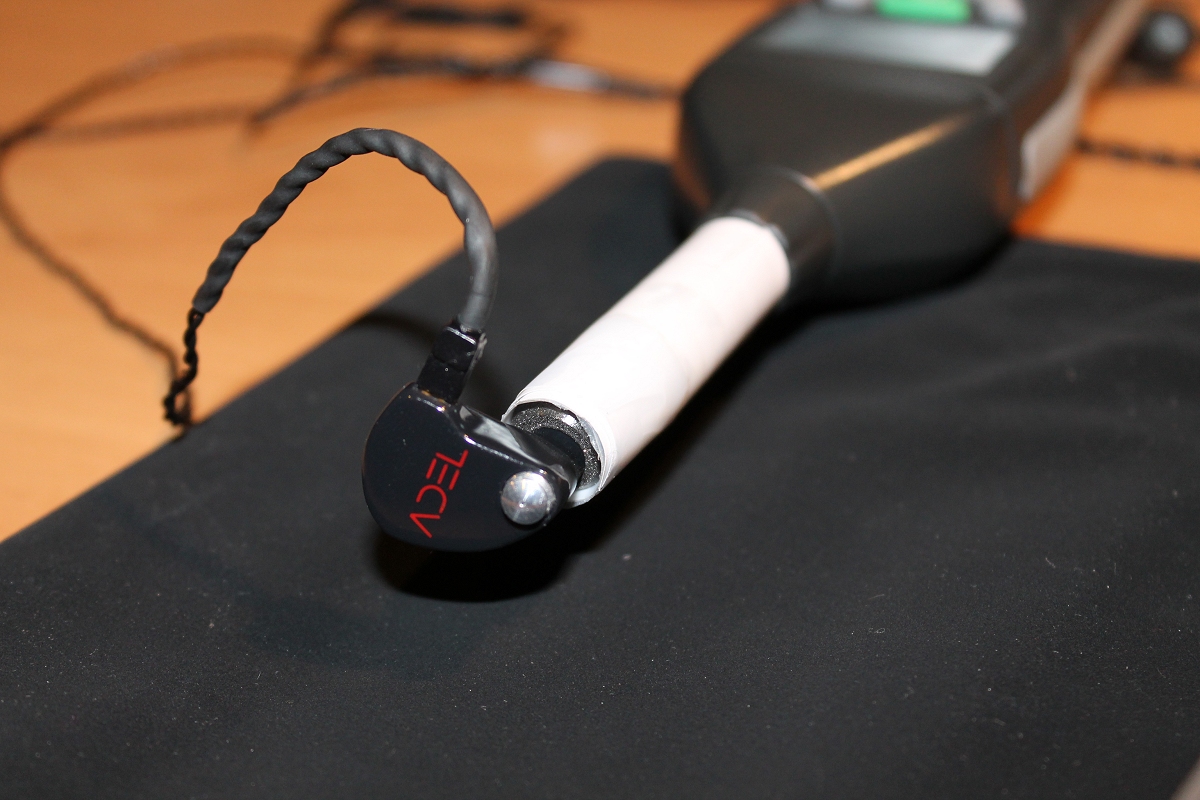
Splitter + attenuator | Adel U 6 mounted in a simple coupler |
So what have we learnt? If we’re not accurately volume matching before making a comparison of any equipment, there is a high likelihood that our impressions of the advantages of a product will be heavily weighted towards the product which has more volume.
Why do we always read that an amplifier always makes our headphones sound better – even when the specifications of the headphone suggest that amplification won’t help? Because usually we’ll listen to the amplified version louder – we just won’t know it.
So we’ve covered the why – let’s look at what I use and how.
My tool of choice is equivalent to this Amazon product. To use it, I mostly use an IEM and a coupler (just a simple tube which snuggly fits the meter and the IEM). I then play a calibrated test tone (usually 1 kHz – you can create and down load these here http://onlinetonegenerator.com/). Then it’s just a simple matter of adjusting the volume on both sources until they match exactly.
And this introduces the next (very cheap piece of equipment) I use for comparing IEMs. It’s just a simple two way splitter, and a Shure volume attenuator. When comparing IEMs, simply attach the splitter to the output of your source, and the louder of the two IEMs (usually the one with lower impedance and/or higher sensitivity) gets the attenuator in-line. Set the volume so the two match, secure the volume control with a bit of blue tack, recheck again, and then you can fast switch between two IEMs very quickly.
Why do we need to do this? Well we already know why they must be volume matched, and the fast switching is simply because our echoic memory is actually pretty poor. Anything over about 10 seconds and we’re not really able to remember the differences we’re trying to compare. So the quicker we can compare the better. Eventually I’d like to find a nice splitter box with integrated volume controls on each channel – that would make the whole switching exercise a lot better.
One final thing – when testing IEMs that might have very different signatures – what frequency do you use? Most of the time I use the standard 1 kHz test tone. Occasionally I’ll use a 2 kHz tone (depending on the frequency shape of the earphone). We know that our hearing is generally most sensitive at the 1-3 kHz range, its where we perceive sound as being the loudest, and I guess this is because it is where a lot of enunciation of human speech lives. So it makes sense for comparison to make this the central point for setting the volume. Then we can comparatively describe differences in the rest of the signature because we have a fixed common point for both IEMs / sources.
But one thing I usually do now before volume matching is first measure the frequency response (if I’m comparing IEMs) because sometimes you’ll have one IEM with a dip at 1 kHz and another with a peak or boost. So in this case if I set the volume at 1 kHz – it would skew the results at other ends of the frequency spectrum. In cases like that – choose a frequency response point where both IEMs are consistent, without having the entire frequency domain completely out of whack.
This leads us to frequency measurement (and a host of other measurable information).
Probably the centre of my testing lab now revolves around my measurement equipment for IEMs and also for other equipment. Unfortunately it’s not uber precise gear, but for the hobbyist it is perfect – low cost, reasonably accurate, and as long as we look at the data comparatively, enough to give us a read on differences.
Vibro Veritas couple and mic | You can just see the mic at the bottom of the coupler |
So what you need here is a soundcard (input and output channels), a coupler to mimic an ear canal, and some software to measure the results and provide meaningful visual output (graphs). As a soundcard, I use a very cheap USB micro unit from Startech which actually works a lot better than my on-board, and was recommended by the makers of the coupler. The coupler is the very affordable Vibro Veritas – which is essentially a microphone mounted at the bottom of a coupling mechanism.
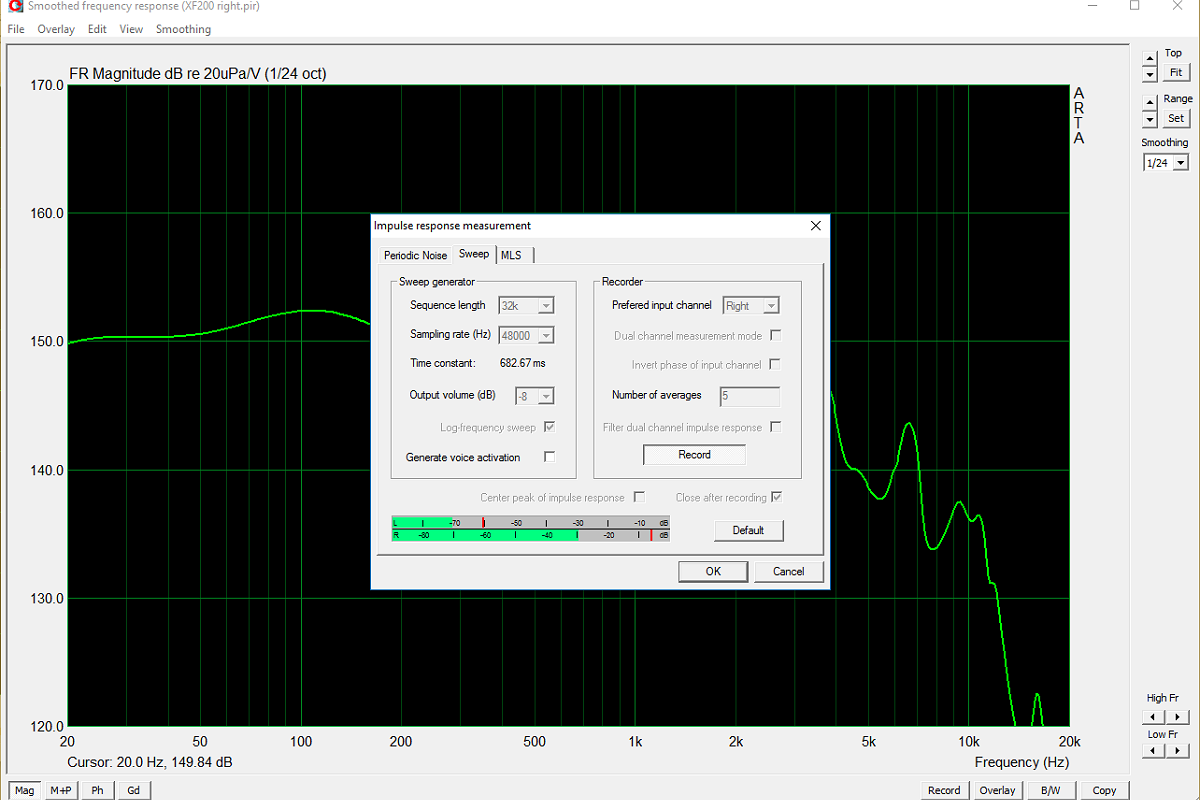
The software is the truly excellent ARTA software suite which allows me to play selected sine waves / pink noise / white noise in set patterns though the sound card, to the earphones being tested, and then they sit in the coupler which is attached to mic input and recorded. The ARTA software then analyses the result, and produces an absolute plethora of information about what you’re measuring. Your job is the to interpret the output, and put the results into meaningful commentary in the review.
Startech sound card | Sound card to E11K to Adel U6 connected to Veritas connected to sound card |
OK Brooko – so what do you measure and why?
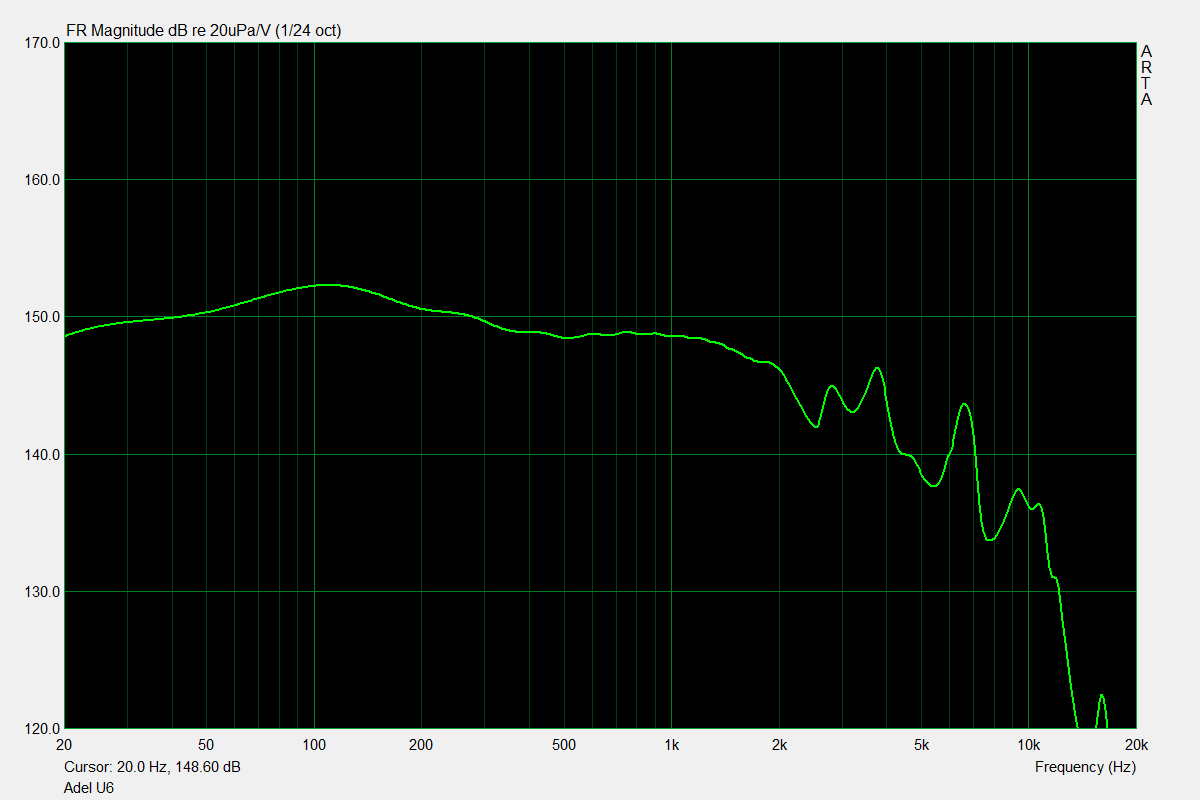
Let’s start with the easy part – IEMs. The obvious thing we can measure is the frequency response, but we can also output CSD plots which allow us to see decay in certain frequencies over time, and identify any particular problem areas which could indicate things like driver ringing or unwanted resonances. There are also screens for impulse response, burst decay, and other reports – but I don’t know enough about those tools yet to be able to utilise them.
| [size=inherit] | ||
Recording in progress | Adel U6 frequency response | Adel U6 CSD |
I have also set up an extremely basic contraption to measure full sized headphones – but it is very rudimentary, nowhere near accurate, and has nothing to allow for interaction with the outer ear. What it has allowed me to do is measure comparative bass and mid-range though, which has been handy when working out what a little EQ in the lower end of the spectrum does. The funny thing about this rudimentary set-up was that I was talking to Jude a couple of weeks ago on the phone about setting up the blog, and we were talking about measuring systems. It led to discussion about what he was planning and what I was doing (with measuring gear), and at one stage he mentioned that some people were simply using a mic with headphones stretched across a box, and how wrong that was. We didn’t have time to cover what I was doing – but I’m sure he’ll be amused when he sees my rig. I basically use Veritas nestled in a pad of foam with a soft outer surface (bubble wrap carefully covered with shrink-wrap. I then have the headphones sitting across a box, but it is measured to be the exact width as my head (with the pad included), and it delivers surprising consistent results. What I’d love to do is get a working model of an outer ear – that would be neat to incorporate!
| [size=inherit] | ||
Veritas and my "face pad" | Measuring HD600 | This set up is exactly the width of my head |
Still using the same sound card and ARTA I can also perform loopback tests with DACs, DAPs and amps, and this can give me really good data on frequency response (is it flat from 20-20?), and things like gain, and bass boost or tone controls. For example, I used this on the E17K test, and it gave me some really good results - allowing me to map the tone controls, and the volume of the gain. The beauty of this, is I can also measure filtering roll-offs, and even EQ effects on headphones.
I have also been able to measure THD and IMD – but I stopped measuring that recently because I realised the limiting factor was the equipment – most competently designed audio gear is either at or below the threshold of the little Startech unit I’m using. What I really need is a better external sound card – but that is going to have to wait until much later in my reviewing “career” I think.
Example of a loopback test - testing the E11K | Close up of the Veritas coupler in action |
So – I have the gear, and the reports – what are the pitfalls, or some of the issues I’ve had?
By far the biggest issue is the accuracy of the coupler – it gives me raw data, but it isn’t compensated to any standard. When I compare IEMs I have to the same ones Tyll has measured though (on properly calibrated gear), my raw data isn’t a million miles away from his (see example). I was all set to try and introduce a calibration profile, and discussed this with Jude. He gave me some really good advice – and suggested not to change anything. His reasoning is that every measurement rig is different in some form or other. As long as when I’m measuring IEM’s I explain the limitations of the system, and mainly use it for comparative data (i.e. comparing different IEMs), then there is no need to change what I’m doing for now.
Other issues include consistency – basically to get the coupler to have consistent fit all the time I need to use foam tips – and sometimes I have to switch the settings around to get a decent reading. I’ve also often measured and measured for hours sometimes to make sure the read get is consistent. For me it is not usable unless I can get practically the same result again the very next day.
Then there is also the sound card’s relatively high impedance (I think it’s about 6-7 ohms), but I’ve overcome that with introducing the E11K into the mix.
This is starting to get overly long now so I’ll try and shorten it a bit, and save some for another blog entry.
The final pieces of equipment I use are a home-made light box (please don’t laugh, I built it myself, and it works surprisingly well) coupled with a relatively cheap Canon EOS series DSLR camera. The light box is getting too small, so mark two is well overdue to be built.
| [size=inherit] | ||
Home made light box | The tiny Fiio A1 in the light box | What you see on the reviews |
I also use MS word to write the reviews, Paint Shop Pro to manipulate the images, and the formatting I actually do inside Head-Fi’s editor software.
The final piece of the puzzle is my own ears. They are the equipment I use most, but the ones I trust the least. I always listen first (now), and then use the measurement information to either confirm, clarify, or understand what I’m hearing.
So let’s call it quits this week on that note.
If you have questions about the gear, fire away. I’ll answer where I can, and others can chime in and help me. If there are others who review – what equipment do you use and why?
For next week (or the next chapter anyway), I want to take a closer look at the basics I apply to my own reviews, what I include and why.


")

