SOHA II Builders Thread
Dec 15, 2013 at 9:01 PM Post #1,651 of 1,694
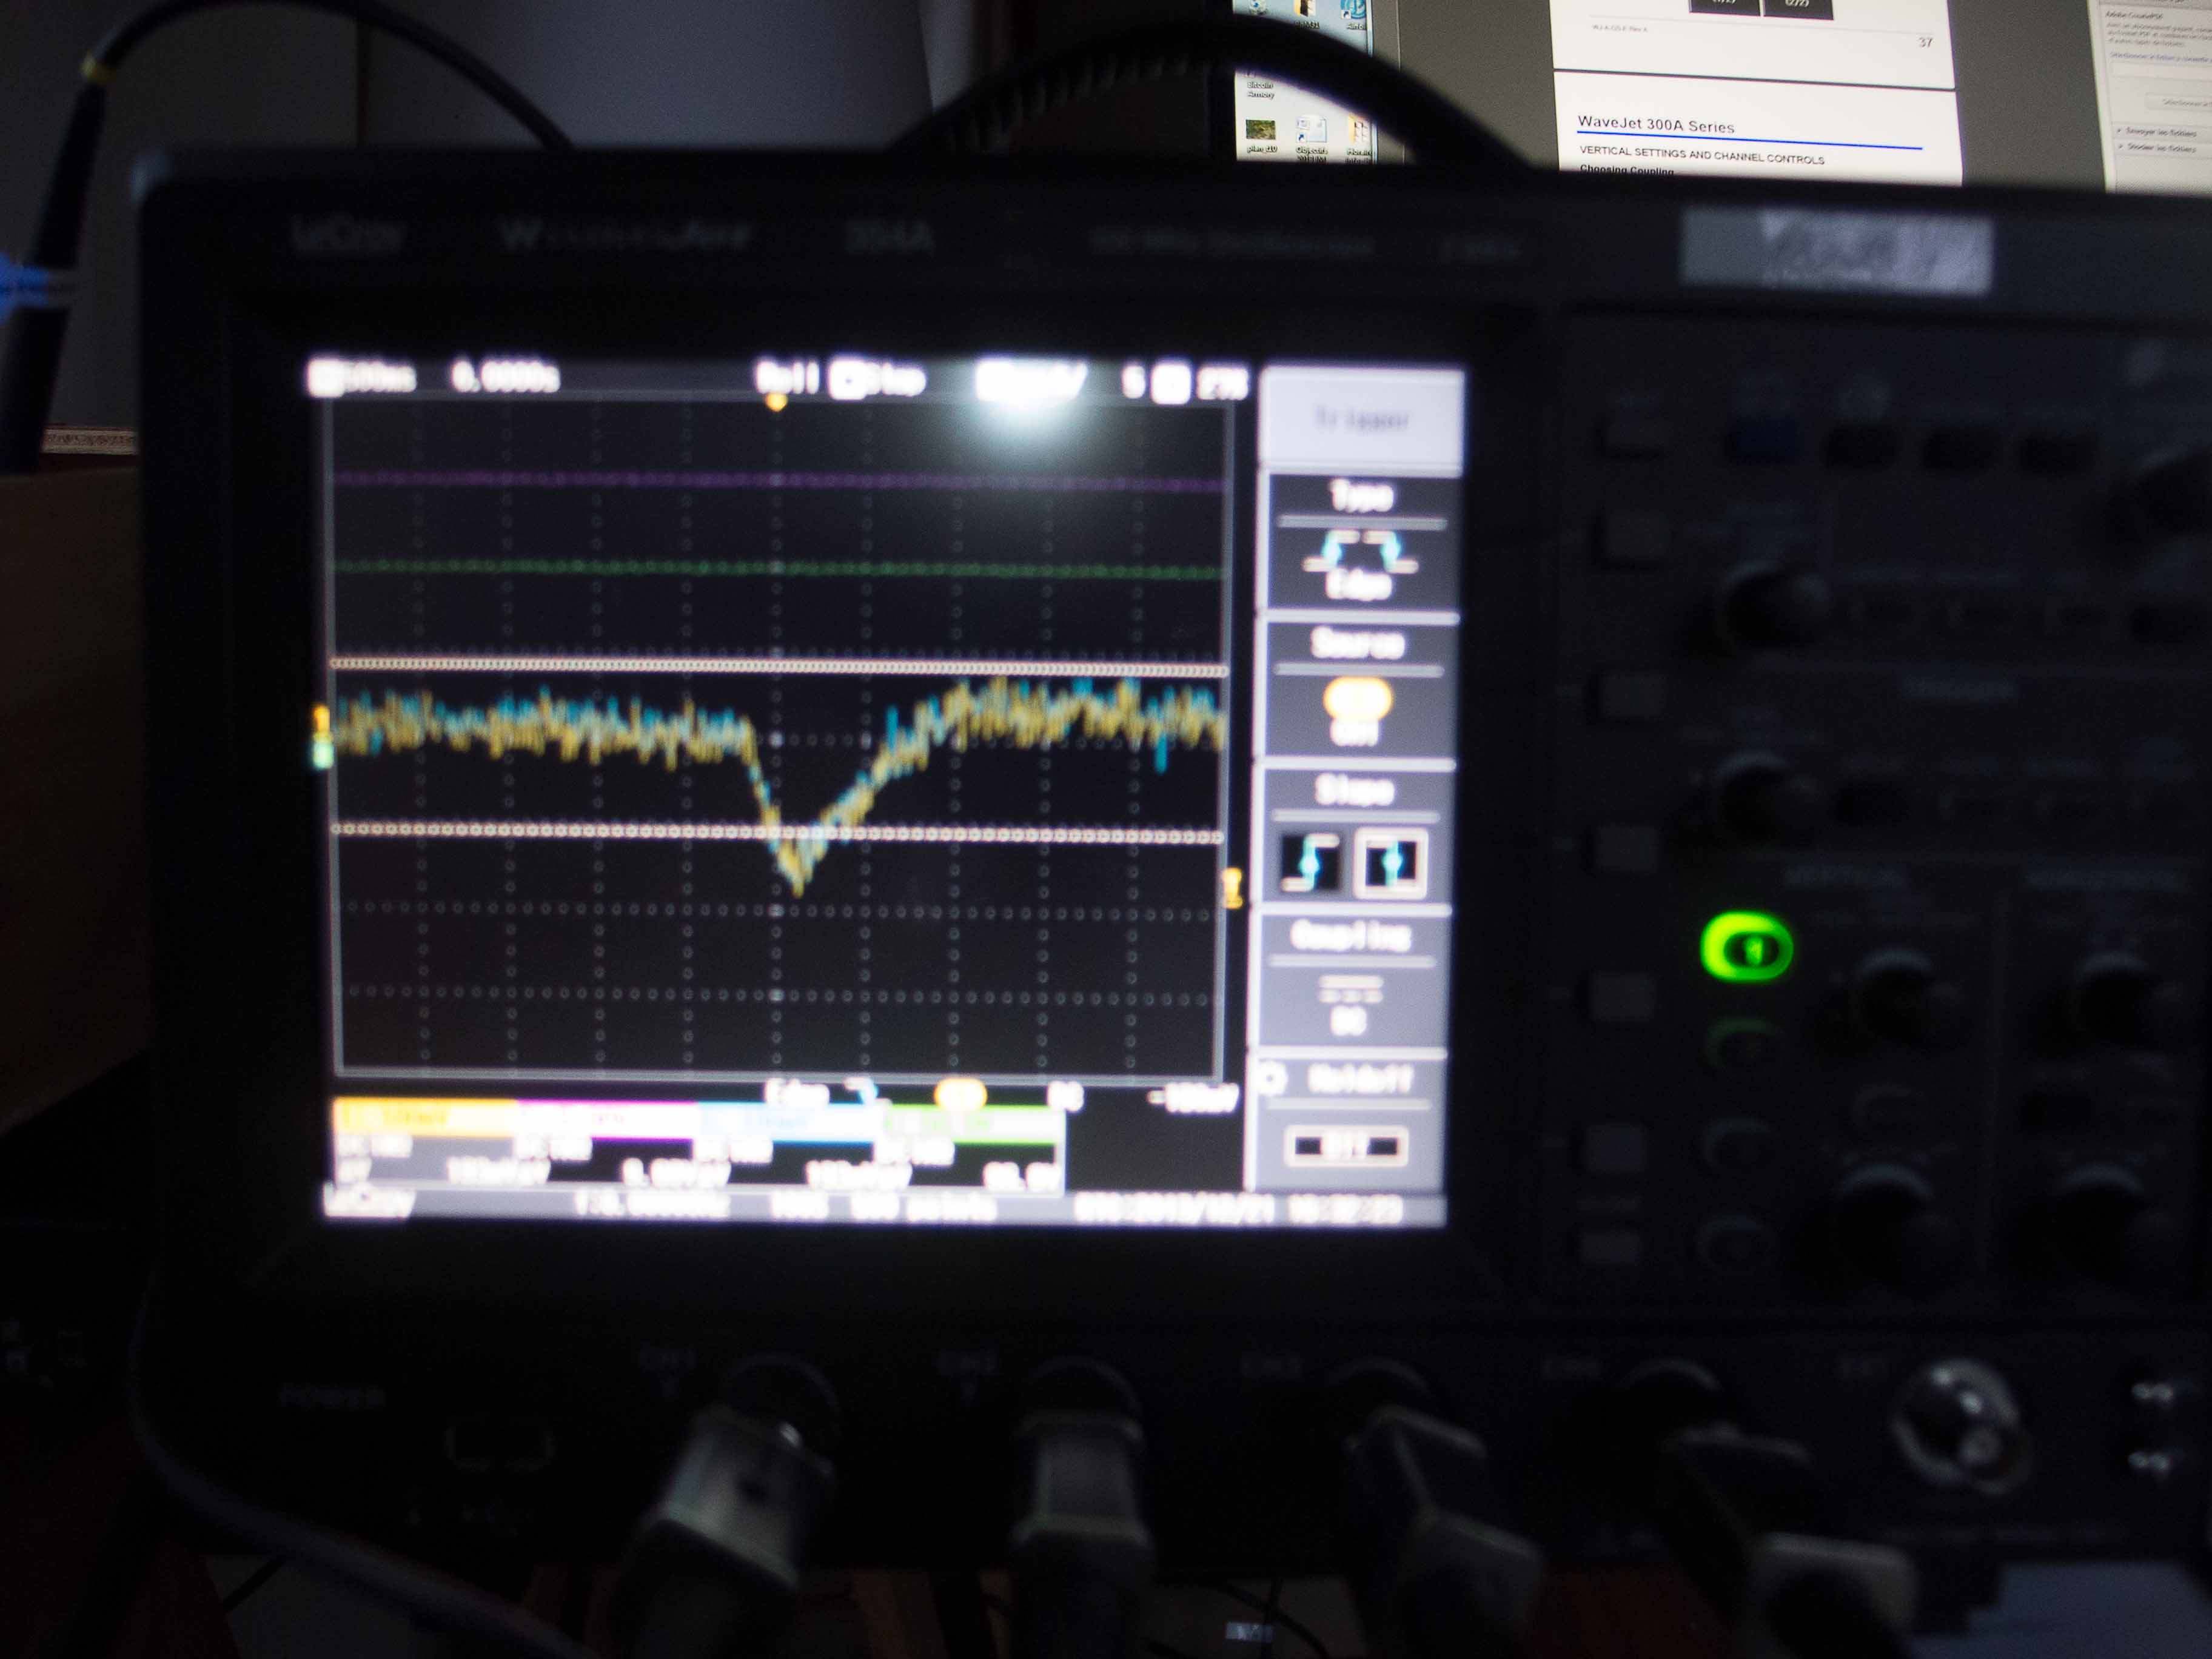
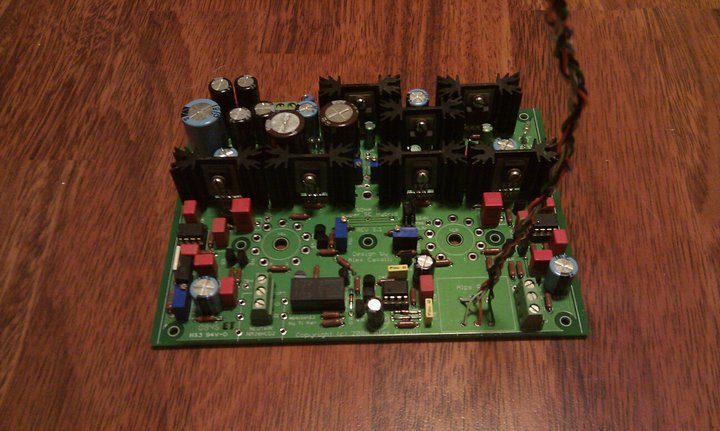
Assuming the DC spikes happen simultaneously on both channels (this can only be confirmed by you), I think the only possible scenario is the power supply, since that is the only place where both channels shares. This could be due to some instability in the ±15V regulation, however I think it is somewhat unlikely. If this is true, it is either the regulator is faulty, or there is some ringing between the capacitors, or simply a case of bad solder joint.

Whatever it is, I suspect mine has the same problem as yours.
 
Dec 21, 2013 at 3:58 AM Post #1,653 of 1,694
Hello,
 
I borrowed a scope for 2 weeks, and I started to investigate yesterday evening. I can catch some events, and I' m really puzzled:
 
Facts:
- events are between -100mV and + 100mV. They don't always have the same shape/amplitude,
- they are exactly the same on L and R channels, so it should come from a part of the circuit common to the 2 channels,
- I mesure at R8 level, so before e12 => issue should not come from there,
- I measured (with several measures) the voltage at different test points, during the events, and in all cases Voltages from power supllies are steady, when the output of the amp at R8R and R8L derives. I tested: +15 and -15 rails (at J1 and J2), TB+, TR+, TL+, TL-, TH
 
The events are much more frequent when the amp is cold than when hot.
 
I would have imagined having one of those voltages moving with the event... but it is not the case.
 
 
Below pictures:
- yellow&blue= output at R8L and R8R
- red and green= power supplies (various)
- vertical gid: 100mV, horizontal= 500ms
 
Would you see other possible common points and tests to perform?
 
Regards,
 
 
JM


Dec 22, 2013 at 1:04 PM Post #1,654 of 1,694
Sorry, this is beyond me.

If you can't get help here, I suggest you head over to diyaudio.com. Post the schematic and the findings there, I'm sure the folks there can point you in the right direction.

If you do, let me know, I am interested in knowing the outcome. Like I said, I suspect mine has the the same problem as yours.
 
Dec 23, 2013 at 5:40 AM Post #1,656 of 1,694
I can't be sure of the range on the O/P stage CCS. You may or may not be able to dial up 100mA with the values specified for the BD139.
Uy8FPC

 
Dec 28, 2013 at 2:47 AM Post #1,658 of 1,694
I checked and rechecked. All power supplies lines are clean up to their connection point to the right or left channel.
 
Up to now, I was thinking that my measuring point was maybe not the last one, and that there could be issues between the measuring point and the client.
 
It is not the case.
 
Could there be some coupling through the e12 33kR resistors ? It is the last common point that I see in the circuit.
 
I also posted on DIYaudio, (amp/headphone systems), but no answer at the moment.
 
Maybe that Christmas is not the best time to sort out this issue.
 
Regards,
 
JMF
 
Jan 1, 2014 at 4:09 AM Post #1,659 of 1,694
So I consider that I failed.
 
I explored all ideas I had without success.
 
I disconnected one input of the e12 (common point), and it changed nothing.
 
I also inspected solders, redone few nice ones. looked for shortcuts between tracks...
 
All seems OK, but the issue is still here.
 
So either I will let the amp heat for 30-45 minutes (when hot, much less DC events), or I will retry my DiYparadise Charlize T amp.
 
Regards,
JMF
 
Jan 7, 2014 at 1:21 PM Post #1,660 of 1,694
Hi, sorry, haven't been checking this forum for a while.

I saw your postings at diyaudio.com , I'd suggest you give one more shot at the preamp forum there, which is much more popular and active than its headphone forum.

For me the puzzling thing is that why it affects both channels identically. If it isn't may there is something wrong with the servo, or there is intermittent power connection to the servo or the transistor. But if the episode affects both channels identically, then there aren't that many places to look at. Very strange indeed.
 
Jan 10, 2014 at 4:11 PM Post #1,661 of 1,694
Hi,
 
I'm puzzled as you are. Even the servos are independant and I only identified a common point at the e12 level, that I disconnected without improving the situation.
 
On DIYaudio, I initially published on the amp forum, but the thread was moved to the headphone one. Less active but with better/longer exposition.
 
Difficult to troubleshoot through internet discussions. So I'll live like this.
 
Regards,
 
JMF
 
Jan 17, 2014 at 9:26 AM Post #1,662 of 1,694
It's been a while since I've last been active on head-fi, but I'm most of the way through a SOHA II build and having some problems. I'm doing a standard build (no mods). I've gotten through the setup process with all readings normal all the way through to biasing the buffers, where my problems start. I am in the process of reading through the entire thread, but thought maybe someone has a quick thought on my situation.
 
The left channel bias is dialed in just fine, with a voltage drop of ~222mV. The right channel, however, is seeing 0 voltage drop. I've so far measured that:
   - both trimpots are reading the same resistance
   - measuring the voltage on the pins of Q7L and Q7R, they are roughly the same
   - measuring the voltage on the pins of Q6L and Q6R, the readings are different
 
The output relay clicks on as described in the build instructions.
 
I don't have the exact measurements on hand (I'm at work) but this leads me to believe that Q6R is bad. I desoldered it and replaced it to no effect. This leads me to believe that either:
   1. another part in the right channel buffer is bad (nothing looks burned or cracked or anything)
   2. I damaged the pads on the board when I desoldered the first Q6R
 
Tonight I'm planning on using some jumper wire to solder from the pins of Q6R directly to the previous and next components, and hopefully everything will work. If not, what would be the next logical step to check in the buffer components?
 
Feb 17, 2014 at 4:05 PM Post #1,663 of 1,694
This thread is pretty much dead. 
 
According to initial setup page:
The difference between TB+L and TPL (or TB+R and TPR) should be approximately 19V. 
If it is you're finished.If it isn't, go back and check the tail current in R6 to make sure that it is 2mA.
This voltage difference doesn't have to be exact. Approximately 19V is good enough.
 

My tail current in R6 is 2mA, but the voltage difference between TB+L and TPL is <1V. Everything works just fine(including sound). Should I be worried about that?
 
Mar 31, 2014 at 5:59 AM Post #1,664 of 1,694
Hello there!
 
Soha ii from glass jar audios kit is now finished and it was time to start testing. Jumpers J1, J2 and J3 are still cut, because TB+ voltage is too low at about +23.9v DC when it should be over +100V. I searched thru all forums and I seem to be the only one with TB+ problem...
 
I would say I'm good in soldering but just average in understanding how these circuits really work.
 
TL+, TL- and TH DC voltages are spot on correct.
 
I'm puzzled about the TB+ as it should be the easiest to understand. It is built from just the six D7P-D12P diodes and five C8P-C12P electrolytic condensators, right? Should I measure the test point as DC or is it still AC in this point?
 
I have checked the solder work, should be ok but maybe a reflow would work just to be sure for the TB+ components. Anyways all components are correctly positioned and all condensators give their correct values when using DMM underside the board and also the diodes work.
 
Damn, the build came up really tidy and all. But something has to be wrong...
 
Best regards, Mikko
 
Apr 2, 2014 at 8:19 AM Post #1,665 of 1,694
Ok I did some resoldering. No luck. I still get 23,8 volts from TB+.
 
Sorry for the false term condensator, of course I meant capacitors.
 
I draw the powersupply with Multisim 13 and when I measure voltage at TB+ it says a little over 100volts DC so at least virtually I got everything working :wink:
 
However when I'm causing faults (short the capacitors in Multisim) in order to get just 20+ volt at TB+ I have to short C8P, C9P, C10P and C11P. If thats the truth and I have to replace all four of them I'm really puzzled. I have never destroyed a single capacitor by soldering before...
 
How do you check from a complete board a single capacitor if its faulty? Just by the legs and the others won't interfere the measurement? Because when I do that, I get 88,8uF from all these four that are supposedly bad and the correct 100uF only from the big C12P cap.
 
Oh well maybe I just have to trust Multisim and order 4 100uf 100V caps as spares.
 

Users who are viewing this thread

Back
Top