
Henmyr
1000+ Head-Fier
- Joined
- Aug 17, 2006
- Posts
- 1,148
- Likes
- 12
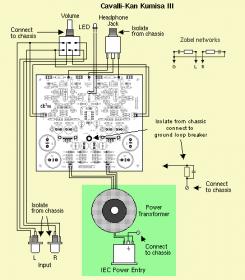
Well, it didn't work perfectly now when I tried it. The led does not shine. I've measured the +15 and -15 against star ground. When I first turn the power on both show +-15V, but after a second they both start to fluctuate around +-10-12V. The output transistors seem to get very warm also. I have heatsinks on all for though.
I've measured at all points for shorts and found none (+-15V to starground and against each other, 0L, 0R and 0G against each other). All electrolytic capacitors are the right way, as are the trimpots and diods. I was really careful when I soldered everything to the boards and always inspected the soldered part for shorts.
Also, the trimpots just keep on turning when I turn them counter-clockwise. There is no "click". I have two Vishay PV36 multi-trim 0736CC trimpots.
What could be wrong?


 Though troubleshooting a CK2III is hard enough.

